wbabik
-
Posts
18 -
Joined
-
Last visited
About wbabik

- Birthday 07/01/1980
wbabik's Achievements
")


-
Well I am a little on the heavy side. About 235-240 ride ready. Thanks for your help.:unsure: In that case you should probably go with the .95's. I'm a bit less than that with the dead cow on. I have a pair at the house and I'll check the rating and let you know.
-
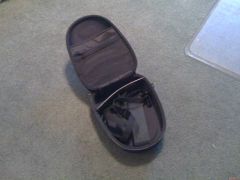
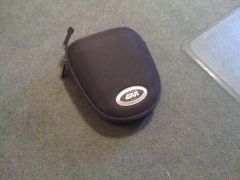
Tank bag for sale
-
-
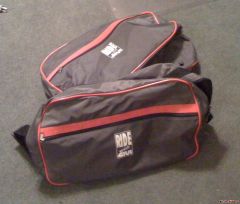
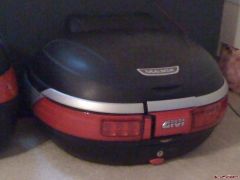
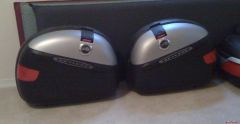
complete givi setup for sale
-
-
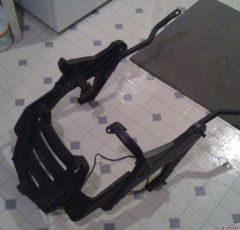
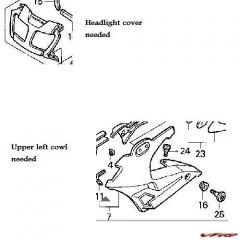
I'm looking for two pieces of plastic to finish my plastic rebuild from the minor laydown.
-
-
I can't remember the name right now, and it may come back to me later, but there is a tankbag that allows you to put a ring around the gas tank fill port. Which bolt into with those hex bolts there. Then it is a quick release connection that connects to the specific tankbag. They are a little pricey, but would fill the needs of #1. no magnets and #2 easy on and off, #3 no straps if you don't take the bag. I'll do some searching for the exact manufacturer. They are fairly large, and I can't remember if they were affiliated with givi or the booth was just next to the givi booth at the motorcycle show last year at the NYC motorcycle show. mmmmmm....
-
Problem solved!!!!!!!!!!!!!!!!! Wooohoooo.....another electrical gremlin solved. Ready for inspection and back on the road. Solution: I removed the subharness that connects the main wiring electrical harness to the two tail bulbs. Then I removed the green wire that goes from the same connection at the wiring harness end, to the two bulbs. I took two pieces of 12 gage stranded copper wire and soldered them to the exposed piece of wire on the connector side and soldered the other ends directly to the bulb fixtures. Violla. problem solved. no more dimming of the one and a better connection in general. should not be prone to any vibrational issues. etc. Those crimps are just evil gremlins waiting to happen. Thanks V4 Rosso and Tightwad for your insight. Got me motivated and thinking on the correct troubleshooting track to get this thing back into business. AWESOME!!! Thanks Will
-
I'll try that tonight. changing it at the plug on the sub harness. then it will isolate the main harness from the subharness. Bulb #1: taillight running light filament goes out and the brake light doesn't come on. ie: no light from bulb at all. Bulb #2: brake light comes on. ie: both filaments are lit. or at least the bright one is. I would have to confirm that the running light stays lit when the brake filament comes on. thanks guys. this is helping get me focused on the troubleshooting process here.
-
That is what is strange. I didn't modify the #5 on the second picture at all. Nor does it appear to mate up with any other mods. unless the gauge cluster somehow interferes here? not really sure on that front. I thought the load would have changed if they were in series, thus causing one to dim, with that thought in mind, would they both dim in series? it seems one works fine and the other doesn't. I guess I have to tear off the bodywork and begin tracing wires. maybe the ground for the defective side is faulty/dirty/?? I appreciate the comments. anyone else have anything here? I need ideas on this one.
-
I'm not sure when this began occuring, but since I tipped her over towards the end of last year, I have made many modifications and the result is a little bit of a problem. Background and mods: 1996 VFR750F - tipped over. Modifications: fiberglass undertail fender, corbin, homemade license plate bracket, Relevant modifications: heated grips, fuse box on relay tied into the license plate wiring, LED from www.superbrightleds.com for gauge cluster, volt meter tied to the fuse box. Problem: When the brake is applied, the left taillight bulb fades out and the right taillight bulb gets brighter as it should. 1. If the bulbs are switched the problem stays with the bulb fixture. 2. If the green wires are switched from one assembly to the other the problem goes with it (ie: to the other bulb). I can't seem to find the wiring layout exactly with the microfiche. Does anyone have any input here? What do I try next? wiring harness link: http://www.ronayers.com/fiche/200_0295/wir...rness_94-97.bmp taillight link: http://www.ronayers.com/fiche/200_0295/tai...t/taillight.bmp I've searched and read countless electrical posts and I can't seem find anything that will help me out. I've also tried electronic cleaner and checked the connections in the subharness connection to the main electrical harness as well as sprayed the bulb connectors. nothing changes the symptons. thanks for your help. hopefully I can get this resolved soon. I need to get out on 2 wheels again. Will
-
Thanks for the response and information. The HF changer and moto attachment was shipped on the 22nd and I should get it on the 30th. so as of right now it looks like i'm locked in for the $100 expense. The no-mar tools I got look bulletproof. I'm sure someone somewhere could break them, but they should be fine for me. I have some rubber material that I'm planning on lining the HF changer contact points with, and if this thing gets me a few sets of tire changes and then breaks, well, i guess it was meant to be that I order the No-mar. If I wasn't in between jobs right now, then I'd probably have just ordered the NoMar and then be able to change my own tires for the rest of my life. I'll post some updates on how my HF setup comes through. I've found several guides here and online on various tire changing setups. If I had a rim lying around, I'd probably have gone that route, and the all thread is a great idea to really tie the Motorcycle rim down for changing out the tire. mmmm..... Now to build the balancer. I've got it all ironed out, and the Abec 7 bearings are coming out of a hardly used pair of skates. at least they'll be used for something useful now. thanks guys. I'll be posting more in a week or so. then hopefully putting some more miles on the new pilot roads that are going on.
-
No responses, eh. I guess I didn't really expect any, but it was good to get my ideas down in list form. I went with ordering the No-mar mount/demount bar, a few of their spoon bars, the large cone balancer kit, some valves, and stick on weights, lube, etc. They came in 2 or 3 days after I ordered them. The harbor freight tire changer and motorcycle attachment were ordered the day before the no mar and I have yet any notification from HF at all. I guess you get what you pay for as well with customer service. I'm almost wishing I would have just bought the whole kit from No-mar at this point. Ah well. maybe I'll do that in the future after I 'F' up a set of rims, but for now I'm attempting to do this correctly, but a little on the cheap. Next steps: #1 Build a basic balancer out of some tube stock and some shielded bearings so I can use the all thread and No-mar cones for balancing. #2 Wait for the HF equipment to show up at the door. #3 Change my tires when it arrives.
-
Alright. I'm facing some important decisions. I need to install my new tires and I have several options: 1. Take my tires to a Honda stealership and pay $70 per tire for installation and balancing. 2. Take my tires to a private shop and pay $50 per tire for installation and balancing. 3. Buy the Harbor freight setup and No-Mar tools and start changing my tires at home. guesstimate $400 4. Buy the full blown No-Mar setup. mucho dinero!!, but it is made in the USA and I would not have to modify the HF setup to avoid scratching rims. guesstimate $800 Anyone in the Philadelphia area can step me through changing my own tires, or help out with the decision at hand? I need to get my new Michelines onto the rims so I can get the bike back on the road. Currently needs to the tires to pass inspection. Has anyone used the No-Mar setup and the HF setup? Is it really as easy to use as their videos make it look? If I get my own tire changing setup, does it really help you make riding buddies? I'd appreciate any help anyone can provide. thanks, Will