kaldek
-
Posts
1,317 -
Joined
-
Last visited
-
Days Won
12
Content Type
Forums
Profiles
Gallery
Blogs
Downloads
Events
Everything posted by kaldek
-

Installing 2006+ ECU and motor on 2002-2005 6th-gen
kaldek replied to kaldek's topic in Modifications
YOU LOSE, HOMEBOY!!! HACKSAW FOR THE WIN! I had a good think about this and decided that bashing it with a sledge was only going to cause more damage. Why? Because the left-side collar was stuck fast to the pivot bolt and is too big to exit through the swingarm bracket. Repeated hits were just stressing the aluminium bracket, so I hit the mutha with a hacksaw and cut off the left-side end of the pivot bolt between the collar and the swingarm bracket. Once that was done, it was a simple matter of dropping the swingarm bracket down and away and off the bike. After that, the pivot bolt and collar came out nice and easy. You hear that, you STUPID swingarm? I WIN, YOU LOSE. Now I can happily drill out the bolt on the spare bracket at my leisure. Ahhhh, time for a beer. -
Installing 2006+ ECU and motor on 2002-2005 6th-gen
kaldek replied to kaldek's topic in Modifications
Righto, seems Murphy is kicking my ass. I got the motor out of the new bike no problemo - we just lifted the bike off the stands, lowered it to the ground and loosened the mounting bolts before lifting the frame and fork assembly off it. However, whilst attempting to remove the swingarm from my '02 it seems my swingarm pivot bolt has rusted itself to the spacers. The pivot bolt and spacers spin nicely in the bearings, but I have bashed the F*CK out of the bolt to get it out and it is NOT moving. The pivot bolt nut came off nicely, and the pinch bolts are of course removed. I would just give up on it and use all the stuff from the new bike, but I currently HAVE to get the swingarm out because I need the freakin' swingarm bracket. Why? Because the other one from the new bike has the sheared-off centrestand bolt stuck in it! RAGH! Anyone got any advice for getting this little shit out? Right now it's practically soaking in WD-40 to see if I can get it to free itself overnight. Anyway I've given up for the evening as I have an early start tomorrow at - of all places - Honda motorcycles head office Australia. Is there some irony in there? -
Installing 2006+ ECU and motor on 2002-2005 6th-gen
kaldek replied to kaldek's topic in Modifications
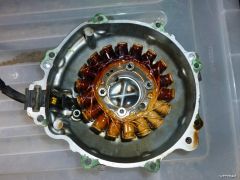
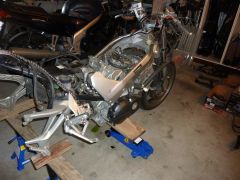
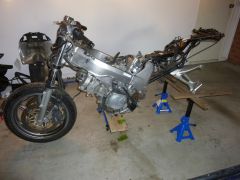
Alright, alright. New '06 stripped-right New '06 stripped-left -
From the album: Misc
-
From the album: Misc
-
That pop is your PAIR solenoid activating. The whining behind the tach will be one of your other relays getting some power (but not much). It's time to see what happens when your ECU is disconnected. Turn everything off, unplug the ECU from the black and grey connectors and then turn the ignition back on. If your problems persists it is definitely just wiring loom nastiness. A good first attempt at a fix is to go clean up all your connectors. And I mean ALL of 'em: All connections from handlebars to the main wiring harness (left and right side of bike next to the frame) Main blue and white connector to front sub harness Ground block inside front sub harness (small black square wrapped inside the electrical tape) Main ground on the frame Connections to all relays I am mildly concerned about your ECU now because of your PAIR solenoid popping. Both the Fuel Pump relay and PAIR solenoid valve are fed power by the Black/White wire from the ECU. In the case of the PAIR valve it is activated by switching the ground circuit on and off, which is also controlled by the ECU. It could well be that the ground of this circuit has shorted to the frame or another circuit. Always remember that a positive wire short circuiting will cause a fuse to blow. However, a normally switched (by the ECU) ground line being permantly connected to ground will cause all sorts of weird stuff like permanently open injectors, the PAIR valve sticking closed, etc.
-
Installing 2006+ ECU and motor on 2002-2005 6th-gen
kaldek replied to kaldek's topic in Modifications
Keep watching! I've got the new bike set up on chasiss stands and have only one bolt left before I drop the motor out of it. It's game time. -
Installing 2006+ ECU and motor on 2002-2005 6th-gen
kaldek replied to kaldek's topic in Modifications
Ahhhh, somebody has added to that after the fact! I have an offline copy (PDF) of the fiche created by one of our members and it doesn't have it listed as left hand thread. Not that I would have looked at the fiche first, mind. Maybe I should start doing that eh. -
Installing 2006+ ECU and motor on 2002-2005 6th-gen
kaldek replied to kaldek's topic in Modifications
Eh? All I got in the parts fiche was "BOLT, FLANGE (10X35)". The Haynes manual didn't mention it as being left-hand thread and I couldn't find a page in the manual that even referred to the centrestand! -
Installing 2006+ ECU and motor on 2002-2005 6th-gen
kaldek replied to kaldek's topic in Modifications
Ahhh FUGGIT, I just checked the bolt head and sure enough it's a left hand thread. WHY, MR. HONDA? WHYYYYYY!!! They must be DAMNED paranoid about that centrestand falling off! -
Coolies - it's midnight here so I might be asleep when you post your results. Back in 8 hours.
-
Installing 2006+ ECU and motor on 2002-2005 6th-gen
kaldek replied to kaldek's topic in Modifications
Oops. You mean it's lefty tighty righty loosy, even when viewed from that side??? Wow, the Honda manual doesn't even list the centrestand as a serviceable part! -
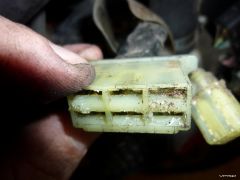
Take this from a guy who has just had his wiring harness off a LOT in the last few weeks, along with a dodgy fuel pump and a bunch of other crap. First up, remove your fuel tank bolts at the front (two 8mm) and prop the tank up. Disconnect the fuel pump power supply. Next, remove the front right indicator bulb cover (black cover inside the front fairing near the fork). Stick your hand up there and feel for a small rubber box with wires going into it; this is your fuel pump relay. Holding a couple of fingers on this relay, turn on the ignition with the engine stop switch ON. This relay should click on for not more than three seconds, then click off. If the relay clicks on and stays on, then the problem could be ECU related, so let's eradicate that if we can. If it clicks off, your ECU is fine but your fuel pump positive wire has been shorted to another circuit (possibly another positive circuit, but it could be a ground). Next, turn the key off then the engine stop switch OFF. Turn the ignition key back on. The relay MUST NOT CLICK ON. If it does, the problem is not your ECU because the ECU power is cut when you have the engine stop switch set to the off position. If the relay clicks on you have a short circuit somewhere which is causing this relay to be provided power even though the ECU is not commanding it on. This would most likely be a short circuit causing the relay to be fed power. Now, what if the relay does not click at all? Turn the ignition switch off, put the engine stop switch to the OFF position and then reconnect power to the fuel pump. Now, turn the ignition on while still holding the relay. If the relay does not click but the fuel pump activates then your problem is not the relay, nor is it the ECU but rather the fuel pump positive wire has been shorted to another circuit (possibly another positive circuit, but it could be a ground). Before going further more work is needed. ECU failures are rare but they can happen if your regulator fails and goes nuts with really high output voltage. I am more leaning towards a short circuit at the moment, so can you also please check all of the fuses under the right front fairing just above the ECU? Pull them all and tell me if any are blown. I'm gonna start getting super technical soon. You got a multimeter? 'Coz if you wanna roll with me you're gonna need it.
-
Installing 2006+ ECU and motor on 2002-2005 6th-gen
kaldek replied to kaldek's topic in Modifications
When removing your motor, do NOT remove your centrestand from the stand bracked unless you REALLY need to. Those fecking bolts are thread-locked in there TIGHT and I snapped the head off one from the new bike. I don't think this bitch is even Ezy-out capable! Luckily all these parts are interchangeable so I can keep the stand bracket from the old bike and NOT remove the centrestand from it. Geeez. -
Installing 2006+ ECU and motor on 2002-2005 6th-gen
kaldek replied to kaldek's topic in Modifications
Yeah already checked that. It was the first thing I thought of, but it wasn't extended. Basically with the 02 ECU it starts OK but exhibits the same issue it aways had, but on the 06 ECU (Aussie or american) it idles at very high speed when warming up and has fluctuating rpms at any given throttle position. Anyone know if it's critical to remove the throttle bodies for the motor swap? The best I can tell is that it's removed so you can get to the coolant hoses connecting to the thermostat. -
Installing 2006+ ECU and motor on 2002-2005 6th-gen
kaldek replied to kaldek's topic in Modifications
Tempting. Very tempting. I will be a good boy and try the spark plugs from the new bike in the old engine first. Not that I can see how they'd make the engine rev to 3,000rpm when I start it up, but at this point it's worth eradicating everything, motor swap or not. -
Installing 2006+ ECU and motor on 2002-2005 6th-gen
kaldek replied to kaldek's topic in Modifications
OK folks I have moved ALL the electrics from the new bike to my old bike. Started her up, and.... SAME PROBLEM as with the USA model 2006 ECU. Time to put the new motor in as well. Something inside my 02 motor is totally stuffed!! If it was an electrical part, surely it would have to be the ignition pulse generator? On the upside, it seems I have a perfectly good wiring harness and 2006 model ECU for anyone who's interested! -
I guess the eBay specials are fairly "aftermarket" and that the HISS transponders are off-the-shelf RFID technology which is easily replicated.
-
Various tech photos
-
-
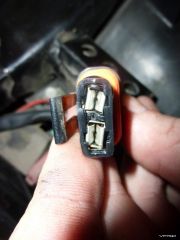
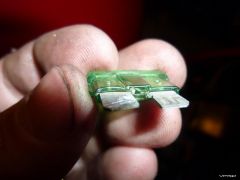
From the album: Tech Bits
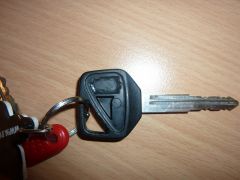
HISS chip epoxied into OEM Honda VFR800 key. -
Huh? Last time I looked at one of my '02 keys the chip was epoxied into the key under that sticker and not removable. UPDATE: They're only sealed in using silicon and pop out easily. HISS chip epoxied siliconed into OEM Honda VFR800 key. I think it must be those aftermarket eBay ones you're buying which aren't sealed into the key.
-
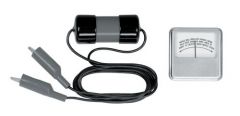
Picked up my 1W 100R 5% carbon film resistor and some alligator clips today. Grand total was like four dollars or something. Eat THAT, Honda.
-
It's nowhere near that complicated! Since you have confirmed that the keys themselves are static, here's what I'm gonna do: Move ECU and HISS transponder from 2006 bike to 2002 bike On 2002 bike, disconnect ignition switch connector block (under right-side fairing) Hold 2006 ECU key against HISS transponder Connect up the ghetto reprogramming tool so the ECU will go into programming mode Jumper the ignition block so the ECU boots up and recognises the 2006 key Remove jumper, plug the ignition barrel back into the connector block and move the original ECU key far away. Follow your procedures above to program all 3 of my old keys into the new ECU I'm definitely going to video this sucker.
-
Hey do we know if existing keys can be programmed to another ECU? That is, do the keys themselves have flash memory or is it just a unique ID for each and every key? With my new bike, I'll probably move my lock barrels over to it as I've got three keys already. If I can code my existing keys into the ECU on the new bike, I'll save myself the cost of blank keys and having them cut.