pseal
-
Posts
28 -
Joined
-
Last visited
Content Type
Forums
Profiles
Gallery
Blogs
Downloads
Events
Everything posted by pseal
-
Normally you remove the seat first and then the cowling, but my problem was that I could not remove the seat. Better to remove the grab handles (or Givi rack in my case) but not necessary. -Payne
-
After many 4-letter words, I got it. To actually get it off I finally pried the seat up the best I could on each side to get out the 2 allen head bolts that secure the rear cowling, allowing me to wiggle it off the backside of the bike to get proper access underneath the seat. I was then able to actuate the latch by hand. The cause turned out to be the single bolt holding the latch to the frame had vibrated loose, allowing the entire mechanism to move around and not allow the cable to properly pull the latch. I snugged it up and also shot some cable lube in the cable, as it wasn't moving as freely as it could be. So, I recommend to each of you to check that bolt and make sure it's not loosening up on you so you don't have to go through this maddening experience! Take care, Payne
-
My seat latch is stuck. I'll turn the key, and the lever just will not pull down. I've tried digging around underneath the fairing the best that I can, wondering if something is blocking the cable from pulling the latch, but I'm just having no luck. Does anyone have any advice? Thanks! Payne
-
I now have an R1 R/R on my VFR! I bought one off eBay for $40 shipped; took a little while to come in, because the seller mixed up my R/R with another buyer's stator hub, so we had to swap packages. Installed it Sunday and took it for a good hour-long test yesterday. I don't have an onboard voltmeter, so I connected my multimeter to the battery and stashed it in the map pocket of my tankbag so I could read it while riding ... I really ought to install a voltmeter ... 14.4V solid the whole way! And when I got home I put my Battery Tender on it as a test, since that was what keyed me into there being a problem (after recently installing a new battery, twice following an hour-long ride it took a few hours to get back to full charge), and now it was back to full charge in about 2 minutes. :-) Pretty easy install. Hacksawing the fins wasn't too bad, and I went slow with my wiring to make sure I had good connections. Crimped and heatshrinked the connectors and used butt-connectors with heat-shrink for the 2-into-1 wires (12ga in, 2x14ga out). R/R barely warm to the touch after an hour, and the wires showed no heat at all (was initially a little concerned about the 2x14ga instead of 2x12ga, but the 2 12ga wires just WOULD NOT go into the butt connector. But, 2x14ga has more cross-sectional area than than 1x12ga, so should be good.) Now time to plan a trip! New rear tire, new chain and sprockets, new battery, and an R/R that I can count on! Payne
-
Got one off of eBay headed my way! One more quick question - what is the preferred method to combine two wires into one, for the purpose of connecting the one positive and one negative wires of the R/R to the bike's two of each? Thanks, Payne
-
Thank you for taking the time to answer, Chris! That is a big help. Regards, Payne
-
Hey Chris, Thanks for taking the time to document your R/R upgrade; I plan to do the same. Would you mind answering a couple of questions? You specify an 04-06 R1 R/R; is an 03 not suited for this use? Also, you state that you use gold spades to connect; did you just crimp them, or did you solder them? Did you connect the two red wires to one, and then spade, and likewise for the two greens? I wonder if snipping the connectors from the old R/R (assuming they're not cooked) and splicing to them would be wise (so as not to alter the bike's wiring harness) - or is it wiser to take those connectors out of the equation? Thanks! Payne
-
I've had this Tour Master bag for 3 years and 75,000 miles and couldn't be happier with it. Plenty of room, sticks like glue, has a map pocket, the rain cover works well, the zippers work well, and it's easy to carry. I first tried a Nelson Rigg and found the zippers very difficult to operate. Payne
-
From the album: Payne's Photos
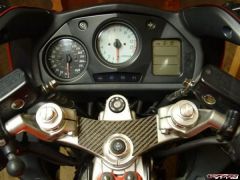
Heated Grip Switch installed in steering head stem© ©vfdiscussion.com
-
Payne's Photos
-
-
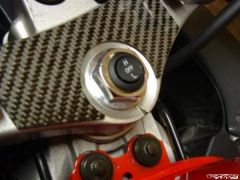
From the album: Payne's Photos
Heated Grip Switch installed in steering head stem.© ©vfdiscussion.com
-
Love my E52; holds lots o' stuff.
-
Water and a washcloth.
-
Using your superb writeup I had my upper cowl off in no time. However, I found that for every minute I saved by not removing the side fairings, I spent TWO trying to finesse the upper back into place. Grrrrrrrrr! I ended up removing the side fairings anyway; it was only another 8 bolts and 2 plastic thingies. I think the service manual has it right in suggesting to remove the sides first; I'd highly recommend that to others to save lots of frustration. Thanks anyway. I guess it worked out better for you. Payne
-
Superb! Great step-by-step instructions and great photos! Thank you very much for taking the time to do that! Payne
-
Page 19-11 in the service manual shows 5 (as well as the two for turn signal indicators.) Payne
-
D'oh. Dumb me; the first two are red and amber only. Payne
-
What's that funny C and km, eh? :P Looks very nice. Might do that myself. Thanks for the photos! How much did each cost? On the following product page, the top three all appear similar, with prices of 0.89, 0.79, and 1.49; just wondering exactly which ones you got. http://www.superbrightleds.com/cgi-bin/sto...8.26576&next=50 Thanks Payne
-
Thanks for the writeup! I'd love a quick synopsis of how you quickly removed the upper fairing. You don't have to go to the trouble of doing it again and taking photos, but just a quick summary of what you did would be really useful. Thanks, Payne
-
That's my Ninja 250 at the top of the page you linked to. :-) You say you cannot use the gas tank mount; the bolt spread on the tank is the same as for the clutch lever/master cylinder on the VFR, and that's what I use; perhaps it's the same on your Superhawk? Payne border='0' alt='user posted image' />
-
From the album: Payne's Photos
-
You want the arrows pointing up and toward the rear. So, from the left (sprocket) side of the bike, rotate ~120? clockwise. I didn't move the fork tubes, and the bike feels the same to me as before, so I'll probably leave them as they are. I'm pleased with the results. Can't beat the price (free!), and the drop is noticeable, but not drastic. Very quick and easy to do (though the bolts took a ton of force to break loose), and completely undoable. I found that this increased the sag, so I bumped the preload up a couple of clicks. I'm a little nervous at how upright the bike sits on the sidestand, but I think it'll be OK. Cheers to Ratfink for pointing this out to us! Payne
-
From the album: Payne's Photos
-
I measured my "triangle" and found the following: AB and AC are equal, and BC is shorter than both of those. Which two points should the shorter dimension connect in order to accomplish this lowering? Thanks, Payne border='0' alt='user posted image' />
-

From the album: Payne's Photos