

coderighter
-
Posts
543 -
Joined
-
Last visited
-
Days Won
2
Content Type
Forums
Profiles
Gallery
Blogs
Downloads
Events
Everything posted by coderighter
-
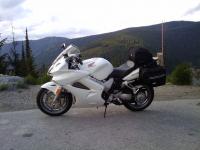
From the album: coderighter
-
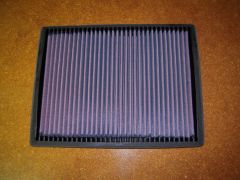
Or you taking about K&N 33-2700?
-
For those that don't like cotton gaze and would rather go paper- K&N 33-2700 fits the following: 1988-1998 SUZUKI VITARA 1.6L L4 F/I - 257MM x 206MM 1989-1995 SUZUKI SIDEKICK 1.6L L4 TBI - All 1989-1995 GEO TRACKER 1.6L L4 TBI - VIN U I'm guessing since K&N filter are usaully not as thick, make sure the paper filter you find is less than an inch thick. (Ironic that it's a filter for a Suzuki)
-
It seems the factory R/R install is not in direct, full, contact with the frame. When measured the temp of the frame and R/R after an ride, the frame is hotter. I know there's been people that have moved the R/R off the frame to below the fairing, it would be interesting to see how they do sitting still.
-
Could you post some pics of the install? This is on my to do list for my '98 electrical cleanup. -- Let us how know this works out - you may be the first CF R/R on a VFR. Here are a few pics sorry i didn't photograph the unit off the bike The old Honda unit Lengthen stator wires Battery connection with fuse So.......I bought a Compufire and when I went to install it, I realized that if you mount it like the above pic's the fins are running the wrong way for cooling air flow, yes.....no?
-
Did my instrutions make it pretty easy or was there something else I should have added?
-
How to install LED turn signal on '06 and newer.
coderighter replied to coderighter's topic in Modifications
pWon't work on '06 and newer because the single filament bulb in front is both the turn signal and the running light. -
With rosin core solder, tin the wire with as little heat as possible. With the cup in some small holding something, get it just hot enough to melt the solder and quickly fill enough so that once you add the wire the cup won't over flow, the amount depends on the wire size compared to the cup. Don't "boil" the solder like the video says, you'll cook off rosin. Let the cup set for second and grab the tinned wire in one hand get the cup hot enough to melt the solder in it and insert the wire. Leave the iron on for a couple more second than remove the iron and hold the wire for a couple more seconds until the solder returns to a solid.
-
Sure, if it stops raining here!
-
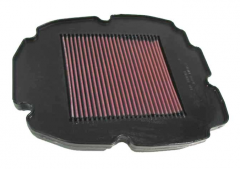
I actually had BMC and I didn't like the way it was just a standard panel filter snapped into a frame. That would be so bad but it was even a very tight fit and would leak 'dirt' no problem. I also didn't like that it also had the element protruding into the air box instead of the lid. The frame of the panel comes within about an inch of the front stacks and I felt it would not allow the correct amount of air to maintain the balance front to rear. Frankenfilter protrudes up the same height as factory and is level on the bottom just like the factory.
-
If you look at the K&N filter for 6th (and 5th) gen VFR you'll notice that the actual filter size is much smaller than the factory filter. The K&N has about half the surface area of the factory filter. K&N knows that because the bike doesn't have an airflow meter it has no way of accounting for any extra air flow. K&N makes their filter flow the same as stock so as not to disturb (further) the air/fuel ratio. Since K&N's filter medium flows more than the factory paper filter, they simply made the filter area smaller to even things out. Which means, by design, the K&N filter buys you no performance gain, zip, zero, nota. However, it's the last filter you have to buy because you can wash and re-oil it. K&N Filter I also don't like K&N's design for the VFR. By making the element smaller, it's now centered over the rear throttle bores while the tops of the front bores are covered with plastic. On the factory filter, the element protrudes up into the air box cover. The K&N element protrudes down into the airbox. These two things would make me believe the front cylinders would have a harder time getting air and would be rather rich compared to the rears. Beside, Frankenfilter was almost half the price and you get that factory fit.
-
-
-
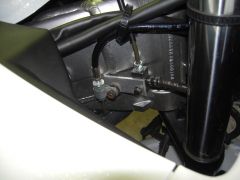
From the album: Frankenfilter
-
Franken Filter So.... you get a K&N #33-2700. I got my from Auto Advance, $43.99 - 20%=$35.20 (they're almost always having a 20% off sale online). If you spend $75, free shipping, so I topped off my oil filter collection. Auto Advance has no stores in the great state of Washington, so no sales tax. The filter is pretty much the exact width and 1/2" short. First I gutted the paper out of the factory filter. Then sanded the sides down to a height of 1/4". . DSCN1502 I added these wooden 'bridges' that I got at Wally World for a $1.49, they're 1/4" square. DSCN1501 Trimmed the filter edges to match the opening. I used heavy duty scissors. You'll also have to sand about 1/32" off each of side rails on the gutted frame for the filter to drop in. Don't force the filter in or you'll distort the filter frame. DSCN1500 DSCN1499 I glued the filter to the frame using Loc-tite 2 part plastic super glue. Sealed everything up with RVT (high temp only because it's black). DSCN1504 My Autotune is now asking for +9% at 100% throttle at 10k, but needs more road time to get the full picture. It feels stronger. Notes: I wouldn't do this with out a Power Commander to add more fuel. If you're using a O2 sensor (Autotune), make sure all you're glues/sealants are sensor safe
-
From the album: Frankenfilter
-
From the album: Frankenfilter
-

From the album: Frankenfilter
-
From the album: Frankenfilter
-
From the album: Frankenfilter
-
From the album: Frankenfilter
-
From the album: coderighter
-
I think I know what you are talking about, I've seen them on other bikes. No such thing on mine. And for coderighter, my bike has neither a catalytic converter or any oxygen sensors! Same with my RC51. The getting the CAT and O2 hot fast is a side benefit, a bonus. It still serves the purpuse of cleaning up the left overs hydrocarbons while the bike is in warm up and the mixture is rich. Once the bike is up to temp, it should no longer be needed. My point is, it's only needed during warm up and is not a part of 'normal operation'.
-
There was a point in which I thought, using the theory you mentioned above, I could use the same signal that activates the PAIR to turn off my Autotune on deceleration. I had removed my PAIR because Dynojet had told me that I needed to for the Autotune to work correctly. To test it's function to see if it would work for my new purpose, I connected a light to the PAIR plug and went for a ride. I found the PAIR circuit was only active when the throttle was closed and when the temp was below 168F. Once the bike hit 169, I never saw the light come on again. Since the bike doesn't go into close loop until it's up to temp, that would make since. The PAIR would never effect close loop operation. With further research, I found the PAIR is only to help reduce emissions during warm up. At the same time it helps generate heat in the CAT and also heats up the O2 sensor to help them both operate correctly. So what does removing it do? Well after the bike is at operating temp....nothing, however it my take the bike it's self a little longer to get to that temp. The reason I left mine off? One less thing to malfunction. Side note: While the snorkel and flapper are there to lower intake noise, their main purpose is maintain intake viscosity at small throttle openings. The flap doesn't open until the bike can use the 'extra air'. Disabling the flap doesn't increase the overall volume for max power, at full throttle and a RPM at which it's needed, the flap opens anyway. Disabling it can only hurt low speed torque. The fact that the intake sounds louder, mentally tricks our 'butt dyno' into thinking we're making more power.
-
Even thou the HID require less current in normal operation, there is a large in surge of current to at start up to strike the arc. If the voltage drops too low during start-up, it won't light off. The separate circuit is good insurance.
-
The HID starters need max voltage to ignite the HID bulbs and when starting the engine the voltage drops, how much depends on how well the battery is charged and it's capacity. It happened to me too a couple of times but my third gen has an on/off switch for the headlights so I can restart the HID by using the switch and not having to restart the engine. On later gen VFRs and US bikes that don't have the headlight switch you can rewire the headlights using the oil pressure switch as a switch to ground for the headlight relays. By doing so the headlights won't come on before the engine is running and voltage has been restored to 12+ I would recommend only rewiring the low beam relay for in case you get stuck by the roadside at night with an engine that won't run you, still have the high beams (or add a parking light like on euro spec bikes). The voltage sensitive latch relay that comes in the kit does the same thing without rewiring the oil pressure switch. The relay, which looks and wires like a standard Bosch style automotive relay, has a control circuit that measures the voltage input and triggers once the voltage reaches 13.45 VDC (bike started). Once triggered, the relay latchs until the lights (bike) is turned off. Here's more info. http://www.jatronx.com/products/voltage-sensitive-latching-relay/
