CHUCK2
-
Posts
585 -
Joined
-
Last visited
Content Type
Forums
Profiles
Gallery
Blogs
Downloads
Events
Everything posted by CHUCK2
-
Thanks, Duc! How'd you come up with that?
-
What actually is the tether? I haven't been able to find any info about it on the RAM website.
-
To those that have the RAM X-Grip mount for your phone~ How do you like it? And did you get the tether thing that their website says comes with it?
-
I received my mount yesterday. What an intriguing piece of engineering! It'll be abit before it's installed and I have no doubt it'll serve it's purpose just find & dandy. Thanks, hg, for creating this for us! Anyone have suggestions on what I should get to mount my phone on it?
-
Thanks hg. I was able to view the pics here. I just wasn't sure why I was seeing the difference. I'll be sending you a pm to get one.
-
Thanks JZH. I also would like to use screws. Did they stay tight?
-
I'm abit confused because the steering stem cap on my 98 is much smaller than the ones I see in the Gen 5 pics.

-
Are the rivets likely to be different then what I can get locally?
-
Thanks JZH I'm quite certain that it is a C2. I've never done anything with rivets before so it ought to be interesting. Will the holes end up bigger after drilling the rivets out?
-
Thanks MBrane I'm concerned it'll end up being too quiet. What would the silicone be used for?
-
The 2Bros. Slip-On on my '98 rattles inside. I'm figuring it needs to be repacked which I have no experience doing. I want to stop it from rattling without changing the loudness of it. Is that possible?
-
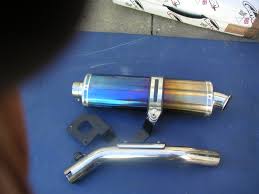
What Brand Exhaust Is This?
-

Unleashing 5th Gen Factory Power + DMr + Thurn MS
CHUCK2 replied to 2k1GoneWild's topic in Fifth Generation VFR's
What are the details about this? -
I've had a Throttlemeister. I had some trouble keeping it properly adjusted & never was able to do the one hand method of engage/disengagement. It was very well made & also functions as the bar end weights. But it's expensive. I've also had the yellow Caterpillar o-ring. It wouldn't hold my throttle in any position. I currently use just a short length (8"-10") of a medium gauge electrical wire wedged between the switch pod & grip with the ends twisted together. It creates an "always engaged condition" & doesn't look too good but it works!
-
I have the PC2 cable but my laptop doesn't have a RS232 Serial port. Is there a way I can make it work?
-
I'm new to leathers & would like to know how you guys clean & store your leather gear during the off season.
-
My 5th Gen has nothing there & it looks too bare to me. My bike doesn't get dirty.
-
How did you go about ordering those decals?
-
Thanks GleninAus. Surprisingly its only 25 ft/lbs of torque on those.
-
Can nuts & bolts from a hardware store be used for mounting the rear sprocket? I messed up the threads on (I think all 6) of mine & I'm supposed to be leaving Friday morning to go racing for the weekend.
-
Thank JZH...that's good info to know.
-
Are 4th Gen clip-ons 7/8" in diameter?
-
Places like Advance Auto Parts & AutoZone loan out large sockets that you could use to remove the rear rotor.
-
Slip-on Replacement Requirements
CHUCK2 replied to captaincautious7's topic in Seventh Generation VFR's
What's the purpose of the servo's on these bikes? -
Slip-on Replacement Requirements
CHUCK2 replied to captaincautious7's topic in Seventh Generation VFR's
RevZilla lists a servo buddy for $56.95. http://www.revzilla.com/motorcycle/servo-buddy-honda-cbr1000rr-vfr1200