
FrankoQ
-
Posts
320 -
Joined
-
Last visited
-
Days Won
1
Content Type
Forums
Profiles
Gallery
Blogs
Downloads
Events
Everything posted by FrankoQ
-
Another question. I plan on doing the relay + fuse box and Zumo wired to the blue sea fuse box. so, when I remove the key from the bike, there is no power going to the fuse box. What happens to the zumo? Does it switch to battery power and you have to manually turn it off? Or does it shut off? Is this something you can control in the zumo preferences? I have read of people that will add the fuse box but wire the zumo to the battery. I don't see why do that knowing the zumo has a battery.
-
Sold. Thanks so much for this thread. I ordered my 550 last night. Going today to get the blue sea fuse box My only question (might have been addressed before) is about BT earphones. I have no intention to use the cell phone while riding. So no need for a mic. All I want is a BT device to listen to music in stereo quality connected to the Zumo. Suggestions?
-
 Mmm... Looks great... the bike and the scenery. I'll have to check that out.
 -
Set up used for a GPS installation
-
-
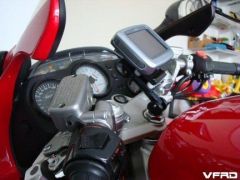
From the album: GPS setup
© ©vfdiscussion.com
-
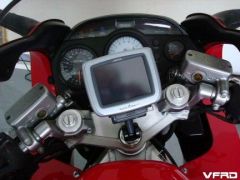
From the album: GPS setup
© ©vfdiscussion.com
-
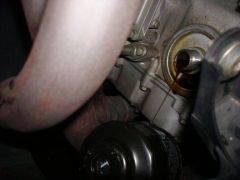
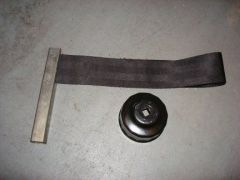
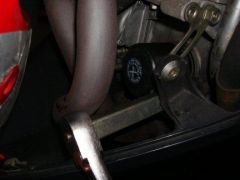
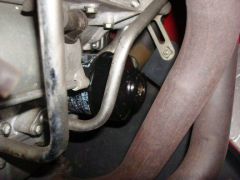
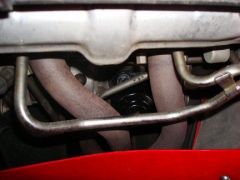
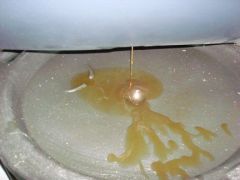
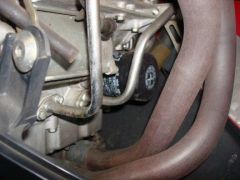
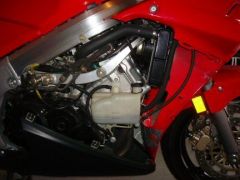
This task took a lot longer and it was harder than anticipated. First time I do it on this bike so I hope this DIY helps others and gives you a better idea of what you are up against. 1) Remove left side fairing. I removed the right one first and ended up removing the left. One allen screw and 5 half turn screws and you can remove the fairing. 2) Use a 17mm socket wrench to open the drain plug. That thing was tight. Be careful not to drop the bike in the process. 3) Let it bleed. 4) So here is the right panel view of the next target in the process. No way to get to that filter from the right side. I tried and actually got the socket wrench in there but I had no room to maneuver and turn the filter. At this point, I'm thinking... " I should have removed the LEFT panel as indicated in the manual" :pissed: 5) front view so you can see spacing to get to the filter. Not a lot of room. 6) Get the right tools for this task. oil filter wrench cap or wrench strap tool. 7) Left fairing removed. A little more room to work. I got an oil filter wrench on the filter but the thing would not turn. I tried and tried and tried. So, I switched to the wrench strap. That did it. 8) Remove the screw that holds the lower black fairing. This will give you room to easily "pull" the black fairing and have room to remove the oil filter once you unscrew it. I learned this the hard way... I unscrewed the filter and then I realize there is no room to easily remove the filter from there. Oh well. I just turn in up side down and let it drain. 9) Clean any spilled oil, attach the new filter, plug the oil drain, give it some oil. 10) I put 3 quarts and then turned on the bike. let it idle for a few minutes and then checked for leaks at the filter and the drain plug. Add more oil as needed. 11) If all good, put the fairing(s) back on and go get a drink :beer: 12) Now go ride your baby. :wheel:
-
Pictures illustrating an oil change on a 4th generation VFR.
-
-
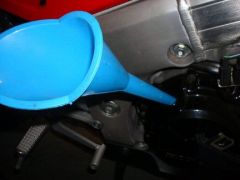
From the album: Oil change 4gen
-
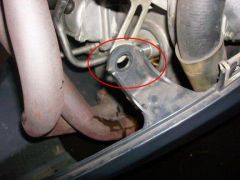
From the album: Oil change 4gen
-
From the album: Oil change 4gen
-
From the album: Oil change 4gen
-
From the album: Oil change 4gen
-
From the album: Oil change 4gen
-
From the album: Oil change 4gen
-
From the album: Oil change 4gen
-
From the album: Oil change 4gen
-
From the album: Oil change 4gen
© ©vfdiscussion.com