


Rogue
-
Posts
55 -
Joined
-
Last visited
Content Type
Forums
Profiles
Gallery
Blogs
Downloads
Events
Posts posted by Rogue
-
-
Hi everyone, I have 1-inch or 3/4-inch risers with the stock clipons. It appears the clipon is pinned into the riser and the riser is pinned to the triple tree. (Confirm this?)
I would LOVE to rotate my clipons forward slightly to reduce the bend in my wrist. I'm waaay more broad-shouldered than the test person who sat on the bike when they determined the bar angle.
 I have to bow my arms in funny for it to be comfortable...
Other than helibars...can I do anything with the risers and stock clipons I have??
Thanks so much,
~Adam
Hi Adam,
You have tried slackening the bars off and pushing them forward to take up the movement in the assembly ? There isn't much there but it may help. Otherwise your options are simple : File off some of the front edge of the engagement tab on the bars, or the risers,or both. Obviously this reduces the strength..
The risers replicate the tab engagement , so some people will simply lift the stock bars up the fork leg and retighten them there without a riser - this gives the same effect but the bar WILL rotate around the fork leg under heavy pressure so that would be your call safety wise. It could turn a simple parking lot tip-over into a new tank purchase..
In any event, you won't be able to move the bars FAR forward without finding the levers/switches hitting the fairing on full lock.
Rod
-
You might think after going to all that trouble he might get the front mudguard (fender) to fit straight.... :fing02:
-
Fotunately they will still be able to let you know, since you rarely use your thumbs when you type. :rolleyes:
-
Hi Dutchy,
This has been in my mind a lot recently, as I've just had my Ohlins off to get the spring preload adjusted by my good mate GreenVFR of the UK site:
the install you have done looks wrong to me..my ohlins has both the remote canister and the hydraulic preload, and it fits with the preload adjuster mounted to the threaded hole in the subframe near the pillion peg mount, but behind the peg out of the way. The remote cannioster fits by the jubilee clips to the rear right subframe behind the rear brake reservoir. It actually is covered by the rear plastics, but of course, should really not need any adjustment once set.
naturally I have no pics of this, but the shock will be being refitted this week, so I'll try to make sure it's clearer. The union bolt comes out of the front of the shock on my install. You may of course be perfectly happy with what you have done- but the hose doubling back into the rear of the canister screams at me..
Sorry..
Dang it, pics would be a huge help here, as the Wilber's shock I'm getting has the same set up as yours, however both Dutchy and I have high mount exhausts, so in that case how do I mount my other remote reservoir???
Ok, so finally got around to re-fitting bits'n'pieces on my bike - here's the skinny on the Ohlins fitment..
Here's the remote preload adjuster:
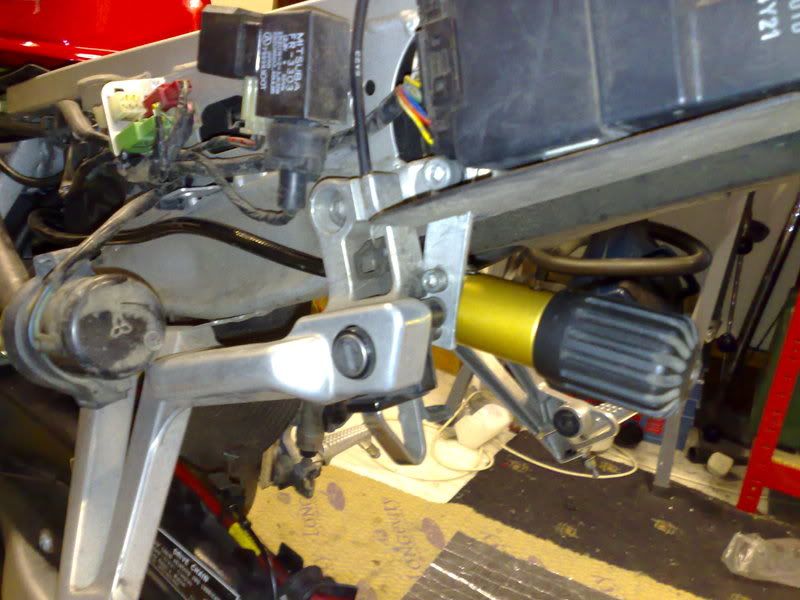
and the remote reservoir :
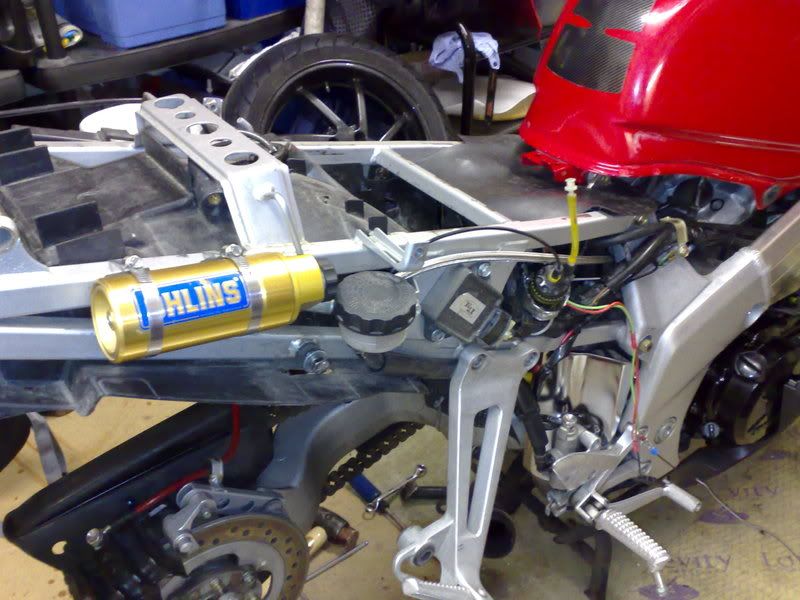
The clicker on the remote reservoir can only be adjusted once the seat is removed, but I see that as a bonus. It fits neatly under the seat plastics.
Rod
-
Hi Dutchy,
This has been in my mind a lot recently, as I've just had my Ohlins off to get the spring preload adjusted by my good mate GreenVFR of the UK site:
the install you have done looks wrong to me..my ohlins has both the remote canister and the hydraulic preload, and it fits with the preload adjuster mounted to the threaded hole in the subframe near the pillion peg mount, but behind the peg out of the way. The remote cannioster fits by the jubilee clips to the rear right subframe behind the rear brake reservoir. It actually is covered by the rear plastics, but of course, should really not need any adjustment once set.
naturally I have no pics of this, but the shock will be being refitted this week, so I'll try to make sure it's clearer. The union bolt comes out of the front of the shock on my install. You may of course be perfectly happy with what you have done- but the hose doubling back into the rear of the canister screams at me..
Sorry..
-
OK job's almost done but ran into a bunch of problems. I lowered the front about 20mm (back was lowered roughly 22mm using a longer 'dog bone'), when all was tightened up to spec (good thing I had a long torque meter handy, access isn't great), I wanted to remove the handles to slide spacers to raise the bars, with the forks now protruding the clutch line prevents me from lifting the handle high enough, I didn't want to risk damaging anything so I undid the triple clam bolts to set the fork at factory height again, then removed the handles and noted that one of the spacers I bought wasn't large enough to fit around the fork tube.. the other spacer fits fine but the difference in diameter is visible so I brought both pieces to a machinist to enlarge the opening of the smallest one hoping it'll work.
Unless I'm doing something terribly wrong, the handles and spacers must be installed on the fork at factory height then sliding the fork up, unless there's a way to get enough slack in the lines to lift the handle up an extra 20mm (or whatever extra height is dialed in).
Thoughts?
Regards,
Bruckner
The normal amount of "adjustment" in order to sharpen up the steering is between 5-10mm, so the answer is that you have raised the forks too much to lift the bar over the top of the fork leg, as you have said.
I realise that this has been done to lower the bike.
You could have simply unbolted the clutch assembly (2 bolts) and the switchgear from the bar..
further thoughts - it also helps a lot if you loosen / undo all the cable ties / clips which hold the wiring / throttle cables etc..
You should have bought properly designed and manufactured Risers... :salesman:
Rod
-
DO ONE FORK LEG AT A TIME!
I'm not sure that's so obvious.. since fork legs are perfectly parallel, wouldn't pulling on a single unbolted fork while the other is bolted tight risk damaging the whole thing??? Things may look more obvious when I get down to it but seems like sliding the entire assembly up and down is the only way to go; now of course measuring the proper height and tightening clam bolts will be done ONE FORK LEG AT A TIME, I hope that's what you meant??!?!
As for the headers, hmmm, is there a better solution?
Regards,
Bruckner
Seems perfectly obvious to me. Pulling on it ?... one fork leg will be unbolted in the yokes and will move in parallel through the yokes - hey it's a spring! It will extend through the yoke by it's own unless it is stuck..the other fork will still be tight and will support the bike.
Rod
-
What's the best way to support the front while undoing these triple clamp bolts? I'm thinking the headers aren't an ideal support, I can't find anything else under there.. what if I stack up sand bags on the passenger seat? How much weight is needed? I'm not sure I understand the "tie-strap" technique?
Regards,
Bruckner
The headers are plenty strong enough as long as they are generally in sound condition - plus the most obvious point :
DO ONE FORK LEG AT A TIME! :rolleyes:
Rod
-
Sorry to hear such a terrible ending to this thread.. The engineering work is pure metal porn. As a machinist I can appreciate fully the work you have done here.
Good luck with your next bike(s).
Rod
-
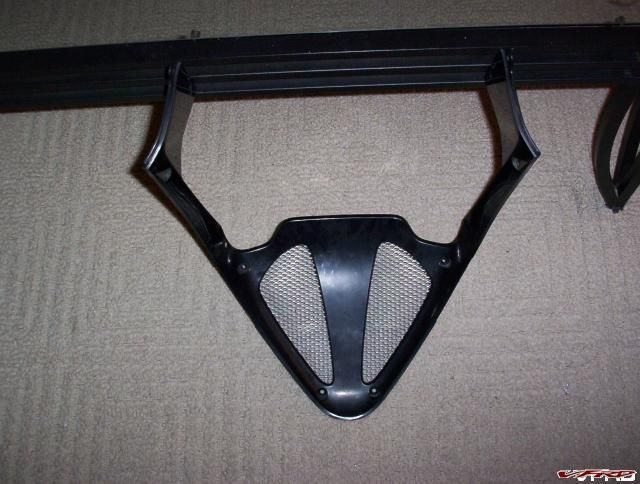
100_3632.JPG
3) After doing areas 1-6, and the epoxy being set, the area of grill at the top will be pultruding. Working from the bottom to the top, of the fairing, suport the edge of the fairing with one hand, and push the grill material out through the openings. This takes a little finessing, and you'll probably have to do it a couple of times, to get it even.
4) At this point the pultrusion at the top, (area 7), should be minimal to non exhistant. NOW epoxy this area.
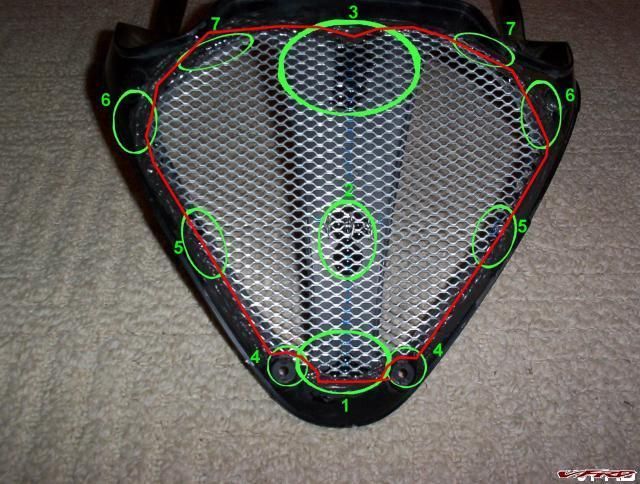
grill how to.jpg
What the hell is "pultruding " ? :goofy:
-
As an aside, does anyone know if the bar height/angle on the various generations of VFRs has changed?
Yes, it has changed, but the placement of the cut out where the tab engages has also changed so not all bars are interchangeable unless you remove the tab ...
Rod
-
From a "I'm no engineer" standpoint, that sounds like a large change to make to the motorcycles basic suspension set up... like chopping the springs on a car to make it a lowrider, as happens a lot in the area I used to live. Tim
Tim, it's a small change for the better , anyway. You should try it regardless.
Look for "fork height" and Yoke drop discussions.
Cheers, Rod
-
I'm interested in getting handlebar risers from GenMar, but I'm worried about the installation. Aren't the fork adjusters at the tops of the forks (the common-screwdriver-tipped thingies)? Does anyone have risers? Is there anything I need to do other than just pull off the handlebars and insert the riser? Will there be any clearance/length issues? Thank you for any info you can provide.
Tim
hi Tim,
The fork adjusters are on the top of the forks. What you are seeing is a cap which Genmar supply to hide the fact that the fork legs are not protruding fully through the clip-on once the risers are fitted. Personally, I don't agree with this for safety reasons, but luckily the VFR responds extremely well to sliding the fork leg up through the yoke. This has two benefits -
1) the bike turns into corners much nicer
2) The installation of the Genmars is safer .
On the other hand, you could purchase a set of MY much nicer, and better designed risers which will do exactly the same job as the others, and at a lower price. have a little look at the link in my signature for info from the UK boards.There is no need for any alterations to cables etc and no problems with clearance at the fairing.
Regards, Rod
-
i was also thinking of making a new spacer with the locking pin moved and another groove to relocate the original pin, so as to lift the bar and also turn them out to be closer to horizontal across the bar. Thoughts?
Dont'cha know there's nothing new in this world mate ?
Rod
-
Nice job. I work a Haas VF-6 amongst other CNC mills. I've never had to do any repair work to a frame, but I would certainly have gone with a carbide cutter from the start. I have however had experience of a VFR frame which had to be replaced due to incorrectly machined upper bearing seats.
It's commonplace here to convert to taper bearings, and we have no problems getting standard sets to fit.
Rod.
Spiegler Bar Risers
in Modifications
Posted
Hmm. You must be one of those rare people whose thumbs point downwards when you hold you hands in front of you....I've STILL never seen a pic of a bike fitted with these kind of bars with the bars at anything approaching full lock.. I wonder why ?