


V4 Rosso
-
Posts
2,466 -
Joined
-
Last visited
-
Days Won
20
Content Type
Forums
Profiles
Gallery
Blogs
Downloads
Events
Posts posted by V4 Rosso
-
-
You can find some nice software on the net, that can geocode your pictures by writing the location into the exif data. All it takes is the tracklogfile and a list of picture files.
Gpscorrelate is an example of such software

-
In essence, he is totally on voice as he is blind unless he uses his reading glasses and then he can not see the road.
That sure is a disadvantage. I sometimes find that when I solely rely on voice prompts I end up taking a wrong turn. Particularly at roundabouts the directions are not always correct.
-
This part bolts on the brake reservoir and replaces the stock cover and looks like it works on all modern Hondas.
..
I am considering this RAM mounting option, not for my Zumo but for future electronic warfare devices
I am looking for another RAM mount as it would be nice to be able to use both my camera and Streetpilot at the same time. Not sure though if this brake reservoir ball mount has enough clearence to the windscreen when the bars are at full lock :goofy:
-
OK, so this 6th gen doesn't have gear driven cams and has only halve the valves working below 6400rpm. But does that qualify the bike to be parked in a parking spot for the crippled?
I guess it does :beer:
Congrats on the new ride Will :rolleyes:
-
As a warning: make sure you secure the Zumo in it's mount using the small screw, otherwise this can happen:

Zumo fell out of it's mount and was hit by a car.
Standard security screw. (click for larger image)

Custom made screw
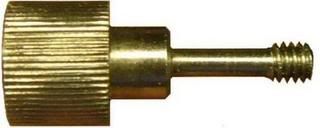
The SPIII mount comes standard with a screw similar to the custom made screws :rolleyes:
-
It doesn't need much airflow to make a big difference to the cooling and this method uses no moving parts to fail.
I wasn't satisfied with the suggestions to fix a heatsink and fan over the top of the soft rubbery side of the RR's case, as they RR is designed to loose its internal heat via its metal base.
...
I fixed two short adjustable height V's made from angle steel which locate onto the two tubes of the centre stand in it raised position. This keeps the bike upright as it is lifted and also it could be used to lift the bike as an alternative to lifting it via the rear wheel, should I want to remove that.
I had a cpu fan on the (upgraded, finned) RR but it didn't last long, so I agree that it is better to not have moving parts for the cooling.
This post shows how I relocated the R/R to the rear putting it on top of a large heatsink.
That you can remove the rear wheel is a big plus over the easy rizer :thumbsup:
Looks like a nice and compact setup.
-
1. Added a pair of 1" flexible plastic ducts from the right hand front fairing back to the RR to provide improved air flow going to it.
4. I am at the moment in the process of building a DIY single post bike lift, to make working on the bike a little easier on my back. This is nearing completion and is
Got some pics of those air ducts? I thought about going that route but had doubts whether or not it would be effective.
I like the bike lift, it's similar to the Easy Rizer.
-
Well, it doesn't. In fact it isn't supposed to stay on the chain (for long) :D
Chain oilers are a total loss system: the oil lubes the o-rings and oil and dirt flings off keeping the chain clean.
The PO FAQ has some good info why to use oil instead of spray-on lubricants.
Gear oil doen't stick to the chain as wel as regular motor oil, so you need a richer setting of the PO.
-
That's what most people that have a pro-oiler will tell you, that it is for reduced wear of the chain and the chain hardly needs maintenance 'cause it is always perfectly lubed, even when riding in the rain. But the real story behind the PO, the users want to keep secret from the general public, is all about rear wheel brake horse power :pissed:
Ever noticed that the can with chain lubricant says that you have to lube your chain after riding when it's still warm? Ever wondered why the chain get's warm?
Because of friction :beer: And friction means loss of power, and who wants that? :joystick: Those chain lubricant seller b@strds make you believe that a warm chain is a good thing as it "absorbs" the lubricant better :salesman: Sure...
My chain gets a drop of warm oil every four miles and stays nice & cool (and well lubricated) with minimum loss of powerrrrr. :pissed:
:blink:
Also, is the oil even gonna hit the O-rings on the chain?That's what it is designed to do.
-
A guy on Dutch gps forum found a way to increase the volme of TTS for Zumo and Nüvi, here you find the howto using a simple hex editor: http://www.xs4all.nl/~marcop/upload/garmin...o_TTSvoices.pdf
HTH.
-
Quite a few have been surprised with the number of software fixes/upgrades the Zumo has received. More are expected. Garmin are responding to the MC side anyway.
Indeed. I heard a lot of Zumo owners complained that recalculation of the route is not optional, like the streetpilots, but that it will be after the next software upgrade.
Also, did you allready check out Zumo Connect on the Garmin website, where you can share routes?
Guess what, I thought the use of shaping points only worked on the Zumo, but I tried them with my SPIII and it works like a charm, they are not announced :thumbsup: It seems that that it works on the Zumo, SPIII and SP2610. the SP2720 & 2820 behave differently, that is, shaping points are still announced.
It takes a little more work to draw a route in Mapsource using shaping points, but at least you're able to draw a route without using that many waypoints. Biggest issue with uninteresting waypoints on a SPIII is that the SPIII is not that fast in redrawing the screen, which it has to do several times when you're about to pass a waypoint.
-
Seems like the more, the merrier to me.
No, excess oil will just fling off, making a mess of the rear rim, SSSA and chainguard. The trick is to run it as lean as possible.
-
You can see the waypoints/flags on this route constructed in Street and Trips or in MS if you use hard Waypoint – all of those flags interrupt your “Run the Ridges†MP3 file!
That viappoints are announced like waypoints, was introduced with recent versions of Mapsource
 I hate it and I hope they fix that soon.
Tip from other gps forum: To reduce the number of flags, only put a waypoint at the start and the end of a route. Place viapoints on intersections where the route goes straight on. If you have to take a left or right at some intersection, put the viapoint at the next intersection where the route again goes straigh on. When a viapoint is placed on an intersection it is not announced.
This only works for the Zumo, on Streetpilots the viapoints are still announced.
Here you'll find a webapplication that takes a Mapsource generated route in gpx format and transforms the viapoints to hidden viapoints that are not announced on the Zumo. Use the button "bladeren" to upload your gpx file en press the button "verberg via-punten". Download the manipulated gpx file and upload it to the Zumo.
-
Nice feature of Google Earth is that you can replay the track log. Load the track in GE, go to options->touring and set camera tilt angle to 70deg & camera range to 3000 feet & speed about 100. Now select the track path and press the play button. You'll get a birds-eye view of your trip.
Here you can donwload a 3MiB rough video sample of how this looks like in GE: http://www.sendbigfiles.com/download.php?id=AD4D07A91
With wingdb you can convert a mapsource route to a track to get a preview in GE, it's more accurate than a track-log. OK, this may not be very usefull, but it's kinda nice though :D
Now think of the trip reports that this thing can generate.For instance here is is my log out of Borrego on Mapsource. Ok but just OK
The tracklog is also usefull for when you want the location of where you took a particular photo during your trip. With software like gpscorrelate you can add the coordinates to the exif data of your digital pictures. The exif data of a digital camera has the date and time the picture was taken, gpscorrelate (or similar program) compares that to the data of the tracklog and adds the location to the exif data of the photo. Other software can extract this data from the photo and use e.g. Google Earth to pinpoint the location. Just make sure the time and date settings of your camera matches that of your gps (there are even cameras with builtin gps).
edit: new link for GE video sample.
-
Installation of a pro-oiler is pretty straightforward, and the kit comes with an extensive manual and a separate sheet with tips on installing it on a VFR.
I made a (alu) sheetmetal bracket to hold the oil reservoir, and riveted it to the subframe. There is just enough clearance between the reservoir and the fairing to unscrew the cap from the reservoir. The kit comes with a lot of 3M Dual Lock to attach the parts to the bike, but for the oil can I didn't like the idea of it sitting there above my rear tire, held to the subframe with Dual Lock. Dual Lock itself is very strong but I have doubts about how well it sticks to the plastic bottle, especially because it can get pretty hot behind the fairing. Anyway, here's a pic of the bracket:

On a 3rd gen. you need the reed switch (later gen. viffers use the electronic speed signal) which comes with a bracket for easy installation on you front brake caliper. In the pic you see the little magnet (in the head of the allen bolt of the rotor) that actuates the reed switch. The magnet is strong enough to stick to the bolt without using some kind of glue. You'll need another magnet to get it out of the allen bolt (any magnet will do). in case you have to replace your rotors.

If all of your riding is done when the sun is shining and the roads are clean, you can put the controller out of sight/reach, e.g. under the seat. If not you can put the controller on the triple clamp, like klein did, or on the top fairing like shown in the following pic. Here I used the 3M Dual Lock.

I have put the pump and the junction box under the seat as shown in the next picture. The junction box is to where you connect all of the electric wires (pump, controller, reed switch and power). Again I used the Dual Lock for the junction box and pump. Electric power to feed the system is taken from the rear lights.


Inside view of the junction box.
The oil line runs along the rear brake line using some of the supplied tiewraps. The nozzle is like in the picture you see in kleins post. You may need to make some minor alterations to the nozzle so it just touches the rear sprocket. Again this straightforward and explained in the manual.
When you order a Pro-Oiler, be clear what gen (90-93 = 3rd gen) VFR you have so you'll get the reed switch with special mounting bracket, and the right bracket for the nozzle.
-
Won't the spring bind up at some point.
Look at: (h) Excess spring travel
No they won't
(heavier the more they're compressed) are achieved by tighter wound coils on one end.Larger pitch means higher spring rate.
Great write-up Slammer :thumbsup: The hardest part will be flattening the spring where the coils were cutt off. Or make a cutout in the (thick walled) spacer at the same pitch of the spring. Where did you find the spring rate of the factory springs, it's not in either the service & owners manuals.


Homemade Manometer
in Modifications
Posted
I think you have to put some restrictors into the tubes to reduce airflow.