

HispanicSlammer
-
Posts
6,954 -
Joined
-
Last visited
-
Days Won
61
Content Type
Forums
Profiles
Gallery
Blogs
Downloads
Events
Everything posted by HispanicSlammer
-
They get dirty of course, but the upkeep is about as much as they were before, getting the chain wax off, tar from the road, They dont seem to tarnish its aluminum. Just about the same as the oem paint wheels. :laugh:
-
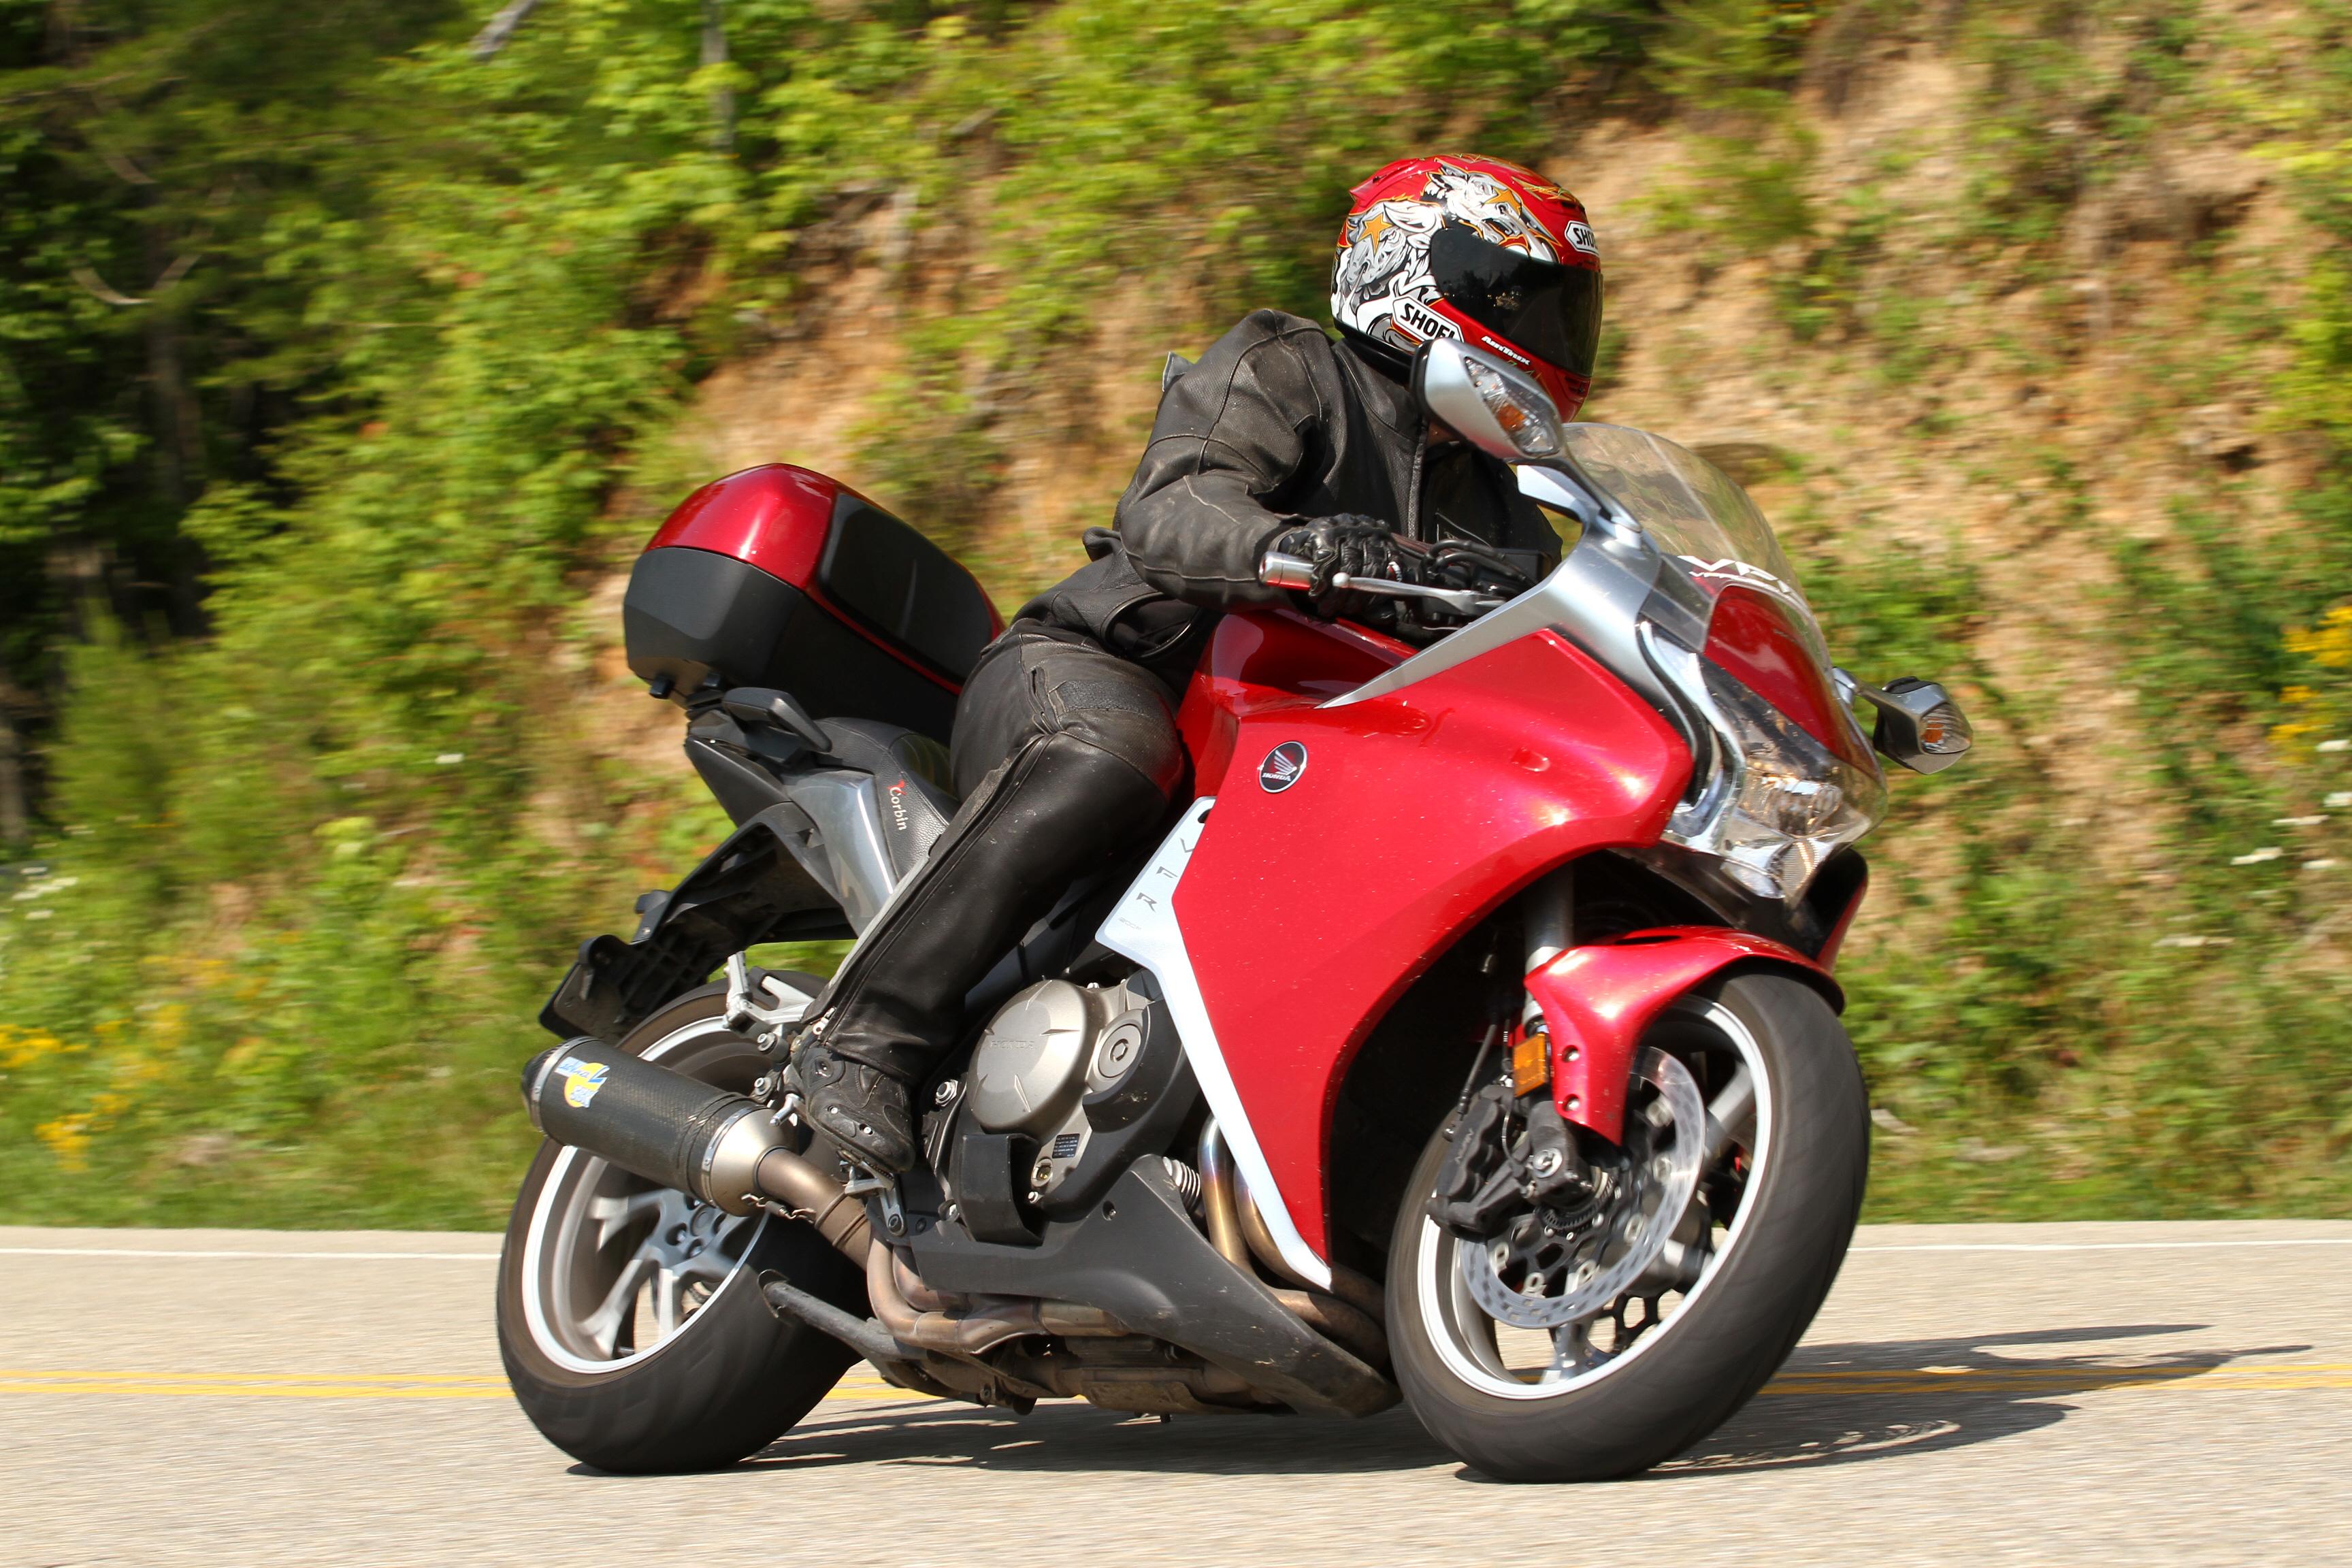
After reading several websites on polishing wheels I decided to go ahead and give it a try. Begin with the right tools, Jasco gel stripper, disposable brush, acid gloves arm length, steel wool or other scouring device, a soft brass bristle brush is good. Keep some bakeing soda around incase you get the stripper on your skin or somewhere else you dont want it. Wear eye protection, full length sleeves and pants, wear a shop apron if you have one. If you have a barrel or somthing to hold up the wheel so that the paint can be collected use that. I had to scrape it off the cement then washed off what was left on the wheels with a hose. I did both wheels at once, remove the brake disks Apply the stripper the can is enough for both wheels make sure to get all the knooks and crannies. Only takes 15 min for the paint to blister off, the stripper will eat a foam applicator (trust me heh) use a metal or wood brush with nylon bristles, then discard when your done. Wash off exess with a hose use a nozzle for hi pressure washing, carefull dont get any of it on you, and wash it all away, keep the kids away and animals this is not for them! clean up any paint residue and dispose of properly. The stripper is water soluible but is dangerous. wear eye protection full length sleves and long gloves. You will have to repete the process untill you get all the paint off, I would do one wheel then wash it then do the other while that one dried, this is where I used the fine steel wool too, dipped it in stripper and had at it! I then applied Mothers Mag Polish and rubbed away till it shined. What do you think? I am going to have to paint or grind down the front spokes and polish them since they have this rough finish to them. :laugh:
-
How to remove the wheels The procedure is well documented in your owners manual page 171. To remove the Rear tire, place the bike on the center stand, remove the mounting bolts that hold the pipe and swing it out of the way. Then loosen the lug nuts and remove the wheel. Removing the Front Tire I don't have a front stand anymore so I used a block of wood and a sissor jack, just let the block rest on the header pipes, that is how it is described in the owners manual. Before you lift the bike, Remove the Calipers from the forks first, Left side has 2 hex key bolts, the right has 2 10mm bolts. remove them then loosen the 4 fork pinch bolts at the bottom of the forks. Unscrew the axle bolt, mine was on like a Mutha, It was too tight, but I managed to get it off by getting a pipe for leverage, I almost lifted the bike off the center stand so be carful when loosening that bolt. Once you have that done raise up the front end, then remove the axle, if you have a rod you might have to pound it out, just don't go crazy or damage the treads where the bolt screws in. Remove the wheel. Do not squeeze the brake lever while the caliper is off! To balance the tire I used my handy dandy Miguel balance, 2 jack stands and gravity, I spin the wheel several times to find the heavy spot then move the clip on weight to balance it. Came out fine! Brake Disk Clearance When replacing the wheel and before you tighten down any of the bolts you must check the brake disk for clearance with the brake pads with a feeler gauge (.028") check to see if the gauge slides in easy if not spread the forks apart or together until the proper space is availible for the disks, then tighten down the bolts!
-
Installing Signal Cancel http://www.kisantech.com sales@kisantech.com November 5, 2001 The signal minder is a unit that replaces the Mitsuba turn signal relay on your VFR The unit can also be set so that if the brakes are engaged (at at traffic light) the signal minder will not cancel The unit cost $89 us at regular price VFR Forum Members 10% off regular price The unit automatically turns itself off, it can be programmed to shut off in 10 seconds to a minute. If they get enough orders the discount could go to 20% off 1-2 hour install time Standard tools from the kit Installation steps 1998-01 VFR Click here to view steps better Begin by removing the upper front faring Remove the side bolts 3 on each side 1 Remove the dash bolts 2 on each side 2 Remove inside moulding one screw on each piece 3 Remove the inside dash screws one on each side 4 Remove the mirrors two10mm bolts 5 Take note of plate and rubber seal placement 6 Remove outer screws 7 Watch out the windshield snaggs, there are several plastic fasteners on the faring that need to be removed I damaged one of them, be carful when removing them (rod and splay type plastic fasteners) 8 Carefully pull off faring, the headlight wires are attached, it is not nessary to remove it entirely just move it so you have room to remove the Misuba relay 9 I just moved it out of the way enough to reach in and remove the old relay 10 Here is the OEM relay hanging from a rubber mount 11 Carfully remove it, it has a locking connector, it is hung from a rubber mount with a palstic hanger 12 The Signal minders plugs right into the same harness, it comes with a velcro fastener 13 I opted to go one further and zip tie it in as well 14 I zipped tied it horizantal and vertical 15 Close up view 16 This part is optional if you want ot connect the brake input, remove the seat and tank (need to rout a wire from brake light to front faring) 17 I tapped into the rear brake light using an inline tap as shown (Radio Shack $1.29 @ 4 clips) 18 Tap into one of the rear brake lights, the left side wire that is( green with a yellow stripe and red dots) this provides 12 volts input to keep the signal minder from canceling while the brake is engaged 19 Run a wire from the rear brake light to the front faring and connect to the bottom of the Signal Minder Follow the same steps backwards to put it back together, I found it was easier to put back together. :cool:
-
Installing Sargent Quick Release Pins Standard Honda "FrankenBolts" Difficult to remove Sargent Quick Release Kit 2 QR pins rubber backed washers 2 clear plastic tubes (not visible) 2 zip ties (I did not use) I added a red cord eyeglass holder to replace zip ties Tools needed Drill 1/4" drill bit for metal Screwdriver for bolt Knife or tube cutter pencil or marker Drill out the threads I used WD-40 on the drill bit to keep the bit from overheating and melting the body work Insert a washer on the QR pin like so Plastic tubing needs to be cut to size, dont get QR pins mixed up. They will each be slightly different depending on how deep the threads are. Mark the point where the QR pin clicks into place Remove the washer and measure the tubeing to correct size I used a tube cutting tool but a sharp knife will do fine It is best if the tubing is a smidge longer than need be for a tight fitting QR pin Install the tube and the washer like so, I cut the eyeglass holder in half then tied the pieces to the inside of the frame with a sailors knot Finished Project The eyeglass holder matches the cording on my Corbin seat (trick) I have seen another member who used an elastic cord and drilled an access hole I just let it hang out the side. No worries about losing the pins. http://www.sargentcycle.com/acfastaccess.htm
-
How do you make a shim? You can buy autobody shims or make your own out of large washers, you just need a slot to fit around the shock bolt. use a hacksaw to cut a slot into the washer, I am seen here using my vise as a guide for the saw. measure and label the shims so you can record the effects each has, use them together even. Move the gas tank out of the way and loosen the shock bolt but do not remove, just make room for your shim (17mm nut on the 98vfr) Carfully place the shim between the shock housing and the top of the frame then tighten the bolt down, this takes some nimble fingers. I only use one shim that is aprox 2mm it works good and my bike does not lag thru corners anymore, turns just right for me!
-
Changing Rear Brake Pads Simple but you will get your hands dirty, no need to remove the caliper it is done without having to take the caliper off. Begin by removing the padpin! Remove the Pad Pin using a Hex Key, mine was stuck I had to get leverage. Reach in and pull out the old pads the inside pad must be removed by pulling out then up above the brake linkage arm (It is in the way) as seen in this pic. I had a bit of pad left but they were worn more on the stop side then on the piston side. (the bike does not have opposing pistons they have a metal stop on the other side of the caliper so the pads do not wear evenly on each side, make sure to check BOTH Pads when inspecting because of this circumstance) See the uneven wear, the top pad is slightly thicker See the new one compared Once the old pads are removed push the caliper in and out to loosen the springs and then to compress the pistons, take off the cap to check the fluid level, this might make the level overflow be wary of fluid level, the rear resivoir is under the seat. My pistons were stuck so I had to get serious, this does not harm the finish one side on the bolt the other on the caliper housing, then gently screw it in till the pistons are receded all the way! If you dont push the pistons back the new pads wont go in! Measure the disk for thickness should be no less than 0.20 inches in thickness, if it is less replace it, the pads will not engage completely and the disk will be suseptable to heat warpage if its too thin. (As you can see mine was .229 inches.) When installing the new pads the inner pad must be brought down over the linkage again since it is in the way, this can be a little tricky and requires a steady hand. There is a retaining spring that the pads lock into and they must be pushed down into position in order to line up with the Padpin. reinstall the padpin and tighten, then reinstall the cap. Pump the brakes untill there is feedback pressure. Check for stopping power and see if the pistons settle into place and do not bind! Do not forget to put the fluid cap back on. Total time 20 minutes. This operations requires that the rear wheel be removed, which might require moving the exhaust pipe out of the way as well depending on what brand you are using and how it is mounted.
-
Rewire your headlamps There are 2 headlamp relays one for hi one for low. Switch circuit, wired to the handle bar switch HI beam switch Blue - Green Lo beams switch White - Green, Green is a ground wire connected to all the lights turn signals ect. Light ciruit, wired to the lamps Hi beams relay Blue/Black - Black/Red Lo beams relay White/Black - Black/Red, Black/Red, is connected to the fuse Rewired the headlights to get them both to fire at once, added a switch to disable the circuit so it works normally when turned off you really cant see. I used a 30 amp relay and some wire taps, you can see the bulb keeps the elements seperated well with a little cup, I think they will not burn out if used sparingly Testing the wire harness, used my multi tester to check that all the connections are clean. After I tested it, I buttoned up the whole wire assembly with zip ties and electrical tape, made sure nothing would work loose with riding. Part 2 Testing the switch and the indicator light here are some pics I took of the bike in the dark, see the difference the mod makes, I dont recommend running the circuit without the motor running and the idle cranked abit. I did and my battery died at Coors lol. Lo beams Hi beams on With both fireing
-
VFR owners delight in the ease of changing your own brake pads, 20 min job and very simple! No need to remove the calipers. Step 1 Remove the pad pin cap with flat head screwdriver Remove the pad pin with the hex key in your tool kit Of coarse this one was frozen and I stripped the key I had to get a harder key Step 2 once the pad pin is out the old pads practically fall out The caliper only has pistons on one side, they are opposed by a flat plate not an opposing piston so one side might not wear like the other To put in the new pads you must retract the pistons by pushing the caliper into the wheel first, if the brake pistons are not retracted you will not have room for the new thicker pads, there is a retaining clip at the top of the caliper where the pads sort of clip into to hold them in, slide them in the same way the old ones came out, then thread the pad pin thru the pad holes and tighten the pin, replace the cap, then pump the front brake to get the brakes to engage. DO NOT PUMP THE BRAKES UNTIL THE PADS ARE INSTALLED FIRST. Note, when pushing on the caliper to get the brake piston to retract you must monitor the fluid level in the brake fluid resiviour so that it does not over fill.
-
What are starter valves Starter valves are valves that take air from the air cleaner and bypass that air directly into the intake chamber of each cylinder, in-place of a choke. There are 4 Starter Valves 3 are adjustable and one is factory set Why Syncronze them? Hard Starting Lumpy Idle Incorrect Idle speed What Tools Do I Need Electronic Tachometer that can read +50- RPM Vacume pressure Gauge for 4 cylinders +1- cmHg, tube to tube nipples-I used the metal carb tubes from the Motion Pro tool. Boxed end wrenches 7mm, 8mm OEM tool kit Clamp or Cap for PAIR Reed Valves (2) First Start up the bike and warm it up to normal temp Remove the tool kit and take out the rear shock spanner and the leverage handle, these will be used to hold up the tank. Remove the front tank screws and replace one back into the frame, slide the bottom of the leverage handle over the screw to keep it from poping out while the tank is propped up by the spanner. From the left side locate vacume tubes #1 and #2, note their position, (they are marked on the side of the tube what number they are) and remove them from the air cleaner From the right side do the same thing with #3 and #4 tubes, connect these tubes to your vacume tool I used the steel carb tubes that came with the tool, making sure to have the tube # the same as the tool cylinder # Locate the PAIR Reed valve on top of the cylinder head. cap it off. There is one on the both cylinder heads I used ordinary bench crimp type clamps because I did not have a cap to put over the reed valves, it does the same thing. Make sure it is clamped off good but dont damage the tubes. Hook up your Tach - mine is a Equus, I found that it can be set to 8 cylinders for finer tach sensitivity, you just have to divide the displayed number by 2, (shown it is set to 4 cylinders) Hook up the battery lead to the positive terminal of the battery. Hook up the inductive lead of the tach to the spark plug wire from the #1 coil on top, to spark plug lead #1, left side under the tank, (see the throttle cable assembly for help finding it.) Turn the throttle stop screw till the RPM is set to 1,200 for a 98 and 1,300 for 99-01 plus or minus 100 rpm, Mine was WAY off it was set to 2000 and the tach on the gauge was showing 1500. Again I set my tach to 8 cylinders for fine adjustments. My valves were off from what it should be, #1 was higher than all the rest. Note the tight clearance of the starter valves to the frame, you cant fit a screw driver (this is on the right side of the bike) You can use boxed end wrenches to get to them, a 7 mm for the starter valves and an 8 mm for the throttle screw, first thing I did was promply drop the 8mm down into the starter valve area, took 5 minutes to fish it out LOL. Set all the starter valves to be equal with #1,( this is the best I could do) Once this is done make sure your RPM have not changed if they have turn the throttle screw back to the correct RPM The starter valves have a plastic bushing that has teeth on them, they click into postion when the valve is turned, the teeth just fall into place, make note that the valves are not set tight and it is very easy to get them out of position, the only thing that holds them is the friction of the teeth. (pictured left to right 1,2,3,4) Turn the #3 starter valve until the #3 cylinder has dropped 2 cmHg from #1, take note of the RPM and set it correctly if it has changed. (this thing was dancing around while the motor was running but thats the pic I took) (turn the starter valves right to reduce and left to increase) Turn the #4 starter valve untill the #4 cylinder has dropped 1cmHg from #1 replace the vacume tubes back into the aircleaner, unclamp the pair, put the tank back. Hey your done!!!! I always remove the mercury from the tool cause I dont want to get poisened from a leak. Put it into a glass jar!


