thewedge
-
Posts
9 -
Joined
-
Last visited
Recent Profile Visitors
873 profile views


thewedge's Achievements
")


-
4th Gen CBR1000rr Tail Swap
thewedge replied to thewedge's topic in Third and Fourth Generation VFR's
Change of plans...did not like the height of the seat going this route...could not get comfortable with it versus where I had it. Architectured a new hybrid subframe and will post pics later tonight. Will be getting the exhaust all positioned and tucked in the final spot and having the local guy weld up one complete. BTW - if anyone is interested I'll be selling the subframe with the supports I made. It will raise the seat height if that's what youre looking to do. -
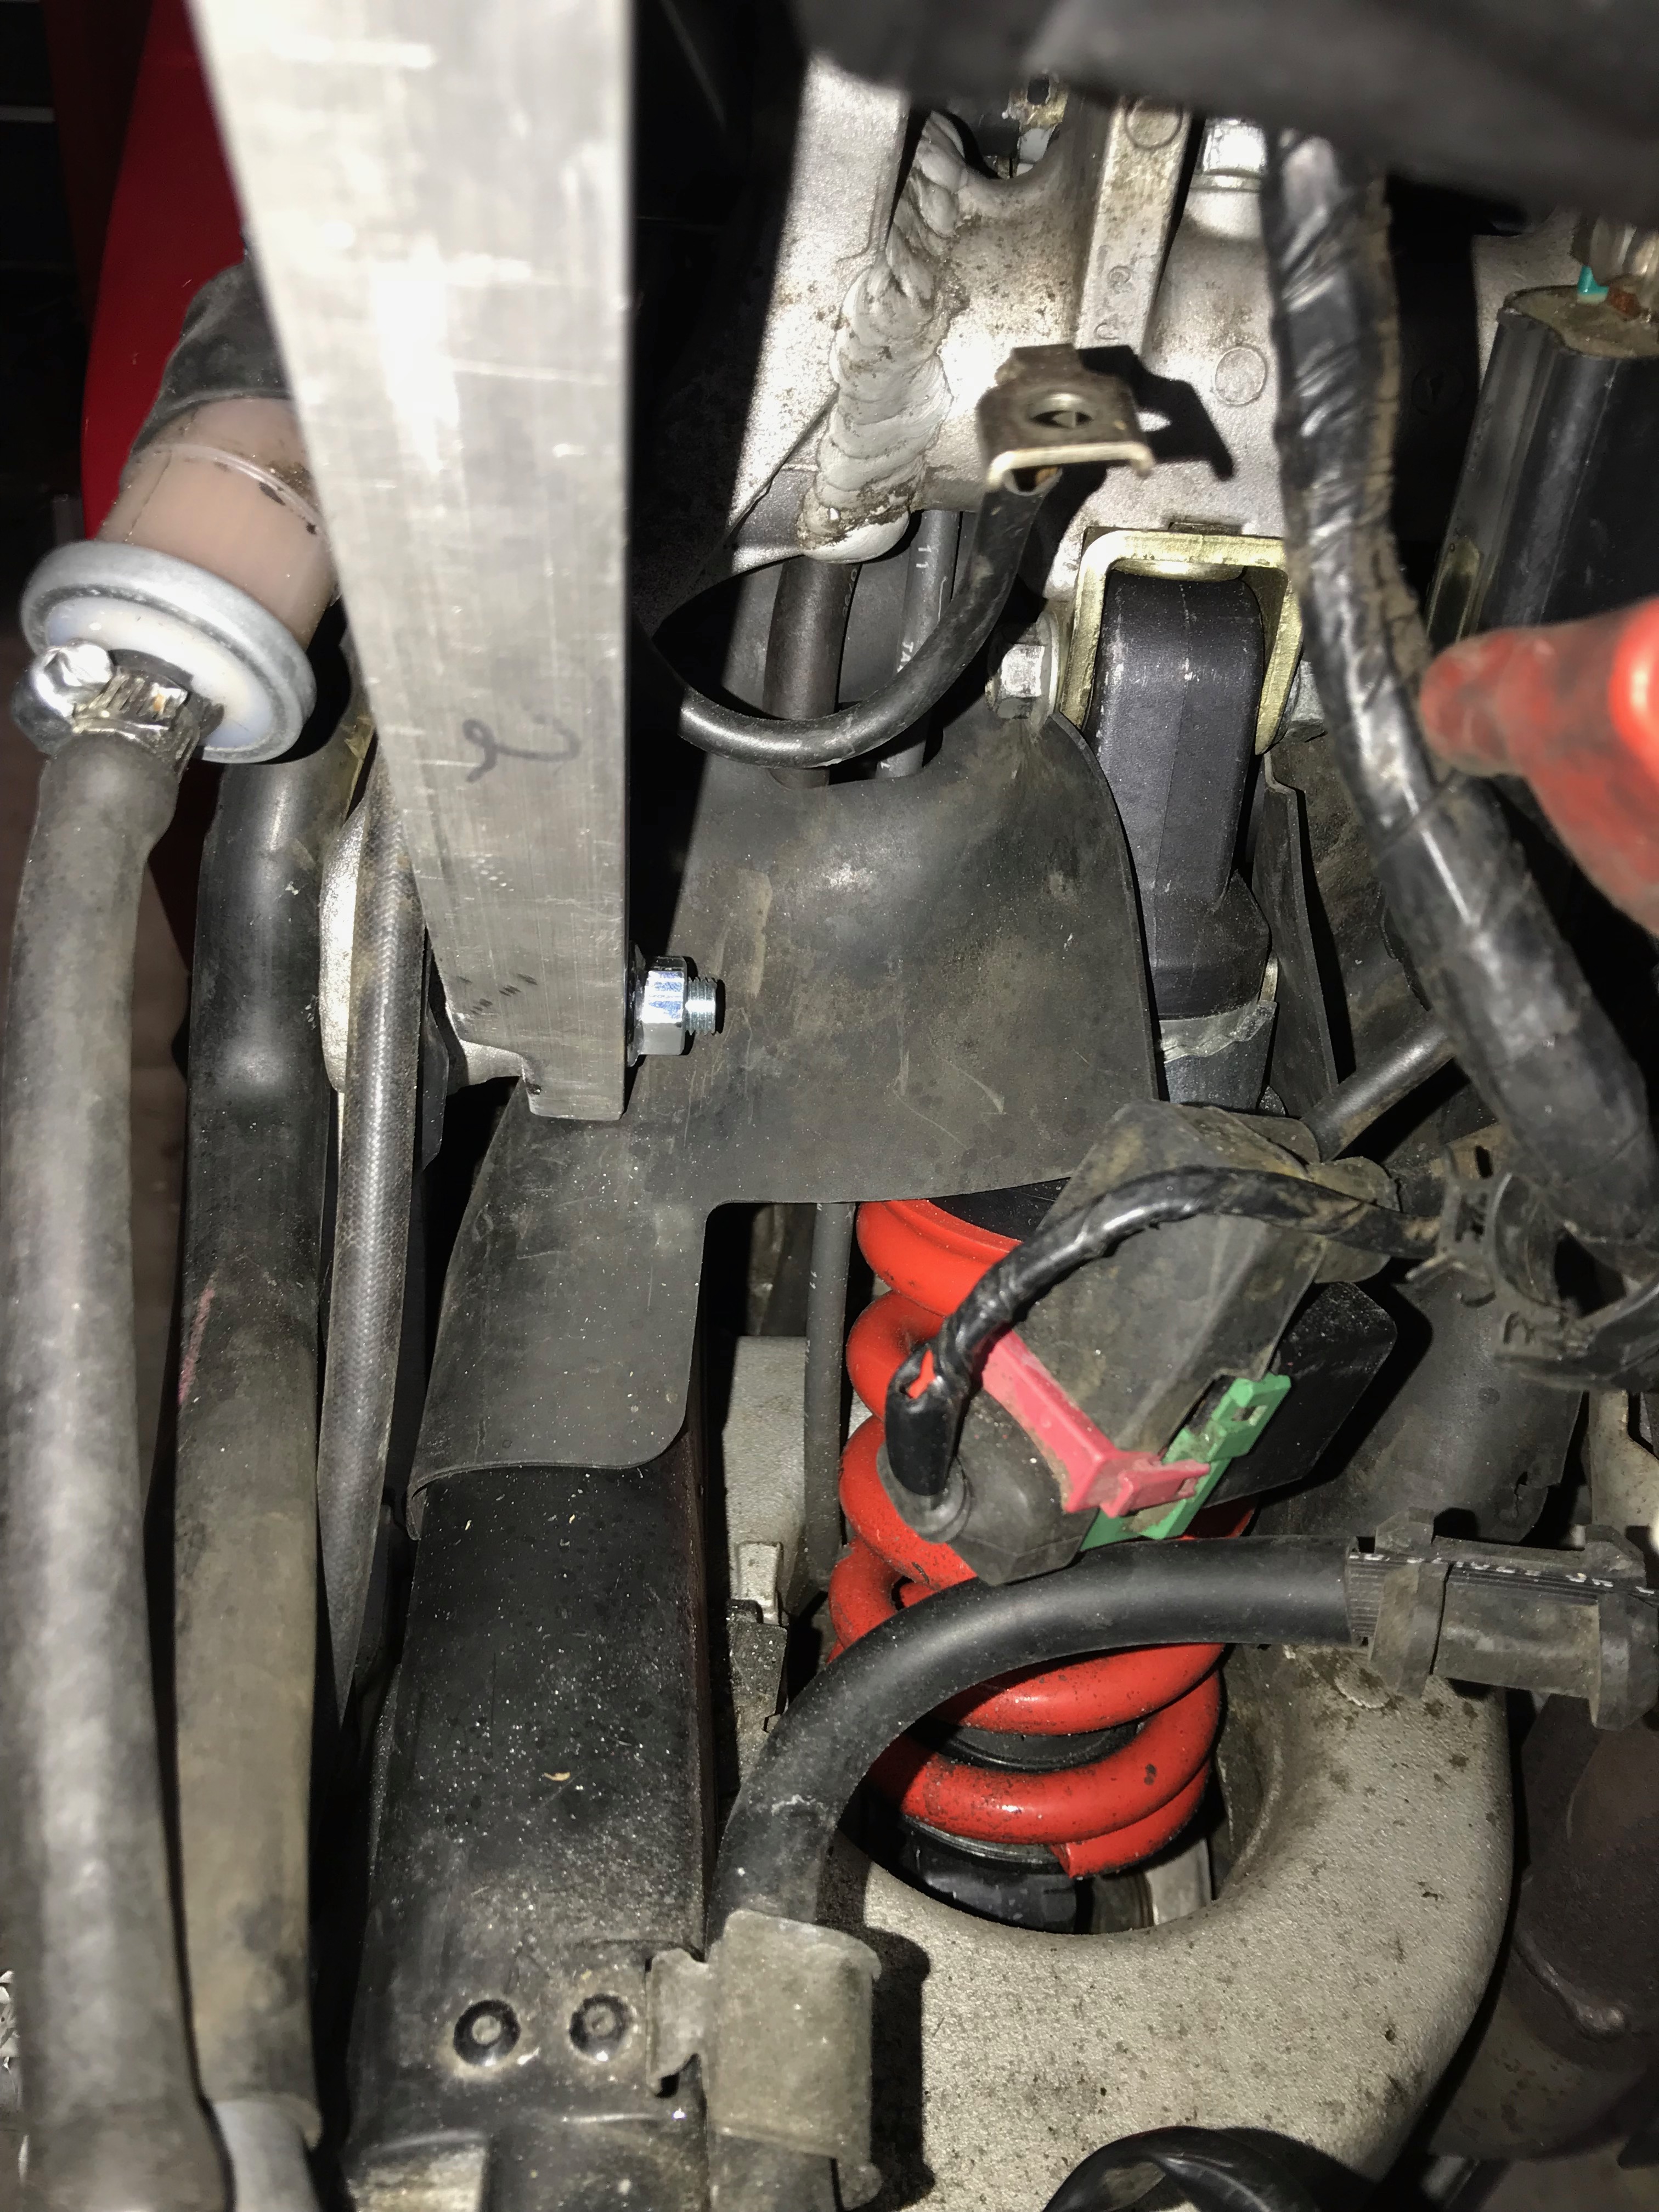
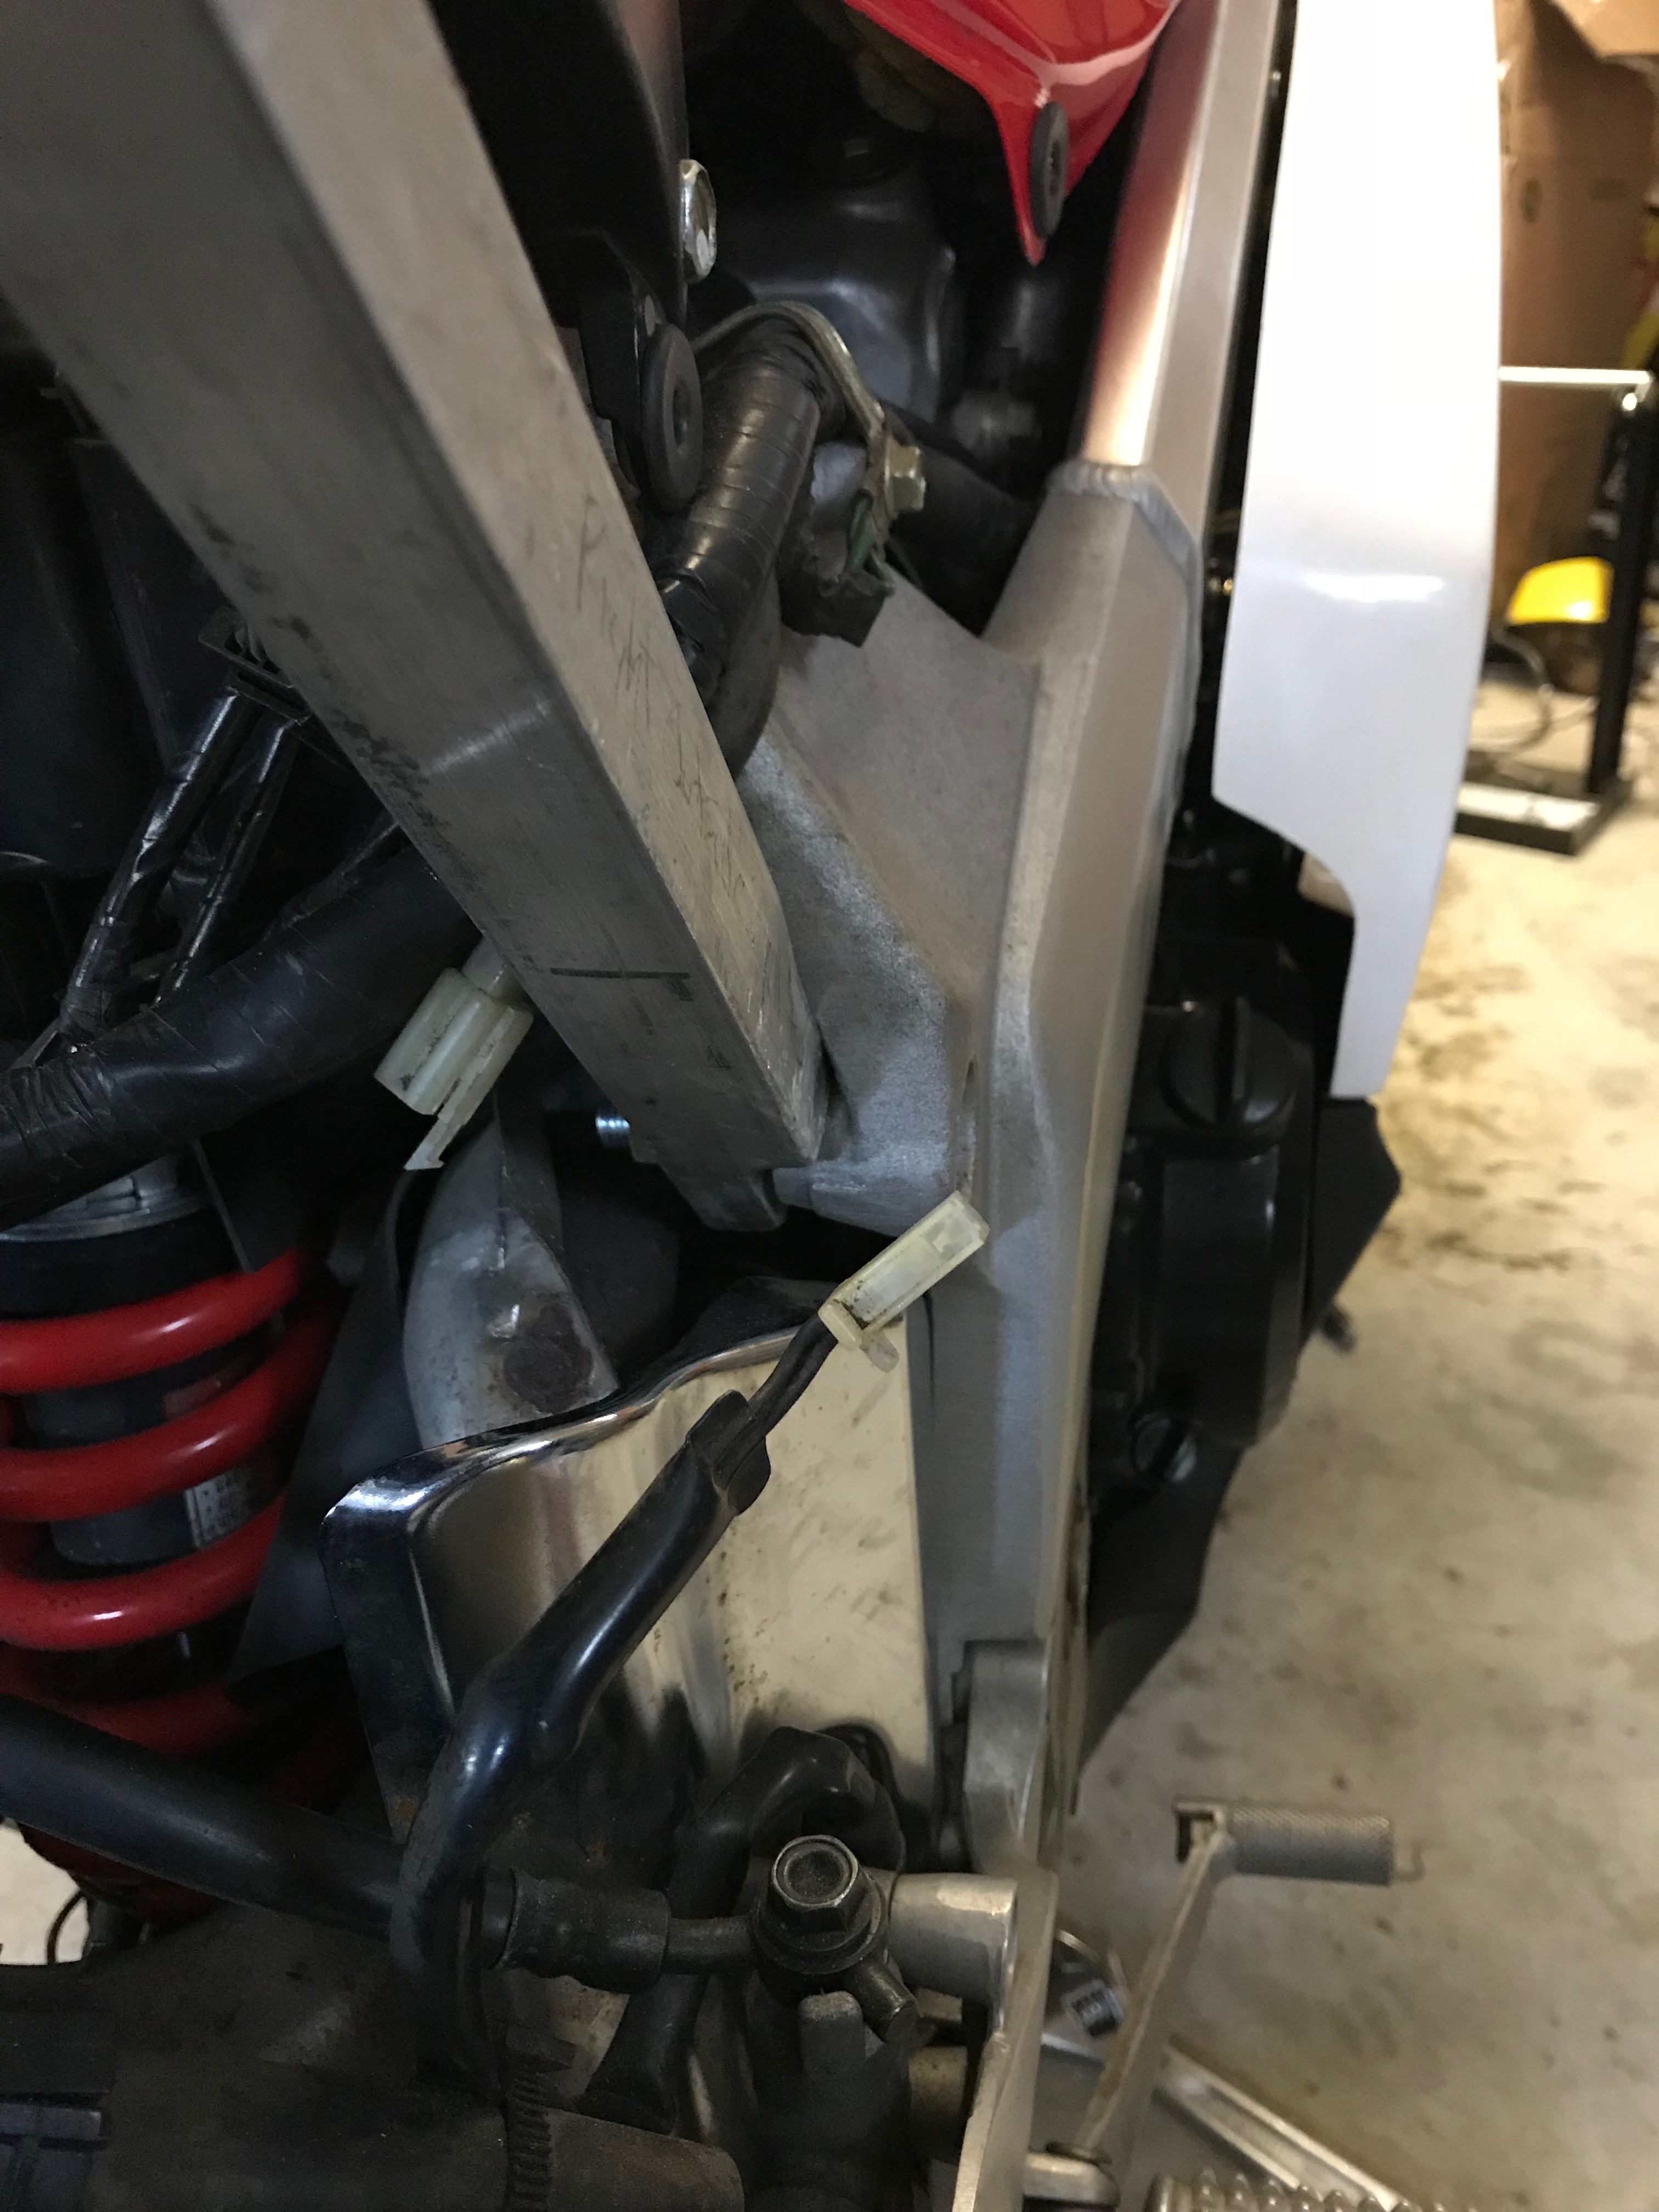
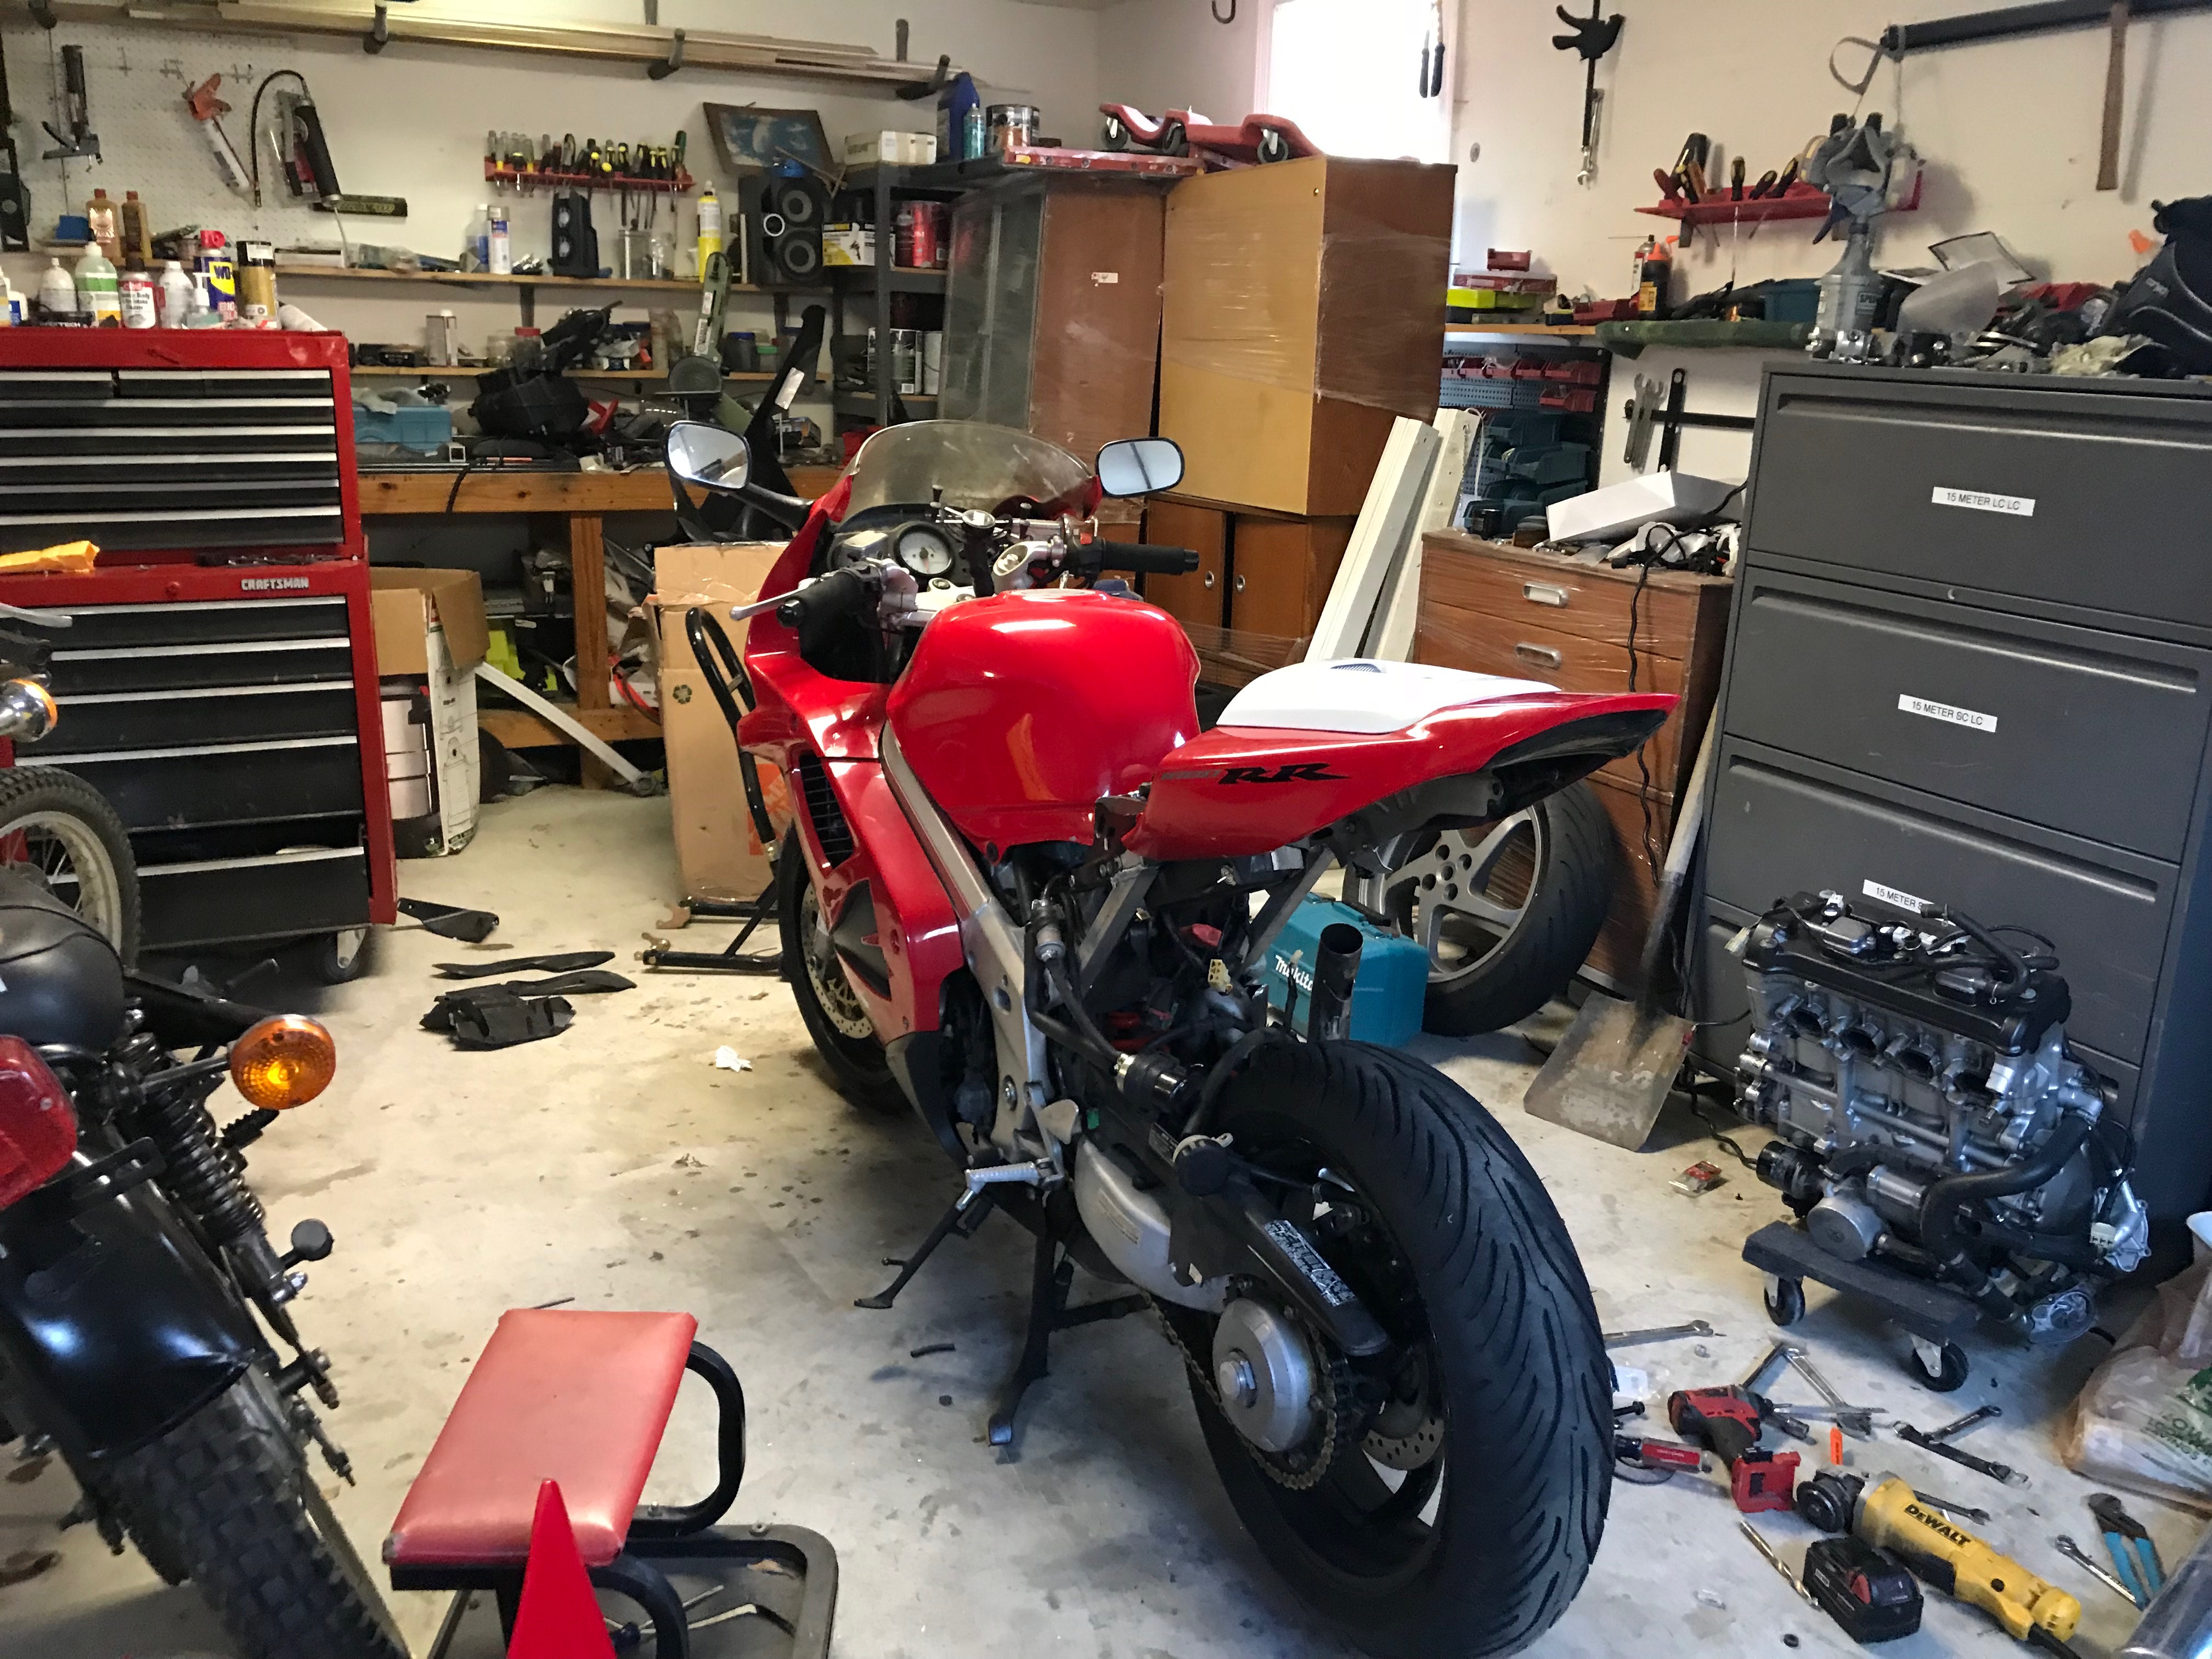
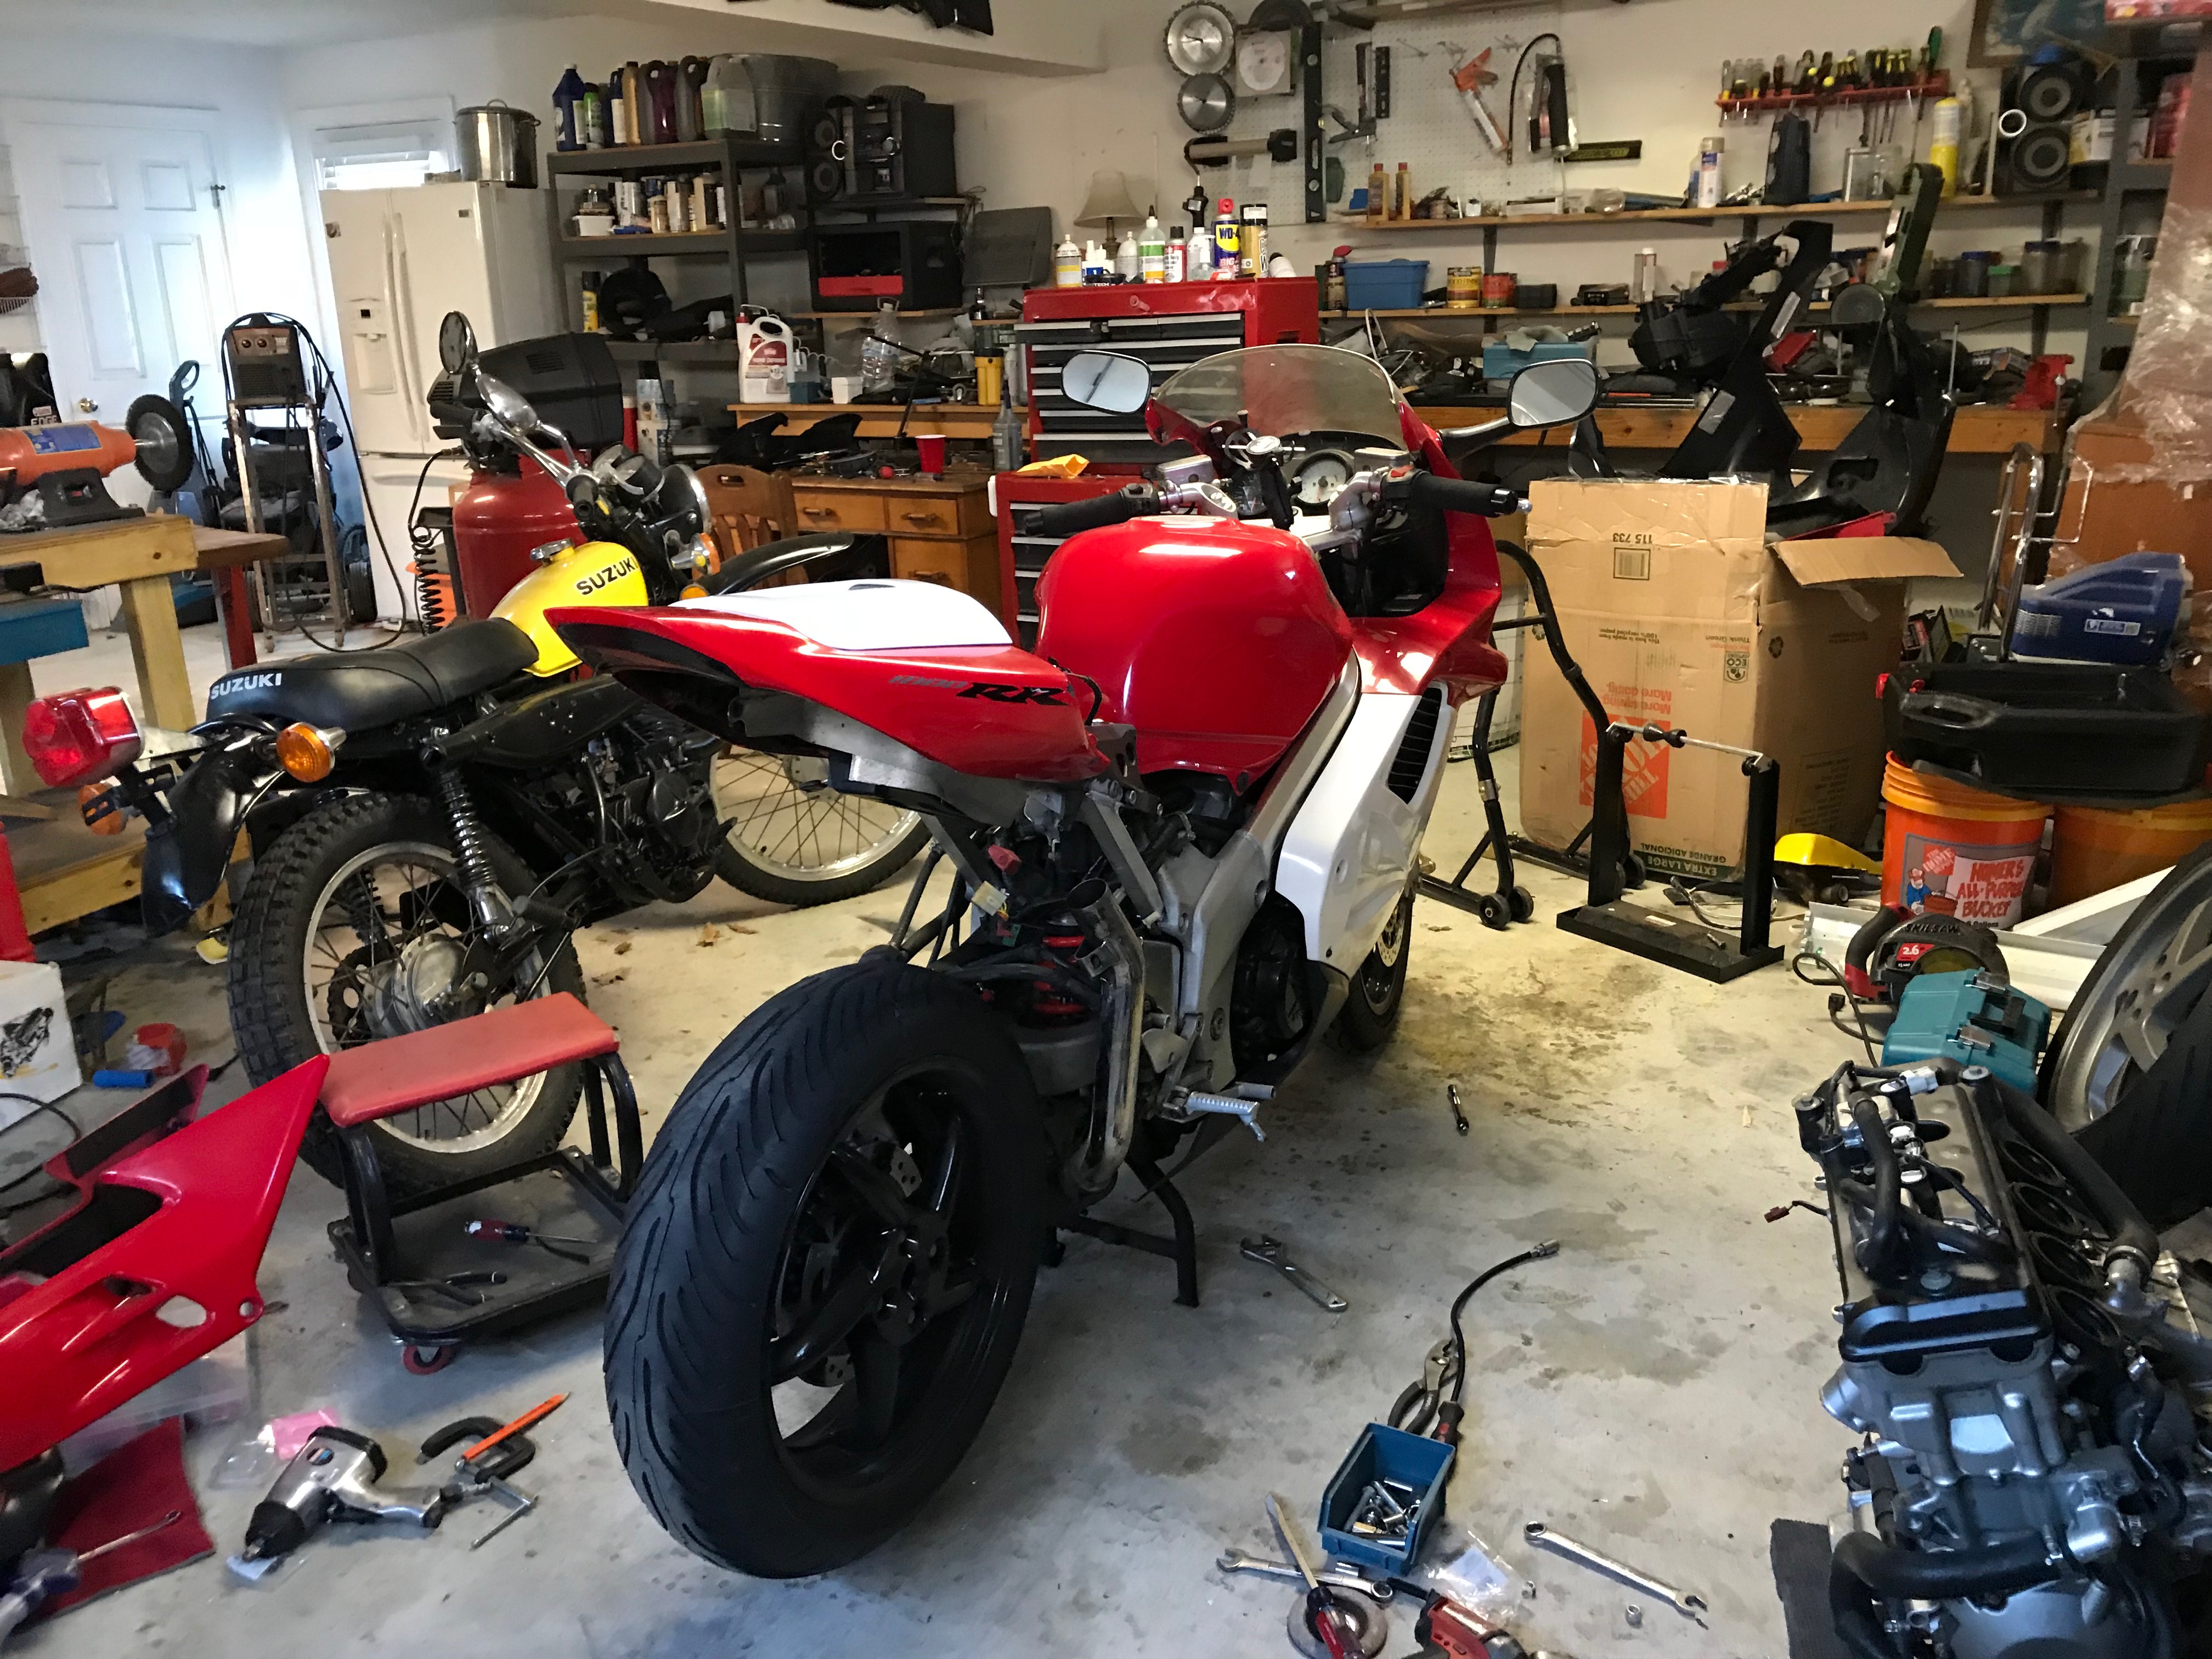
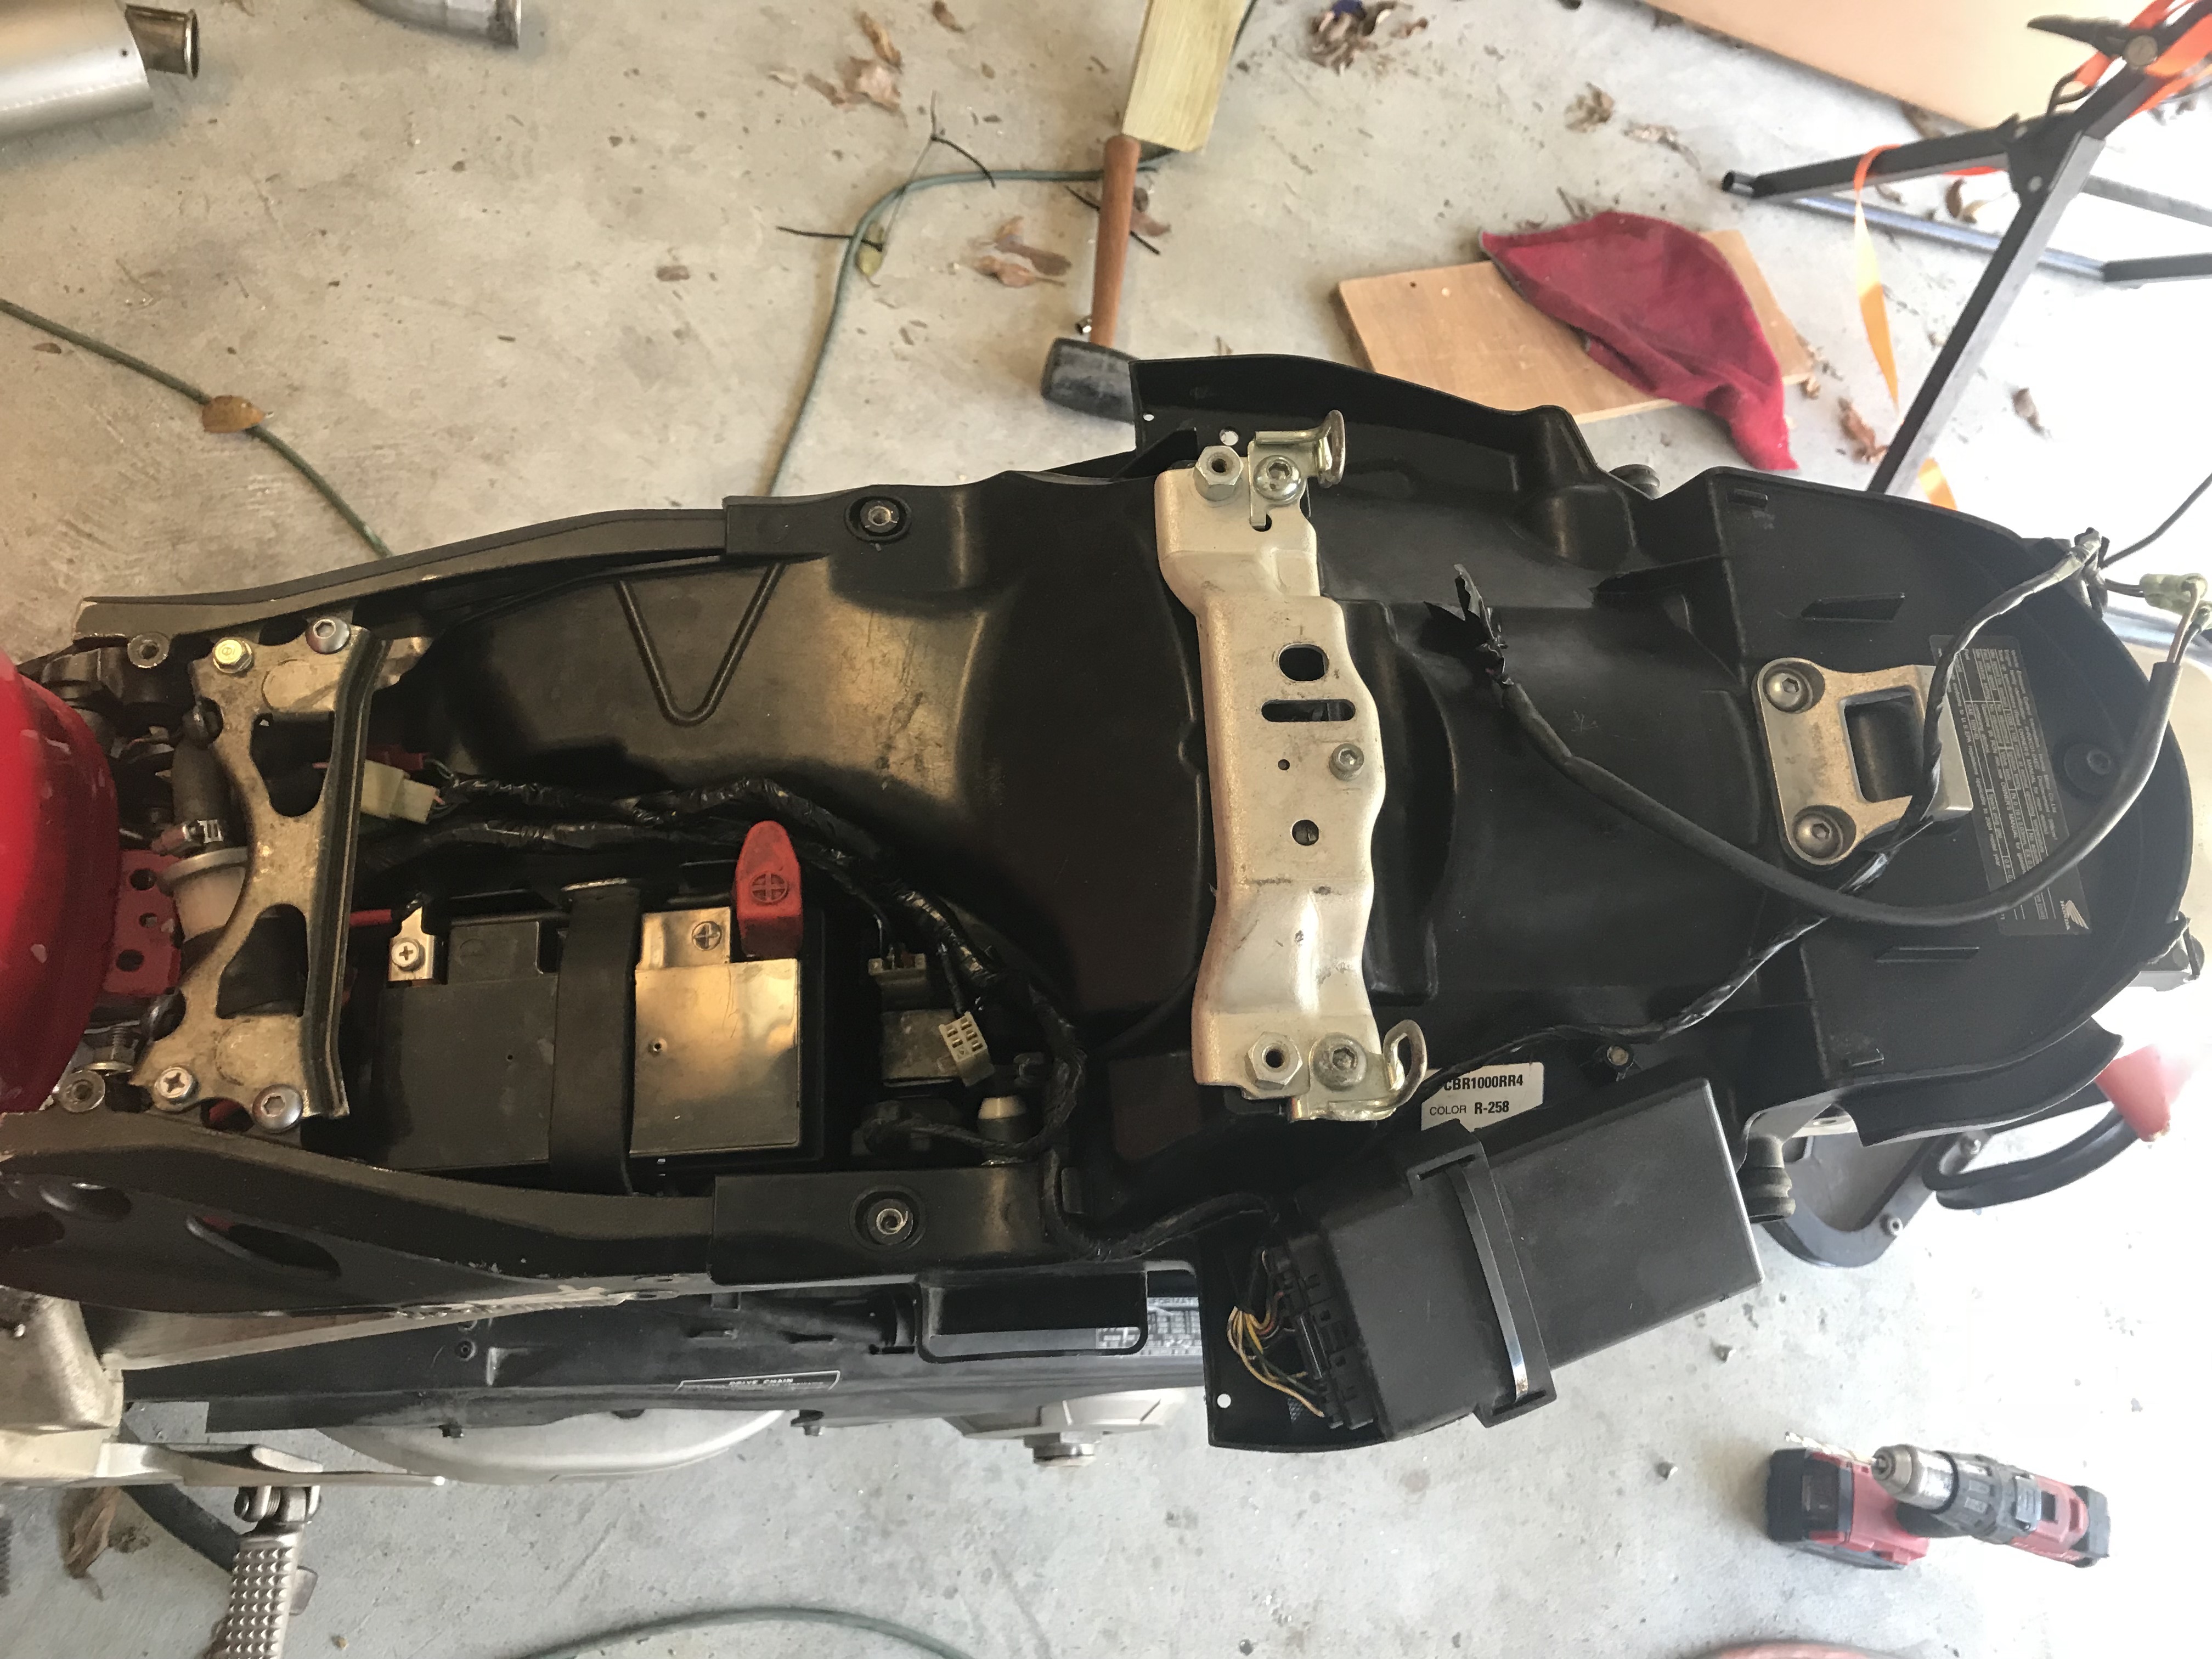
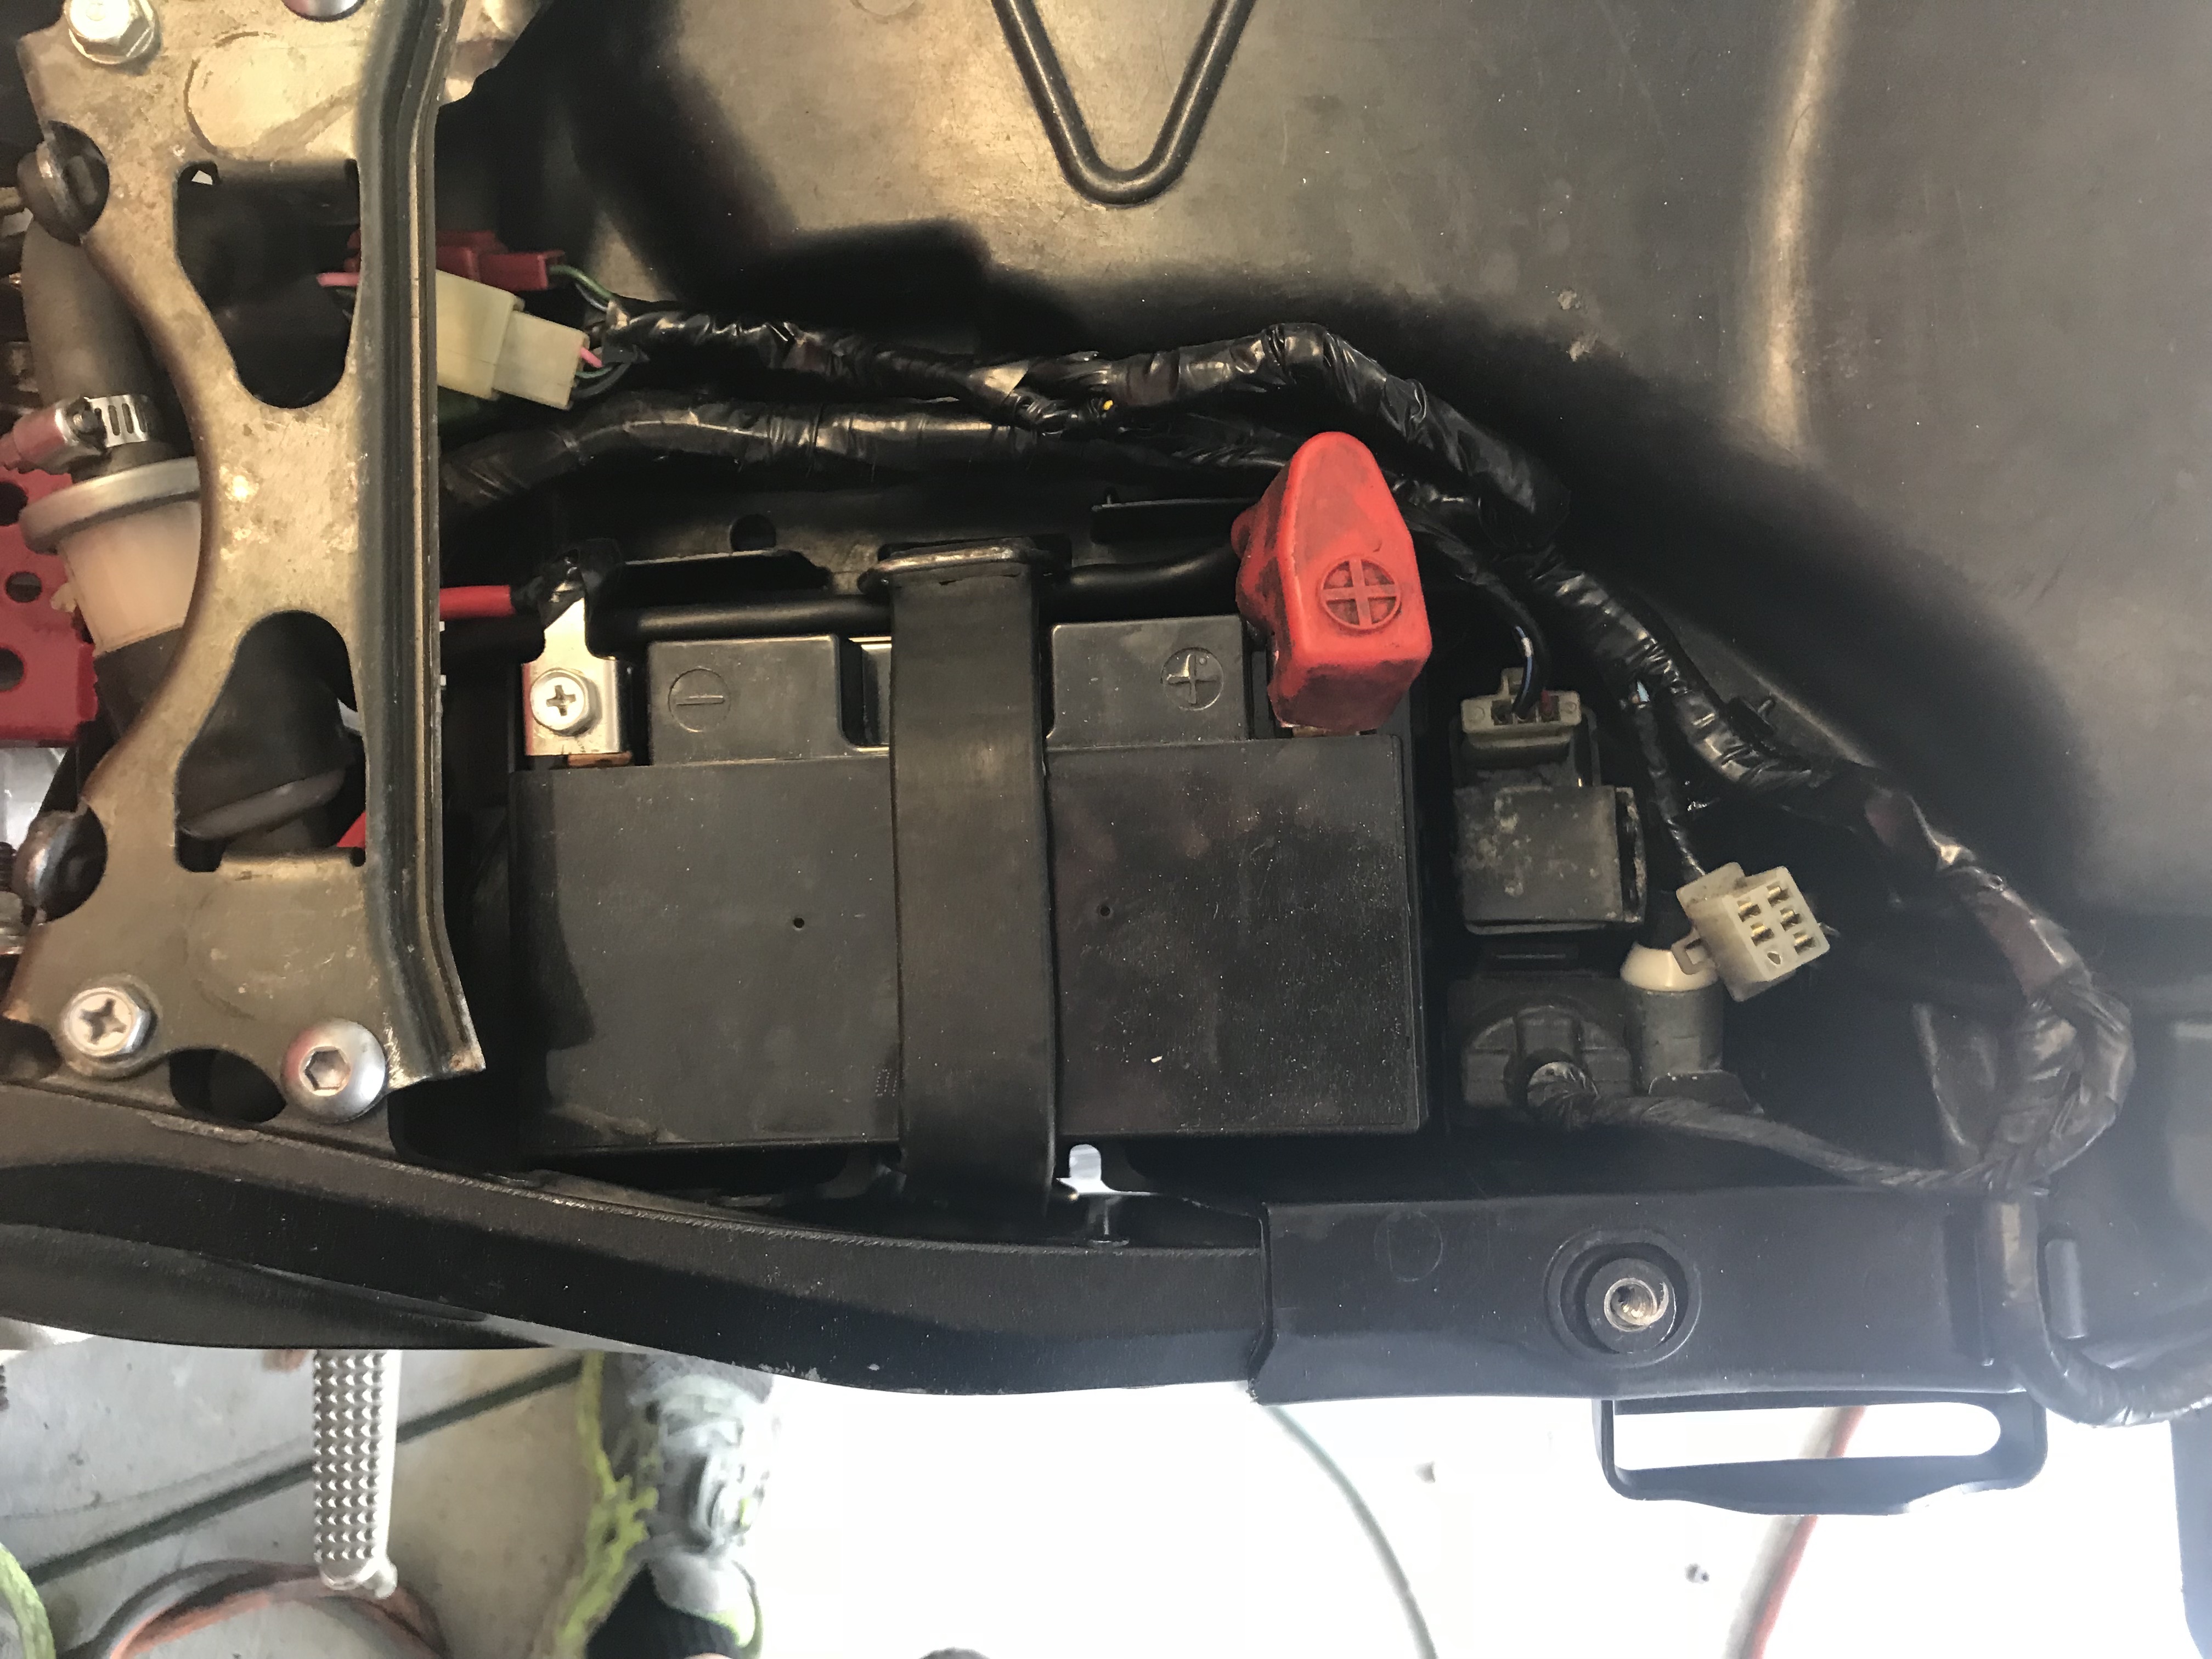
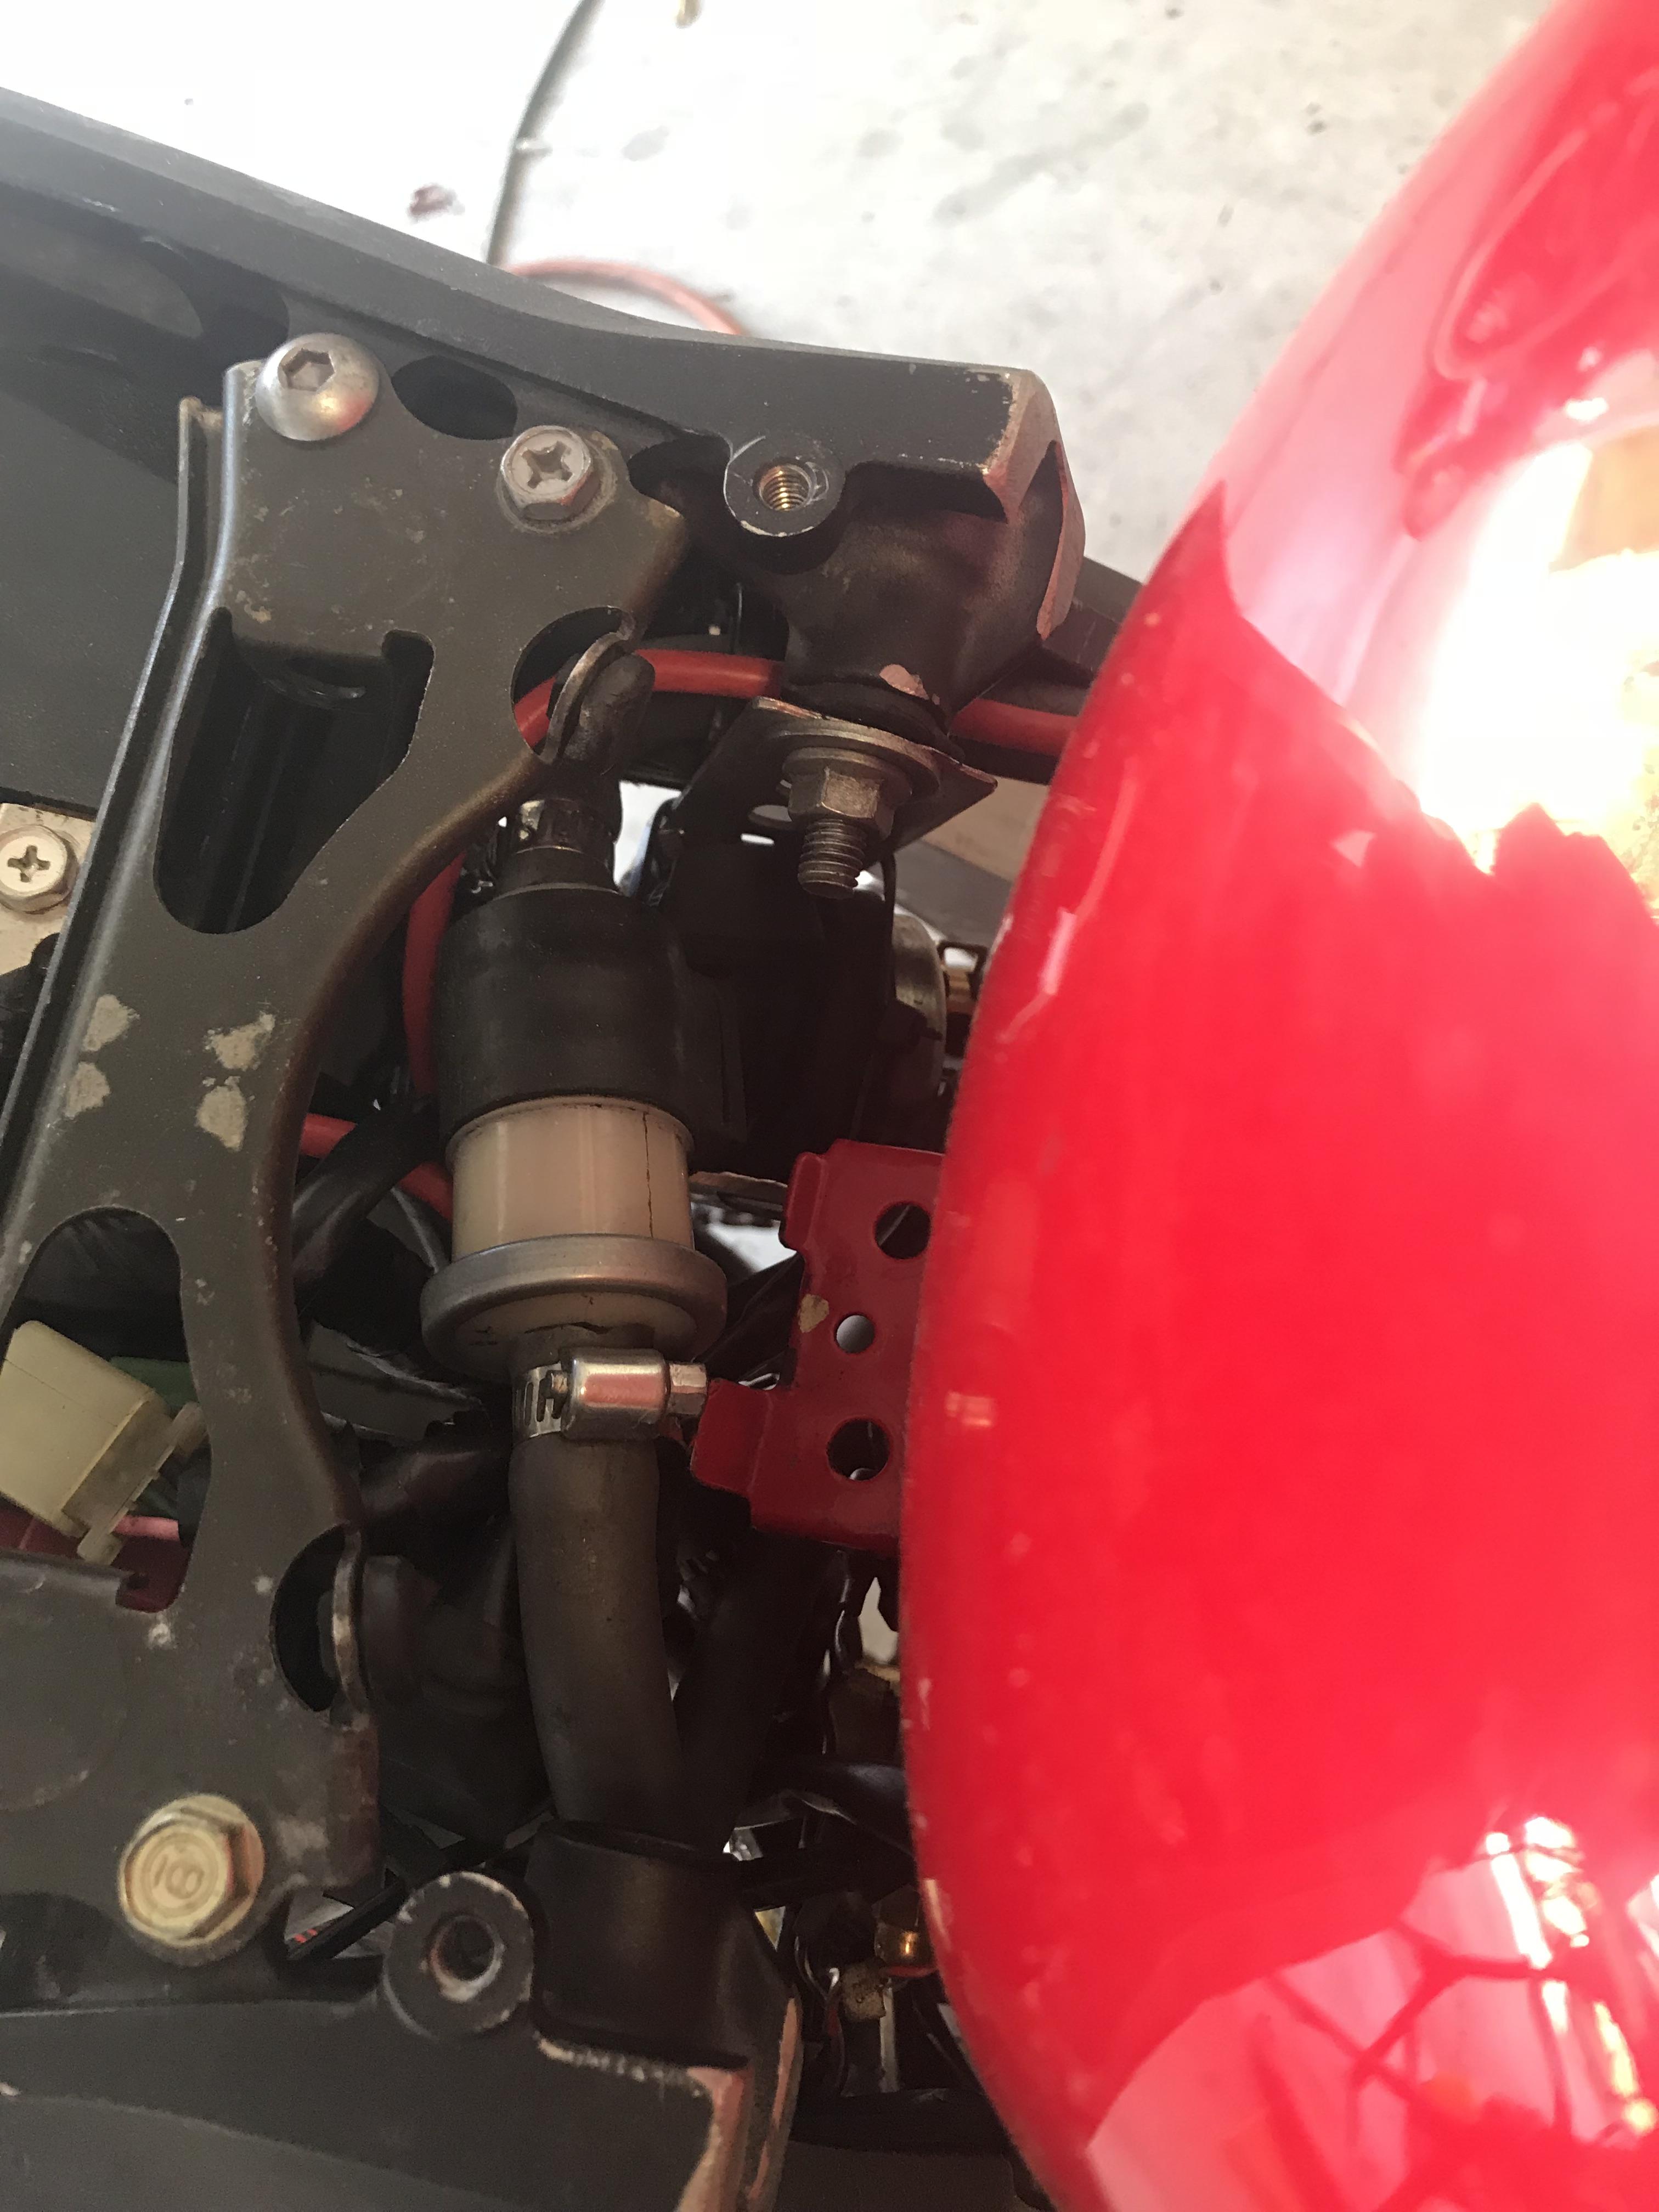
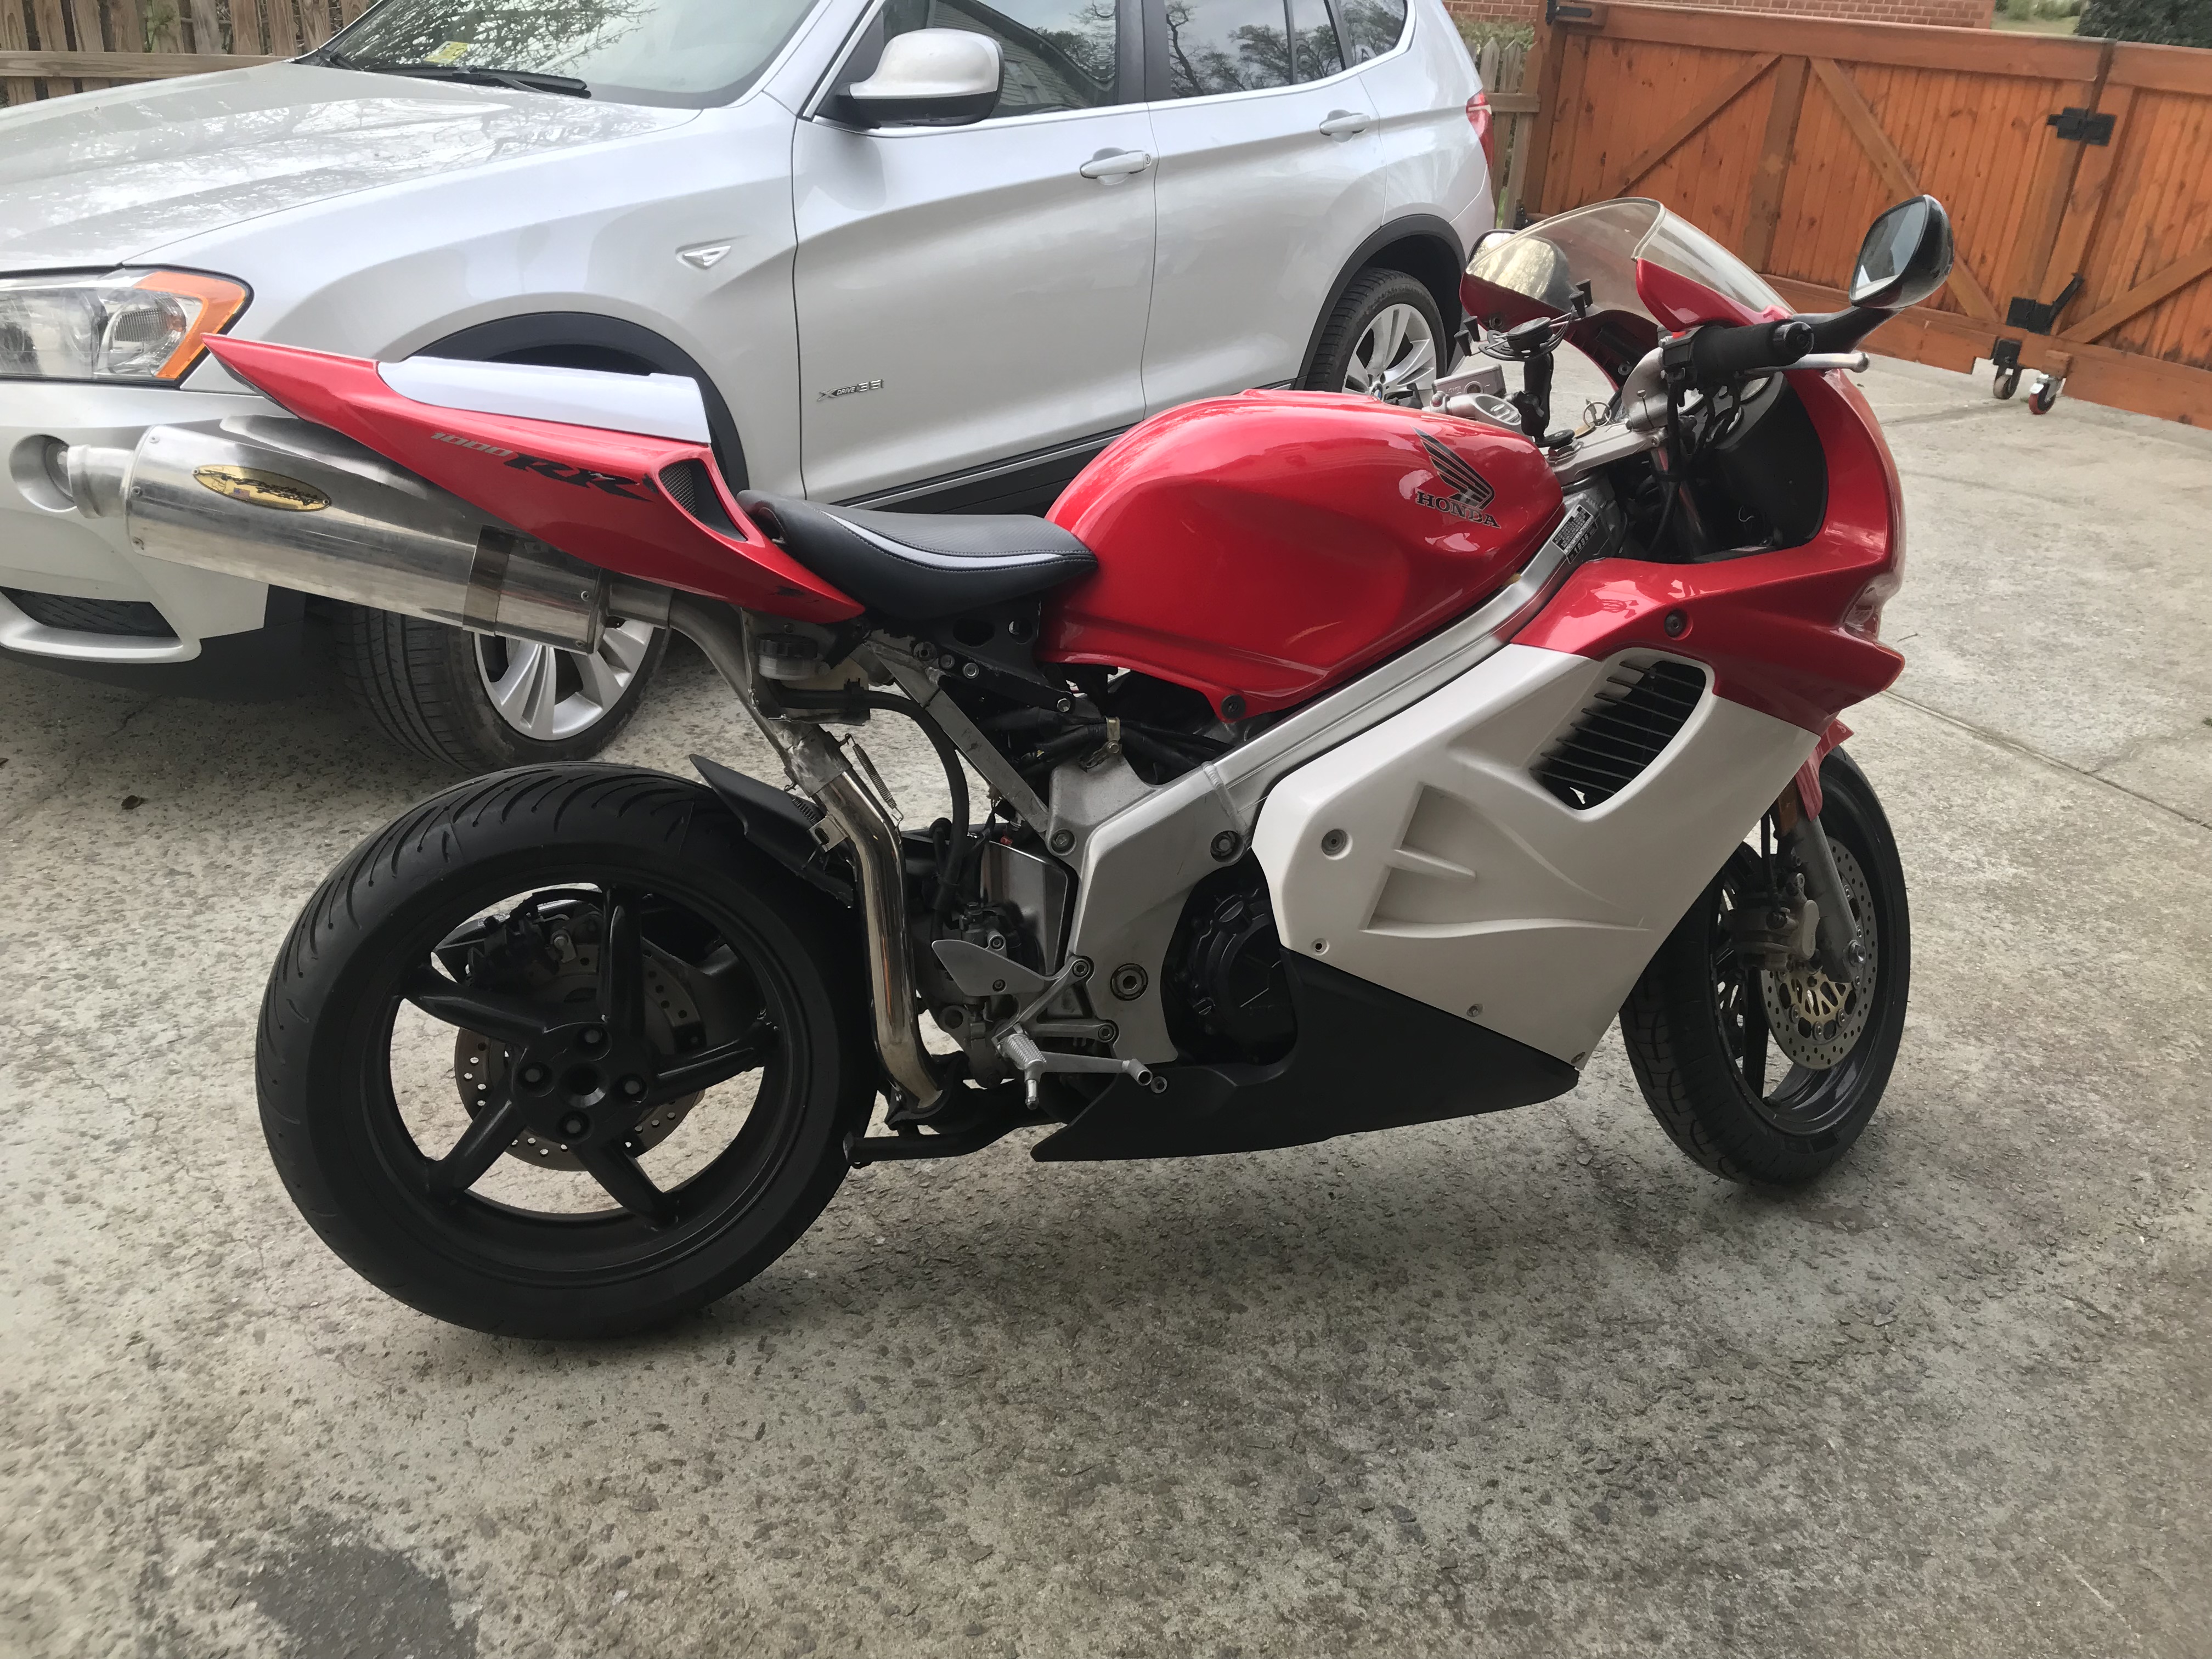
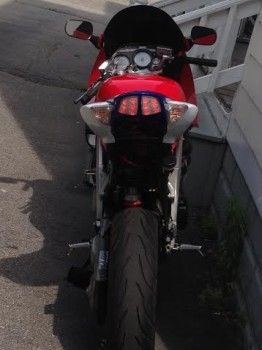
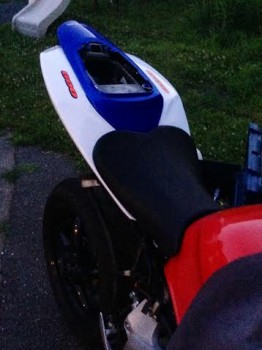
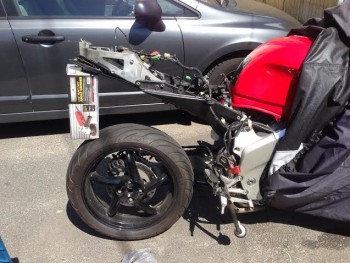
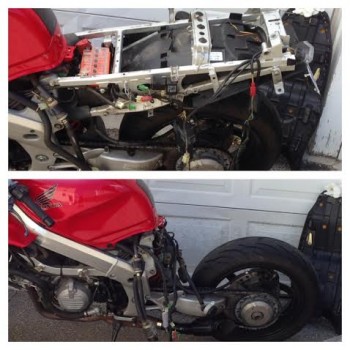
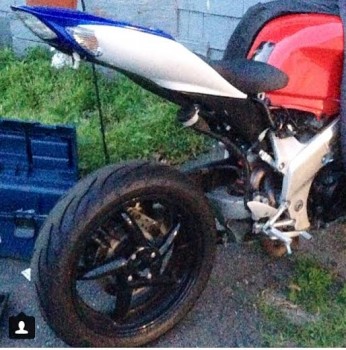
Getting some progress happening on my plan for the bike. 1996...16,000 miles. Mechanical is all complete so venturing into the (mostly) cosmetic fun stuff....I've been at this about 3 days and nearing completion. Overall - This is a VERY simple mod to do. The hardest techniucal paret being the small aluminum welding required...easy to find a pro to do what you want though cheap. Fitting the Subframe to the VFR I used a 2006 CBR1000rr subframe and used the bottom holes of the CBR subframe as the top mount to the VFR. I saw this part done before by someone else on a 5th gen and took a similar approach. I then manufactured bottom supports from 1"x1" square solid 6061 aluminum. If you can see, I welded the 1" bar flush to the outside of the subframe which let the bar hit the bottom receiver about 1/4" into the bar. I then cut out a section of the bar wide enough for it to slide past and be bolted up. The beauty of this is that it creates two points of support...the bolt itself...and then the cutout back side which lets the support rest against the frame...a bonus feature when doing this on a 4th gen. Super solid. The key to doing this is making sure you have the angle you want and then cutting out just enough for it to rest against it. You also want to cut off the top OEM mounting flange on the CBR1000RR subframe so it's not hitting the tank. I trimmed mine a good bit back as I am customizing a fairing piece to fit along there (The plan as of now anyway). Electrical Management - Again, really easy. Very little had to be extended or released in any way from the harness. Regulator/Rectifier Relocate - I moved the R/R to the front of the bike down in front of the headers. Mine was a CA bike and I removed the emission which left a perfect center mounting receiver for this. It's full protected in front by the fairing and gets a lot of airflow being beneath the radiator. I cut off the plug from the harness wire going into the R/R and connected enough wire in the middle to run it up to the new front location. Just need to be sure you have the same or better wire and label each one to make sure you reconnect the same wires front and back. Coils - No changes required...I will be swapping in cbr100rr coil-on-plugs at some point. Battery terminal Wires - You will need to make new ones that are about 10" longer each. Rest of the Harness - Using the CBR1000RR battery box/under tray all pretty much lines up perfect to just lay the harness in. The 4th Gen "ECU" goes under the seat fairing and is zip tied to the tray that look like it was made for it. I used some rubber to line the plastic tray...probably not necessary but gives it some shock protection. The relay, etc all fit right down in the slots beside the battery in the tray area...again the CBR1000RR must have something very similar as it's a perfect fit like it was made for it. *REAR TAIL LIGHT - The real tail light I have it a combination light and signal LED unit. It has the sub-harness with it that provides the resistance needed so it doesn't fast-blink. I used the VFR extension cable and simply spliced in the ends where needed. Fuel Pump/Fuel Filter - The cbr1000rr subframe provides a lot of nice space to use under the seat up to the vfr tank mount. I "manufactured" a bracket that attaches to one of the open holes on the subframe and then holds the fuel pump...I faced the pump forward to the tank and up a bit so I could run the fuel lines as straight as possible. The only turn it has is up and around to the fuel filter which is mounted on top of the pump above the metal CBR1000rr cross member for seat. It's all gravity friendly from the tank just-in-case... "Tank slightly down angle to filter...filter down and around to pump, pump slightly down straight shot to carbs (with the stock 90 degree turn to meet the entry)." Rear Brake - The rear brake reservoir bolts on nicely to the CBR Subframe in available hole. I made a protective box to shield it from tire debris and pipe heat. I'll be making a nice box eventually (this one made frrom sheet metal and rivets). Tire Hugger - A simple fitment, one hole drilled, and some shape cutting and the CBR1000RR hugger works perfect. took 15 minutes. The left side of the hugger will line up directly with the tabbed area so the brake lines sits on top of the hugger. Drill the plastic VFR chain guard where the hugger stock hole lines up and is level. On the unsuspended side, you just need to have something suspending the free outside "tab"...I used a zip tie from the pipe bolt flange since it was right there. Will need an updated thing here once I get a final seemless pipe made. Pipe/Silencer - Not cpmpletely happy with this yet....I did a rough final fitment but there is plenty of room still to get the silencer in there almost flush. I decided to order a new end-cap for it from Two Brothers today and need that before I can lay it flat (oval). Once I have that, I'll have my local place here do a full stainless pipe match up to the collector box. For now, it's rolling as shown. *Silencer Mounting Bracket - I "manufactured" a bracket that attaches to one of the side holes on the subframe and "bends" up around to about the center of the wheel well arc and then 90deg turn down. The silencer hanger bracket joins there and is attached with a bolt and a screw. License plate is hung off another hole next to it. The manufacturing is simple cutting some metal, bending it, and drilling needed holes to mount. silly easy stuff here. BIG NOTE: After some test riding, I've realized that I have accidentally made the PERFECT VFR rider setup for anyone over 6' tall. The additional seat height (along with my helibars) dramatically increases the leg room and riding comfort. The CBR1000RR seat length is also a lot longer so there is a ton of room. I'm only 5'10", but I can see this being a dream setup for anyone over 6 foot riding this bike. Ironically, it may actually be a little TOO much room for me at 5'9"...dunno yet. I can easily drop it a little by letting the bottom supports slide though a little more (re-drilling or extending the hole in the aluminum bar...which I may do)/ The CBR stock seat is abysmal but will be an easy fix with a Corbin, or something else with more ergo built in. More updates to come with final pipe, re-finishing/polishing all the pieces/parts, etc. After this it's on to the plastics. Joby (aka The Wedge)

-
Got it all re-assembled again and voila....seems to have worked properly this time. Must have been something magical I did re-assembling...no idea. However, now my NEUTRAL light quits working after a few miles riding (and bike thinks it's in gear if I put the kick stand down). Seems like a simple fix whatever the heck is going on now. Sheesh...this thing is anything but a simple bike so far! Hopefully I'm on the home stretch to many miles of fun riding though. It was sooooo nice driving it tonight.
-
Thank you I'll check with him. The manual says 13.7....but I have no idea how I would even set that if it's out of spec since the float itself is entirely plastic. No tab to bend. bizarre.
-
Need some help (and did search but could not find exactly a match for this). I recently acquired a 1996 4th gen with 16,000 miles. Bike overall is in fantastic shape. It sat for at least a year before I got it. Emptied tank, new plugs, changed brake fluid and coolant, and various other small stuff. After a couple hundred miles I developed a problem where the bike would bog down and then it finally shut off on me....so to the carbs I focused. I have had them off the bike several times now (4-5 times) and cannot figure out what the issue is. Basically, the issue I have is fuel is leaking...and also is flooding out of the overflow tube...and is also filling the crankcase. On a recent carb pull I cleaned the pilot jets, re-assembled and the bike ran perfect...except still had a significant amount of fuel leaking. I then bought all new pilot jets, floats, float pins, float needles, and gaskets (replaced the float bowl gasket and the ones on the horn side...re-assembled the carbs...put them back on the bike and the issue was worse than ever....gas pourerd out the overflow drain and the bike is nearly impossible to start and shuts off right away if throttle is closed. I have blown air through the pin seat and it appears to flow nicely as you can feel the air through the tubes. I have no idea how to remove the seat itself as it's flush...guessing has to be done from the other side. The only difference I can visually see is the floats "bob" significantly more with the new needles. I put the old floats back in to compare...and they bob the same amount...guessing the internal spring is just stronger. I did this to see if there was a float height adjustment needed...which I have no idea how to adjust the float since the original and Honda replacement part is all-plastic. So any ideas where I go? This freaking bike is about to put me over the edges trying to get it running right. Joby
-
 What tail did you use for the swap?
 -
-
Awesome...thanks. Bought the kit...I've made some detailed diagrams for the EVAP and the PAIR and think I have it covered. The 4th gen is very different than the earlier ones of the 800's so it took some study to get it straight. Mine is a California bike (no idea how it go here in VA).
-
Anybody know if the VFR800 PAIR Valve Block off plates will fit the 4th gen 750? or am I stuck manufacturing my own?
-
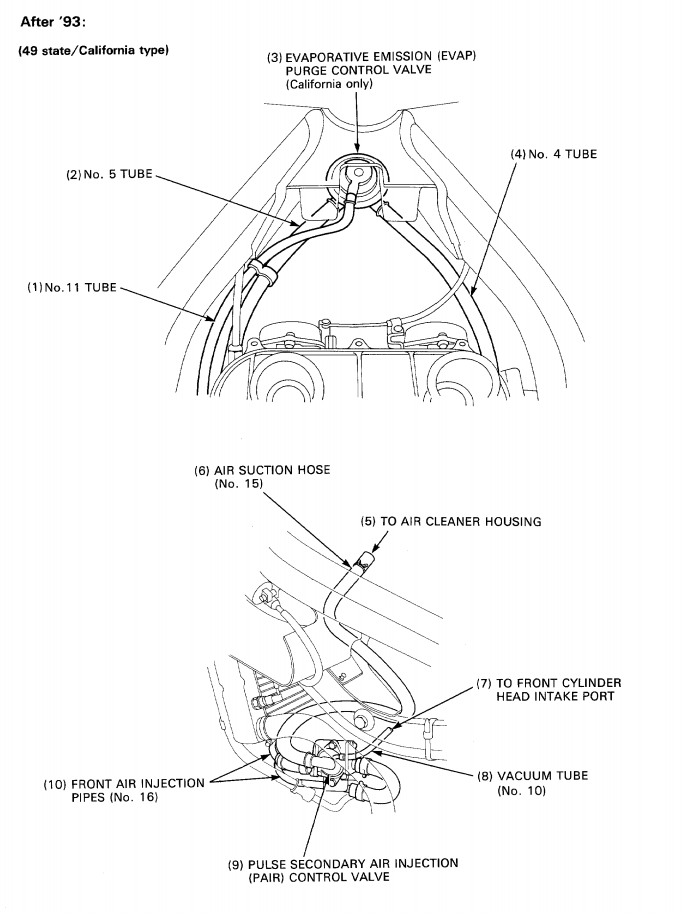
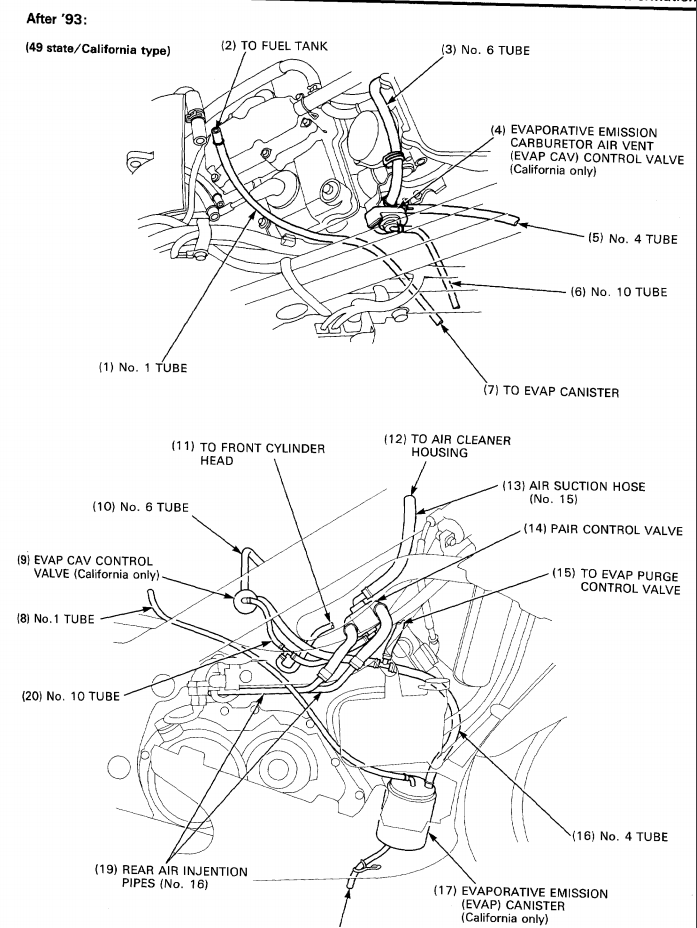
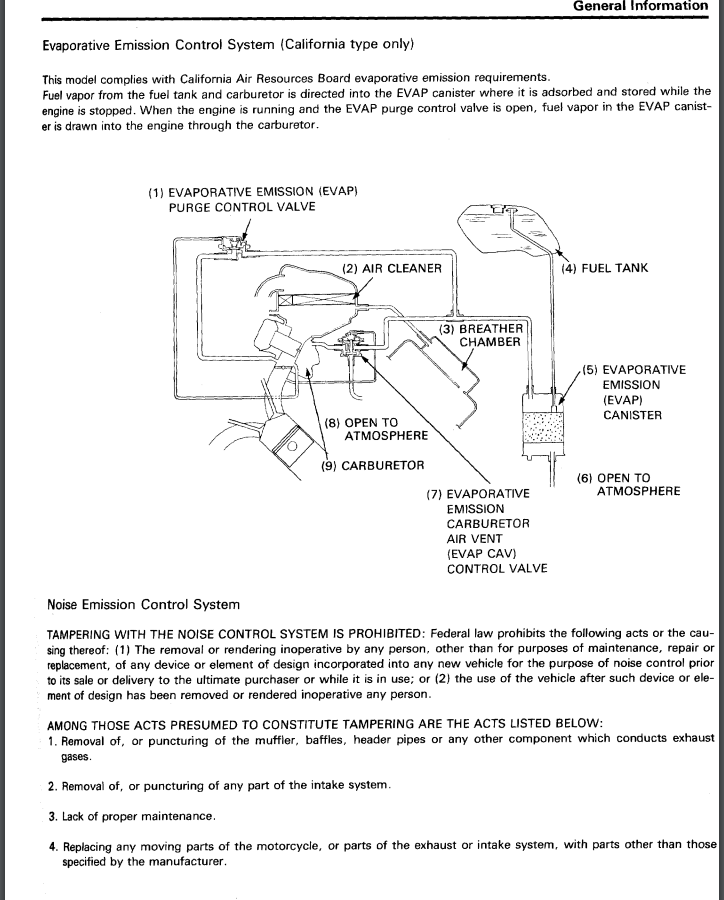
First, I have been searching and reading extensively on this. if I missed the information somewhere, I apologize. in short, I would like to remove the convoluted California Emission stuff from my 1996 VFR750. At the same time, I'd like to remove the PAIR valve stuff as well. From my reading: 1. I understand the concepts and am mechanically capable. 2. I could not find an Emissions Delete thread that looked like the stuff on my bike...none seemed to be for a 4th generation. I have attached some pics from the Clymer manual... Can anyone give me the instructions on what needs to be pulled/plugged (using these pictures for reference) to delete the Cal Emission and the PAIR valve from this bike? Again...thank you for revisiting this topic and my apologies again if I missed this in my searches.