


JZH
-
Posts
4,092 -
Joined
-
Last visited
-
Days Won
55
Content Type
Forums
Profiles
Gallery
Blogs
Downloads
Events
Posts posted by JZH
-
-
- Popular Post
- Popular Post
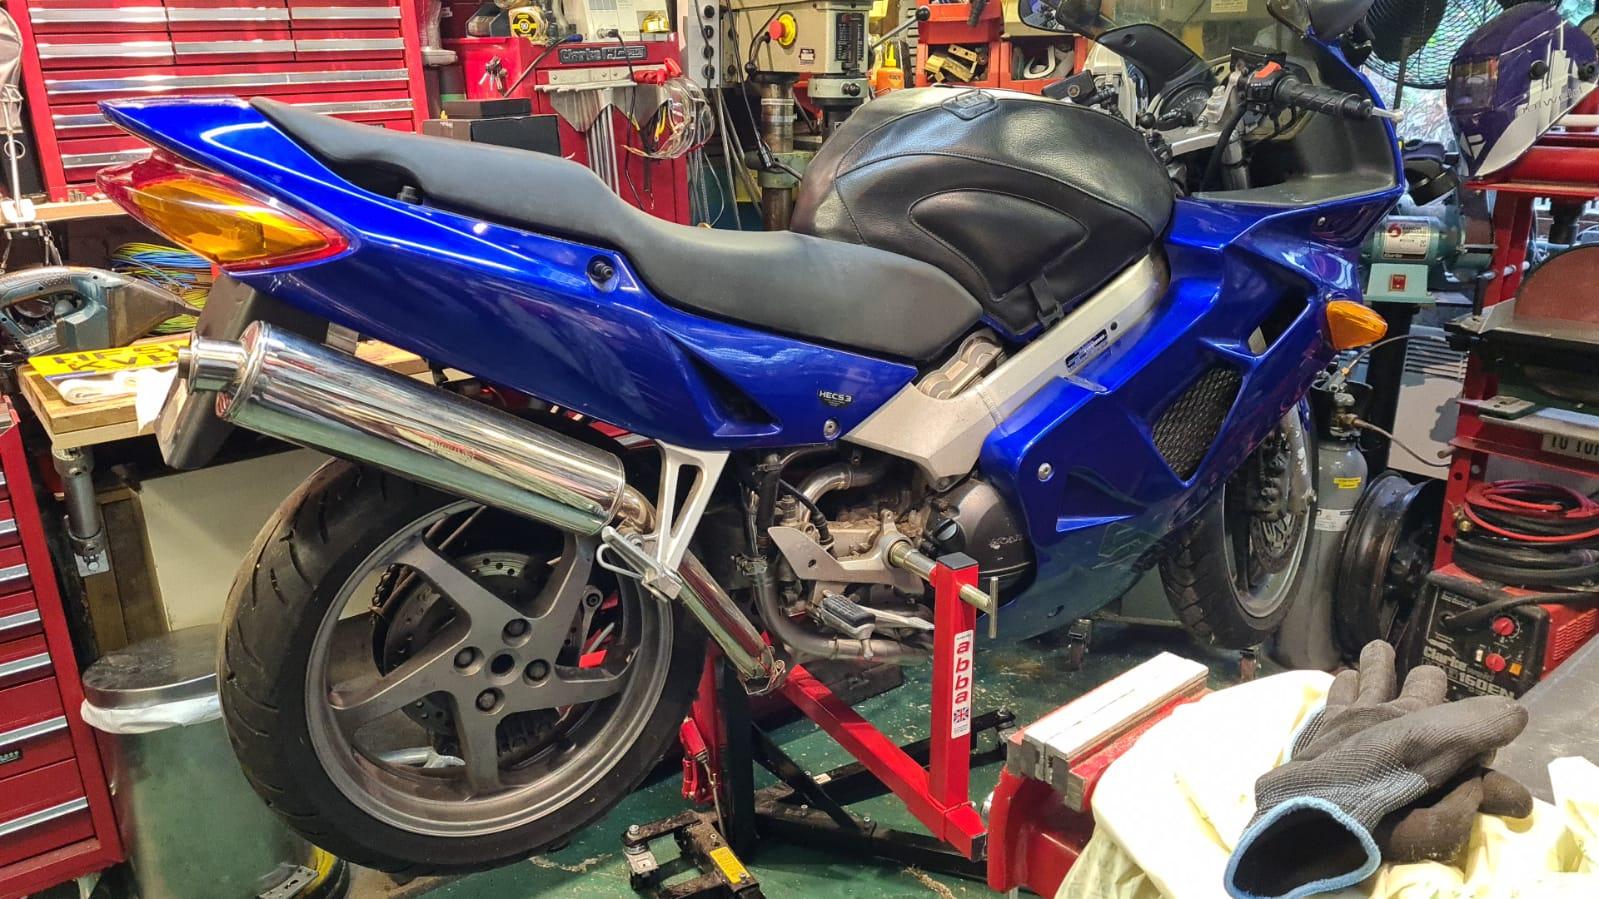
Twelve and a half years ago I began to modify a CA-spec Y2k VFR800Fi:
Today, under vastly different circumstances and with somewhat different goals I have begun to modify its UK cousin, a Pearl Tahitian blue '01 VFR800Fi. I actually haven't worked on or ridden bikes for several years, for various reasons which all sound like excuses now, but that ends today.

It's a good place to start. I acquired this bike ca. 2016, with low miles and apparently no damage (we'll see about that...) Over the years, I also acquired a load of parts for it, such as: SP2 forks, SP1 front wheel, SP1 bottom yoke, 929 top triple clamp, Tommaselli adjustable clip-ons, 8-spoke rear wheel, SH847 reg/rec, GiVi and SW-Motech luggage, Nitron shock, VFRD headers, Harris hugger, 6th gen rear cushion bracket, Sato adjustable rearsets, 6th gen ABS rear caliper, windowed clutch cover, xenon projector headlights, etc. Sadly, no supercharger or custom underseat exhausts this time...for now.
Where to begin...
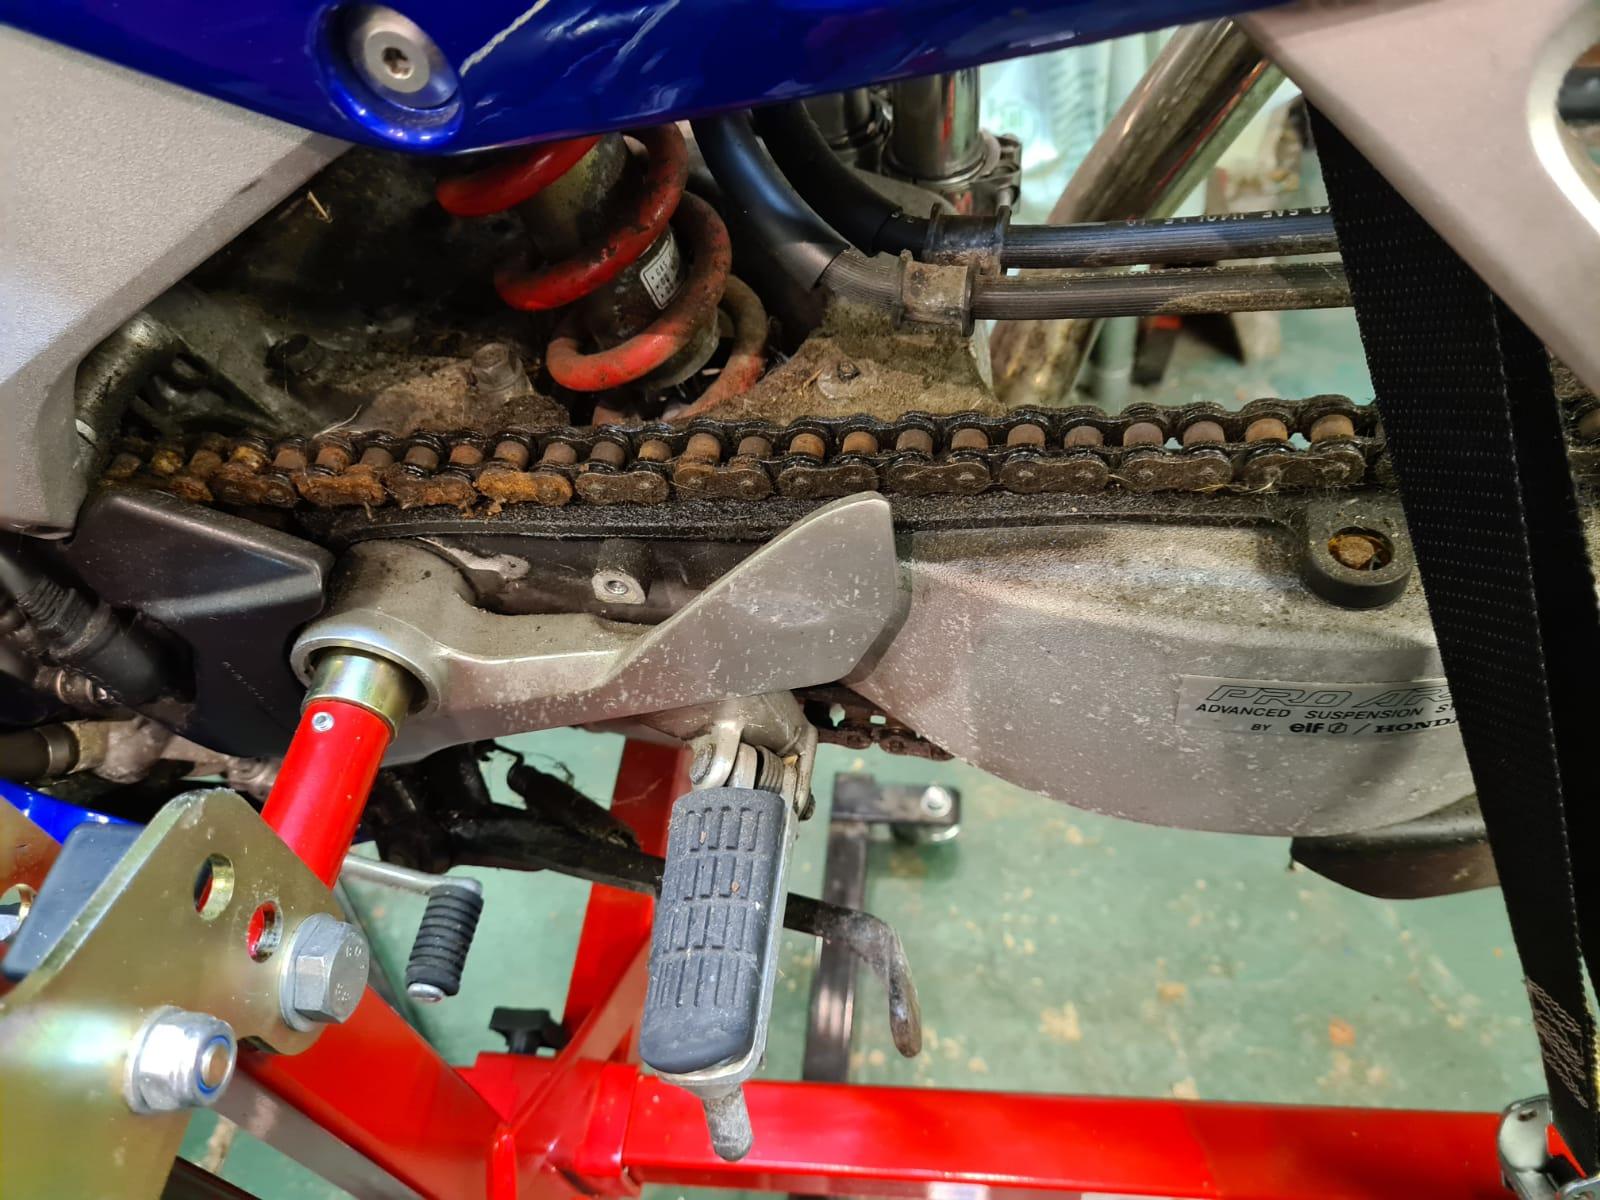
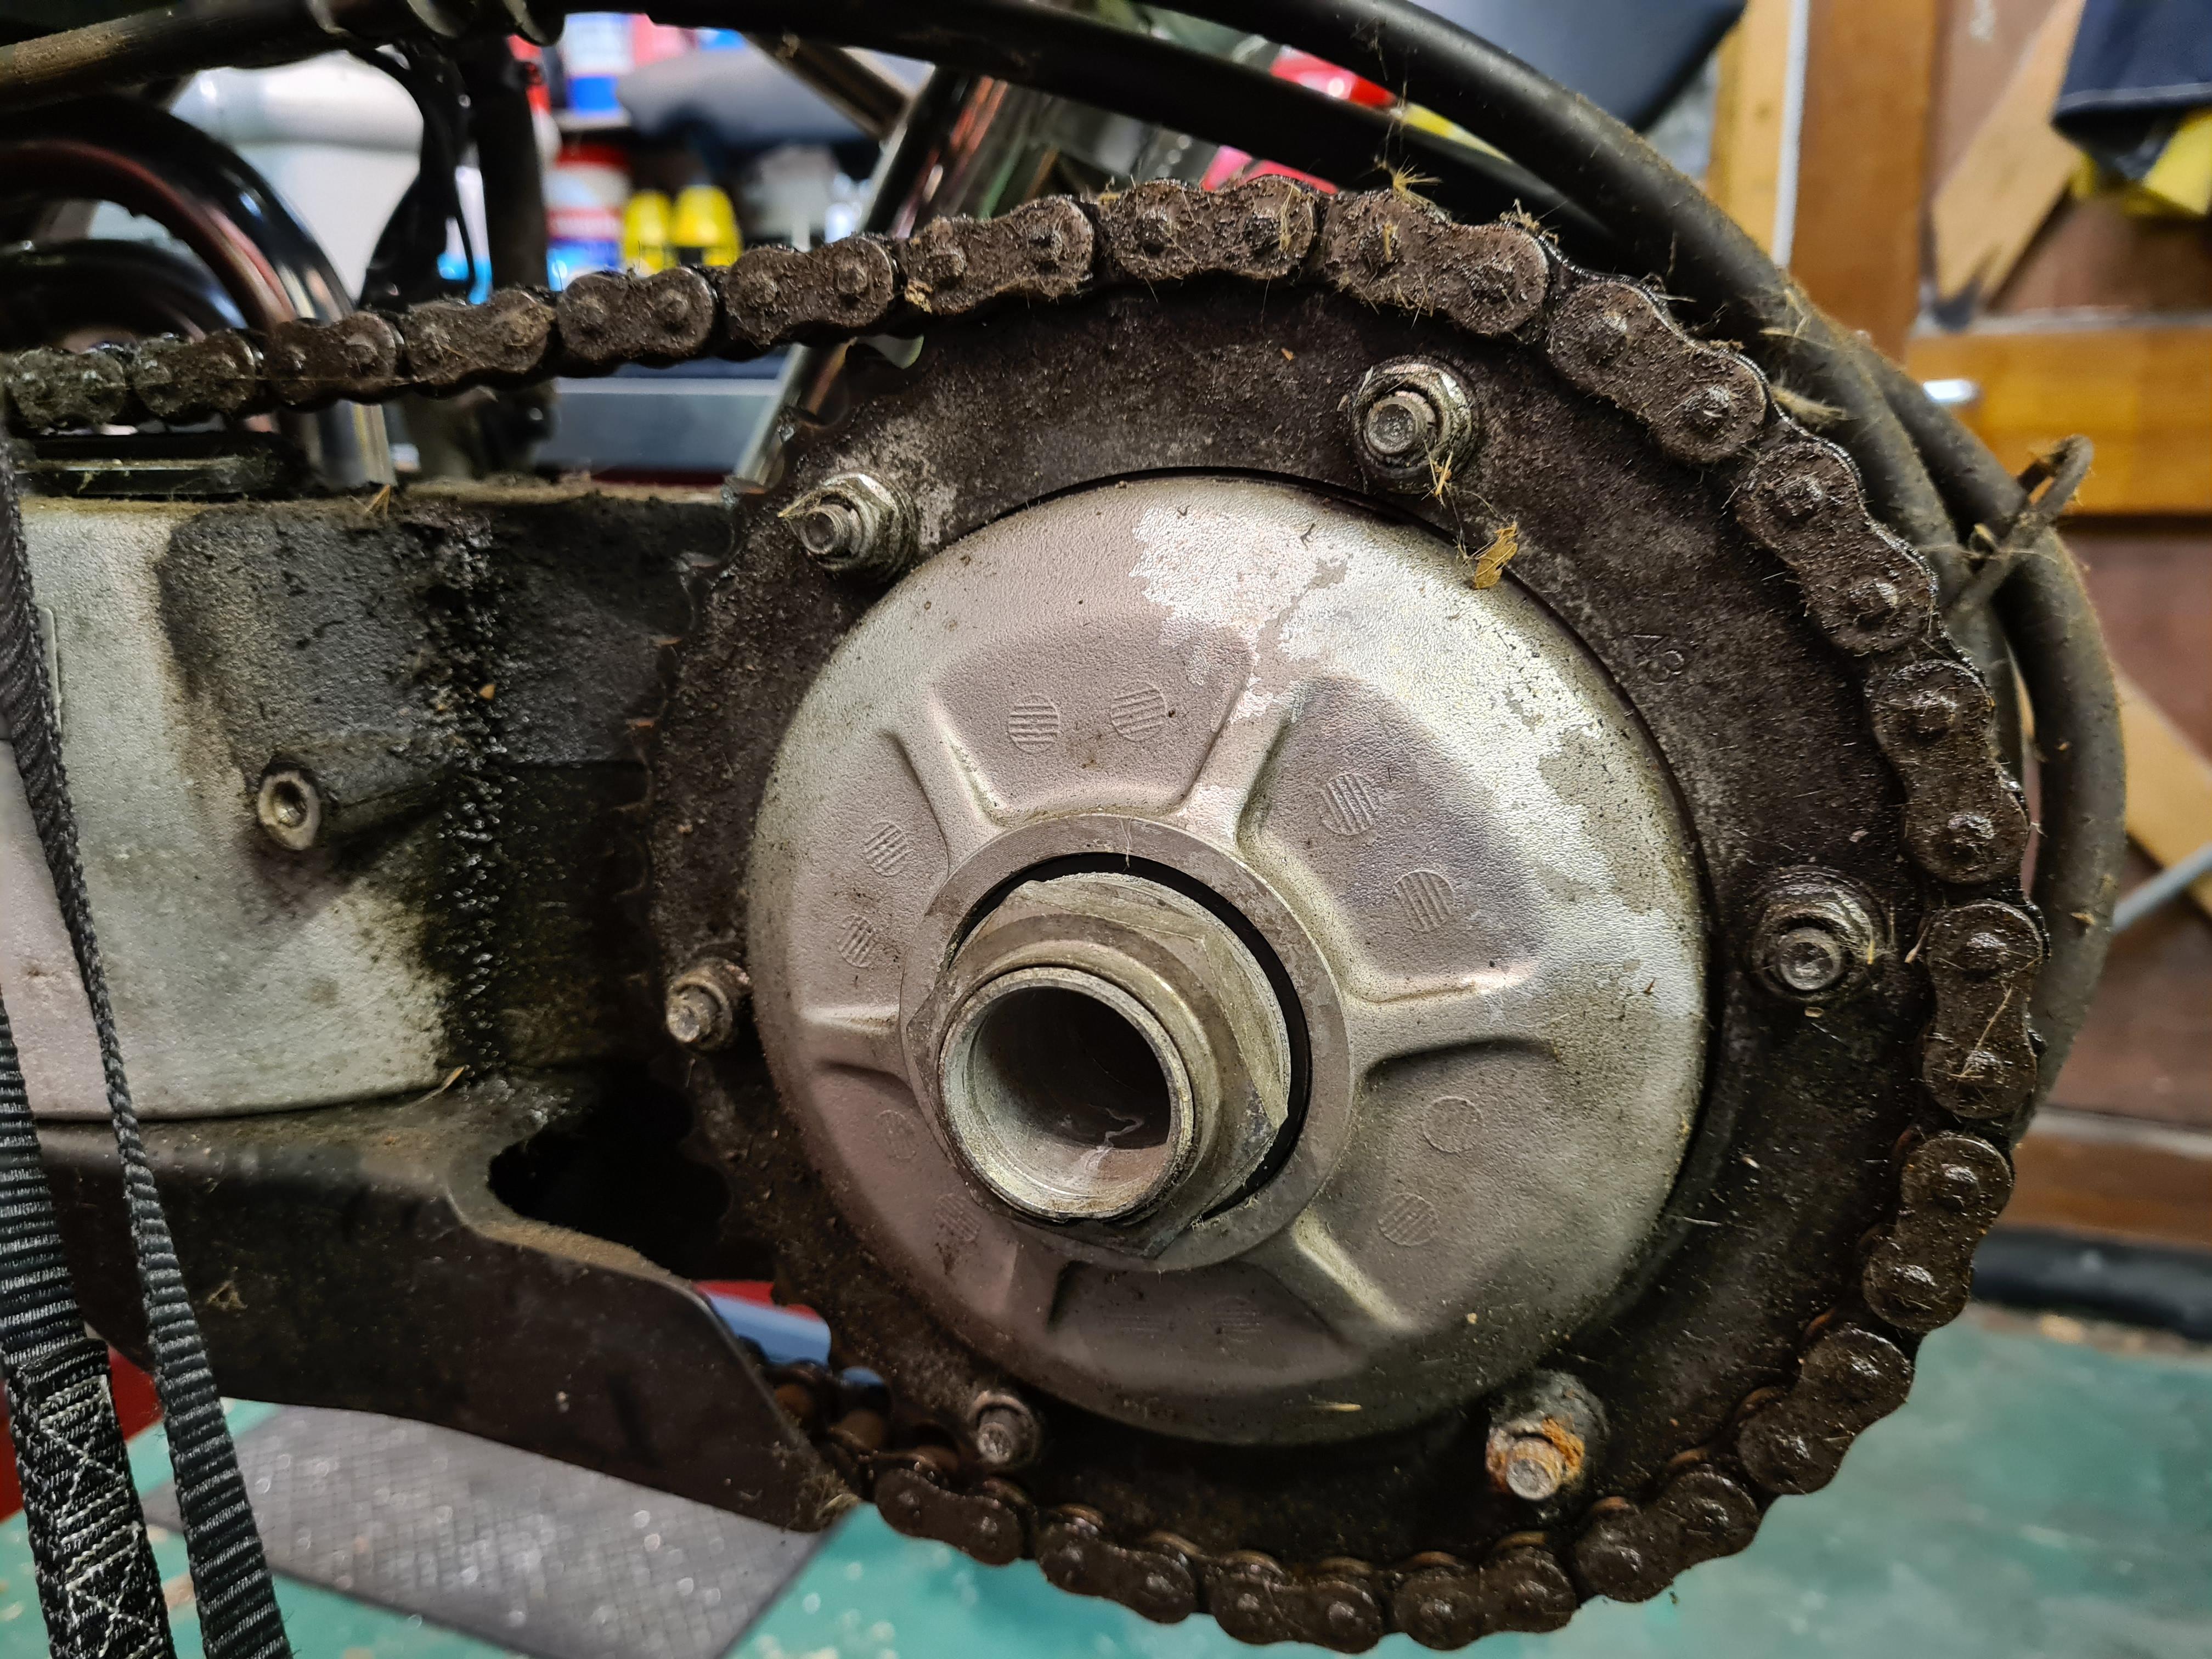
Mmmmm. I do love cleaning years-old chain spooge...
Wish me luck!
Ciao,
JZH
-
 10
10
-
On 12/21/2023 at 2:47 PM, Dutchy said:
The money shot
It's not looking very wintery over there, is it?
(I'm in London at the moment, where it is also not very cold.)
Ciao,
JZH
-
10mm, I suspect (unless Seb's some kinda Imperialist).
-
 1
1
-
-
Some kind of bot.
Deutsch connectors are commonly used in high-performance automotive applications, as they're sealed, can handle high current and are reliable. But also expensive, as are the special tools you need to crimp the terminals onto the cables and the special Raychem boots used to seal them into a sealed wiring harness. I will be using them in my Hiace V8 conversion, but only for the part of the wiring loom which is attached to the engine and transmission (everything else will use OEM-type connectors from Sumitomo, Yazaki, etc.)
IMHO, using Deutsch connectors on a bike would be overkill and needlessly expensive.
Ciao,
JZH
-
On 11/27/2023 at 10:15 PM, Pennywise said:
I have no Idea how they removed the decals but it looks great imo, the fairings still have a tiny bit of purple sparkle, the tank has a lot more sparkle, but I think I need to practice my polishing a little more to make the fairings match the tank a little more. I did caught a few tiny rust spots where the paint chipped because of stones I think.
If it's not a re-spray, then it is probably colour code RP-147P, Pearl rasberry black (a Euro-spec 1994 colour). As Captain mentioned, there should be a white sticker under the seat with the paint code. The paint code can also be found under the number plate on the rear fender, though that label is often missing. Looks great anyway!
Ciao,
JZH
-
21 hours ago, bmart said:
That looks so much better than stock! Nice work.
The 4th gen was available in a pearl black in 1994, and a metallic black in 1995 (albeit not in the USA), but I note the absence of decals on the bodywork. Could have been removed?
Ciao,
JZH
-
On 11/13/2023 at 5:55 PM, fastbroshi said:
My current plan, if the VF500 version isn't viable, is to break off the remaining filter plastic, leaving just the base. This appears that it will still seal when seated properly with a new o-ring. I'm going to take some stainless pipes and cut them to length to mimic the height of the plastic filter's cylinders. Cut windows in them and cover with stainless mesh, epoxy in place. Mate the pipes to the plastic base with epoxy, being careful to not mount too deep and keeping total height in mind. Cap the pipes with stainless plugs.
You wouldn't need to make any tubes--just a filter/strainer. Your US-spec setup only uses the RES and OFF positions on the petcock, so why wouldn't you want the pick-up point to be as low as possible in the tank?
I have rebuilt these petcocks before. Good luck.
Ciao,
JZH
-
7 hours ago, vfrcapn said:
I have a new 8th gen set for sale in the classifieds. 10% goes back to VFRD.
On the VERY off-chance someone in the UK or EU wants a 5th-gen version, I have an unfitted one I just received from the most recent production run, and I would be happy to swap it for an 8th-gen version (to facilitate a center radiator).
Cheers,
JZH
-
1
-
-
The petcock is interesting. I'm not 100% sure about the 4th gens, but Honda used the same petcock on all 3rd gens, whether they had the US-style "no reserve" or the ROW's remote reserve switch (but no low fuel light). (The "MT4" on the strainer tube suggests that the part is the same across all 3rd and 4th gens, however.) The difference at the petcock was in the knob used: the US-spec knob goes from OFF to ON, with RES being blocked.
The difference between ON and RES is simply which inlet is directed to the petcock's output. But that only works when the OEM fuel strainer tubes are fitted, which make the ON inlet effectively a couple of inches higher than the RES inlet within the fuel tank. So, on non-US-Spec bikes, when the switch is ON and the fuel level drops to the level of the ON inlet on the strainer tube, the engine sputters--prompting the rider to turn the switch to RES (ideally in one swift move without breaking stride)--which then allows the RES inlet at the bottom of the tank feed the remaining fuel in the tank to the carbs.
US-spec bikes only use one of the inlets (the RES, which is the lower one), which means that if your OEM fuel strainer tube falls to bits all you really need to do is fit a strainer/mesh to the RES inlet on the petcock and you'll have "full US-spec" functionality again. Or don't fit anything and rely on your fuel filter? (Not what I would suggest!)
However, the petcock itself might be past its prime, but it can be rebuilt using common o-rings. Drill out the two rivets and tap the holes for M4 (I think it was--whatever is smallest that allows threads to be tapped). NRP in the UK sells dedicated rebuild kits, but any o-rings (which fit) can be used in a pinch. Unlike earlier petcocks which use special-sized seals, this model only uses round ones. With some trial and error, and a good selection of fuel-resistant o-rings in different sizes, you can rebuild these petcocks to again function perfectly.
Ciao,
JZH
-
 1
1
-
-
On 10/25/2023 at 7:57 PM, Mohawk said:
Heated clothing & gloves is so much better than heated grips. Different ethos, grips are great for slighty cooler than you expected rides.
But heated clothing is the thing for proper cold riding. I used to use it commuting on those winter dry days so no ice but very cold less than zero C temps @ 90mph I had to turn the heat down ! 😳
I haven't ridden in winter in years, but when I was commuting into London I found that even with some nice OEM Honda heated grips and ST1300 controller (purchased separately, by individual part number, seemed to be the cheapest option at the time), because I usually had to cover the brake and clutch levers riding through traffic, my palms would be fine but my fingers frozen!
That's when I switched to heated gloves and never looked back (heated glove liners would also do the same thing, assuming there's enough room in your gloves to accommodate the liners and your hands). My last set of leather heated gloves were Tucano Urbano Hot Road, IIRC. No longer made.
One thing to look out for with heated grips is the wire to the throttle side has to move, of course, so it can short or break (with is usually irreparable). Careful routing and looping could help alleviate this, but that kind of constant movement isn't going to be good for the wires for ever.
Ciao,
JZH
-
That may or may not be something.
My first thought, when you said the bike had sat for a while and wouldn't run, was clogged injectors. When I was building the Yellow Peril I had the OEM injectors professionally cleaned, but when I tried to start the engine I only had one or two cylinders firing. After a suitably long hair-pulling session I think I followed someone's advice on here and started tapping on the injectors with the engine running, and sure enough, they all came un-stuck and the engine began to run like a VFR engine should. Wooden mallet or stick. Give it a try.
Ciao,
JZH
-
OEM Honda parts are available everywhere, if you know the part number... The regular dealer network might only be "plugged in" to the local distributor, but secondary market OEM parts dealers like CMS in NL can often obtain parts directly from Japan or from the US distribution network. And some US dealer also ship internationally.
Finding part numbers is a matter of finding the correct part catalogue/microfiche for the model you're looking to buy parts for. So for US-market parts, find the online parts catalogue at a US Honda dealer. Should be on the fairings page. Then pop the part number into the online catalogues for CMS, bike-parts.fr and maybe David Silver Spares (are they still around?)
Ciao,
JZH
-
1
-
-
By the way, I'm not sure about Aussie models, but UK and the other European models do not interrupt the headlight circuit when the started button is pressed. They expect riders to have the headlight switch in the OFF position when starting the bike. US models, with their always-on headlights, do not have headlight switches. The starter switches in the different models are, therefore, also different.
Ciao,
JZH
-
Damn. I didn't get to meet him, but I bought some SP1 forks from him five years ago. He was a stand-up guy. My sincere condolences to his family and friends.
Ciao,
JZH
-
1
-
-
To save some dough, you can basically buy a used tool kit from any Honda off eBay, and most of the tools will be the same (you can check the parts fiche in advance if you want). Then you only have to buy the ones that are missing from Honda.
(Better yet, buy some good quality tools instead of the "HONDA" marked cheapies...might actually work out cheaper!)
Ciao,
JZH
-
Very interesting, thanks.
Ciao,
JZH
-
Someday, I will find a way to get a 3d scanner... I wonder if they're available for rent? If I had one, I would be happy to scan my NOS sidestand cover...
Ciao,
JZH
-
On 9/9/2023 at 9:30 PM, Bluehawk said:
So, went back today for the 'ordered Honda front beariings' and another cockup by the parts people!!!
Koyo bearings arrived not genuine honda, but came with honda seals.
Whilst they were debating/arguing among themselves....one mech i spoke to said he 'often' opens Honda packets and Koyo parts are included, as tho Honda recommend/approve these people. Koyo have been making heavy industrial bearings since 1912 in Japan. Anyway the seals were genuine honda and the price of 38 of my British pounds worked out the same in the end (free labour).
Sorry, but I had to chuckle at this!
Honda doesn't make bearings (or many of the other parts they use on their bikes and then sell as replacements), so you will never find a bearing with the name "Honda" on it. On the box or packaging, sure--that's why there's an OEM markup of 50-100%...
KOYO is one of Honda's OEM suppliers, so the quality will be on-par with any of the world's major bearing manufacturers. Moreover, most (but not all) of the bearings and seals Honda uses are standard automotive sizes and configurations, so once you decipher the codes, you can shop around and fit bearings from your favourite manufacturer. Years ago I saved a large chunk of money by replacing the bearings in my 3rd gen with new ones sourced from various suppliers and manufacturers. Only a few of them were available at a reasonable price via the Honda distribution system. The table below is from 2005, so a few years out of date (!), but it will give you the idea...
Honda VFR750F-P—Chassis Bearings and Seals
(Based on 1993 U.K.-model w/1998 VTR1000F fork conversion. Read the Notes below. Use at your own risk!)
Description
Type
#
Honda Part Number
Original ID numbers
ID
OD
W
Comments
Source
Price each
swing-arm main bearing—left
needle roller
1
91071-MR7-003
HMK 2830 Japan UU NTN
28
37
30
caged rollers, no integrated dust seals
City
DSS
ACB
£11.61
£9.08
£7.00
swing-arm dust seal—left
1
91202-MR7-003
SDO 28 37 4 A2 ACS
28
37
4
City
DSS
ACB
£2.20
£2.85
£2.50
swing-arm main bearing—right
radial ball
2
91072-MR7-003
6904 Japan WS NTN
20
37
9
no integrated dust seals
City
DSS
ACB
£4.20
£7.74
£5.85
swing-arm dust seal—right
1
91214-MR7-003
SDO 26 37 5 A5 ACS
26
37
5
(26 37 7 supplied by City-might fit)
City
DSS
ACB
£2.20
£2.85
£4.20
swing-arm pivot collar B
inner race
1
52106-MR7-000
N/A
DSS
£13.06
suspension linkage bearing (at swing-arm)
needle roller
1
91071-KV3-005
BHM 1725 Japan Koyo
17
24
25
no cage for rollers, no integrated dust seals
DSS
£11.51
suspension linkage bearing (in shock connecting rod & shock arm)
needle roller
4
91072-MJ0-003
7E-HMK 1725 Japan WS NTN
17
24
25
caged rollers, no integrated dust seals
A&P
DSS
ACB
£8.50
£8.87
£6.50
suspension linkage bearing (at shock absorber)
needle roller
1
91072-KT7-003
7W-HMK 1720 NTN
17
24
20
caged rollers, no integrated dust seals
A&P
DSS
ACB
£8.50
£8.88
£
suspension linkage oil seal
8
91262-MG7-005
NOK AE8444H
17
27
5
A&P
DSS
ACB
£1.87
£2.06
£
suspension pivot collar (shock connecting rod)
inner race
1
52462-ML7-000
N/A
17
DSS
£8.82
suspension pivot collar (shock arm—at shock absorber)
inner race
1
52477-KT7-000
N/A
17
DSS
£5.08
suspension pivot collar (shock arm—at swing arm)
inner race
1
52463-KV3-000
N/A
17
DSS
£5.51
suspension pivot collar (shock connecting rod)
inner race
1
52463-MT4-000
N/A
17
DSS
£7.32
wheel bearing—front
radial ball
2
91054-MN8-741
6004
20
42
12
integrated black dust seals on both sides
DSS
ACB
£11.00£5.50
wheel bearing dust seal—front
2
91257-KA3-711
AE1544F NOK
28
42
8
DSS
ACB
£3.80
£2.00
sprocket carrier bearing
radial ball
1
91061-MT4-003
DF 0768 LU Japan NTN
35
55
20
integrated (red) dust seals on both sides
City-5wk
DSS
DSS-wait
ACB-3wk
£25.20
£50.22£37.64£16.40
sprocket carrier dust seal
1
91258-ML7-003
SDO 45 55 5 ACS
45
55
5
DSS
£3.90
sprocket carrier o-ring
1
91352-MN8-003
N/A
2
City
DSS
£0.42
£0.82
rear hub bearing—right
needle roller
1
91062-MR7-003
8Q-NK 50x62x25-1 Japan WS NTN
50
62
25
caged rollers, integrated black dust seal on one side
A&P
DSS-wait
DSS
£10.69£30.82£41.09
rear hub bearing dust seal
1
91284-MR7-003
SDO 50 62 5 ACS B8
50
62
5
City
DSS
£2.38
£4.75
rear hub bearing—left
radial ball
2
91061-ML0-731
6908RS Japan Koyo
40
62
12
integrated black dust seal on one side – plus plastic linking ring to lock both bearings together (leaving single black seals facing outwards on each side)
City
DSS
DSS-wait
ACB
£33.22£50.22£37.67£14.40
steering stem bearing—upper
angular contact ball
(1)
91015-KT8-005
32005X Japan MCI
26
47
15
(note ID—must be 26mm)
ACB
£8.40
steering stem bearing—upper
tapered roller
(1)
91015-425-832
N/A
26
47
15
(note ID—must be 26mm)
DSS
steering stem bearing dust seal—upper
1
53214-KA4-701
N/A
27
48
4
metal ring with rubber edge
DSS
£2.47
steering stem bearing—lower
angular contact ball
(1)
91016-KT8-005
32006JR Japan MCI
30
55
17
DSS
steering stem bearing—lower
tapered roller
(1)
91016-371-000
N/A
30
55
17
(32006JRRS— has integral dust seal)
Moore
£13.20
steering stem bearing dust seal—lower
(1)
53214-371-010
N/A
31
56
4
metal ring with rubber edge
DSS
£3.50
UK-based Sources Key:
ACB = A.C. Belting Ltd, 58 Kingsholm Road, Gloucester GL1 3BQ (01452) 410 968 (Jason)
A&P = Angus & Perthshire Bearings, Unit 62A, Buccaneer Way, Perth Airfield, Scone, Perthshire PH2 6PL (01738) 553 479
City = City Seals and Bearings Ltd, 23/25 Stevenson Road, Sheffield S9 3XG (0114) 243 5343 (Jason)
DSS = David Silver Spares, Unit 14, Masterlord Industrial Estate, Station Road, Leiston, Suffolk IP16 4JD (01728) 833 020
DSS-wait = Optional 2-3 week wait, resulting in a 25% discount.
Moore = Moore International, 104 Ashley Road, Parkstone, Poole, Dorset BH14 9BN (01202) 462 220
Notes:
Steering stem bearings were originally angular-contact ball bearings; it is common to replace with tapered roller bearings, though these are more difficult to adjust properly. Tapered rollers are available from many aftermarket sources, but also from Honda (note that these Honda part numbers have not been verified). Both types of steering stem bearings use separate metal/rubber dust seals; but the optional tapered roller 32006RS lower bearing incorporates a dust seal, so no separate seal is required.
The top bearing used on many Hondas (including the VFR750FL-P) is a non-standard size. Although it is often marked "32005", it is actually a 32005 (this is an ISO standard bearing number) with a 26mm I.D. rather than the 25mm I.D. you might expect. Needless to say, this means it won't fit onto the steering stem no matter how hard you hit it. <G> Some bearing manufacturers helpfully call this bearing "32005/26", but some do not!
Front wheel bearings are for a ’94-’97 FR-FV, since the VSource.org FP uses a front wheel from a later RC36.
Ciao,
JZH
-
1
-
1
-
-
On 9/17/2023 at 3:19 PM, Mohawk said:
I checked this block on mine & on opening it & removing the bridge pieces it all looked great. When checking the cables entering the block green corrosion was apparent. So I cut all the cables off the block & half a dozen had bad surface corrosion. So I stripped them back, cleaned up the individual strands with abrasive & intertwined & soldered all together then sealed with amalgamating over wrap. All my weird issues went away 👍 If you do this I would advise adding an additional thick ground wire to the bundle & run it direct to the battery negative terminal.
I did exactly the same on my yellow bike. However, having since gone down the "motorsports wiring" rabbit hole, instead of soldering I would bunch them all together and apply a massive brass crimp (maybe a Sealey 16mm2 or 25mm2 ring terminal with the ring part cut off), crimped using a Draper battery terminal crimping tool (the kind you slam with a sledge hammer), followed by adhesive-lined heat shrink with the end pinched off. The ground wire can be used with that method as well.
Ciao,
JZH
-
1
-
-
On 9/17/2023 at 3:12 PM, Mohawk said:
I'd just say to anyone out there with a 5th Gen to check the fairing below the headlight. There is a small infill panel that pops out to allow the parking bulb to be changed. It also pops out accidentally & then lets rain & spray in that corrodes the tracks on the dash circuit board. Just tape it up if you don't have the infill, its not visible so most people don't know its there ! ☹️
Aka, the "dropped bike indicator"...

Ciao,
JZH
-
Where did you get them?
Cheers,
JZH
-
Eastern Beaver (in Japan) probably has them, plus Kojaycat in the UK and possibly Corsa-Technic in the USA. The electronics majors sometimes have relevant connectors and terminals (and if they do, they're potentially a lot cheaper), but they frequently do not stock the automotive speciality ones.
Ciao,
JZH
-
Good tip, re bicyclist tools.
"It’s also important that you prepare the relevant component you’re fitting. It’s always worth adding a lower-strength threadlock or an anti-seize to prevent a bolt from loosening over time, but it also allows you to tighten the bolt up to a lower torque. You should always have suitable threadlock or anti-seize on any bolts – never have them dry."
However, this^^ is potentially bad advice... Most torque specs are for "lightly lubricated" fasteners. True, they are not "dry", but neither are they the same as for threads slathered in anti-seize or thread lock. Because torque wrenches read drag, any time you decrease drag by making the threads slippery you affect the torque setting. Beware that you cannot use the OEM torque reading "as is" if you change something which increases thread lubrication. It is therefore recommended that the torque setting be reduced 25% - 50% if you lubricate threads where the OEM torque spec does not call for any special lubrication. (YMMV.)
Ciao,
JZH
-
3
-
-
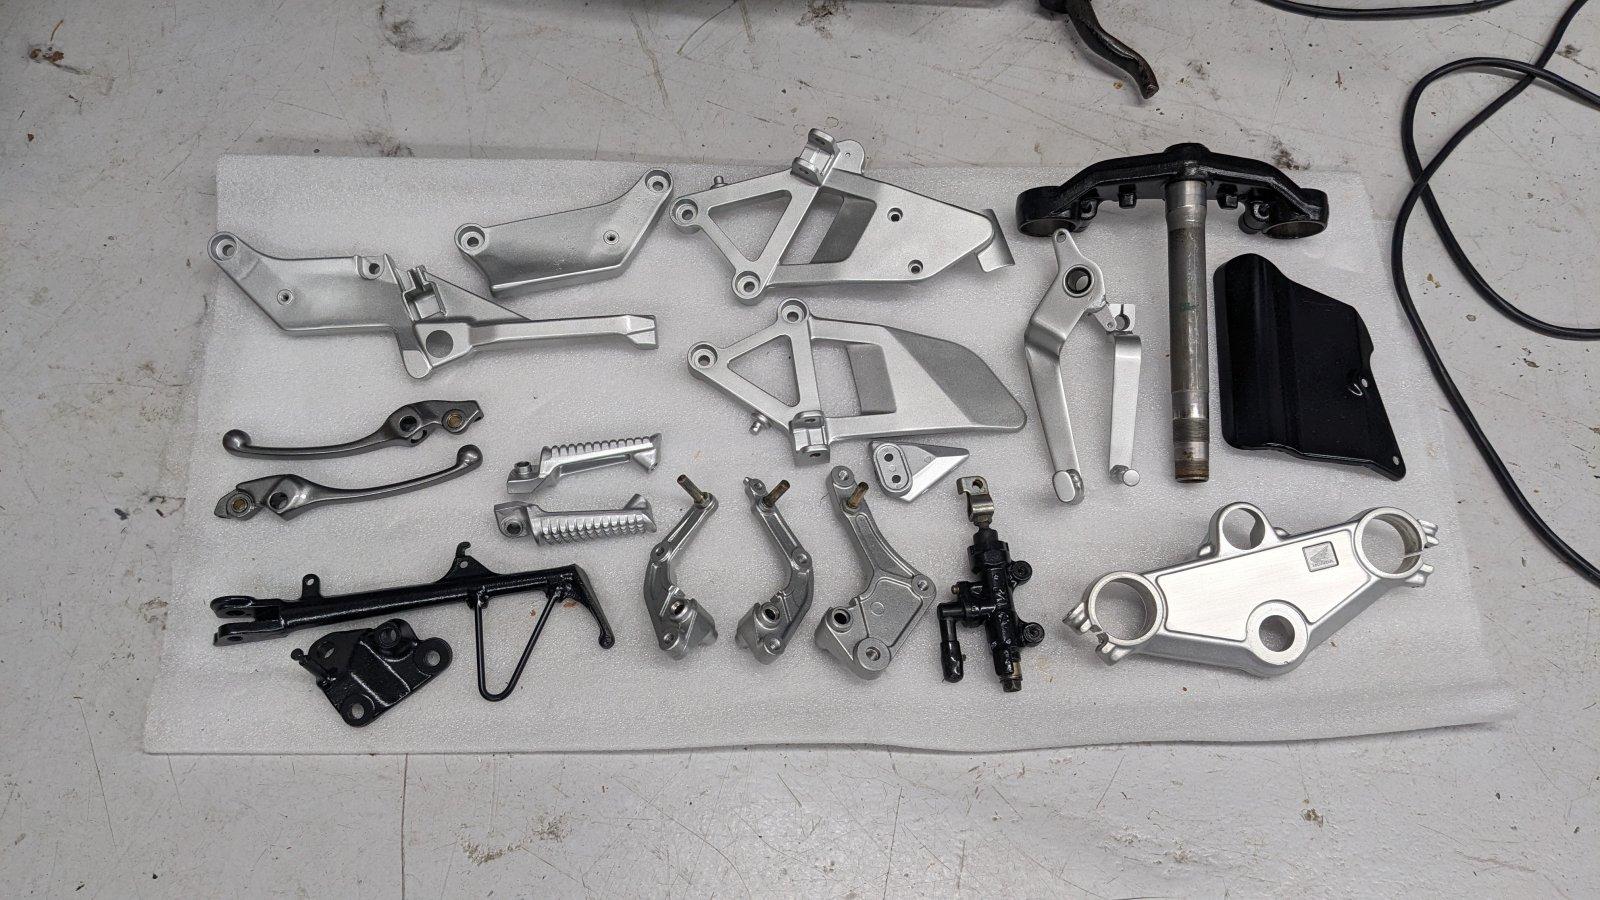
On 8/18/2023 at 2:53 AM, Captain 80s said:
Here's some of the small items that were restored...
Very interesting what you've done with the rear passenger footpeg brackets. It's great to see that they can be re-shaped in a way that looks like they could have come that way from Hamamatsu. FWIW, I believe I just deleted those brackets entirely on my FL/FP, foregoing the side handle and helmet lock, and using a separate (hidden) remote-release for the seat latch. (I believe because it's been five years since I last worked on it, unfortunately!) Because it's been so long, I'm not sure what I had planned to do with the front rear cowl bolts--maybe just put the bolts back in, backed by a fender washer and locknut? I don't think those bolts are necessary to hold the rear cowl on.
Ciao,
JZH
-
1
-
The Cure for the Wintertime Blues
in Modifications
Posted
Oops...
Anyway, thanks for the words of encouragement. At this point, the idea is simply to end up with a pile of OEM parts on the floor. Later, who knows?
I'm planning on moving all my US stuff to Europe next year (including the yellow bike), so once I have it back in my possession, why not take some measurements of those A&A supercharger parts?
JZH