
JeffInFranklinTN
-
Posts
254 -
Joined
-
Last visited
-
Days Won
2
Content Type
Forums
Profiles
Gallery
Blogs
Downloads
Events
Everything posted by JeffInFranklinTN
-
Got another 2.1 amp usb power port from www.3brpowersports.com to install in the left side of the fairing. (dash board) Like the one I installed on the right side which is always hot, this one will be only have power when the ignition switch is turned on via the tail light circuit. At this point I already have the usb port installed in the "dash" and have all the plastics removed for the wiring and relay install. Here I have removed the ecu from it's cover. Makes it easier to maneuver the harness. Pulled (gently) the rear part of the harness out from under the seat support so you can get to the wires much easier. Very carefully slice the electrical tape and remove exposing the wires. The tail light circuit is the brown with blue stripe. The section I opened up you should find some extra amount of that wire. The next few pics shows the installation of a posi-tap and has to be installed in this order. Similar to a piercing valve. No cutting of the original factory wiring I used a brown 16 gauge wire to serve as the power supply that activates the relay. There are instructions that come with kit on how to install the posi-tap. Then tape it up to further prevent moisture getting in. Then tape the harness back up. This is where I put the grounds for the relay and the usb port. The ground wire from the relay is a 12 gauge wire. Nothing wrong with a little overkill on ground wires. While you have this disconnected clean the ground connector and the frame with some emery cloth You will need a lot of zip ties. :) Some you will have to cut off and redo like I did. I also taped over the wires I installed just for added protection. I ran the wire from the tail light circuit under the rear seat support with zip ties. Also run that wire on the bottom side of the rear tail frame rail so it's not in the way of the seat. Perfect spot for a relay. I did have to drill out the hole on the relay mounting tab for the bolt to fit. From the battery I also used a 12 gauge wire. (I may want to ad something else to the relay one day) It is critical that the factory ground tab touches the frame first. All other connections on top. (ground wire from the relay and the ground wire for the usb port) This is the ground wires for the relay and usb port and also the power supply for the usb port all taped and zip tied to the rail. 12 gauge wire going to the relay. This is the power the relay will send to the usb port when the relay is energized. This is the "tap" for connecting a battery tender or heated gear. Location for the fuse to the usb port. Nice and neat. Last pic of the usb port....finished!! There is no noticeable power drain on the tail lights.
-
- 1
-

-
- switched power
- relay
- (and 1 more)
-
That's what I needed to know. Thank folks. Jeffrey
-
How much amperage does a relay use?
-
Isn't there an extra spare 10 amp wire on this wiring harness that I can tap into? One that has power only when the ignition switch is on? I have an 98-99 Honda repair manual. I don't see a "spare" wire listed anywhere in the wiring diagram. HELP. The 80's model Hondas had a brown "spare" wire usually located in the head light bucket or in that vicinity.
-
Thanks Bailey. I'm quite happy with the 3BR products. The real pita with this mod is pulling the fairings off. I still have more goodies to buy yet. GPS, waterproof case for the GPS and a waterproof case for the Droid Charge. OMG!! I can't believe plastic costs so much. Ridiculous. For now my phone and the Navigon app will suffice. Time to go pull the fairings off....again....
-
I agree with you. After some further reading in the installation guide they claim it can drain a small motorcycle battery in 3 to 5 days. What do they consider a small motorcycle battery? I will leave it as is and see how it goes. I did however (just now) order a few waterproof rocker switches. I do have a battery tender but will leave it off just to see.
-
You would be correct. I overlooked that. Looks like I'll be installing a switch for the one connected to the battery. Thanks for posting this info. Jeff
-
Blue Ridge Motorcycle Campground. NC 276 south of Wanyesville, NC.
-
Looks like this "waterproof usb port" was an excellent choice. With the other temporary port I had mounted on the mirror my phone would act like it was plugged into a laptop or PC. Like it was going into a data sync mode. (a lower voltage) With the new usb port it no longer does that. I have been testing it using the "Navigon" app while riding. It remains fully charged and also a big plus the phone (battery) does not get hot like it did with the other charger. Just recieved the other "panel tapp" in the mail today. I'll install that tomorrow night. I want to put this one on a keyed power source. Both of these usb ports have a 7.5 amp inline fuse. Any suggestions of what keyed wire/source I should use? Thanks folks, Jeff
-
Ordered two of these...http://www.monoprice.com/products/product.asp?c_id=103&cp_id=10303&cs_id=1030307&p_id=5137&seq=1&format=2 A great website for audio-video, pc, smart phone cables and chargers. CHEAP!! http://www.monoprice.com/
-

From the album: 2000 VFR Interceptor
-

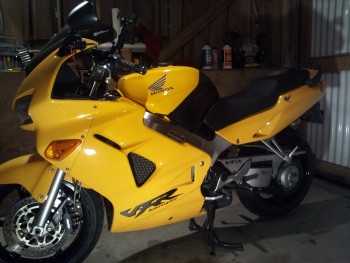
From the album: 2000 VFR Interceptor
After I purchased this bike a friend told me I was gonna love it....he was right. -
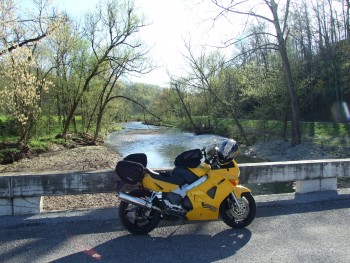
From the album: 2000 VFR Interceptor
S. Lick Creek Road near Franklin, TN. -
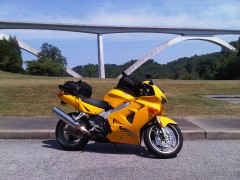 I know this bridge all too well. Nice looking YELLOW Viffer!!
 -
I looked into the Powerlets. They damn sure are proud of their chit. With theirs you have to buy extra "ports" to connect to the power outlet for whatever connection type your device is. Which gets even more exspensive. (if that makes sense) The thing that also made me decide on 3BR was that I found a " local dealer" for the Powerlet products which happens to be a Yamaha dealer. So I went there to have a hands on look to see exactly what I would need. Well turns out they are deginitely a dealer but have NOTHING on display for you to look at. The dealer would still have to order from the Powerlet website....I looked at the counter guy, Chase is his name who also works at the HONDA dealer right next door, and said to him..."Well that's kinda stupid don't ya think?" he said, "Yes it is." and I said "Have a good day Chase." If you have a Garmin they sell a USB connector for the Garmin that has the waterproof boot built onto the wire. (fits over the port like the one pictured when it's not in use) OR you can buy a kit like the one also pictured in this thread and use your own usb cord.....but once you do that you will not be able to plug that usb cord into a pc or laptop. Another reason I want a permanent USB power source is I have a Scala Rider Q2 system (bought used) You can blue tooth to a smart phone and or a GPS so you can besides talking to other riders, talk on the phone or hear the turn by turn commands from your gps. A USB charging port is a must have.
-
I think it would charge the phone, but I also think if you were to use the apps on the phone while it's on the charger it would still slowly drain the battery while plugged into a 1 amp port. Some apps consume more power than other apps too. There is an app called Navigon. It is a Garmin based gps program you can use on Android phones. (I believe Iphones also) That app will use a lot of power quickly.
-
Now that I know this location will work, I'm going to put one on the left side as well but that one I think I'll have it connected to a wire that has power only when the ignition switch is on. That way if and when I'm out on a ride and time to stop for lunch I can have power to charge a camera battery while eating and not have the gps draining the battery as well. With this usb port you will have the max power your phone or gps needs to charge. For example..If I'm using the "Navigation" feature on my phone Android, the temporary usb port I had setup wouldn't allow enough voltage to keep the battery fully charged. The battery in the phone would slowly discharge while plugged into the charger. Kinda dumb aint it? Jeff Oh...and I wanted a product made in the U.S.A.
-
Slowly but surely I am getting my VFR set up for waterproof USB power supplies. I got one installed tonite. A company called http://3brpowersports.com/products.php has got just what I want but just like everything these days....they proud of their chit. I removed all the fairings plus I removed the headlight composite from the upper fairing so I could have some access to measure for the clearance needed for the connector in the location I picked. They call this the "Panel Tapp" Splash proof usb power port... Using a 7/8" "boring bit" I drilled a hole and installed the port. Here with the upper fairing installed without the headlight composite you can see it does clear. From the battery I wrapped this spot with a triple layer of electrical tape for added protection against chafing. Along the frame rail on the left side I zipped tied the wire to the linked brake lines. ..and then around the head stem. I taped this connector to further help prevent any possible corrosion. I used red tape because I ran out of black. They also have available "Tapp Capp" USB cable seal kit. You can use your own usb cable and put this waterproof seal on it. They also have some pre-fabbed sealed cables also but remember I said they're proud of their chit? Not actually going to use this cable but here's a pic to give you an idea.
-
 Yep that sure is. If you ever fly U.S. Air out of Charlotte, NC., this man just might be your co-pilot.
 -
That looks like Tim Hartney???
-
From the album: 2000 VFR Interceptor
As per.... http://pages.cs.wisc.edu/~john/vfr/specs/98-00-vfr800f.html Max. HP 108 hp @ 10,500 RPM Torque 61 ft*lb @ 8500 RPM Bore and Stroke 72 mm x 48 mm Compression Ratio 11.6 : 1 Engine Displacement 781 cc Size 210 cm (82.7 in) (L) 73.5 cm (28.9 in) (W) 119 cm (46.9 in) (H) Wheelbase 1440 mm (56.7 in) Seat Height 805 mm (31.7 in) Dry Weight 208 kg (458.6 lb) 210 kg (463 lb) (Calif. model) Front Wheel 120/70-Z17 Rear wheel 180/55-V17 List Price (new) $9499-9999 US