BonusVFR
-
Posts
2,104 -
Joined
-
Last visited
-
Days Won
7
Content Type
Forums
Profiles
Gallery
Blogs
Downloads
Events
Everything posted by BonusVFR
-
 Always Special!
 -
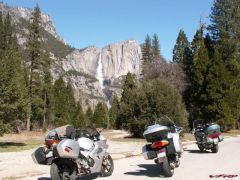
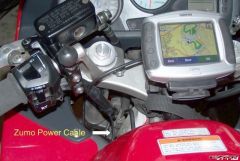
Final Zumo Install I purchased and installed another Zumo Power Cord and wired it to my previously described switched Bluesea fuse box. The rationale for the relay controlled input to the Zumo was that I did not want to have permanent power to the Garmin MC cradle. In this shot, I do not have the Zumo leads on the fuse box yet. I ran the power cord up the left side of the bike between the seam of the frame and tank. I rigged the cord so that I could use the Zumo on the left grip housing or the tank RAM mounts. I wanted the option as I may need the flexibility based on the gizmos I strap on. I ensured that I had enough cable for at least the Std/Med RAM arm which is needed to clear my tank bag be it on the left or tank RAM mount. Please note that the short RAM arm is included in the Zumo package. Alternatively I found another power cord option from Powerlet, which would work well with my BMW style Powerlet power plug in my stem. I prefer to keep my Powerlet free for other useless doodads. I also tried out the long RAM arm on the center tank mount, which brings the Zumo up a couple of inches and is easier to see at a glance. This is probably how I will run my Zumo. The long arm provides this view from the cockpit (helmet/rider view), when a tank bag is fitted. N.B. I am sitting on my new Sargent courtesy of the VFRD. Thanks again. :thumbsup: I fit the tank bag on all of my long trips and you need at least the Std RAM Arm to clear the bag. For the moment, I will use my 3.5 mm IMC headset or earbuds for my Navigation prompts, MP3 tunes and cell phone input. Downstream, I may rig a transmit capability for my cell but it is not a priority on the VFR. I already have that functionality on the Wing.
-
-
-
From the album: Misc VFR
-
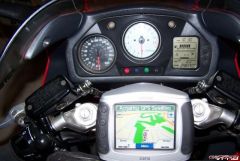
I finally got a chance to really see how the gas gauge works on another trip to Julian on Friday. Some of the screen shots I took to illustrate how it works were not in sequence as I could not push all the screen shot buttons at the time to make the point. And I was experimenting. At first blush the gauge seems kind of redundant on a VFR or for that matter a Wing but……..on a trip this could be very useful. First step is to make sure you reset your mileage functions on the fill up and ensure that the Tank range or “Miles Per Tank†is set appropriately and your fuel gauge is zeroed out. Be conservative on Tank range as there is no actual tie in with what you are actually using here just a guesstimate. There is only one setting so if you have two bikes be careful. The fuel gauge only works when the Zumo is in the MC mount. Besides the fuel gauge with the below picture you can see that effectively you have two more odometer functions ie Fuel Odometer and miles since you reset you Zumo odometer. That makes four total on the bike with the two that come stock. You can see this screen anytime by touching the Speed reading on the lower left of the main Zumo screen. You can also see that my gauge is getting to the Red Zone on my fuel. But no warning yet. From the above screen you can reset: Odometer – I only reset this to log each day. Max Speed – Do you really want this recorded????? Trip Data – I will reset this prior to a long trip and ensure beforehand that I have downloaded tracks from previous trips. This data is what goes into Mapsource and Google Earth and can also be displayed as tracks on the Zumo. Do not reset this at a gas station or your multiday trip data will be lost. Fuel Gauge – This is what you reset when you fill up. Miles Per Tank – Again a one time conservative setting in miles on how far your bike will go on a tank. In this case I had mine set at 240 miles (Wing this time out). At EXACTLY 30 miles before your tank range you get an aural and a visual low fuel alarm . The alarm Your main Zumo Screen looks like this now. Note the Fuel Pump icon. You touch the Fuel Pump Icon and you get this. Is this great on the road or what. This is handy especially if you like one type of gas or you have a Mobile Speedpass thingamajig on your key ring which allows you to fill up without pulling out your credit card and wallet. You select your Gas Station. That phone number on the gas station could also mean that you could call on your BT phone/Zumo rig – why I will never know. Actually you could use a Zumo search and find this station if you had a puncture or whatever. Directions to selected Gas Station. The odometer page after the alarm has sounded. No change here except less gas. I think that this function is valuable and I will use it on my longer trips on unfamiliar terrain. :rolleyes: :thumbsup: What do you think?
-
-
I'd at least have turned it on. Paper maps are fine by me so far. For a long trip to unfamiliar turf, yeah then I might really want one. :thumbsup: I love the satellite images / maps. I've seen plenty on computers, and they're getting better all the time. But, Do they have those on handheld GPS now? That would be cool. Still not necessary though. I must be a cheapass. :goofy: He is young and probably likes his beer cold too. And maybe even this Got to give him credit for some of those pics though! Those maps seem to get him to the right places. I am frugal to say the least ........... and it takes me forever to pull the trigger. In this case my bride called Santa! I am a lucky guy and really it is fun to play with ---- the Zumo I mean. And of course the maps will be still here on the tankbag. :thumbsup:
-
:lol: :lol: And I was about to let you sponser a road trip in California for me, in exchange for pics from the 101!! :P Great little gadgets, those GPS's are. I had a Magellan unit that I took with me on my big trip, but I never even turned it on... just used directions I printed out from Yahoo maps... I have noticed that some of the younger folks on this board have problems with high technology stuff. :goofy: Maps I don't need no stinking maps! http://www.moviediva.com/MD_root/MDimages/badges.wav Lodging available at Casa BonusVFR. Here our house rules. I found these bad examples in somebody's album. Just remember you can not sit on your ass or smoke in California! <_< And none of this in the house. Look forward to the photos!
-
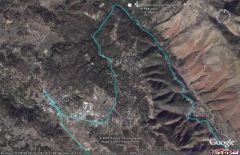
I will be playing with GE more. Thanks Rosso. :thumbsup: The track log on Google Earth using the auto export feature of Zumo/Mapsource is a fantastic way to document your trip. It is not perfect as there are errors in GPS, which occasionally locate you off the road. Incidentally tree cover does not seem to bother Zumo reception like many of the older GPS units. There is no break in the track despite this road literally being in the trees quite a bit. This is Banner Grade coming from the East to Julian, CA. By the way if you have not figured it out by the picture below, Banner is an incredible MC road. :rolleyes: If you blow this up or look closely you can see that had some bad corners (rhythm as the other Rossi fellow would say) and went over the cliff a few times. Edited to add - the jagged nature of the track is more evident in the corners as only a limited number of points are recorded so the track is drawn to connect the "dots". In this leg there were some recorded 670 points in about 55 miles.
-
From the album: Misc VFR
© ©vfdiscussion.com
-
Exactly just like my VFR. :wacko: The biggest return will be on my multi day trips in unfamiliar terrain. Took 3 long trips on the VFR last year and this works. Now think of the trip reports that this thing can generate. For instance here is is my log out of Borrego on Mapsource. Ok but just OK But when you auto load it into Mapsource and then Google Earth you get this - Now mind you it was probably before the recent rains when they shot this Satellite photo and the campground was a little greener and packed but you can really see where I was. I will not have to steal any more of Sebspeeds pictures for my trip reports.
-
Earlier I showed the track as it is shown on the Zumo. This is how the Zumo depicts your actual track (not planned route) as I left Agua Caliente on a back country road towards Borrego. As I said before you can leave this track on the Zumo if you like – maybe you are retracing your route for instance. Below is an example of what it looks like when you download the tracks (actually where you rode) from a trip to your PC. They load right into Mapsource and you can really dissect each trip. Here is the first leg of my return trip from Borrego to San Diego. The track record includes 46 points of information for the 2.6 miles from my camp site to the gas station in Borrego, which was my first stop. About 8 different pieces of info are collected for each point i.e. altitude, direction, coordinates, time, speed, etc. You could play with this for a long time to include making altitude profiles, avg speeds for legs and the list goes on. In the first picture the color of the unused roads is not very distinct from the background: 1. Is it possible to select other color combinations? 2. Have you found it difficult to see under any cirumstances? As far I can figure out there are no other possible color combinations. Although the colors chg at night. Not sure there is a way to upload different color combos from Mapsource but am not keen to do that just yet. You know the law of unintended consequences! Color Mode on this screenshot just switches from Day/Night or Auto mode. Brightness obviously makes things clearer and may help with the contrast to make the colors jump out a little more. You can also change the level of detail of the maps but this does not change the colors other than to hide some roads/names that would otherwise appear. Most of the screen shots of the Zumo in this post were taken with screen at the stock brightness settings and with the level of detail set at Normal. Normal detail is the middle setting. I find the screen adequate as regards my ability to see it. But in direct sunlight it does wash out a bit. As I said before, this was with the factory brightness settings. Subsequently, I have upped the brightness level. My slip-on sunglass may be factor too as the polarized lenses sometimes makes it seem as there is a sheen on the road and may appear to screw up my Zumo a touch too. I am looking at upgrading my sun glass technology. The bottom line is that the screen size and clarity work for me. I believe it is one of the best touch screens available. Some would argue that the Garmin marine unit (ie 276/376/378/478) screens without the touch capability are superior. Here is a screen comparison with a Winger favorite the iWay 500 (see Jon, a GPS aficionado, at goldwinggadgets.com), also a touch screen. Pretty close although the iWay is probably just too big for the VFR.
-
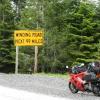
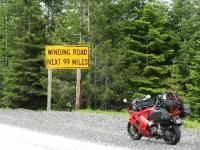
I could have used this Nav aid on my last trip looks like it is easy to fold the page so to speak. You have to rig an internal light for night use of course. Seems like, I have always been in a rut and stuck with the Mercator projection format. But now with the Zumo, I just feel like you could substitute the word “Maps†in this famous clip and pretty much say it all. Bogie would be proud in the Sierra Madre. http://www.moviediva.com/MD_root/MDimages/badges.wav :thumbsup: :beer:
-
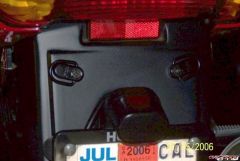
Wiring a switched auxiliary fuse block. I finally got around to the permanent setup as regards wiring the Zumo. As mentioned previously, I prefer not to wire appliances directly to the battery. I want my accessories to be switched. The basic reason is that I have a severe case of CRS, which ultimately leads to inter alia battery failure. For the VFR, my solution is another Garmin Power cord running to an auxiliary fuse block hooked to a relay triggered by my license plate light. But the first thing has to be the fuse block install. I choose the 6 pole Blue Sea Fuse terminal. They have been several “how to†posts on VFRD about this particular fuse block. Besides the Bluesea rig, I looked at aftermarket blocks from Electrical connection, Aerostich/Centech and your basic box sold by NAPA etc. I finally opted for the Bluesea because of its size, ruggedness, obvious marine/water suitability, an integrated negative bus and that both ATO or ATC blade fuses are acceptable. http://bluesea.com/category/5/21/products/5025 First, I mounted auxiliary fuse block from Bluesea. Note that I have both ATO and ATC fuses installed. Note I do not have any devices hooked into the fuse box here except my powerlet plug input which has its own fuse already and you can not really see here. The basic wiring instructions came from a website I was referred to. This is the best resource I have found to wire a relay and fuse box so that your accessories are switched. http://www.canyonchasers.net/shop/generic/relay.php A picture is worth a thousand words particularly mine so here is the critical wiring diagram. http://www.canyonchasers.net/shop/generic/...agram-final.jpg To collect the miscellaneous 14 & 18 gauge wire and connectors, I shopped at Aerostich and auto parts stores but later I found out you can get everything you need at Walmart and less expensively too. The wiring diagram calls for a 4 pole Relay but Aerostich sent me a 5 pole. Their tech support said don’t sweat it and ignore the center pole 87A. Pray tell what the other pole does. Probably another manual switch function or something. http://www.aerostich.com/catalog/US/12V-40...ay-p-18316.html This relay is pretty small which allowed it to fit nicely on the right side of the bike tucked underneath the sub frame. There was a handy plastic tab sticking out from the VFR pan so I just bolted the relay to that. Warning don't be alarmed - I have not cleaned up the wiring with tie downs etc. Thanks again to VFRD, I was able to find the wiring diagram for my 5th Gen. To get the switched “Low Current 12 Volts input from deviceâ€, I choose the license plate light. I used a T-Connector to tie into the Brown 12V input wire and attached that to a wire to run back to pole/pin 85. This may date me a bit but if you run moon shine at night you could just as easily plug right into the hot lead (brown wire) for the license plate light. The relay would work and your plate would be dark and Robert Mitchum would be proud. Thunder Road Next step is to wire the Garmin Power Plug but that is a piece of cake now that the hard part is done.
-
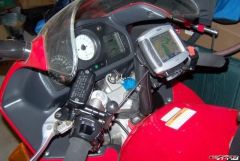
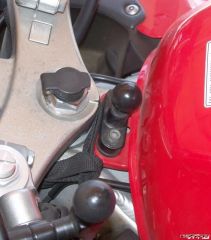
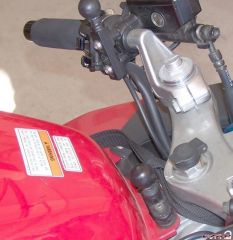
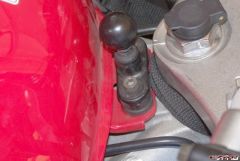
I have had a few questions about the RAM mount at the forward edge of tank. Here is a picture of both RAM mounts, the RAM handlebar mount packaged with the ZUMO and the RAM ball forward of the tank. With regard to the RAM mount forward of the tank, I used RAM-B-231Z part # and installed it without using the Zinc U bolt. This install has often been discussed on VFRD. Thanks again VFRD. RAM 231 link - Any RAM dealer will have this part. http://65.102.174.116/rammount/productdeta...mber=RAM-B-231Z[/url] I fitted the RAM mount over the existing tank flange, which secures the leading edge of the tank. I purchased slightly longer bolts than the stock ones to secure the RAM mount over the flange. The RAM ball Installed forward of the tank
-
From the album: Misc VFR
-
From the album: Misc VFR
-
From the album: Misc VFR
-
Will take me a while to figure it all out. Most of the trip maps, I have downloaded, have been in Streets and Trips format. That way you can play with it to suit your requirements. One thing for sure if someone sends me a ride I will want to look at it first on Streets and Trips or Mapsource. Then I will import to the Zumo. The PC programs are just better suited to planning I think for a whole bunch of reasons: screen size, keyboard and performance. I can see bringing a debugged route to share with a fellow Zumo rider on a trip though. It would be nice to be talking/listening from the same script just once. But you would still have the unannounced detours to see something or other. :thumbsup:
-
 This is on my list. Thanks
 -
I do find the Zumo very useful especially on trips to unfamiliar terrain. :thumbsup: Maps are still almost a necessity I fear. You need the big picture and the map format is comfortable to most. But this is what maps can not do. Tell exactly when the next turn is coming up which prompts you to look for it. This takes no interaction it is on the main screen. And I really like the screen which tells you how far to your final destination for the day. No questions - the answer is right there with just a few touches. I need the help. For example, you pull out of small town enroute to a turnoff miles away. All of sudden you get distracted by traffic or pray tell the view and you fail to note the exact mileage to your next turn. Maybe you failed on your last stop to note precisely when the next turn is - you just know it is up the road a bit. I used to mark each turn with the route number and the mileage to it on my windshield but that is a lot of work. And if you failed to note your trip odometer this technique fails. All it takes is one truck blocking your view and you can miss the turn/route sign. Maybe the marker is under a tree in the shade and you missed it trying to get the perfect line. Or maybe you were picking your way through a pack of cages and were just too focused or forgot to look around for signs. Unfortunately, I have missed several turns especially in the backcountry. With the Zumo the distance to turn and arrival time is always there so you are prompted to look for the turn. Plus the beatiful lady is telling you heads up idiot! You can and will still get input from the locals but now you can figure out exactly the mileage to determine the feasibility of a detour. How often have you heard - oh it is just up the road a bit - don't exactly know how far and be careful because the road is not marked well. <_<
-
I am not a cell phone guy. But, I had an epiphany about 6 weeks ago about this whole cell phone issue. My cell moment came when I was the first on a scene when a R6 rider hit a tree. Taking off all your gear to check to see if you have a cell does not save time and maybe could have cost more. Eventually when more assistance arrived, I had to ride to where I thought I had a cell. Fortunately I did (after I took off my gear again) and I still made the first 911 call. He will be ok (after months of therapy and a helicopter ride out of the hills). There are lots of different ways to rig the phone up to the Zumo. For both bikes I will activate the Bluetooth on my phone. You can put your phone anywhere: jacket, bike pocket, tankbag as there are no wires involved. Lots of neat things happen immediately when the phone links to the Zumo via bluetooth. I really did not have to configure anything it just happens. First you find out/see even if you have a cell which is nice especially if you run in the mountains often. Secondly you see/hear when somebody calls and have the option to accept or.........You also have your complete phone address book on the zumo. You dial direct from the Zumo using the touch screen, it also has a neat feature to call home (that ET thing again). There are more things available: missed calls and all the rest but those are the highlights. On the VFR I do not have immediate plans to talk thru the zumo/phone (need a hard wire or Bluetooth mic for that). I will however know already if I have a cell before I pull over and will also know if somebody important called before I do so. On the Wing, I can talk now through my regular headset mike which is hardwired into my stock sound system and the Zumo. The Razor bike forum has a bluetooth section as well. There are just too many options here: bluetooth helmet, autocom, starcom, bluetooth only, phone or mp3 or nav or all, etc etc etc to give you good advice without the particulars. http://razorbiker.com/zumo/viewforum.php?f=4 I think I read on a forum that some guys are using it for bike to bike thru their Zumos. I think I will stick to FRS/GMRS for the moment as cells are not realiable in the MTs/remote areas.
-
Wrap up – Part Seven I forgot to mention to find my way home from Borrego, I just touched “Go Home”. ET never had it so easy. But you could just as easily return to a "Favorites" or "Recently Found" location. This would be handy on a trip and you wanted to return to a motel or campground. Lesson Learned: 1. Whether you are downloading routes from Street and Trips or Mapsource, always review the route after it has been processed by your Zumo. You may have to modify the route by adding more waypoints in the source PC program. Alternatively, you can modify routes on the Zumo by adding/removing points to include your destination or end point. Also check your Navigation preferences in the Zumo Tools Menu to ensure your route generation is in accordance with your real wishes ie faster versus shortest, vehicle type, avoidances (U turn, Highway, Toll, Trafffic, unpaved roads etc). 2. Of course, the Zumo is not fool proof. So for Gosh sake never utter these fateful words- “Maps, I don’t need no stinking maps.” 3. I have found that sometimes when you add a waypoint such as a town, Mapsource/Street and Trips may drive you off the actual route to find the geographic center of the town. This may in fact be off the main highway no matter how small the village/hamlet is. As I result I find I am using actual streets or intersections often to drive the route to avoid algorithm driven detours. 4. Keep your eyes out of the cockpit and on the road – Zumo is great but watch where you are going. The aural alerts do most of the work so don’t focus on the screen! 5. Despite the complaints from many of the GPS purists in this, I find the recalc issue a red herring. Again “the Zumo” keeps trying to get you to your final destination” by recalculating the route when you stray far from the designated route. I just touch "stop" on my Zumo when I screw around and purposely go off route. Then I just reload the route and it directs me to my next waypoint. Never lost a route yet. 6. I find since my overnights are often loops that I make one route for the two days. With the Zumo that works but is not optimum way to program the machine. My rule of thumb is one day-one route. That way you will always have the Zumo cue you to how far and what time your day will end. In other words load a separate route for each day on the road. This way the "Arrival" time is accurate for where you are going that evening. Add it is remarkably accurate too! This screen gives you the whole route and miles to as well as time. You may want to go to Borrego because of my lame post but beware. The California Department of Transportation (Caltrans) will close a portion of 78 near Scissors Crossing and in the vicinity of the San Felipe Creek Bridge (about 12 miles east of Julian). http://www.dot.ca.gov/dist11/news/2007news...07-78Bridge.doc The plan calls for closing the highway in both directions at that location from Monday, March 12 through mid-afternoon on Friday, March 23. THIS means all the RVs, Trucks will going down and up Montezuma grade in that period. Watch the center line and slow down! Interestingly enough this is prime Vintage Motorcycle and flower viewing. Be safe. A few photos from previous years. I think this is an Indian (European name or "Eagle soars high in the sky"). Looking down into Borrego with flowers Montezuma Grade with switchbacks galore. Thank you and in summary the Zumo works for me. I hope you found this overview helpful. :goofy: Next stop “Run the Ridges” of our Green Land Tennessee? :goofy: At least on my Zumo MP3 – what a route! Did I mention the MP3 player? :thumbsup:
-
Is Cape Town somewhere up there by Santa Barbara. God you have to love the Internet! I think Garmin has done a remarkable job of putting out changes to the Zumo. 3 changes since my wife delivered it in a sled, which is tough going BTW in San Diego. Having worked at two software companies, I know what a challege it is to update software. I am impressed. Now to your question.......... Here is an example of the sum total of my dirt experience, since I crashed hard on my 250 motocross bike way back in the day. So take everything I say with a grain of salt I mean dirt. I think the Garmin engineers/marketers were talking to mostly street riders when they crafted the Zumo specs. Much bigger market and they seemed to have hit the basics pretty well. But the Zumo does have off road capabilities. First there are dirt roads on the Zumo maps but several have been loading Topo maps onto their Zumo for better dirt road info. I have to say the best guys on hard core GPS dirt capabilities are found on the GPS thread on advrider.com . Some of those would use less than complimentary terms to describe the Zumo's off road capabilities. Somehow, my VFR would get the same rap on the dirt! Never mind my Wing. What a surprise! Near my house there is a road, Proctor Valley, which turns to dirt for miles just north of the lake. You can see how it looks but I could have given you more detail. When you go to the Off Road mode on the Zumo you get a screen like this. Here I am navigating through my neighborhood direct to a point. I imagine I was on a plain with elephants or tigers or something. Do you have those things in Santa Barbara. Keep in mind that I am in my office now on the 2nd floor with a heavy tile roof. But you asked. And another thing none of the so called dirt GPS machines could get a fix like this except maybe the 60x version which has the Sirf chip too. Here I am headed off road to Point 004. You touch the arrow on the bottom right and you see this. This tells me – boy you have to go left a little to get to you destination in about 3 miles. The off road screen has a direction arrow unlike the regular compass screen. Does this diatribe help?