rc30fan
-
Posts
37 -
Joined
-
Last visited
-
Days Won
2
Content Type
Forums
Profiles
Gallery
Blogs
Downloads
Events
Everything posted by rc30fan
-
Its still for sale. So far 4 serious buyers have pulled out at the last minute. A few people have asked if it would make a good race bike but the answer is a definite no. With no spares available for the NL0B engine, one small issue would turn the bike into a paperweight. I had to miss the Handbuilt show this year. I broke my leg in two places in January (damn supermotos are fun right up to the point of impact). I'm off the crutches now, but walking around the show would cause serious pain. Did you go? Got pictures?
- 72 replies
-
- 1
-

-
- rc30
- restoration
- (and 1 more)
-
He's not in the market for another RC30, although he knows other people who might be and said he will let them know mine is available for sale.
-
Thats the one. The owner, Ray, is a great guy.
-
Heres an interesting update. This bike is still for sale. I've had a few 'firm' offers fail to materialize but I'm not in a hurry to sell. As I said, if I can find someone who can make plain bearing shells to order I wont sell. But thats another issue. Anyway, I'm in Sydney visiting family and I heard a rumour about the sister bike to mine. I followed up and look what I found: This bike is identical to mine in all but a few ways. - polished frame - stock brake calipers - ohlins steering damper - endurance fuel filler - welded-on side stand boss (required for homologated superbikes back in 1994) - non-running. (Although it needs some serious work its nothing an experienced RC30 mechanic couldn't do) Anyone interested can see more pictures here: http://s841.photobucket.com/user/rc30rdr/library/Winfield%20RC30/sister%20bike?sort=3&page=1
- 72 replies
-
- 2
-
-
- rc30
- restoration
- (and 1 more)
-
Thats what I thought too Phil but it turns out this is not the case. The same style bolts have been used in multiple VFR engines for years but none of the workshop manuals for these bikes include the final additional 90 degree twist. Honda trained mechanics are told to reuse the bolts. Even the race team that built my bike reused these bolts for years, with 3-4 engine rebuilds per season. This is the best picture I have of it. It was still in the previous owner's possession at this time. It's wearing track bodywork(obviously) and wheels. Looks like it has some nice mods. Whats the history of this one? Will you be riding it?
-
Lets see some pictures of your RC30
-
Thanks Guys, I'm not sure what I'll replace this bike with yet. I might get another special V4, or I might invest it in a new business. CornerCarver, I'm not with Ridesmart any more. I'm now a coach for California Superbike School so I'll be doing events all over the country this year. If you ever decide to do a CSS day let me know. Shaun
-
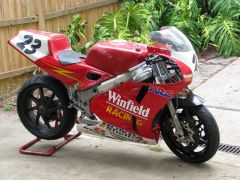
Well its a sad day but I finally did it. This bike is now for sale. I always thought I'd have this bike forever but after seeing how difficult critical engine parts are to get (i.e. impossible, at any price) this just isnt the bike for me anymore. I want a bike I can ride but this one is just too valuable. It needs to be on display somewhere so other enthusiasts can see it. Its fully functional and I've ridden it once since the rebuild, in addition to starting it up dozens of times so people can hear it run. Anyone who reads raresportbikesforsale.com will see it there shortly. I took a bit of a guess at the price. Its by no means a pristine RC30 but it has a different value. I'll also be contacting the Barber museum to see if they are interested, plus a collector in Sydney who has the polished frame sister of this bike.
- 72 replies
-
- 1
-
-
- rc30
- restoration
- (and 1 more)
-
Another update on this project; I spoke to a few engineers about this bolt. The consensus is the spiral increases stretch which actually reduces clamping force on the crankcases.
-
Thanks Baileyrock. Unfortunately now that the bikes rebuilt there's not much more worth posting. Phantom, I did have a solid red fairing for this bike - i didn't want to risk the winfield bodywork on the track.
-
Thanks. Bertie did a good job. There were a few minor errors but nothing glaring.
-
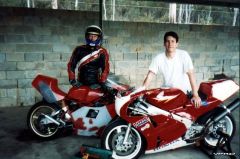
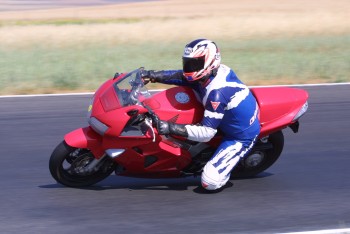
I finally got around to scanning the tintype photo taken at the Handbuilt show, printed on a sheet of steel. According to the photographer this picture will last "hundreds" of years. Another shot from the show: Recent track day. I didnt take it on track, its too much of a risk. I have my new V-4 for that:
- 72 replies
-
- 2
-
-

-
- rc30
- restoration
- (and 1 more)
-
Thats awesome, thanks Matt. Its great to see Aussie racing again, especially on tracks I used to race on myself.
-
Thanks Matt. Nice looking 400. Do you have video of it anywhere? I'd love to hear it running. I'm trying to find pictures or video of Gobert and Corser riding my RC30 back in the early 90's but i'm having no luck at all. You're right about the cost of rebuilding an RC30. I could have bought a (very) nice track bike for what I spent on this thing.
-
I just got back from the Handbuilt motorcycle show held in Austin, sponsored by COTA for the MotoGP weekend. I was invited to bring my RC30 and they had a photographer take pictures of all the bikes. They also had an artist come in to draw selected bikes. He asked me what I considered to be the most visually appealing aspect of the bike and I said the rear wheel/exhaust. I look forward to seeing his interpretation in addition to the photos: The show was spectacular. The bikes were amazing, the people even more so. I've never been a fan of custom built bikes that use harley engines and cant go around corners, but these things, and the people who built them, are incredible. The closer you get to these works of art the more spectacular they are:
- 72 replies
-
- 1
-
-
- rc30
- restoration
- (and 1 more)
-
Heres the custom made converter in action: http://youtu.be/GlKf5yPXpfw I'm designing a pcb now which will be easy to make with my CNC mill.
- 72 replies
-
- 1
-
-
- rc30
- restoration
- (and 1 more)
-
Small update on this project. This bike was originally fitted with a tach from the HRC catalog (which only goes down to 3,000 rpm and runs to 15,000 with no red line) which is designed to work with 2-strokes. As a result, the 4-stroke CDI is incompatible and requires a small converter box to talk to the tach. My converter box was lost in shipping so I was able to borrow one from a fellow enthusiast on the condition that I return it when I've reverse engineered it. To do this I've enlisted the help of an avionics specialist currently working on F-35 systems. He whipped up a circuit and we tested it tonight. With a few more mods the new converter should be complete. Here is a video of the testing process: http://youtu.be/U3X9FLwV7PQ
- 72 replies
-
- 2
-
-
- rc30
- restoration
- (and 1 more)
-
Thanks for the feedback guys. Damn Kel, that's about the nicest thing anyone's ever said to me! Phantom - we have spoken. I'm a machinist also and boasted about the merits of CNC. Larry wasn't convinced! I started teaching myself after a series of screw ups every time I took my bikes in for service - at multiple dealerships. Various ham fisted morons scratched a brand new tank to hell, cross threaded a sump plug, reassembled a gear train incorrectly, left spacers out of a front wheel, lost various fairing fasteners (and didn't replace them), and many more. One even forgot they had my bike. If it had been only one dealership that would be easy to fix but this all happened at Honda, Suzuki, Ducati and KTM dealerships. As a result I started out by doing an oil change myself. Then I learned how to change tires, and worked my way up to 2-stroke rebuilds. Then a 4-stroke dirt bike rebuild, then a 4-stroke single street bike rebuild, then a 4 cylinder rebuild. You get the idea. All it takes really is a Haynes manual and a willingness to invest the money in tools that will pay for themselves many times over. Check out my YouTube channel for a few different bike rebuilds, http://youtu.be/Jz-MzJ6yKUo If I had one piece of advice to offer it would be this - buy a dirt bike that's not running. Then buy a Haynes manual for it and use it to learn. If you screw up, the parts are cheap and there's only one cylinder so its simple. Then when its fixed, either ride the hell out of it or sell it to pay for all the tools you had to buy. Then, when you need to work on something more complex/more important to you, the confidence is there because you know what needs to be done. I personally consider the tech schools out there a total waste of time. They are nothing but profit machines designed to take money from people. If they just happen to turn out a good mechanic its by accident not design. There are so many truly horrific techs working in dealerships that it makes no sense to let them work on a bike. Obviously they aren't all incompetent but the ones who do know what they're doing are under pressure to do their work faster than is possible and get paid barely more than minimum wage to do so. They are not allowed to check their work because that takes time away from other jobs so bikes go back to customers with loose wires, missing bolts and cross threaded plugs. Damn, I sound cynical but this is all from personal experience, not hearsay. Seb, that's a breather for oil vapor. The hose goes up to a catch tank in the tail which is then vented into the carbs. Switchblade, As far as I know the motor mount position is stock. What you're seeing is extra aluminum welded on by the race team to reduce/prevent flexing. I have noticed though that the Moriwaki chassis made for this engine actually uses the motor mount down in front of the sump - much like the RC45. That's some forward thinking engineering right there.
- 72 replies
-
- 3
-
-
- rc30
- restoration
- (and 1 more)
-
My mill didnt do a very good job of the foam instrument surround. I'll just have to cut the next one by hand. Lots of plumbing. I have a new catch bottle on its way from England. Making the oil cooler lines was dead simple. Still need to finish the front brake lines. They're not so simple to make. Closeup of the kit CDI, new wiring harness connectors and fairing bracket I made 15 years ago. I found the original connectors for the kit tach. Shipped all the way from England. New cast iron Brembos compared to cast iron HRC discs that are worn out after a lot of fun track time. One of the many plastic items I had to make. Its still a little cold blooded. I havent reconnected the choke yet so it takes some convincing to start up. The tank needs to be repainted. I had a friend remake all the winfield graphics based on the existing decals on the fairings. I lost the original front fender when I made a mold for the carbon fender in school. I have another one ready for paint and graphics.
- 72 replies
-
- 1
-
-
- rc30
- restoration
- (and 1 more)
-
Thanks guys. The rebuild is about done. All I have left is replacing a few hardware store fasteners with high strength bolts that can only be found online, new chain/tires and brake pads and thats about it. Heres a video of the engine running: http://youtu.be/fyLLQviL3To
- 72 replies
-
- 3
-
-
- rc30
- restoration
- (and 1 more)
-
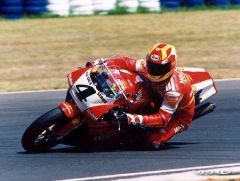
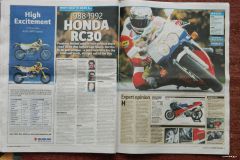
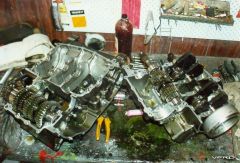
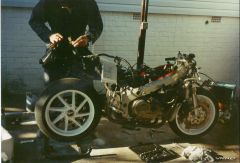
Hoping this is the right place to post. This is the rebuild process of my early prototype VFR-750R built in 1986 and imported into Australia specifically for use as a race bike. I bought it in 1994 and was lucky enough to get it with an engine that was built in 1993 with the full HRC race kit installed. At the time this kit alone cost almost $60,000 in addition to the cost of the bike. And back then they were selling in dealerships for just under $20,000. The bike was raced its entire life and then retired when the RC45 was introduced. Thats when I was able to pick it up for what I considered to be a steal. I rode the hell out of it, doing 50 or so track days in 5 years before the crank lost a gallery plug, causing the bottom end to seize. The stock titanium conrods were destroyed but I was able to get the crank repaired. At the same time I was in the process of moving here to the US so I had no time to repair it. As a result I covered the chassis in a layer of grease, put the engine in a waterproof box and put it into storage. 10 years later I was able to ship it over here so I packed it up and it arrived with the thick layer of grease still in place. It took another 3 years to find all the parts I needed before I could even think about rebuilding it, and then my 996 went all Ducati on me and I had to rebuild it just so I could get rid of it. But once that was done I cleared out my work space and got started. There were a few nasty surprises in the build but nothing I couldn't handle. There were a bunch of parts on this bike custom made by the race team that were either broken or worn out but thats why I taught myself how to use Autocad and a bunch of CAD/CAM programs. I built myself a small CNC mill specifically to make parts for this RC30. So here are some pictures: My first track day on this bike early in 1994 Picking up the package from the freight hub in Houston The special parts cleaner in use. It works perfectly. Cases all clean and ready to go back together. Heres the top end ready to go back together. New aftermarket rods cost more than my KTM supermoto. You can see the damage on the original titanium rod but these are not repairable. Checking side clearance on the new rods when installed. Using the damned expensive internal micrometer to check the custom bearings. Much more accurate than plastigauge provided you take all measurements with the parts at the same temperature. Old pistons are worn out. Thats why the motor was smoking a little the last few times I rode it. New pistons. Notice the different reading on the micrometer. Thats the difference between smoke and no smoke under decell. Checking the cylinders. Thankfully they were still within spec. This motor has the cylinders cast into the top crank case. As a result the engine has to come apart any time new pistons are needed. Here they are going in: From below. Individually weighed and balanced rods and pistons installed. Transmission installed after each gear was washed and all bearings checked. There are four of these oil jets in the cases. Dont forget any or there will be problems. Cases together. It takes a lot of jiggling. Heres a question - who can shed some light on the spiral groves on this bolt? It holds the cases together so has no interaction with oil or gears. Heads of two of these are visible in the next picture. Flipped over, this is the oil pump. Its actually from a VF1000R as the standard pump doesnt have passages for the lines to the oil cooler. I figured this would be the best time to bring the engine and chassis together. Thats when I noticed the crud in the threads. Heres a shot from the timelapse - frame installed on the engine. http://youtu.be/PTBPv6x7GbA Roger at OnroadOffroad.com rebuilt the shock and forks. This is the titanium swingarm pivot - part of the HRC kit. It feels light as aluminum. Here are the starter motor and gears I installed when I first got the bike. Why? Bump starting is a real pain. Race kit crank allows ignition timing to be adjusted. All ready to button up. (oil cooler bypass line waiting for new hoses) Time to start work on the carbs. Luckily I emptied them before I stored them so they werent bad at all. I installed a choke system - not easy with the short-port NL0 heads. But worth its weight in gold. On the other side of the motor I found some more stripped threads. The race team helicoiled almost every bolt hole in the motor for reduced weight. I did the rest. Coming together nicely. Checking piston travel to verify cam settings. Checking cam travel. There is actually a degree of difference between the front and rear intake cams. Not sure which one is wrong though. I cant adjust until I know which one is correct. I then found a bad bearing on the front bank so I replaced both. Here the hot bearing drops onto the chilly cam. Race kit ID mark. Now comes the fun part. The race kit wiring harness was replaced with the stock wiring harness so I could use the starter but is huge and heavy. So I ordered a used VFR-F harness to donate wire and connectors for a new harness made to the race kit wiring diagram. I later found out that there were several plugs missing from the F model harness. I found a goldwing harness that had all the plugs I needed and it was an easy process to make the new harness with starter motor and charging circuit added. Kit CDI connected to the new harness. We now have sparks in all the right places. Heres the new brake calipers mounted with custom made brackets. The old calipers needed new seals that were no longer available. Hopefully these calipers from a 999S will work as well as the AP Lockheed ones. (Thats not dirt on the calipers, the previous owner painted them then scraped most of the paint off. Theres a little more left to do though).
- 72 replies
-
- 10
-
-
- rc30
- restoration
- (and 1 more)
-
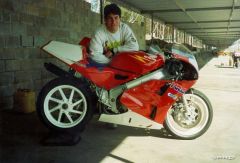
From the album: 1987 RC30
-
My RC30
-
-
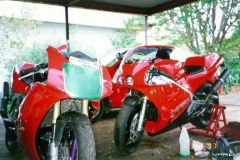
From the album: 1987 RC30
© ©vfdiscussion.com
-

From the album: 1987 RC30
© ©vfdiscussion.com