

tinyminds
-
Posts
347 -
Joined
-
Last visited
Content Type
Forums
Profiles
Gallery
Blogs
Downloads
Events
Posts posted by tinyminds
-
-
Looks about like what I did to my charging system several years back as preventative maintenance. That Monitor wire from the factory goes through I think 8 Connects/Fuses/Switches routing through the ignition switch before It actually reaches the battery. When I tested the voltage drop across that wire from the R/R to the Battery I had some 1.2-1.3v dropped across the connectors, causing the R/R to step up that 1.2-1.3 volts to make up for what it thinks is a less charged battery than it really is, causing the R/R to overwork itself. My bike holds a perfect 14.3V all the time, no matter if I have high beams on, fan is on, heated grips, etc.
The only differences I did compared to your setup is I didn't fuse the monitor wire, since there is no amperage draw I didn't see a big reason to add anything that could cause voltage drop (Fuse). And I added new ground wires straight to the frame from the R/R, just because i could :P
Excellent work on your upgrade and pics!
PS: Does anyone know if the monitor wire was rerouted bypassing the ignition switch on the 06+? I haven't taken the time to look but if not it might be a good idea for the 6th 1/2 gens too.
-
-
I wrote this up for someone and decided I would copy / paste it on here for any interested. I'm sure some / all off it might have been covered elsewhere but I didn't feel like reading all the 100000 electrical posts to verify.
Turn the key on but not running, check voltage on the black ( or black/white) wire at the R/R. Then test battery voltage directly at the battery. She if there is a big difference. Generally the only reason those connectors melt is because the R/R is overworking itself. But in nearly every case its only working itself to much because it thinks the bikes not charged. Two reason, number 1: That black wire is telling the R/R what voltage the battery is ( monitor wire ). If it see's to low of voltage, it tells the R/R to work harder, that's where the heat comes from. That wire is running from the R/R to the key cylinder, then back to the battery, but it passes through some 6 switches/connectors before it gets there, so resistance is a huge issue on that wire, along with a lot of room for voltage drop error. The more voltages the R/R has to product, the more the diode packs inside heat up. Those plastic connectors have a much lower insulation than the wire itself does, so when heat reaches a critical point, the connector will melt before the insulation on the wire will. Number two: You can only push so many volts through a wire before the wire will start restricting the voltage flow, even before it starts to melt. Those two red wires coming off the R/R also route themselves through a few connectors before actually getting the charge from the R/R to the battery. Voltage output on that red wire probably looses some 1/2 a volt by the time it reaches the battery as it passes through the ignition switch and different connectors. So in order for your battery to get a 14.4 volt charge, ( which is where my R/R keeps my battery planted at every second without fluctuating at all, and where ideal charging is ) the R/R would have to push 14.9 volts to allow a 1/2 volt to be lost and get 14.4 to the battery. So my solution. Tap ( solder ) to the two R/R wires coming out of the R/R, leaving the two that are already there in place, because they do to much routing and serve other purposes that I didn't feel like going through, and place a inline fuse in each running the new cables directly to the battery, no connectors, no switches, no voltage loss. Now that black wire you need to pull out of the connector completely because you need to tape off the wiring harness side leaving it hooked to nothing, connect a new wire the the R/R's black wire and run it straight to the battery also, that way its reading exactly whats at the battery and not voltage dropping through connectors.If you do a backward calculation. Even if you loose about 0.1 volt on every connect made, that's ideal but usually your close to 0.2 on a connector because of the world isn't ideal. If your battery says 14.4v, and the black monitor wire passes through 6 connectors at 0.1 voltage drop per connector that means your R/R would have to charge 0.6v more to keep 14.4v, so your R/R is now pushing 15.0v. Now the red wires pass through about 5 connectors loosing another 0.5v forcing the R/R to be pushing 15.5 volts which you will never see that its pushing that because it loosing it before it reaches the battery and all you see is 14.4 volts ( ideal number ). Your R/R pushes way more than you notice if wiring isn't working properly. Even putting a voltage meter on the battery isn't taking into account how much extra your R/R is having to work to show that number, extra work = extra heat = R/R connector melting because its the weakest point.
Let me know if you have other questions. That's the best way to explain what I've learned and what I've done to fix / prevent future problems on my bikes charging system.
Pictures can be found on the bottom of the first page of this post.
-
Hey guys! I manage to track down some used 99 catless headers locally. I installed them last week. I also gutted the exhaust, added a K&N filter and did the o2 mod. I am waiting for my PC3 to arrive in the mail from Hardracing.com ( $259 with a battery powered power adaptor for free!- this is the best deal i could find) I would love to use this map but am having problems reading it on the computer. I keep getting pop up messages saying;
"adobe reader could not open file because it is either not a supported file type or the file has been damaged. for example it was sent as an email attachment and wasn't correctly decoded"
Can anyone help me figure out how to use this program/read this file? Just a warning i am completely useless with computers!
PS. the 99 header and gutted exhaust sound real mean!!
Not sure if you got your problem fixed or not but sounds like you just don't have the Power Commander software installed on your computer. There is a change the file itself got damaged in the server transfer or one of the server crashes. Theres a working version of the map in the 'Downloads ' section of the forum. Keep us updated. Hope your enjoying your headers!
-
Looks great John. You need to come visit so I can see this thing in person!
Keep up the good work :thumbsup:
Edit: Next time I see you I want to see how well the MRA windscreen fits up to that bug buster. I have the DB screen also that I use most of the time, but when I'm on trips I change out to MRA.
They do look good... now all you need is a fender eliminator!
He actually just took the fender eliminator off and put the stock fender back on because hes getting hard bags for it.
-
Well, most definitely not as impressive as yours: 102hp 55lbs of torque.
I know my PCIII is too rich because the power went down as the bike warmed up. (100.9hp on run 4).
Anyhow, the guy is quite nice, and lives near my home, so I'll go see him later next month. But I don't expect to be near your numbers.
SG
***Edit***
I should have mentioned that the gas I used was at least a month old. The R6 that was there before me went from 101hp last year, to 111 this year. The only real change was racing fuel. So, maybe wit a fresh tank of gas that will help.
I know every dyno is different. Did they follow SAE or STD standards for results or do you know? Mine was SAE guidelines. Did they tune your bike or you throw my map on it? My map was setup for Florida atmosphere, not sure what yours did. I just feeled up with BP gas, which seems to run better than any other gas I put in my bike. I kept 87 octane in it for tuning because thats what I use all the time. I'm sure I could have got a .1-.2 difference every so often if I would have ran premium, but then he bike would be turned for a later combustion time --> to lean when using regular. What other mods do you have on your bike?
-
The biggest change in voltage from what I've seen on my bike and others is when replacing that 'black' voltage monitor wire from the R/R.
Jason, can you clarify this for me. That black wire does not need to be switched? Just run a replacement straight to the battery? I'm really dense when it comes to electrical thingamajigs.
The black wire does not have to be switched, but you do have to remove it from the harness and break the connection from the factory harness. If you don't pull the somehow break the connection from the factory harness ( either cut the wire or pull it out of the white r/r connector ) it will send 12v backwards into your ignition allowing the bike to stay running even if you turn the key off.
Guys, is this still a problem with the 6th gens? Is it something that I should still "bother" doing? My bike is pretty much nekked at the moment, and I could just get it over with now if that's the case. From the sounds of it, it does seem like something that I should do. :unsure:'02-'05 use the same harnesses, which means these problems couple be a potential problem for your '05. I know the wiring harness changed for '06-'07, but I'm not sure and haven't heard of what changes were made to know if they are still a potential problem or not for newer models. So far it seems no one has had an issue on the '06-07's to date, but only time will tell for they are the newest & least milaged VFR's out there so far.
-
Thats pretty sweet. Interesting map. I always like to compare various maps. I predict it will use more fuel though, take a look at your cruising rpm ranges at 20-40% throttle. I think thats where a lot of gas is used. Report your mileage back.
Those numbers look great. I'd like to have seen a bone stock base run on the same dyno.
Wish I would have dyno'ed the bike stock also. At the time I had no intentions of modding anywhere near this extent, but you know how that goes. I'll report fuel milage tomorrow, can't ride today, gotta go pick up my g/f's new car 3 hours away <_< . Owe well. That was the agreement when I bought Jeremy's CBR Track bike Friday that +1 bike means +1 car for her
 . Owe well what can you do!
Jason, I did my 02 bone stock: 98.4hps - look in my gallery for the print out. I will have my bike dynoed today or tomorrow: Catless, Loe Vince without baffles and the PCIII (the map loaded at this time is the Remus) I would have used yours or Coyze's but I don't have my PC this weekend, so that'll have to do.
Awesome, be sure to post up results.
-
Thats pretty sweet. Interesting map. I always like to compare various maps. I predict it will use more fuel though, take a look at your cruising rpm ranges at 20-40% throttle. I think thats where a lot of gas is used. Report your mileage back.
Those numbers look great. I'd like to have seen a bone stock base run on the same dyno.
Wish I would have dyno'ed the bike stock also. At the time I had no intentions of modding anywhere near this extent, but you know how that goes. I'll report fuel milage tomorrow, can't ride today, gotta go pick up my g/f's new car 3 hours away <_< . Owe well. That was the agreement when I bought Jeremy's CBR Track bike Friday that +1 bike means +1 car for her :rolleyes: . Owe well what can you do!
-
One of the service guys at the shops going to be emailing me a PDF file of the graph. I have a paper copy, but no scanner etc. He said he would get it to me after he got home tonight. :thumbsup:
-
Results are in. Picked my bike back up from the tuners. Took him almost 3 hours, 26 miles, and 1/2 tank of gas. So much smoother now. As some of you know, I installed 99 VFR Headers on my bike ( Catless Headers ) and already have several mods done before this one including Staintune Exhaust, K&N Air Filter, Power Commander 3, and 02 Sensor Eliminators. Heres my before & afters.
Before:
2004 Honda VFR800 (Staintune Exhaust, K&N Air Filter, Power Commander 3 "Running Cozye's Map )
After:
2004 Honda VFR800 (Catless 99 Headers, Staintune Exhaust, K&N Air Filter, Power Commander 3 "Dynotuned Map")
Before ------ After
@ 20% Throttle Opening
HP: 23.6 ----- 32.8
TQ: 31.8 ----- 36.3
@ 40% Throttle Opening
HP: 47.9 ----- 64.6
TQ: 45.2 ----- 47.1
@ 60% Throttle Opening
HP: 78.3 ----- 87.6
TQ: 51.2 ----- 53.3
@ 80% Throttle Opening
HP: 94.8 ----- 100.3
TQ: 54.6 ----- 56.1
@ 100% Throttle Opening
HP: 101.2 ----- 109.3
TQ: 57.7 ----- 59.2
Vtec is smooth as butter, and the mapping at highway speeds should be any different than I was getting with Cozye's map w/o catless headers. Something I realized he did in the mapping is put a 4 in the 2000rpm 0% slot and a -8 in the 1000rpm 0% slot, to help remove the fuel injection delay, made a huge throttle response difference. Below is a link of the map thats on my PC3 now. Note: This made is designed for catless headers, I wouldn't recommend using it on stock headers.
Heres the map file: Vtec_CatlessHeaders_Staintunes_K_N_PC3_No_O2s_.djm
Time to go ride!
-
 1
1
-
-
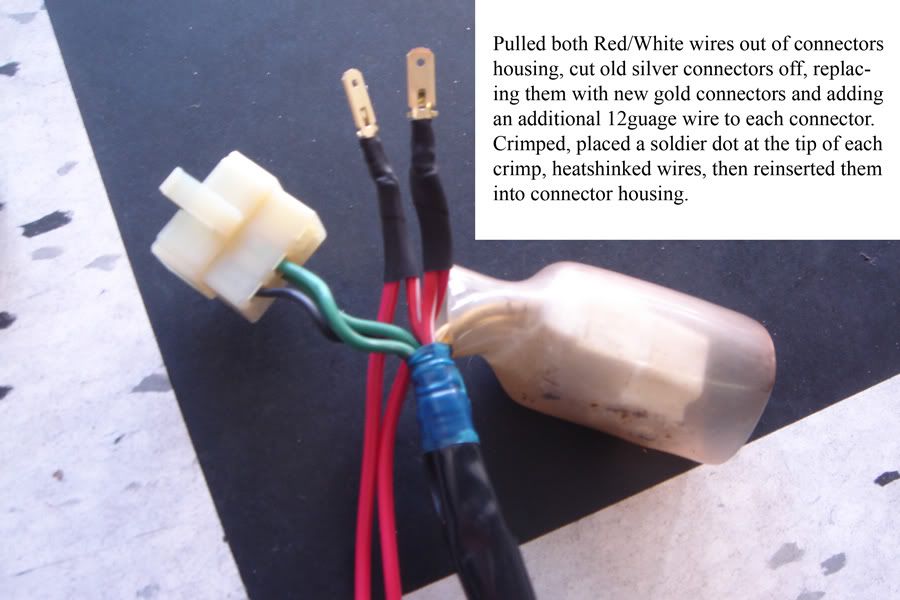
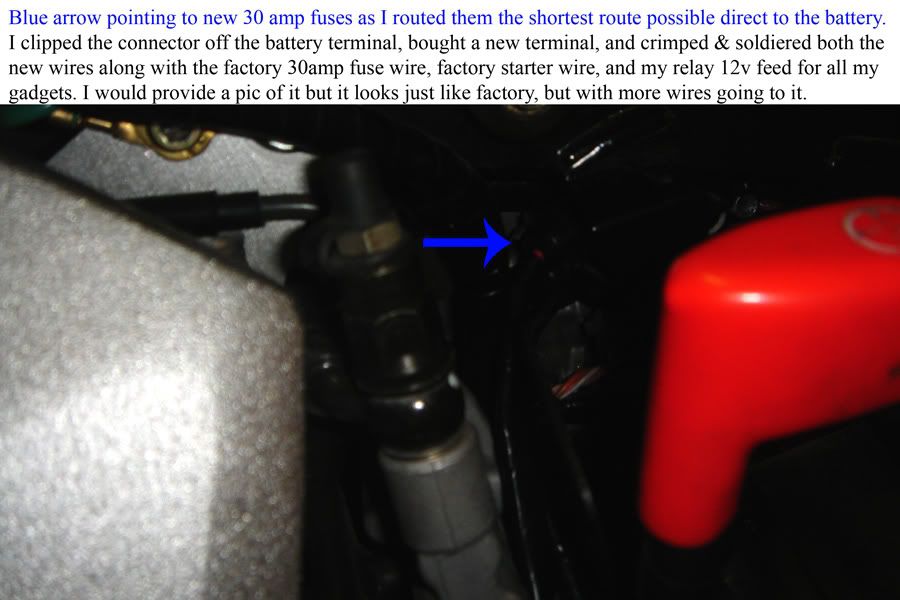
I added fuse holders to the direct-charge wires that go to the positive cable. What is a "safe" fuse size for the output going through each wire?
I just put 30amp fuses in them since thats what the factory harness has in it. The biggest change in voltage from what I've seen on my bike and others is when replacing that 'black' voltage monitor wire from the R/R. Theres a major major progressive resistance problem in that wire somewhere. Someday I want to take the front end off and track that wire down to see exactly whats the problem in the wire from the ignition to the R/R. Mine has a major issue with about 9.3 ohms of resistance from the monitor wire to ignition, which was upping voltage output to 16V +. Since replacing that wire, I can remove the fuses from positive side running to the regulator to the battery to test it and it only causes a 0.6v voltage drop. So basically by rerunning that black wire to my battery allowing correct voltage monitoring, solve a lot of overcharging issues in that alone.
-
Figured I would post this from a different thread since its pretty well related to this one:
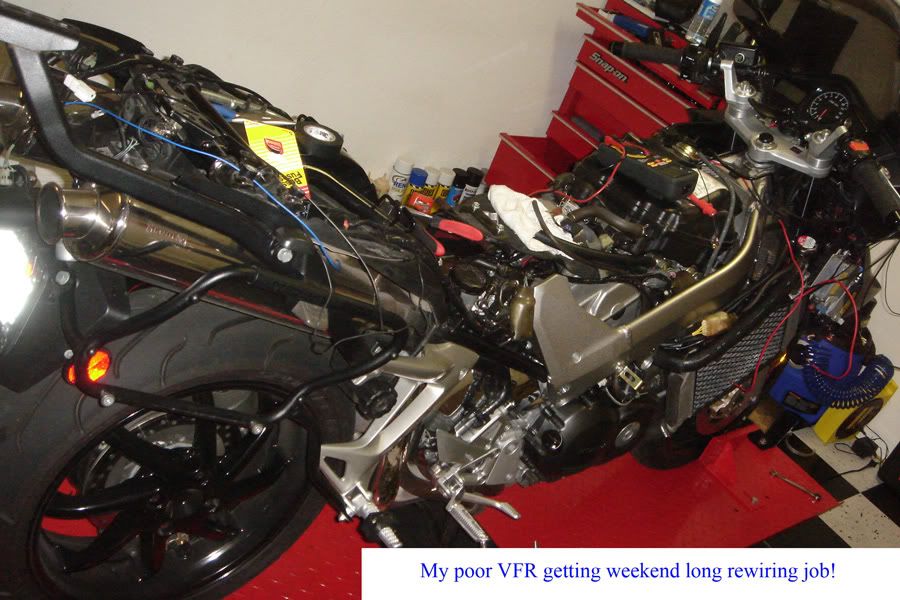
Got my bike ripped apart rewiring everything I can think of and decided to add the RR>Battery rewire to the list. Did mini writeup. Most of the stuff should have been covered through the rest of this post, but heres a couple pics of what I did. Haven't got the bike back together to test it but I'll let you know what my results are when I finished, hopefully by Sunday.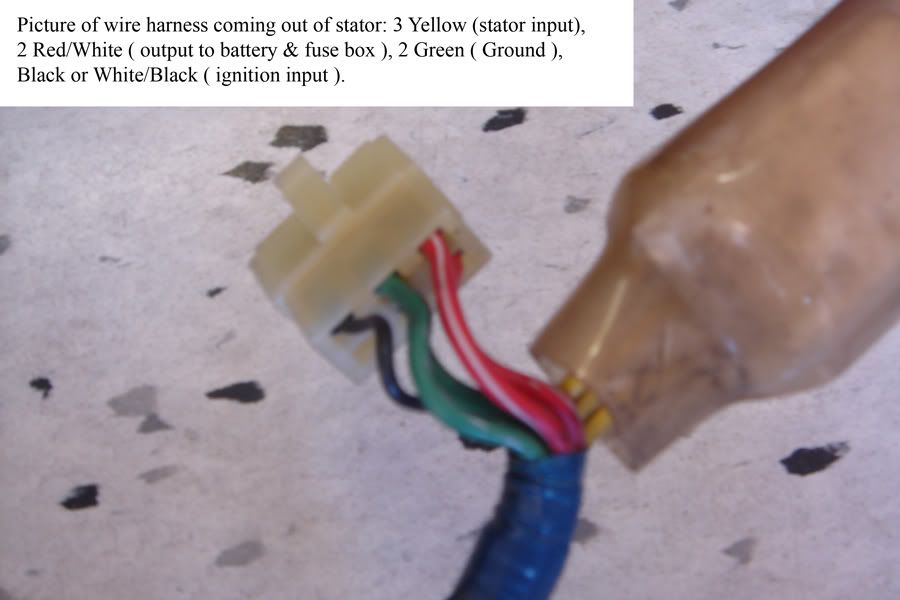
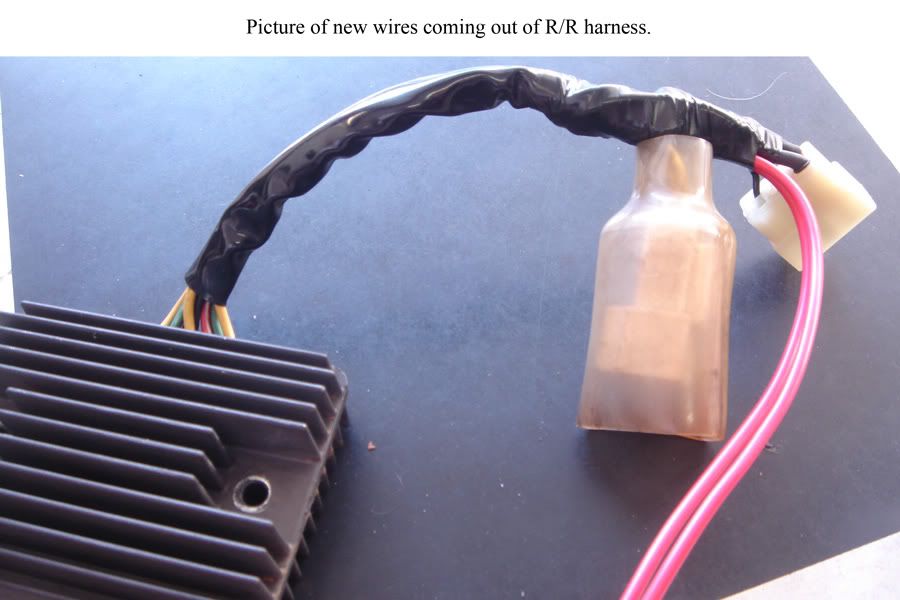
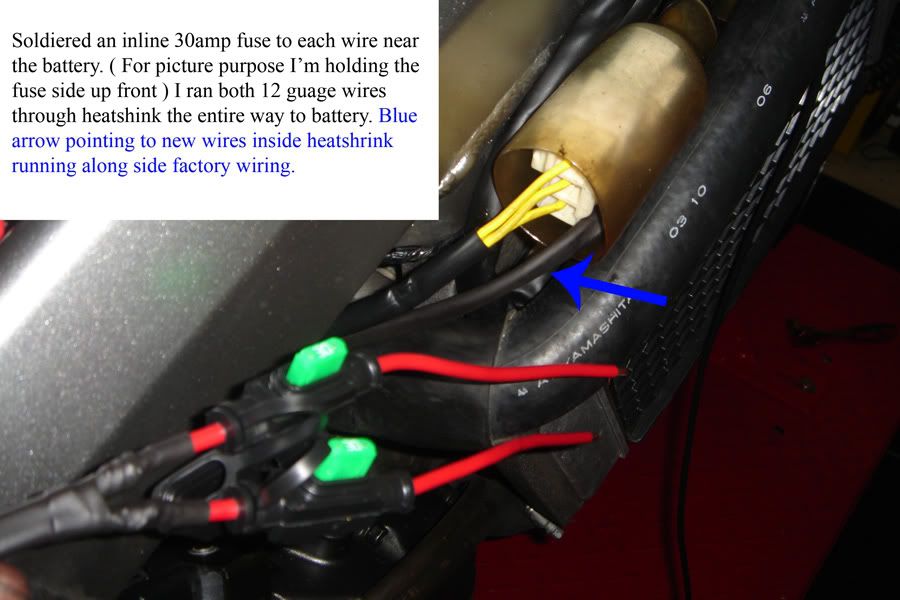
 It sits at 15.0 at just above idle (~1300 rpm), but if I rev it, it does not fluctuate much. The real test will be the riding test. I hit 16V between Rolla and KC yesterday, and that scared me.So relating to what you posted about running high voltage, I finally got my bike back together after doing the wiring mods, then hooked up multimeter, started her up, woooooooo 16.0vdc. Not cool. Well that wasn't right thats for sure. So, I got a different Multimeter because I have blown several Amp fuses in that meter and was thinking maybe somehow I damaged the meter, since I pretty much just use that meter for amperage testing. So, new meter, boom..... 16.0vdc. Well, I wasn't happy. So, I remember Jeremy mentioning to me that he had this problem and it was an issue with the R/R's Monitor Feed ( Black Wire > Ignition ). So pull that fairing off again, backprob the 'black wire from R/R with one multimeter, while leaving the other multimeter hooked directly up to the battery, ( Battery showing: 16.0vdc, Black wire showing: 12.3vdc ). Cha..ching! So, pulled the black wire out of the stator connector harness, hooked it separately ( out of the connector ) up to the battery direct to she if this helps the problem, plugging the harness back up which connects all the wires but the ' black > white / black '. So hooked this wire up, boom, voltage charge dropped instantly from 16.0vdc to 14.7vdc. So hook up a perminant wire from stator voltage monitor wire ' black wire ' to battery, still solid 14.7vdc. Slapped fairing back on, good as gold.
Edit:
if you run a new wire from black monitor wire to the battery, you have to, have to, have to disconnect the black wire to white/black wire from eachother in the harness. If you don't when you turn the key off, the bike will keep running because it wills end a reverse 12v feed to the ignition switch, tricking it to thinking the key is still on.
Edit End:
Come to find out, this high voltage problem has been going on for a while I suppose ( haven't checked voltage in about a month, was good then though ), but didn't test voltage before I started this project, so... lesson learned, but problem solved. So, back to what this thread is about. I ran the two new 12guage stator wires ( red/white ) from regulator to battery to lower resistance while keeping an additional 30amp fuse in each wire. So, pulled the fuses out of the new wires, tested voltage, 14.5 vdc, put fuses back in and tested voltage, 14.7vdc. Not a huge improvement in my case, but dropped resistance on the feeds for sure. Have been pretty constant on doing a lot of preventative stuff without any problems, excluding the new R/R monitor wire I stated above, which has been my first electric issue thus far. Some people get better results than others, but its a peace of mind and worth the time to prevent issues before they occur for me, instead of waiting for things to blow then figure out what happened. :thumbsup:
So, does this wire need to be switched? My black lead into the R/R is not hot when the bike is turned off. I don't have me service manual on me, so I can't double check what wire is what, and verify that this is the voltage regulator monitor wire.You can run it constant w/ no problems, but you have to disconnect it from the 'White/Black' wire on the female side of the R/R Connector and cut it off or tape that wire off or it will send a 12 volt feed backwards to the ignition, causing the bike to keep running even when you turn the key off. You don't have power to that black wire when the key is off because its reading voltage from the ignition, but its just monitoring the voltage, not actually putting it to use. Running it constant instead or switching it the way it is factory, makes no difference, all the R/R cares about is how much power is at the battery, when the bike is off, voltage is still feeding to the monitor wire, but its just sitting there, no current draw from it at all. Next week I'm going to look at trying to track down exactly where and what is causing the resistance problem in that 'white/black' wire that seems to be a known issue. Not sure if its a short somewhere in the wire or a connector problem along the way. Its a tiny wire, so short could easily be a problem, but it appears to be a progressive problem, slowly getting worse and worse, which makes me think its heat related. Will keep you informed. If that doesn't make sense let me know, I'll draw up a diagram. -
if you run a new wire from black monitor wire to the battery, you have to, have to, have to disconnect the black wire to white/black wire from eachother in the harness. If you don't when you turn the key off, the bike will keep running because it wills end a reverse 12v feed to the ignition switch, tricking it to thinking the key is still on.
So, does this wire need to be switched? My black lead into the R/R is not hot when the bike is turned off. I don't have me service manual on me, so I can't double check what wire is what, and verify that this is the voltage regulator monitor wire.
You can run it constant w/ no problems, but you have to disconnect it from the 'White/Black' wire on the female side of the R/R Connector and cut it off or tape that wire off or it will send a 12 volt feed backwards to the ignition, causing the bike to keep running even when you turn the key off. You don't have power to that black wire when the key is off because its reading voltage from the ignition, but its just monitoring the voltage, not actually putting it to use. Running it constant instead or switching it the way it is factory, makes no difference, all the R/R cares about is how much power is at the battery, when the bike is off, voltage is still feeding to the monitor wire, but its just sitting there, no current draw from it at all. Next week I'm going to look at trying to track down exactly where and what is causing the resistance problem in that 'white/black' wire that seems to be a known issue. Not sure if its a short somewhere in the wire or a connector problem along the way. Its a tiny wire, so short could easily be a problem, but it appears to be a progressive problem, slowly getting worse and worse, which makes me think its heat related. Will keep you informed. If that doesn't make sense let me know, I'll draw up a diagram.
-
Neeto!
-
Summary::::::::::::
It sits at 15.0 at just above idle (~1300 rpm), but if I rev it, it does not fluctuate much. The real test will be the riding test. I hit 16V between Rolla and KC yesterday, and that scared me.So relating to what you posted about running high voltage, I finally got my bike back together after doing the wiring mods, then hooked up multimeter, started her up, woooooooo 16.0vdc. Not cool. Well that wasn't right thats for sure. So, I got a different Multimeter because I have blown several Amp fuses in that meter and was thinking maybe somehow I damaged the meter, since I pretty much just use that meter for amperage testing. So, new meter, boom..... 16.0vdc. Well, I wasn't happy. So, I remember Jeremy mentioning to me that he had this problem and it was an issue with the R/R's Monitor Feed ( Black Wire > Ignition ). So pull that fairing off again, backprob the 'black wire from R/R with one multimeter, while leaving the other multimeter hooked directly up to the battery, ( Battery showing: 16.0vdc, Black wire showing: 12.3vdc ). Cha..ching! So, pulled the black wire out of the stator connector harness, hooked it separately ( out of the connector ) up to the battery direct to she if this helps the problem, plugging the harness back up which connects all the wires but the ' black > white / black '. So hooked this wire up, boom, voltage charge dropped instantly from 16.0vdc to 14.7vdc. So hook up a perminant wire from stator voltage monitor wire ' black wire ' to battery, still solid 14.7vdc. Slapped fairing back on, good as gold.
Edit:
if you run a new wire from black monitor wire to the battery, you have to, have to, have to disconnect the black wire to white/black wire from eachother in the harness. If you don't when you turn the key off, the bike will keep running because it wills end a reverse 12v feed to the ignition switch, tricking it to thinking the key is still on.
Edit End:
Come to find out, this high voltage problem has been going on for a while I suppose ( haven't checked voltage in about a month, was good then though ), but didn't test voltage before I started this project, so... lesson learned, but problem solved. So, back to what this thread is about. I ran the two new 12guage stator wires ( red/white ) from regulator to battery to lower resistance while keeping an additional 30amp fuse in each wire. So, pulled the fuses out of the new wires, tested voltage, 14.5 vdc, put fuses back in and tested voltage, 14.7vdc. Not a huge improvement in my case, but dropped resistance on the feeds for sure. Have been pretty constant on doing a lot of preventative stuff without any problems, excluding the new R/R monitor wire I stated above, which has been my first electric issue thus far. Some people get better results than others, but its a peace of mind and worth the time to prevent issues before they occur for me, instead of waiting for things to blow then figure out what happened. :thumbsup:
-
Looks like your on your way to where I want to be. I'm doing this this weekend. I'm hoping to lower my voltage as it sits around 15.1 most of the time. I think that's high.
Might want to check your battery voltage feed to to the R/R resistance, which tells the regulator how much voltage the battery has, essentially the regulator thinks the batteries running at 11 vdc ( example ), so it steps up charging output to make up for the low voltage. ( I'm thinking you shouldn't have more than 0.6 ohms when connecting between the Red/White to Battery + ) I was talking to Jeremy556 about this yesturday and apparently several people have had problem with this, which I was unaware of, but it can cause charging to peak at 16+ vdc sometimes. I don't know a whole lot about what was causing the problem, all I know is Jeremy said when he ran new wires it fixed the problem allowing correct monitoring of battery voltage. Might be worth a farther search on this before getting into it for I just did this to pick up a little voltage and lessen resistance across length & connectors. I think total if you include fuses as connectors, the voltage runs through 4 connectors w/ a 0.2vdc voltage drop off each connector, which off the top is loosing 0.8vdc. Will post final results later.
Edited: forgot to add this: was getting 0.6ohms of resistance off the factory feet from r/r to battery, getting 0.15 ohms of resistance off the new wiring. Big improvement of resistance off the top.
-
Got my bike ripped apart rewiring everything I can think of and decided to add the RR>Battery rewire to the list. Did mini writeup. Most of the stuff should have been covered through the rest of this post, but heres a couple pics of what I did. Haven't got the bike back together to test it but I'll let you know what my results are when I finished, hopefully by Sunday.
-
Hmm, interesting mod. I like it. :thumbsup:
-
Wow ken now thats an extreme way to make sure you drill the whole straight. Looks good though I like the idea. Would have never thought about doing it that way. :thumbsup:
-
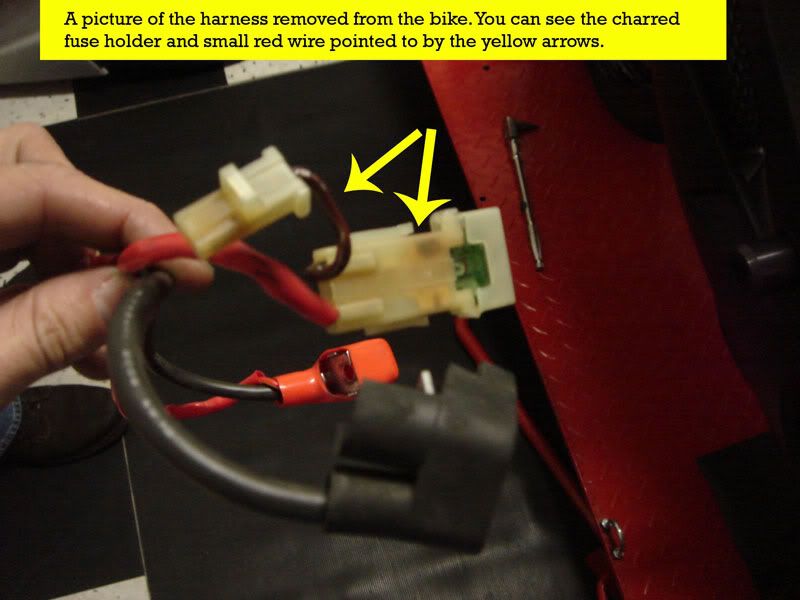
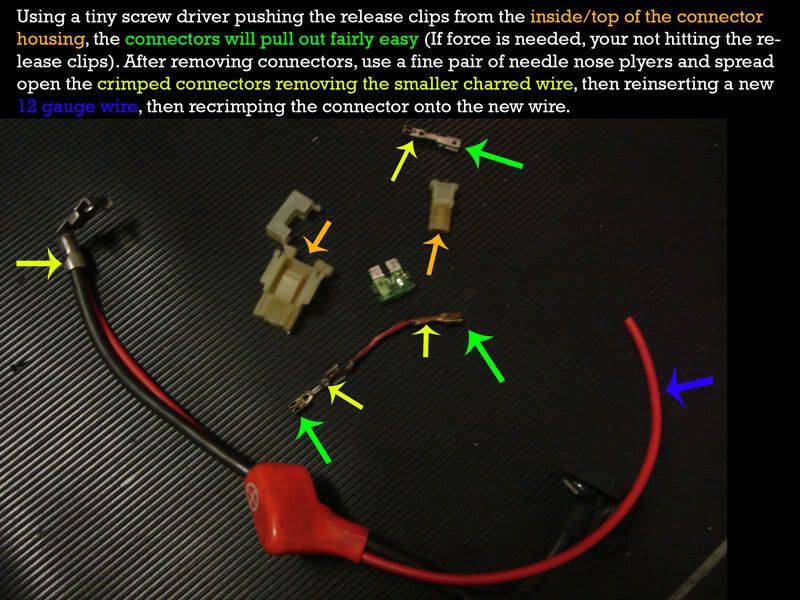
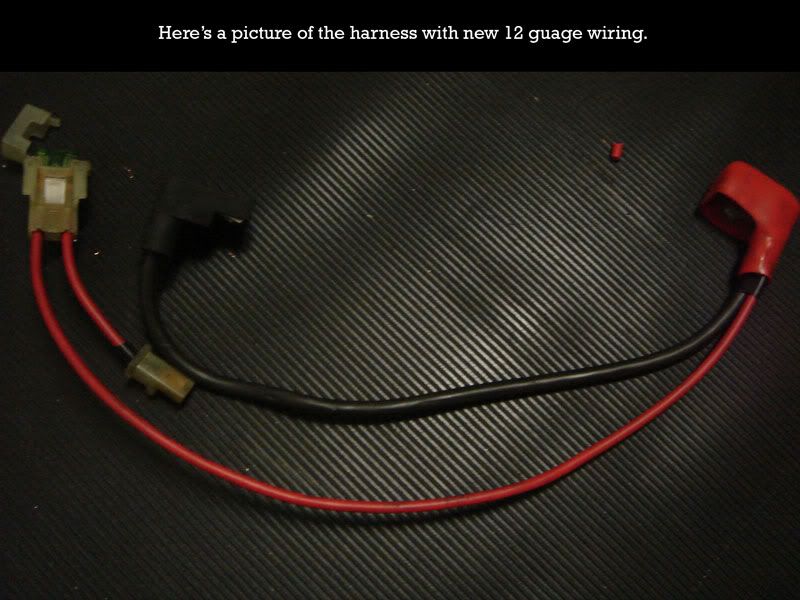
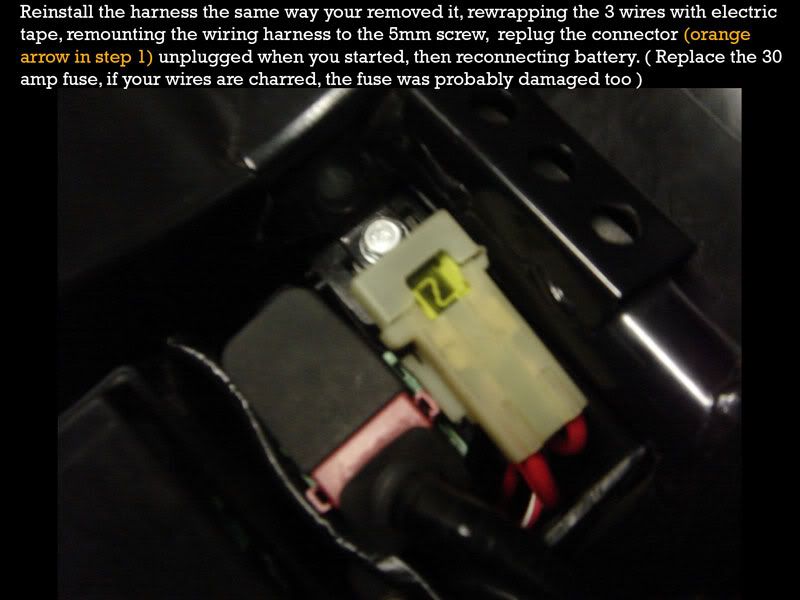
Was asked to post this up from another How-To i made here:
http://www.vfrdiscussion.com/forum/index.php?showtopic=29737
There was a writeup before, and a couple different people saying how they did things, but no pics. So we were replacing Teague's last night ( and mind even though mine wasn't shorted out, just for prevention ), and I decided to take a few pics of the process. Any questions let me know.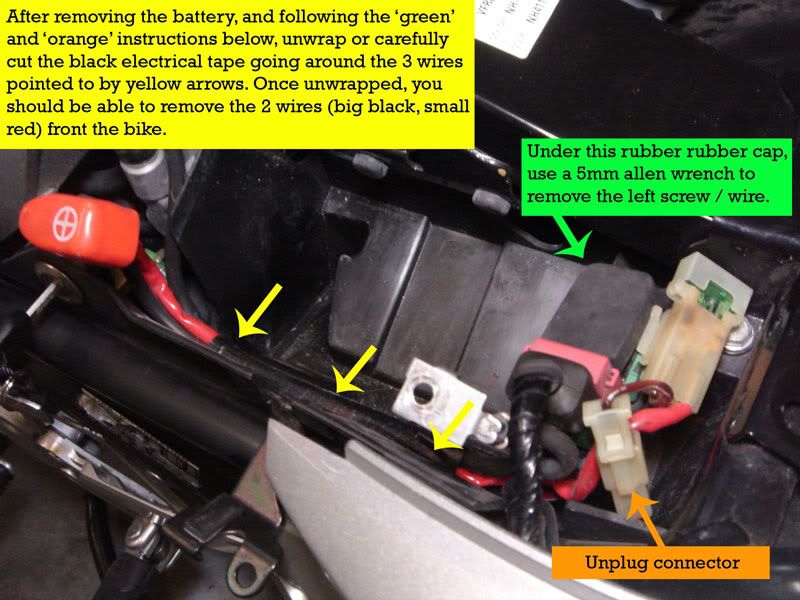
-
1
-
-
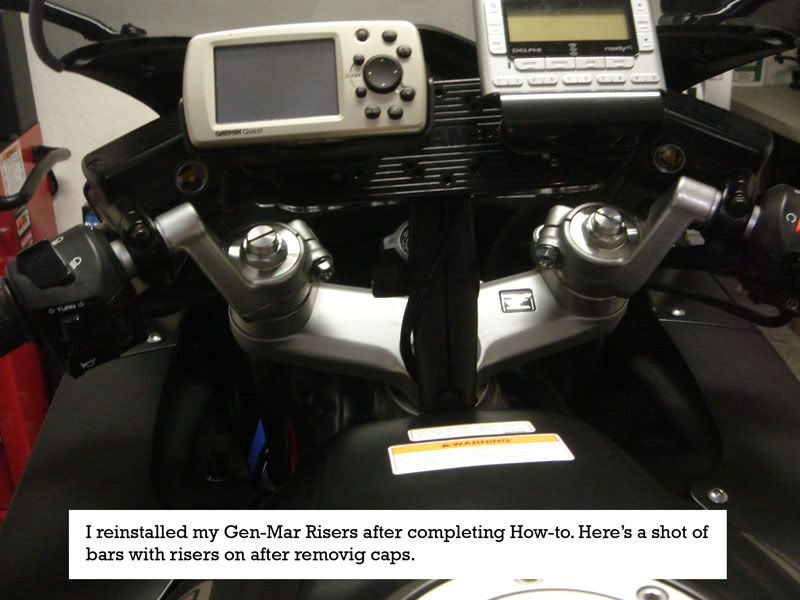
I just realized Tuesday I had room for a "double-stack" of Gen Mar risers under my stock bars.
Wow, thats a lot lol. Suprised you don't have ground clearance problems with that. I'm contemplating investing in an Ohlins rear shock, I've just never been able to get the suspension setup the way I want on the rear. Gotta wait til after TMac because that will be a 2 week trip for me so need to save $$$ til then.
-
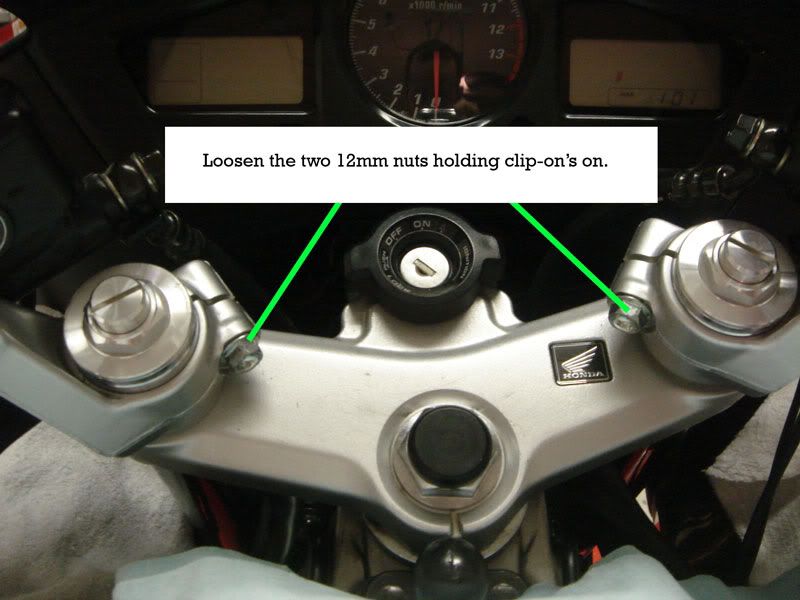
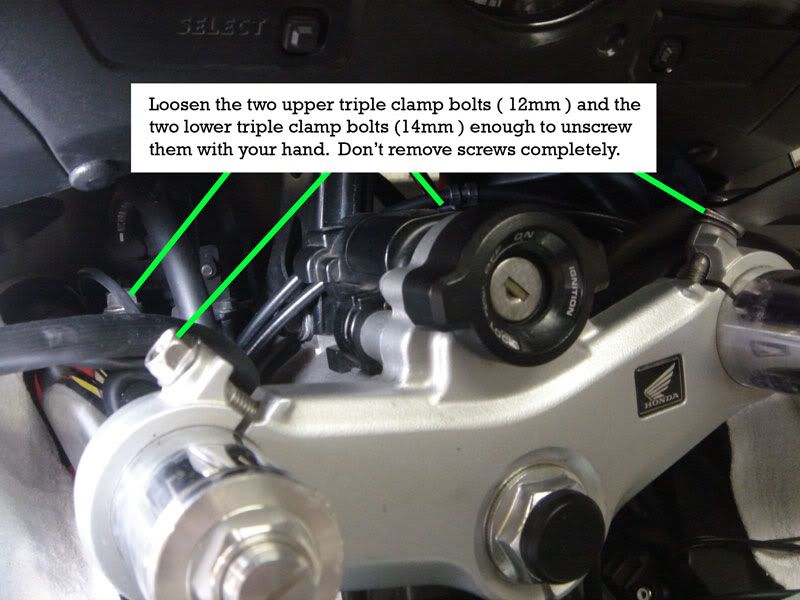
id be cautious loosening both legs at same time. seen one person due that with weight on the front and soon as he loosened the second legs lower pintch bolt the both legs went sliding up and a crushed up fender was the outcome.
Owe yeah, lift the front off the ground first, edited first post to add that. I just put it up on center stand and tie-strapped the back down to lift the front up.
-
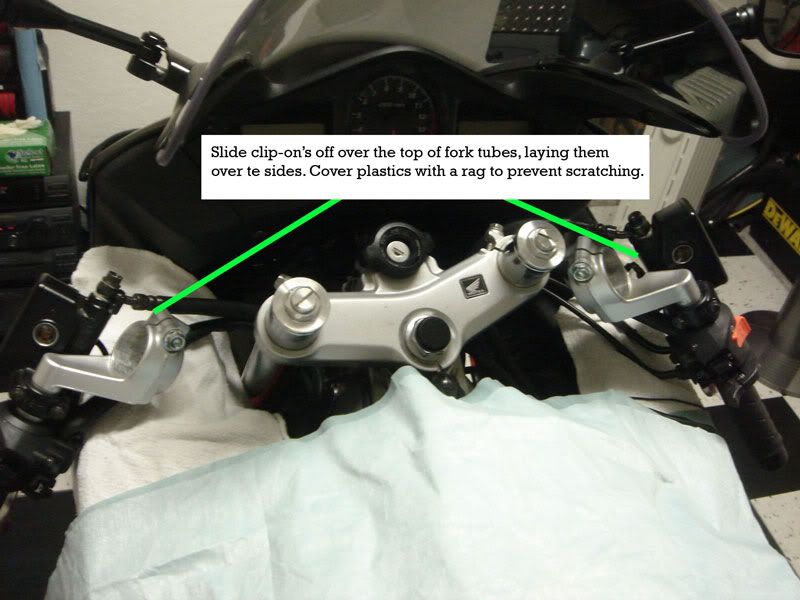
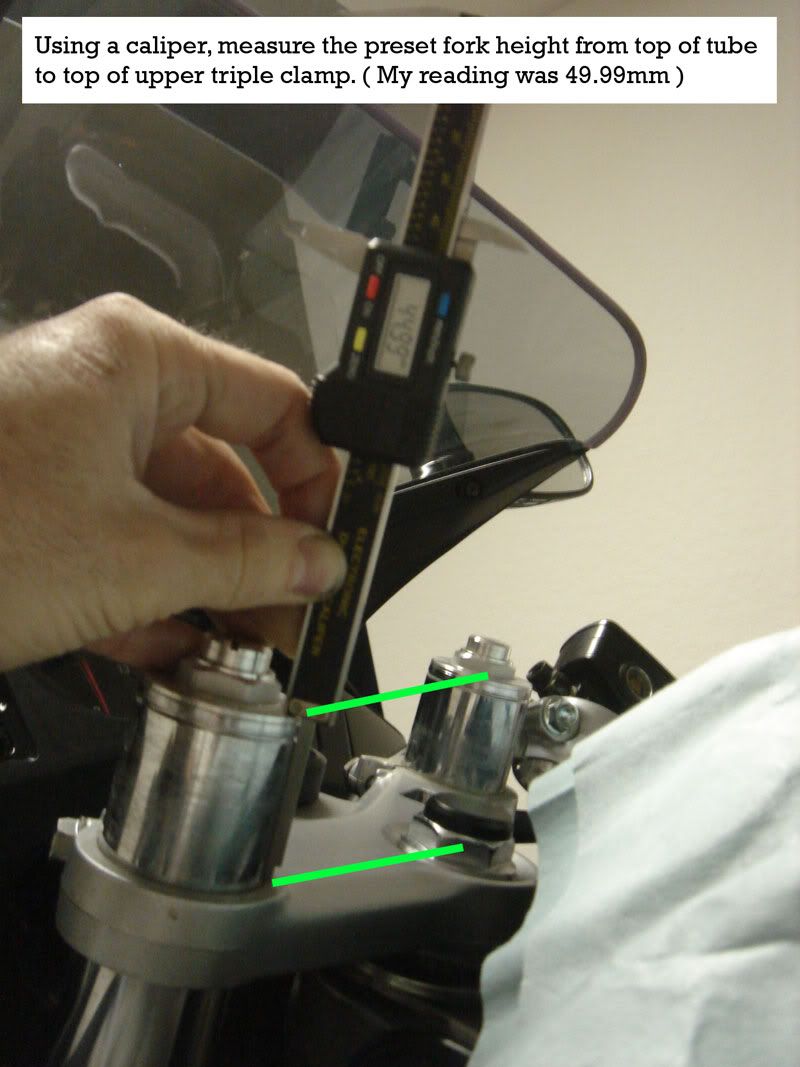
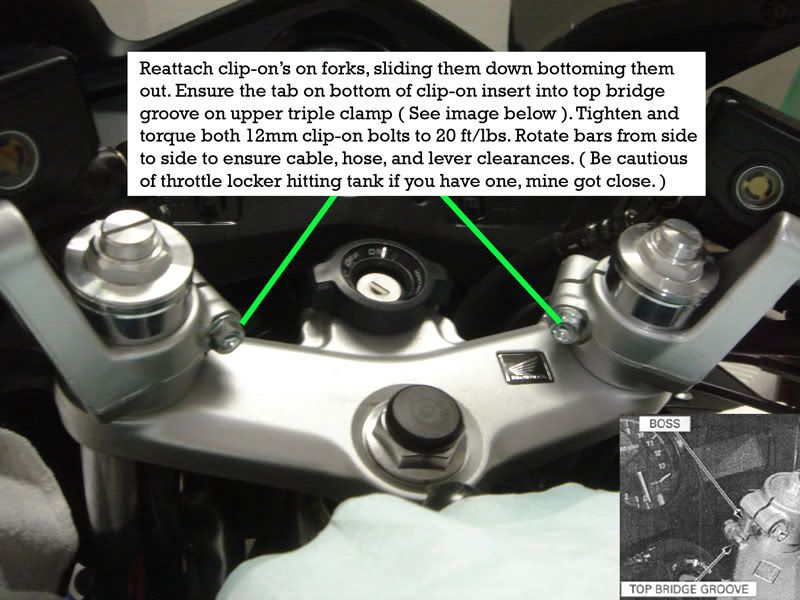
Was raising my forks up the way I had them before I took the bike in for warranty work on throttle cables, figured I would do How-To in case anyone was interested that was unsure what to do. Enjoy!
Cover tank before you start, in case you drop a wrench or something. I've learned from experience.
Edit: Forgot to mention, raise the front of the bike up before you start. The bike will come crashing down from the weight when you loosen the 4 triple clamp bolts if you don't. I put mine on the center stand and pulled the back down with a tie-strap.

Experiences of a PCV with Autotune on a 2004 VFR800
in Modifications
Posted
This is actually the first time I've seen a this detailed report or even paid this close attention to how in depth the autotune is. I'm impressed. Look forward to hearing more about your experience as your weeks go by, I may have to see about doing this myself, just to have a hands on and see the comparison is after riding with PC3 for years. Great report BTW, Thanks.