


FotoMoto
-
Posts
1,137 -
Joined
-
Last visited
-
Days Won
3
Content Type
Forums
Profiles
Gallery
Blogs
Downloads
Events
Posts posted by FotoMoto
-
-
What other NON-VFR wheels will mount up to our beasts?
Short answer: nothing else bolts up to the stock VFR hub.
-
 1
1
-
-
Dang, pres589 beat me to it! :rolleyes:
-
So, if you know a good machine shop in the San Diego area, let me know.
Paging BLS (busylittleshop), you have a customer on the parking lot. BLS, you have a customer on the lot. :rolleyes:
-
My RCBVFR is down to 491 lbs. wet (real world wet=full tank and all fluids). Getting another 40ish off it would, IMNSHO, be realistically impossible; 20ish, maybe but that would come at an extreme cost by throwing lots of carbon, ti, and magnesium at it, many custom bits. :rolleyes:
If weight loss is the ultimate goal and a worthy goal it is since it is always "working" unlike motor mods, then an F4i front end may have been a better choice. USD units are typically heavier and most utilize massive rotors (320's) which is good for braking but somewhat negates the mag wheel weight savings.
This is a path of diminishing returns. It's starts off easy and relatively cheaply (aftermarket exhaust, chunking stock parts) but gets progressively more difficult. We each have different levels for when this becomes silly. For me, it would be spending hundreds of dollars for mere grams of weight savings on a street bike (Ti bolts and screws, etc). Your best bang for the buck in weight savings comes from unsprung weight. Unfortunately that isn't very easy to do on the VFR rear end.
-
When I started seriously considering this conversion, I decided that I would need to have inverted forks with radial brakes. That eliminated the most common upgrade, the RC51 SP1, which automatically made the process harder.
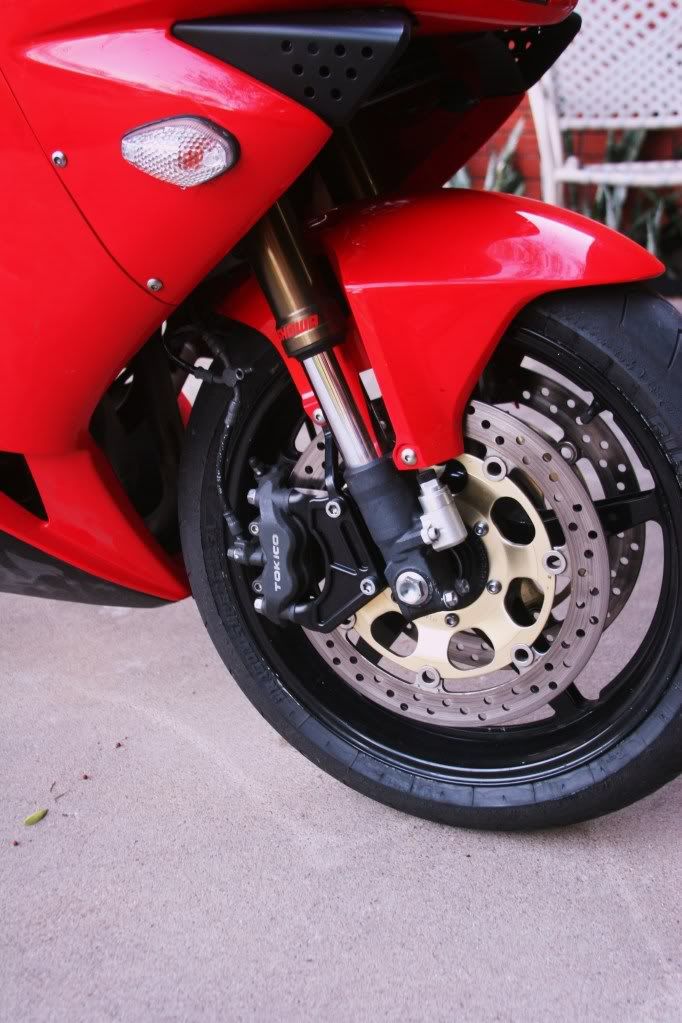
After trolling some Kawasaki forums, it turns out the stock ZX-10R Tokico calipers were kind of weak, so I abandoned the set I had scored and instead bought a complete '04-'05 CBR1000RR braking system.
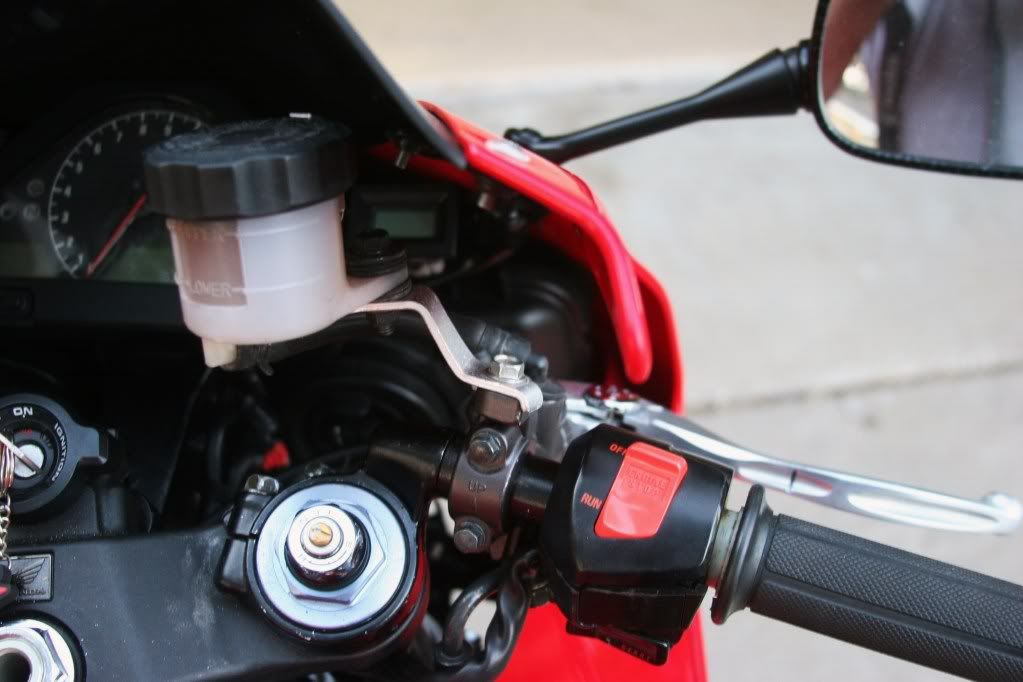
Stock RC51 brakes (full system) are serious kit and shouldn't be brushed off when upgrading but radials, of course, are more up to date and are easier to source. I, too, sourced adapters to mount cbr1000r radials (pictured). Better yet, I later found a set of mono-blocks for $40!!!!! :happy: They (not pictured) will require shimming on my mixed bag of parts configuration while adding even more brake bling :ohmy: :fing02: but hopefully will provide more feedback and sensitivity.

As for the zx10 brakes reputation, I suggest a big bit of pessimism as that bike has way more HP/performance than any Viffer. I think they'd more than adequate on the VFR.
My 2cents.
Lacy,
Good luck with the mods and give us an update when you get it all together.
-
-
got that swivelsocket somewhere,
i'll give it a try tomorrow.
Thanx again!
Lubricate now if you haven't so the oil can have time to work. The rear nuts are the hardest. Sometimes the nut will stick (weld) to the head stud and you will have to remove the stud too. It can be tough and slow work.
-
Nobody has ever done this before. <joke>
No you don't have to remove the engine or the rear subframe. Yes, there is very little space to work on the rear pipes. Get a small swivel socket adapter to reach the rear exhaust collar nuts. Like this:
http://www.toolprice.com/c=aBNQBIOjjRvV1Em...et_Adapter.html
A long extension is needed too. Spray all the nuts with penetrating oil/lubricant first and give it time to work into the rust and dirt.
Remove the muffler first, then the main exhaust assembly, and the rear down pipes last. Reverse order for new exhaust but don't tighten everything up till all parts are on. New gaskets are highly recommended as a leak will require doing it all over again. It is not easy and help is recommended. I use a floor jack to hold it in place when doing it by myself.
We have several Dutch members who may be able to help too.
-
I touch a brake lever if warranted; not real hard to do and you're even better able to smoothly apply brake force if need be.
-
Here i have boosted bike performance no end!
Looks great! Start thread with details and more pics please.
-
OH MAN I love the ingenuity! :blink: :laugh:
Unfortunately for me and my pea brain, it's remembering to use it that would be the weak link (pun intended).
-
BEST VFR streetfighter I've ever seen. Very well done Gazman. :fing02: :beer:
I don't now what I like the best so it's easier to say what I don't care for: the 3 spoke duc wheel. I'd rather see a newer duc design on it (1098 anyone?).

-
Gearing. -1 +2 is common but I find it to be a tad too much
Used aftermarket header
air filter+jetting kit (should still be able to find new or old stock)
drop weight
-
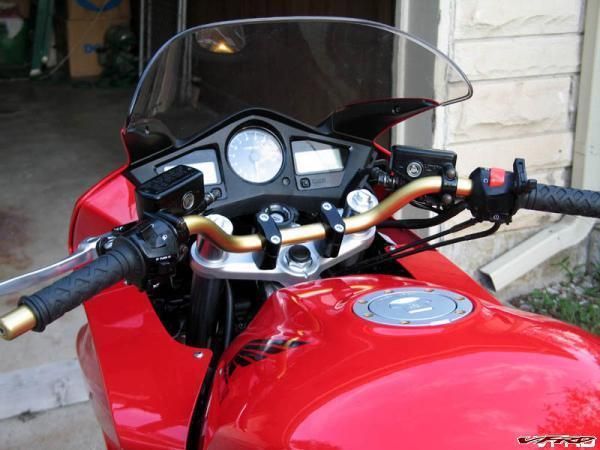
I did something similar but more involved on my RCBVFR with it's RC51 front end. The stock RC clipons actually have a negative rise (extend downwards) when mounted underneath the top triple. This makes the RC so darn comfortable on the street. :fing02: Since I have my RC forks raised on the 4gen for handling reasons, I had enough tube material to mount them above the triple. Switching the clipons left to right AND inverting them, changed the former negative rise into a positive but the bar ends now pointed up too high. No worries, a long cheater pipe solved that! A pic is worth a thousand words so here it is:
Yes, I had to redrill new holes for the locking pins on the switchgear and throttle housing. This pic was taken before drilling so the throttle housing isn't completely cinched down.
-
I researched around and found a few differant solutions.
Gen-mar bar risers- cheap but not enough rise
Heli-bars- better rise but not adjustable
Converti-bars- adjustable but too much money
LSL Handlebar risers (from Spiegler)- about the same price as Heli-bars but offer potential adjustability.
May I add a 5th option? Make your own:
SuperBike Bars Gold renthals with off-road mounts.
I've STILL never seen a pic of a bike fitted with these kind of bars with the bars at anything approaching full lock.. I wonder why ?Kinda' hard to tell but here ya' go. No issues at full lock; especially on a 6th gen as the fairing seems designed in mind for this option/mod.
IMG_0469.jpg
-
WOW folks, just WOW. A collective thanks to VFRd. :mellow: Obviously, there's no way to sincerely respond to every post but THANK YOU everyone! Sorry I haven't replied sooner. I've been chillin' and using a keyboard with bruised fingers is not fun. I dictated the OP to my wife but the fingers and wrists are way more better now.
Yes, the RCBVFR will be a force again. Damage is bad but not that bad and it could be back on the road for less than $500/used prices but obviously I don't have the time to do it before the summer summit. Speaking of which, I do still plan to attend. Plan B is afoot. :biggrin:
-
Short version: 100% pit crew's fault.
Longer version: Friday evening during a long and last checkup ride before heading to the summer summit, I had an instant and violent 75+mph highside on a straightaway. Over the summer I had upgraded the front brakes on the RCBVFR's RC51 front end to cbr1000rr radials. The brake line mounts didn't match up but the lines were so short I didn't worry about it. About 150 miles into the ride, I hit a hard bump at a concrete bridge/road junction. Upon compression, I believe the crossover brake line got sucked under the backside of the front fender, pulling it taught enough to apply full pressure as the line was pinched closed then snapping. Instant wheel lock, front end tuck, and high side. I recalled a snap or pop sound right before my superman imitation.
I was launched into a Lorenzo class highside into the opposite lane as the bike slide down my lane on its left side. I landed on my knees first (hard armor) , then hands and face plant (HJC modular helmet). I flipped over once landing on my back to slide it out on the concrete bridge. No traffic or it would have been worse, a lot worse.
Bottom line: gear works. I have some rash on the left knee but more on the right butt cheek, some wrist pain (better all ready), a few contusions and bruising. Basically, I feel like I went 12 rounds with Mike Tyson but meds help! :fing02: It's been about 25 years since my last major crash and I'd like to lengthen it even longer for the next one; a lot longer!
Attending the summit is looking iffy at best. I'll try to make it if I can but the RCBVFR certainly won't be there. Oh well, I built it once I can build it again. (cue bionic man theme song).
-
What bugs me about my voltmeter that's run through an existing circuit (former license plate light) is the wiring and relays along the way that switches the power on and off with the ignition, will most likely cause a voltage drop, so the numbers I am seeing isn't exactly what the voltage is at the battery. Not as critical with analog meters, but the digital ones tend to see thsi discrepancy more.
Yup, that's why I checked with my hand held meter at the battery and wires I connected the Datel unit too and noted the difference. On the RCBVFR, it's about -0.5 volts so I "factor" that in when I read it. On a previous bike, I went to the trouble of running wires directly from the gauge to the battery via a relay activated by the tail light wire. IIRC, it was less than a -0.2 volt drop.
-
Hmmm, I wonder where they got that idea from..... :blink:
Seriously, I took it from the goldwings but never could find a cheap one, even on flea-bay. That's when I got the idea to try a marine unit. I can't believe they Honda is only $17. Nice find.
Yes, you'll certainly need a relay; especially, if it's lighted design. I prefer dash mounting as it's easier to see and I take my fairings off to often. I have since moved on to a datel unit due to fork clearance issues.
-
I've tried to explain in the past what it feels like to ride a supercharged bike, but I think you've nailed it here. It's just a really fun powerband to play with, and that rev-limiter does come up awfully fast.
Dan,
Have you considered or tried "easier" gearing. A larger front sprocket (6gen) might do wonders with 1/2 gear acceleration and due to the abundance of torque 3/4/5 probably wouldn't feel any different.
-
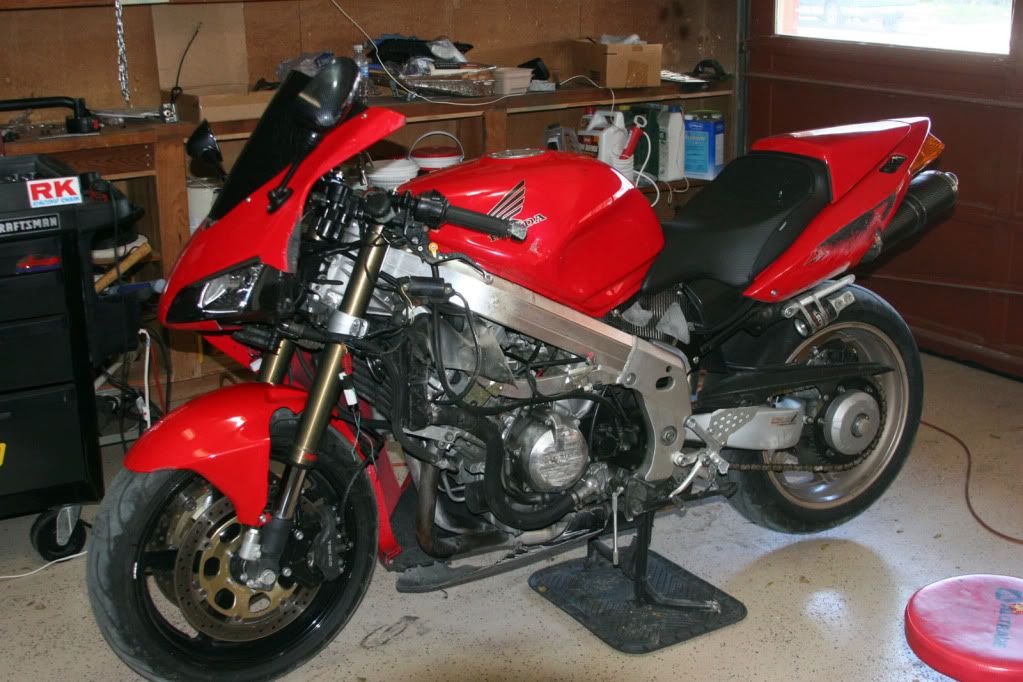
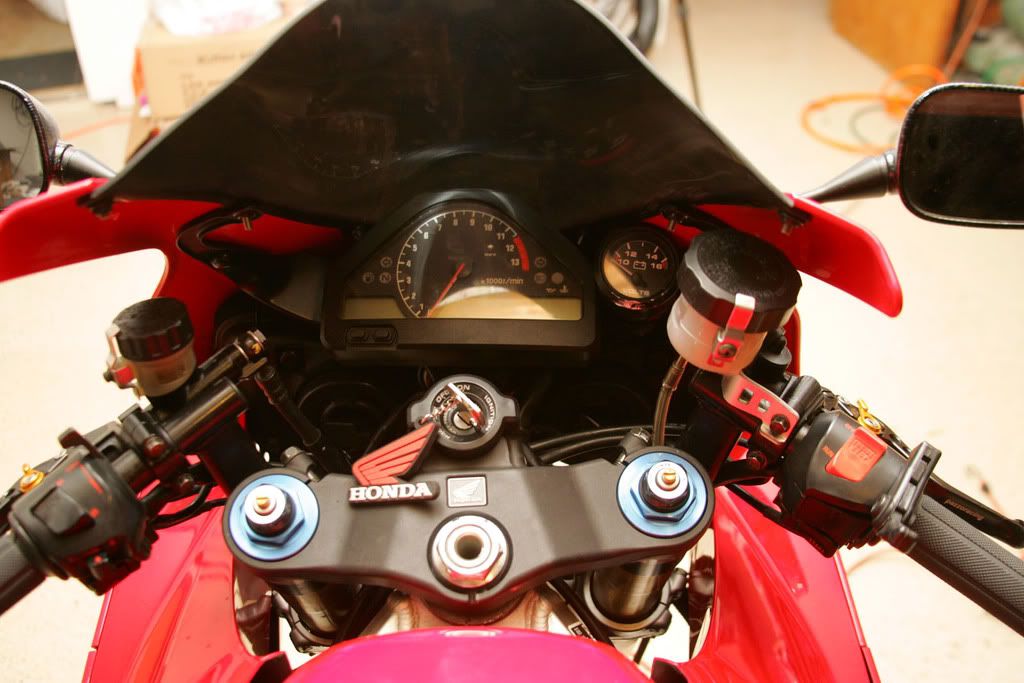
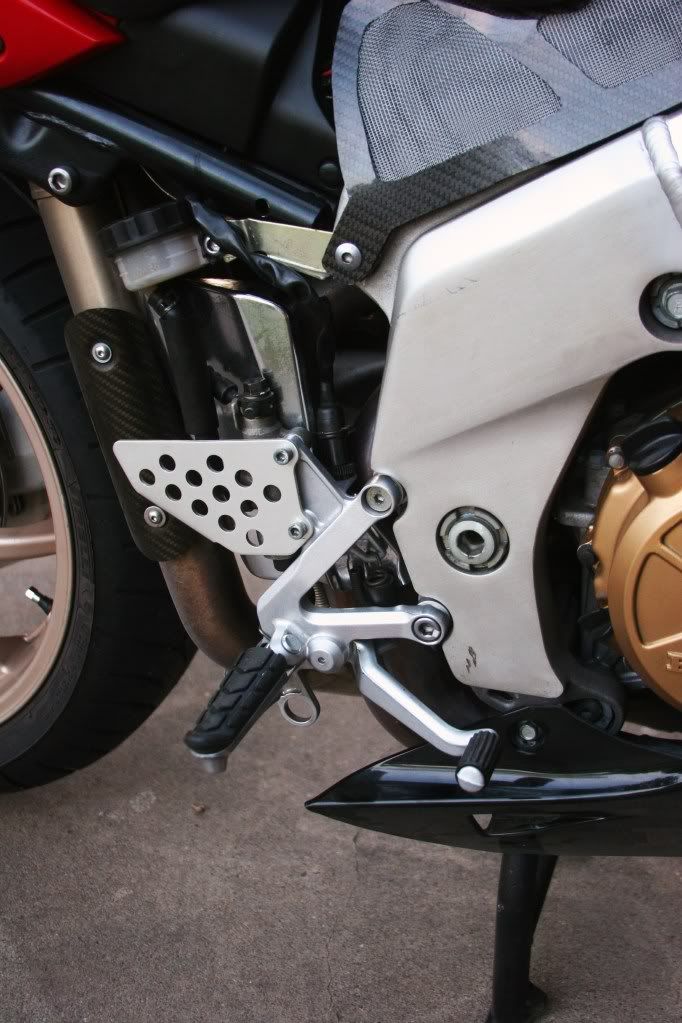
A few more mods: CBR1000RR radial front brakes via custom mounts, RC51 clip ons, and RC51 footpeg assemblies. Just got it back together tonight so I haven't ridden it yet but did butt test it in the garage. :beer: The pegs are about in the same location but IMO look better/more modern and replace damaged/rusted stockers. I could have re-installed my buell footpegs but after owning an RC51 for the past year, they now feel too low. The altered clipons are closer to me and have a better angle. The brakes stopped it when I pushed it outside. :blush:
The business end of the new rotor chompers.
CBR radial master cylinder mounted on the RC51 clipons. With the fork tubes raised, I had enough room to mount these ABOVE the triple. I reversed them (left is now the right) and bent the angle to my liking with a cheater pipe. :cool:
The footpeg hangers are about 1 to 1.5mm off in bolt spacing but slightly enlarging the holes of the RC units with the next size drill bit did the trick. The rubber footpegs are aftermarket as the stock RC pegs are bare metal. Gear change assembly went on easily; I only had to space the entire mount out about 20mm for the shift rod to clear the frame spar. NOTE: with a shorter rod you could easily go to GP shift if you prefer.
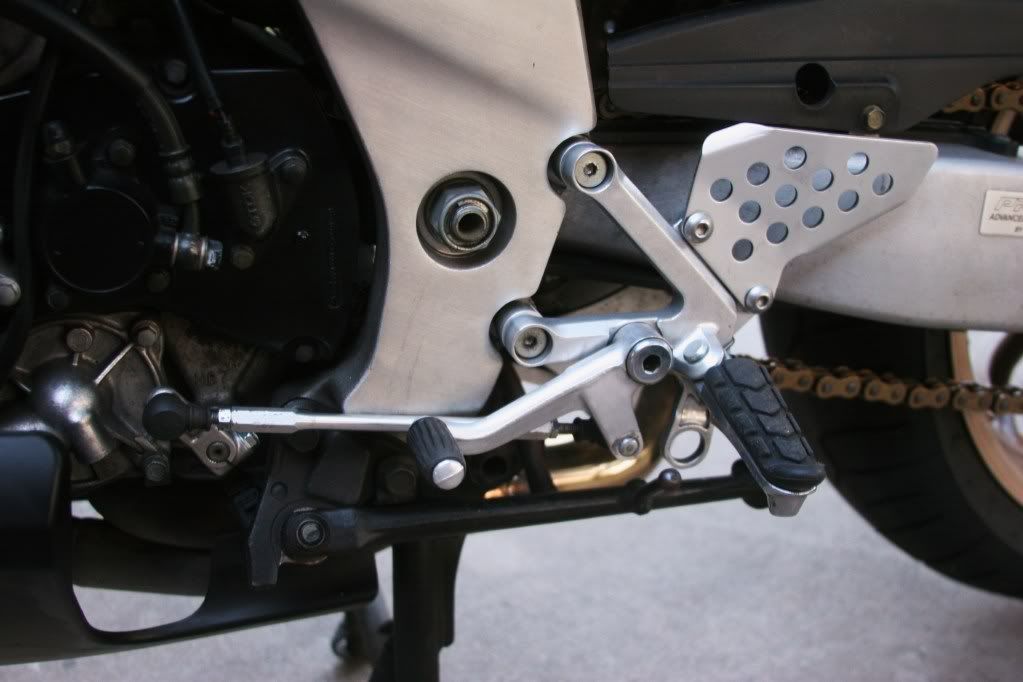
The rear brake side also bolted on after enlarging the holes but the heat shield needs adjusting. There is a gap at the front letting out more heat so I'll need to address that; probably with a CF solution. I still need to cut off the large holes on both sides. These were the mid-pipe exhaust mounts on the RC and aren't needed here.
Hard to believe it's really a 96. :fing02:
-
:lurk:
Good stuff here
So am i right, a cbr/rr clock will slip right in place of my 4th gen clock?
Or do i simply need a speedo healer to make good?(never used or seen one of them before)
A how do sheet with out all the fluff would be awsome.
No, the cbr1000rr clock doesn't bolt to the stock fairing bracket (stay) so you'd need some kind of adapter plate or brackets. Plus it's a LOT smaller so you'd have some unsightly gaps with the stock 4gen plastics.
You need version 4 of the speedohealer. The older versions don't have the wide range of adjustments needed. BTDT
You would also need the cbr headlight/instrument panel harness that plugs into the back of the gauge. All this involves cutting off and splicing into the main harness; not for the timid to say the least.
-
[ I still haven't even fed out all of the red stuff that came in the pump. (What is the red stuff, anyway? Maybe I should cycle it through "prime" a few more times, and push that red stuff on out.)
I don't know what it is either but I think it's ATF so you can see it easily. I added mobil 1 syn (only open bottle I had on hand) and it's pretty hard to see in the line once I purged all the red out.
Can't say anything about fling yet as my RCBVFR is currently sans front wheel but UPS will fix that today with delivery of an SP2 RC51 hoop. :fing02:
-
Speaking of the gas tank, how did I mount it? Well, the subframe didn't come with the gastank bracket, and I couldn't find one. But, I HAD to have this thing on the road, so how did I do it? Zip ties. The back of tank is zip tied MANY times to the gastank mounting hole/tube. When the bracket get in (no one had it in stock), I'm going to cut the mounting tube off the tank and weld the tap to the seem (if you are familiar with the tank, you know what I'm talking about). Once I do this, I *should* be able to mount the tank the stock 6th gen bracket. Along with this, I'm still waiting on the side covers to come in, and I also have to mount the license plate (it's just zip tied too). After that, I should be done
This is why I didn't do mine this way. Welding. Gas tanks. Not for me! :dry: I preferred making a couple of brackets with longer bolts and it's been working fine for the past couple of years. I know of at least a couple of other folks working on their versions as I speak. Modded 4gens are the perfect future! Prepare to be assimilated. :biggrin:
St3mpy hasn't logged in since Nov. Got busy with school?
Where HeliBars left off, my new bars succeed!!
in Modifications
Posted
GREAT, easy mod. :blink:
The only downside I can see (besides color mismatch) would be finding a nice straight pair from these now 25 year old specimens; can't be that many floating around as the 1000's didn't sell in near the numbers of the 500/750's. When I had a CBX with 39mm forks, a popular mod was to add VF750f bars for a lower, more sportier, position as the stockers where incredibly tall.