


JES_VFR
-
Posts
390 -
Joined
-
Last visited
-
Days Won
1
Content Type
Forums
Profiles
Gallery
Blogs
Downloads
Events
Posts posted by JES_VFR
-
-
OK, so AC voltage checks out on both RC and PC. However, the book also suggests checking for continuity between the stator plug and ground. Should NOT be continuity. It seems as though both bikes DO have continuity to ground on all three connectors. Low continuity plus the AC voltage being ok leads me to surmise that the stators both charge, but not at full capacity. Which is where I'm at currently. Haha, currently! Get it?!
The VFR, by the way, with new Ricks stator has zero continuity on the plug. That tells me I'm performing the test correctly, at least.
So, seriously? I need Two new stators at the same time? The only similarity between the circumstances being the MOTY. Coincidence? Five years and over 55,000 miles difference in the two machines.
Thoughts?
Well continuity to ground is a sure sign that the stators are Tango Uniform..
Why, who knows.
as for your comments on your RC having previously been a good charging machine, I don't know what to tell you.
My SP2 just about makes 12.8 at the battery, at idle..
I have yet to have a battery sit in it connected, for more than a couple of weeks without needing a recharge.
So you know the next time I'm in doing any electrical work on that beast, Its going to get a new stator, a new rick's R&R, all grounds tied together and the positives from the R&R run directly to the battery.
I keep planning on tying all the VFR's grounds to a common point and running the positive from the R&R directly to the battery.
-
Careful, I'm 44 (almost 45) and still play Magic..
Very nice Rob, I thought about the art work from Nightmare when I was rebuilding the VFR.
to the OP.
I'd go with the Pro-oiler, if I was sure that general vibration and motion would keep the multilube mixed enough.
-
I'd be interested in the plates.
Okay, I spent a little more time looking around at these retrofits and now I have some more questions for you.
Why did you install them so far forward in the housing?
I understand these lights don't need the reflectors at all to focus the light pattern, so their position fore/aft is not critical to the pattern produced, but I would have tried to move them as far aft in the housing as possible to disperse the hot spot on the front lens as much as possible. There is some space behind the headlight housing and the front forks on the VFR, space I would think would greatly help manage any heat issues.
Why did you leave in the reflector? Or are am I not believing my eyes when I look at the reassembled headlight and don't see the reflectors.. When I looked at it before it looked like you were only leaving the reflector for appearances. It looked to me like your mounting plate was a complete replacement for the reflector.. Am I missing something here?
Did you look at any of the mini projector replacement kits? or are there too many compromises in their designs compared to using the full size units? I mean a pair of the one company's superbike kits would run $300 and would not involve as much fabrication..
Have you tested the headlight to make sure that you got it resealed? I have enough issues with US OEM car headlights leaking, that I don't want to open myself up to a leaking VFR headlight.
Made any decisions on where you are going to mount the ballasts and relays??
Seeing the H4 to bi-xenon projector kit, has me thinking about this a lot.
Whether I do a full size set of projectors like your are doing, or just go with the H4 style ones, I think I'm hooked.
70W of power to the headlights is a lot better than the 110w/120W that I'm currently drawing.
Add in the much greater output and its a no brainer..
Now, I'm off to find a spare headlight.....
-
Any updates on the moveable H4's?
I'd really like to get a set on my 5th gen, both for the great amount of light they throw and the reduced wattage compared to the auto H4's I'm running now.
-
I'm sure that when Dynojet rolls out their pc5 for the VFR1200F, they will have the de-restriction worked out.
Its kind of a must for them, as they will be working with in the ecm harness to determine the gearing for map by gear anyway.
I'd be that it's just a change to the Throttle by wire positioning map.
-
I just installed a Compu-fire 55402 series regulator; I bought it from Chrome-Addiction.com for $173.
The unit is a little smaller than the standard Honda R&R but the mounting holes line up nicely so installation was easy. I just cut off the stator connector and lengthen the wires then connected them to the new regulator using a connector block. The unit came with 2 long and very beefy power output wires which I connected directly to the battery via the 40 amp fuse that it came with. This avoids using the old cables and connectors that everyone here on this site seems to replace with a VFRness.
The regulator gave 14.25 volts at the battery and was supplying 15 amps to run the bike and charge the battery i.e. much less that the 40 amps that is continuously supplied by original shunt unit most of which is dumped to ground.
The major benefit of the series regulator is that the power supplied is typically half that of the standard unit as it doesn’t regulate by dumping excess power to ground. So I don’t expect to burn up regulators and stators on regular basis as many people here seem to. The regulator is rated at 40 amps which gives it has plenty of reserve power for more accessories.
How is it for keeping cool itself?
I mean when my OEM R&R failed on my 2001, you could fry and egg on the fins (I burned my hand through a leather palmed work glove).
So when I installed the Rick's unit I mounted it on a heat sink plate and now it gets warm, but not hot.
What I'm most concerned with right now is the fact that the Honda wiring harness is causing a nearly .7V drop between voltage at the regulator connector and the battery terminals. Getting a VFRness should solve that issue. It is interesting that the compu-fire unit only needs one positive and one negative output wire.
Still I'm going to be watching this thread to see how the compu-fire unit holds up.
-
I have not read the entire post yet.
Which way does your car fan run? Does it pull cooler air toward the engine or does it blow hot air from the engine to the cooler ambient air outside of the car?
Bikes are not diesel trucks ,the small capacity of a bikes cooling system are not made to cope with the traffic conditions that we find ourselves in.
Actually it matters not if the fan moves the air over the engine or not. What matters is that it draws the coolest air it can find across the fins of the radiator.
In you cars case the coolest air it can find is at the front of the vehicle.
The coolest air that both radiators can find on the VFR is still at the front of the bike. What happens when the oem sucker fan runs is that it pulls air from the left side of the bike, heats it with the left rad and then heats it again with the engine & header then pushes it out the front of the bike. The right side rad gets next to no flow and what it does get is already much hotter than ambient so the right rad just becomes a heat mass, not a heat sink.
The fan is dsigned to keep the heat off the rider, it works really well if the bike is working as it should. If your sitting in 100 degree traffic, at 223 degrees, the fan should kick in and take temp to the lower 200.s . I find the fan very effective sitting in traffic in its ability to drop the heat. But 100 degree in san antone or Austin will be hot no matter.
Turn the fan the other way, the Hot air will be hitting you in the face
I don't find it hitting me in the face. It used to rise up around the triples and bake both my hands, but now only my left calf and my left elbow get warm. I'd rather put up with that instead of overheating my motor.
In fact the only issue I still have with the heat on the VFR is that if I'm really stuck in hot traffic, the bike will go into the state where the fan constantly runs.
I think I may make some sort of extractor duct to make sure that all the heated air from the rads is ejected to the atmosphere and none can find a stagnant spot behind the fairing.
-
Not much to report here, as the roads around here are just getting back to rideable.
I had to repair one of the terminals in the VFR's pcm connector as the tab on it was broken, So the wire kept coming out of the connector, triggering the FI light.
I found a close match to the Honda terminal, in a surplus stereo installation kit. It was for a Pioneer radio to patch into a oem amp system. The socket was the correct size to connect with the pins in the pcm, but is was just a little bit shorter. Since that was not a problem once it snapped into the pcm, I chose to go with it.
One little soldered splice and a bit of heat shrink later, the FI light is gone. No more wedging fingers up under right side of the seat cowl and blindly pressing at the connector to "fix" the problem.
FIXED..
But the circulating pump was blowing fuses, Something was wrong with the wire where it enters the pump.
It has no real strain relief designed into the case, so all the fiddling around the pump, and with it, caused some internal short.
I got another pump from a marine supply (as they seem to be the only ones that stock the all plastic bodied versions of these pumps) and installed it with a molex two pin connector.
Still no strain relief on the pump body for the wires (and I may put some RTV around it), but now the pump won't ever end up hanging on its wiring.
This weekend I hope will be the one to break the cabin fever and start rubbing off the rust.
-
With the vast offering of HID components out there, I was not comfortable changing brands/types of ballasts. I am glad these are available to build kits from again!
I wasn't suggesting that you change the brand of ballasts that you use, I was only suggesting that I might be able to find you another source for them .
-
DDM Tuning no longer carries the slim ballast HID kits that were used as a base for the VFR kit. I am still able to supply the Relays and even specific wiring for other kits, but I won't be supplying the HID hardware until I can purchase the same kits again. I do not like selling products I haven't used myself, or had very good reviews from people I trust. Sorry to the 5th gen owners who expressed interest in a kit, it didn't happen prior to the ballasts going away. I do have the bulbs for the 5th gen, and will still look at developing a kit for when the parts are available again.
What brand were the slim ballasts, Tight'..
I've got contact with a local HID supplier that used to supply the cycle shop. They only sell to resellers so they don't even bother with a website, but I could contact them and find out if they have the slim ballasts you want to use.
-
So I started looking at the dual beam kit for the older gens. Here is how it works unmodified:
Headlights are disconnected, bulbs are removed.
One headlight connector is connected to the wiring harness for the HID kit.
Wiring harness has battery connections (fused) included.
Both bulbs are trigged from the one headlight connection...so the second bulb connector is left alone.
There is a relay in the wiring kit that works with both low and high beam. I don't know why they used it however, as the high beam is already relayed.
Each bulb has it's own ballast.
Each bulb also has a small 2 pin plug for the high beam solenoid.
I determined I could bypass their relay module which is really just activating the high beam solenoid, and just use the low/high beam relays to do the same thing, but there isn't a cost savings to do so, just a potential reduction in the wiring. The options I think we have (and i need input from the 5th gen owners on) are:
#1. Use the voltage latch relay instead of the low beam relay, and leave all else as is. This would mean both bulbs fire at the same time, but not until the charging voltage is above 13.2V as determined by the Latch relay.
#2. Partially re-engineer their kit to allow the addition of the bulb#2 delay relay as well by adding it inline with the second bulb. This would allow the use of both Latch and Delay relays as the 6th gen has.
#3. Completely change the kit, doing away with the added relay, and using the output of the high beam relay to trigger the solenoids inside the bulb housing. This would also allow the use of both Latch and Delay relays as the 6th gen has.
#4. Do away with the factory high and low beam relays, and use the kit as is.
#5. Same as #4, but re-engineer the kit to use the Latch and Delay relays along with their relay.
The cost will naturally vary depending on the final option choice. It woudl be helpful to have a 5th gen to try this on, as space limitations may dictate the best options.
Any thoughts?
My vote is for #3.
-
Another update:
While the wife was out of town, I decided to take on a project of laying down a stone walkway and expanding the flower beds. It was 105 degrees that weekend. I am not a landscaper. It sucked, but looks good!
I have more 5000K kits available to ship now, and I ordered a Hi/LO H4 kit for the 5th gens who have been requesting it. Looking at the bulbs, I am not sure how the dust boot will be addressed, as the motor portion on the back of the bulb that moves the shield to create the “hi beam” does not appear removeable. Wiring the Latch and Delay will not be a problem, I will only need to know how the relays are currently configured.
I also ordered an H7 kit for the RC51 folks who were interested. The RC51 (not sure about exact years) uses the same H7 style bulb in low and high beam, with the difference being built into the reflector itself. Wiring in HID bulbs would be simple enough, as would adding the delays. From what I understand (haven’t seen an RC51 apart) the wiring harness actually has H4 connectors, with adapters for the bulbs. The bulbs that come with the kit just have spade terminals to plug into the adapters….but those get removed for the Latch/Delay kit anyway.
If you own an RC51 and are interested in a kit, PM me to work out some of the details.
How are the Hi/Lo H4 kits for the 5th gen's coming???
I still want them even though there are some projects that should have priority.
The rc51 does indeed have the adapters from H4 harness sockets down to the H7 bulbs.I can send you pictures to help.
The issue I see with fitting HID's to the RC51 are the following.
While the low beam is on all time, the Hi beam is not, so the delay while the HID strikes the arc may be an issue. And if you are not going to fit an HID in the high beam because of the striking delay, what do you suggest as the standard bulb will just be utterly washed out by the HID low beam.
-
Okay, okay, okay JES.... how about a truce? If you and your loyal supporters leave behind the leftist, apocolyptic, conspiracy-piracy-theory-MIB-Matrix spoutings out of this TECHNICAL DISCUSSION about the merits or lack thereof of HHO, I'll butt-out with my criticism and chain-yanking from the sidelines. It is because of my pro-capitalist, anti-global warming, anti-New World Order, anti-Michael Moore, anti-Al Gore stance that I simply can't let unfounded opinions about the future of oil go unchallenged on this forum. When myths go unchallenged for too long, they begin to eclipse the truth. Thus I had to go on the offensive to put some records straight or at least question the liberal politics that have invaded your "Cooking With Hydrogen" thread.
So.....why don't we ALL leave politics out of this, as it serves no purpose. We can agree to disagree about the future of the planet and where HHO fits into it. Hell, I'll even stop picking on HHO as being junk science and sit back to see your eventual results! Let us allow the technical chips to fall where they may. Sound reasonable?
As for the future of electrical power generation for the Rest Of All Time Of Earth....learn what you can about Traveling Wave Reactors. http://en.wikipedia.org/wiki/Traveling_wave_reactor Lots and lots of science involved there!
For the record, I don't have any control over the people that post here. The only person I control is myself. I only wanted to clarify my point that, I feel we still depend too much on oil for our energy. I wasn't going anywhere near the politics of oil, not at the local level, state, federal or global levels.
I wholeheartedly want to keep this thread as technical as possible. For the record, my one exterior electronic thermometer records the highs and lows for the last 24 hours. At 0830 this morning, it had recorded an overnight low of 15 F, after only a high of 36F.
That prompted me to go out to the garage and check the fluid in the bubbler/conditioner. It was still liquid, which was good since it had been a while since I had last filled it with a 50/50 windshield washer and distilled water mix, I don't know if the bubbling action vaporizes any of the anti-freeze elements of the fluid or not.
If it had frozen, I would have had to thaw it out. Fortunately it was okay, so the electrolyte should be okay as well. If the roads seem okay tomorrow, I may attempt a ride to King of Prussia.
I doubt the new R&R will have any trouble staying cool with all that metal to try and heat up.
As for the chemistry and the physics of the process, I have the help of a guy with both Batchelor's and Master's degrees in Mechanical engineering specifically Internal combustion. He's published some works on Hydrogen's effects on combustion. Now that was straight hydrogen not Hydroxy, He's doing more research into separated gas electrolysis and Hydrogen Ionization effects.
He tells me what we need the system to do, Dustin and I design to match his equations and then I get to make it a mass production ready design.
-
What do you have to gain?? The launching of a project to free the world from oil addiction and slavery.
That is absolute bullshit statement and you should be ashamed of yourself. THAT is why I resurrected this thread....to expose this crazy political nonsense that blindly supports "capitalist oil conspiracy theory"....yet attacks anyone who points out the decades of scientific work that has totally debunked the Brown's Gas Conspiracy is infuriating and baffling.
Slavery? Oil addiction? Those are big words and have no place here, especially after I [me, Trace] got pounded for bringing this nutbag topic back for inspection by the membership and wondering about your (lack of) progress. I asked for an update, and we got more political spin instead of results. How DARE you shill for your own Pepsi project, asking your fellow VFRD members to vote for you regardless of the merits of your project. Ahhhh...I see. If MONEY goes toward your cause it's okay. If it goes to Exxon....it's evil.
Slave oil? No. HHO snake oil? Yes.
Welcome to the Matrix, but I'll stick to the Blue Pill, thanks.
:lurk:
Whoa, just a minute, I did not say that Exxon was evil. What I said was that this world is addicted to gasoline and diesel.
And it is, I mean how many LPG fueled IC engines, particularly in vehicles and equipment do you own?
How many do you see?
How many fueled are with CNG, Methane, Methanol or LNG?
For most people everything from their vehicles on down to their string trimmers, are powered with gasoline or diesel.
We as a world are addicted to Gasoline and Diesel.
I'm not talking about "Big Oil's Evil agenda", I wasn't discussing the state of politics. I have no comment on the supposed MIB's. No politics where involved in that comment Trace.
My only point is that the human race is addicted to petroleum as an energy source and any addiction makes the user a slave to the source of the addiction.
The oil that is in the earth is not going to last forever, nor can the Natural gas, or even the coal, if we continue to power the transportation all over the world with it.
It doesn't matter what I think of the government or the oil companies in this case, I'm talking about the human race and our major fuel source is going to run out.
We need to find another source of power, and since I have yet to see a Mr. Fusion reactor that can fit in a vehicle to power it, I'm trying to develop another alternative.
I delivered an update that detailed the creeping rate of progress that I have had. I'll be the first to admit that I'm particularly frustrated with the lack of good data,
Part of that was the installation issues, part the lack of funds hindering every step of the way, part of it was me being inconsistent with my riding.
But it was a full update none the less.
I can boil it all down and say that at this point, If I did no further tuning, I've achieved about a 20% increase in mileage.
However, I'm convinced that this is not the most optimized tune, nor is the cell production maxed out either.
I'm certain I can make more gas and go leaner, probably even a bit past stoichiometric as "interpreted" by the wideband o2 sensor in the OEM exhaust bung.
It was 19F outside this morning, so its not like its great weather for mileage tests either.
General condition and maintenance of the VFR adds another issue as the exhaust header is just about gone and even if I get the Delkevic header, I'll have to get a new bung welded in.
I know that the update was not full of great data, but I did want to let you all know were the testing was.
The gas does alter the trim changes the Autotune wants to make compared to just burning gasoline.
That will make your job harder, you need to compare optimized to optimized. Fortunately the PCV can switch between two maps.
Not on the fly with the AutoModule plugged in, it cannot. The terminals on the side of the case to switch with and the memory that you would use to store the second map are used by the autotune module. So, first I have ride the bike enough with a set of trims in the autotune to develop a good map, which can take a bunch of miles. Then, save that set of trims off on a laptop and start over again with a set of trims for running with HHO. Once those too sets of maps are made, I'd have ride a loop with one map, then ride the same loop with the second map, hoping that all the external conditions are the same.
As soon as I get some funds, I'll make a trek to a dyno and try to get a set of trims put together for each.
 On what trace said (both versions :biggrin: )
John, when I search for some scientific data that backs up all the claims I only find websites that say:
Do you have any links that point to some scientific studies that contain factual data? The use of hydroxy boosters has been studied since WW1 but most of the researches come up with youtube vids
to show how well their system works. Haha, holding a white pice of paper close to the exhaust pipe and claiming (i'll translate here) it spits out zero soot, zero CO, zero HC and 30% fuel saving and CO2 reduction! Instead of backing up claims by mentionig mpg and holding white pieces of paper near the exhaust pipe, why not put the engine on a dynometer or sticking an exhaust gas analiser in the can?What is different about your setup compared to the kits already available on the market that justifies spending $250.000 in R&D?
Well I have not been able to test my emissions on my bike yet, That is another reason to get to dyno with a gas analyzer.
But, I do have a couple of documents from independent testers on cars running gas and diesel. They have mileage and emissions data, particularly since it is easier to get support for an emissions reducing device, than you can an alternative fuel system.
the latest one I have came to me from a peer in the hho industry, as proof of how good his new design is. I don't have spot to post this word document, but the data is not mine so I have no bias for it, and the testing was done by and independent group instead of the manufacturer. They did use a portable exhaust tester, so they have readings while driving around as well as the consumption figures.
If someone has space to host it, I'll send you this document, plus a couple older ones and then we can link to these.
Now, you asked what makes this project different from the already existing Boosters out there, These boosters (even the cell on my bike) are only able to improve the combustion of gasoline and diesel. They don't produce enough gas, to run the engines on their own, So, they are not able to eliminate the need for petroleum them altogether.
That is the next step, removing the gasoline and diesel fuels all together AND that is where this project comes in. Its much more than just a Hydroxy booster.
The basic design is three parts.
1. A EV Conversion with on board electric generation (much like a diesel/electric locomotive). Only we won't have batteries and all their issues (weight, charging, life-cycle, disposal, fire, etc). Range will be far greater than an EV today, and even better than most petroleum powered vehicles.
2. The GenSet will have an very efficient rotary generator head driven by an efficient constant speed IC running on a mixture of HHO and ethanol, Thus removing use of gasoline or diesel as an energy source.
3. A low energy use, ethanol production station will be finalized that will break down Cellulose and Lignin into sugars for fermentation into ethanol. As a part of this process a "no-heat" distillation methodology will remove the water from the fuel to achieve the proof required for fuel grade ethanol. No food stocks will be effected by this system. In fact, only the garbage stream to the landfills will be affected. It will be scalable, so that home stations are planned as well as larger units for fleets and consumer roadside stations.
So its a complete package, not just a booster kit.
-
JES,
Thanks for the update, and appreciate your willingness to step back into this controversial subject.
Just an FYI, my 2000 gets a consistent and carefully calculated 44 mpg with a 45 tooth sprocket. By "carefully calculated", I mean that my speedo is exactly correct using a speedohealer, and that my odo is exactly 11 percent low as a result of that correction. Thus, I crank 11% into my odo miles when gassing up. Plus, I use traveling mate's mileage at gas stops as a comparision/validation of miles traveled. Anyway, it always comes out to 44 mpg over the last 5 years during fairly hard highway running.
And my gas-pig RC51 gets 31 mpg doing the very same runs from Florida to Franklin NC and back! :pissed:
Well maybe I should get you up here to be my pacer as I freely admit that I was hammering along on when on the slab on both these trips.
I pack heavily for these rides and really need to make sure I have time to thin out the luggage.
past rides with similar loads have netted 37-39 mpg averages, So the 42-46 mpg numbers I got on the wdgah ride with an flaky R&R are better than normal.
I still have tuning to do, so I expect to get better, but I also know I have to back off as well.
That's why I say I need a pacer to run with.
Someone to keep me from just saying the hell with it this curve is calling for 95mph and going for it.
-
Before you tear down your current setup, you've got an opportunity to collect more data and prepare for gen 2. If you can get your current setup stable, you'll learn a lot more and save effort in the long run. It's OK for now if you can't run over rough roads (maybe tough to find in New Jersey, eh?).
- You've already seen the level of doubt so you'll have to have bombproof data to back you up. If you're just doing it for yourself, then you should be your own worst critic.
- Get a baseline on fuel consumption post PCV install, pre Brown's gas. Make sure your bike is in excellent working order.
- This science stuff is tough work, you've got to make just as many runs on the unmodified setup as you're making with the generator going. Hit the pike and figure out a circuit, you need to show that you can achieve consistent results on the unmodified bike.
- It would be good to do some A/B comparisons. Can you easily switch the generator on/off without affecting the bike's operation? You need to show repeatability - so going back and forth several times under identical conditions is important.
Well, I took to calling this configuration "install 2.2" as the second install was close but there had not been time to do it quite right.
As for gathering data, I'll be doing that until I have some thing much better to install. With the shock preload handled and the current tray shape, I can handle any road that the stock bike could.
I get blasted daily by doubters, hecklers and disrupters on the one hydrogen fuel forum, so the doubt is constant criticism is nothing new.
As for getting a baseline with the PCV, and then data with the PCV plus the gas running, I'm working on it. The gas does alter the trim changes the Autotune wants to make compared to just burning gasoline. Its going to be a struggle to generate apples to apples datasets, but I'm working on it
Also I don't want to be on to regular a route as that might attract the Staties (I know I have heavy hand).
I can switch the generator on/off easily by just pulling a fuse but idle goes up about 300 rpm when the generator is running and throttle response is sharper everywhere.
So again apples to apples comparison is a bit of a challenge.
-
Thanks for the update, John.
I will repeat one of a previous posters comments, and say that you doing a project such as this, can not possibly lose,
Even a negative result, will be a win for you.
It appears that all the problems you are having are not a product of the technology you are trying, but rather a product of your method, which is mostly governed by your small research budget.
Keep up the great work.
looking forward to your next installment
Tom
That is exactly the situation.
If the funding had become available sooner, than several projects would be further along.
But so far a lot of my materials have been paid for by me.
So we are creeping forward at a snails pace,
That is why I really need everyone to help me by voting in this round of the Pepsi Refresh Everything Challenge
The vote doesn't cost you anything,
You can vote for the project everyday.
What do you have to lose?? a couple of minutes a day on line.
What do you have to gain?? The launching of a project to free the world from oil addiction and slavery.
-
Fine. When we get to the 80+ mpg VFR we WON'T bother you.
OKAY!!! Last May this post came out about hydroxy or HHO or whatever. Much interest was generated, the tree huggers and Big Oil Conspiracy Theorists proclaimed JES_VFR a saint and visionary. Most other members adopted a wait-and-see attitude hoping for the best, and several others (including Mad Scientist and myself) immediately waved the BULLSHIT flag.
My position was that you can't get something for nothing, no matter how many black helicopters with Exxon emblems you think might be following you; or no matter how many pseudo-science bullshit websites you subscribe to. The assorted wackos out there might not like pure science, but just because your politics make you think that there is a conspiracy doesn't necessarily mean there is one. [And I don't exactly mean your politics, JES, I'm using the general "you" and "your", here].
You (actually it was mostly your followers) resorted to name-calling when the logical and scientifically-educated members questioned your HHO investigations. I KNOW that you're a good guy, a good member here and that you mean well, but I can't let pseudo-science and left-wing theory run amok without a challenge.
What say you now? How about that 80 MPG that you referred to? Frankly, I'd love for you to tell us it's working and making lots of power and giving big mileage improvements, so I can eat a bunch of humble pie.
I think that regardless of our expectations of the outcome, we can all agree that everyone wants Jes to carry this experiment through to its conclusion.
Thank you for trying and for letting us know about your efforts.
Yes, exactly right. I don't think anyone said he should stop, but six months have passed and there was a lot of interest and discussion by both supporters and naysayers, along with an ongoing heated argument that ventured into politics and big business and conspiracy theories. So, what I'm thinkin' is that after tossing this experiment smack-dab into the middle of VFRD-land, it's about time "for letting us know about your efforts".
Isn't that fair? Just sayin'....
Okay well its fair to say I had an epic fail on keeping everyone informed.
So let me put this forward as an update. Please Bear with me it's a bit of a saga.
back in May I stuffed a HHO (also known as Hydroxy gas) generator cell under the passenger seat of my VFR. The reservoir tank for the electrolyte was mounted under the rear of fender. A circulating pump was required to as the cell was laid flat, and it was installed under the right side of the rear bodywork. There are pictures of that install up at the top of this thread.
I rode it this way for about a month and a half (Pretty much every day). Now the bike had absolutely no changes to the factory EFI tuning, so there were no changes to the mileage. At the time I could not afford a PCV and Autotune module so I was doing little more than vetting the installation.
I did have some issues with the keeping the cell functioning .
The first problem was that if I allowed the electrolyte level to drop enough, when it shut down the cell would empty. The issue here was getting it to refill evenly without having to pinch off return lines, or over filling the tank on every start up.
The second issue was that the system would suck fluid from the bubbler back into the tank after shut off. This also created a lot of extra maintenance as the bubbler was mounted in from the left radiator, behind the lower fairing.
So I made the decision to do three things.
1. relocate the cell to a position below the tank and pump, there by removing the priming issue. The spot that was chosen was right behind the battery box, underneath the rider seat. The auxiliary fuse block, relays would be moved under the passenger seat along with an inbound PCV and AutoTune Module. The PCM would move to the left side of the bodywork behind the Rectifier/Regulator.
2. Enlarge the main tank to roughly doubling the volume of electrolyte on board. That would reduce fill ups and help maintain stability in the cell.
3. I'd add a check valve between the main tank and the bubbler to stop if from sucking fluid in the bubbler back.
To facilitate these changes, I'd cut out the bottom of the underseat plastic 'tray' from the battery box back to the mounting bushings for the taillights. So a round of selling stuff I call collectables (and my wife calls junk) on ebay netted the funds to buy the materials and the PCV. A call to Dustin, got me a check valve mailed out.
Remember I'm basically unemployed so this it all done on a shoe string.
Figuring that I would have plenty of time to get it done in time for the 'RIP' ride that the VFR Mailing list was having the second weekend in July.
I decided to go. Then my buddy bumped me out of his shop (as he actually had a paying customer) and needed the workspace that I had been 'borrowing'.
So I had to talk the wife into getting me an early birthday gift, and a bike work table finally came to live in my garage.
And another 'friend' suddenly became to lazy to 'rent' me his sheet metal brake.
The result of all this was I start the actual installation about ten days later than I had planned. Bending the sheet aluminum on my table saw with hammers and wood blocks.
On Wednesday the 7th the VFR looked like this
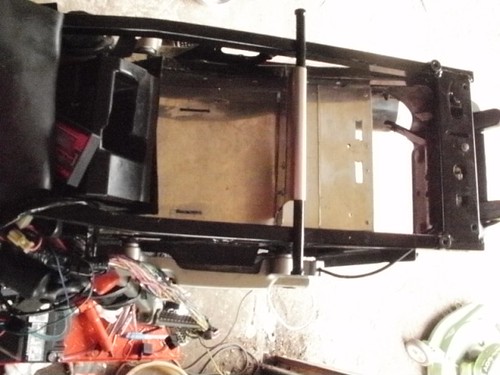
So, I buckled down, drafted my son Alex (he's a moose at 16) and hammered on getting the bike together.
Still the heat was high and the time was ticking, so about 2 am on Friday, I flopped on the bed, knowing I still didn't have a real tune in the PCV and that I was probably over packed by a factor of three.
In true test pilot fashion I slept like the dead, no nightmares, or even dreams that I could remember.
0600 came and I was on me feet gearing up to leave.
After putting the luggage on the bike, I eyeballed the sack in the reflection in the black paint of my neighbors SUV and dialed the preload on the hyperpro just about to the stop.
Damn, I knew I was way over-packed and overloaded, so I made Alex reach under and check for clearance.
His double pork chop hand fit between the rear tire and the front sheet of the tray with room to spare so, it all seemed good.
Since I had so many fluids on board for both me and the bike, I was guessing that I'd be okay as the weight would just drop all day.
Like a maxed out attack aircraft I rumbled over the driveway apron and off to meet Steve and another John.
We gathered and headed up state on our trek to the catskills.
Going through Trenton, I felt rear suspension hit hard while trying to pick the smaller and shallower potholes in a section of road that could only be called a crater farm.
We pulled in to take a quick pee break and top off our tanks about a half an hour later and I noticed the circulating pump was making a lot of noise. looking up under the fender, this is what I saw
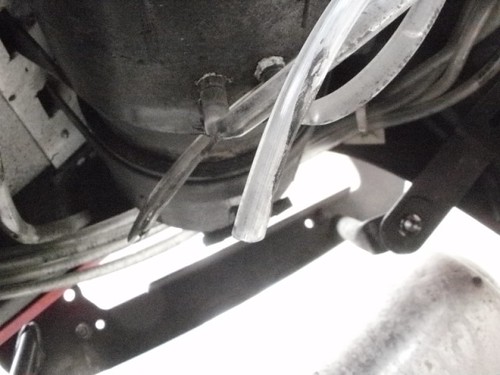
Note that fitting in the foreground is crushed and the hose in front of it is rubbed through. Also the four return hose fittings where all broken off .
All the electrolyte in the tank had leaked out.
So I pulled the fuse for the cell and the fuse for the pump, zip tied the hoses out of the way and continued on the rip ride.
By the second stop for gas I was experiencing an intermittent odometer. It would stop working for miles and then sudden start up again.
I also had to adjust my chain to nearly the limit on the eccentric.
And I still wasn't up to the RIP ride.
Made it home safe from the RIP ride, although the odometer would come and go,
Also when I got home my rear tire looked like this
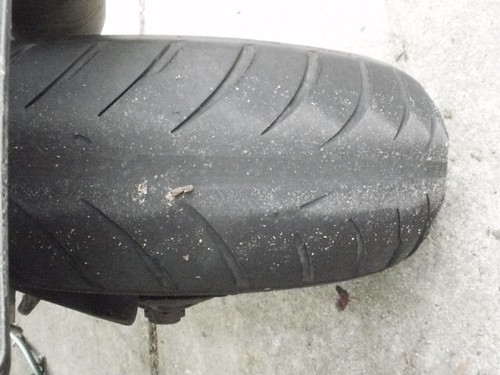
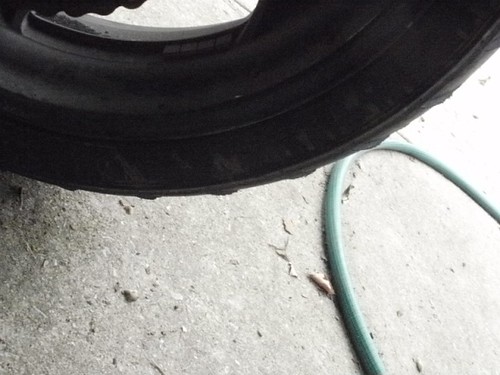
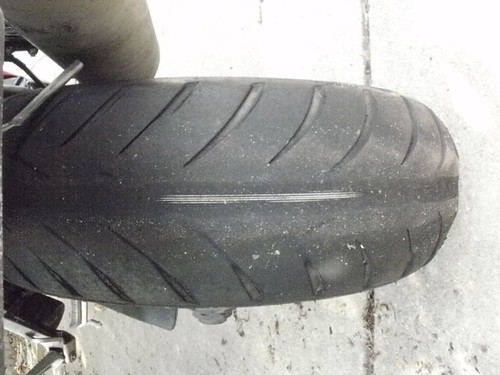
the chain was also shot.
And the mileage figured from google maps and other peoples gps logs worked out to be about 38mpg.
So I ordered a chain and a set of Angel ST's from Jake Wilson,
I pulled the tank to fill the holes, called for new fittings and went to buy more sheet aluminum.
Working ebay netted the paypal $$ to get an Autotune Module.
This time the sheets cost three times as much as before, so the beer and pizza money for the month was spent on sheet aluminum.
Two days after I got home, My wife's car, aka the family taxi, blew up the transmission.
so dipping into the emergency savings fund, I embarked on a three week adventure in replacing a modern electronic controlled transmission.
Here is a picture of the beast
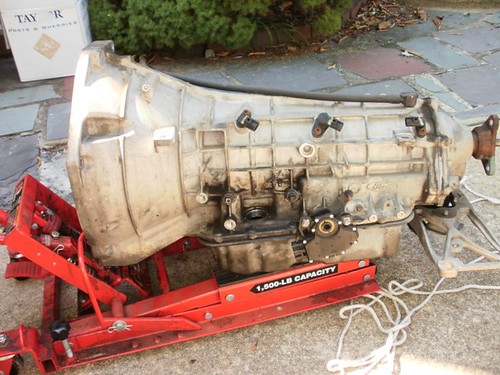
Thanks the old dead one. That big round hole just above the pan gasket is where the computer harness connects to take all its readings from all the sensors. It has about 20 pins and is a bugger to get off.
The black thing a few inches behind that is the electronically controlled solenoids for the Manumatic mode.
It was like the entire car was built around the transmission as a ton of stuff had to be removed just to get to the transmission.
here is part of the pile of parts in my Dad's garage.
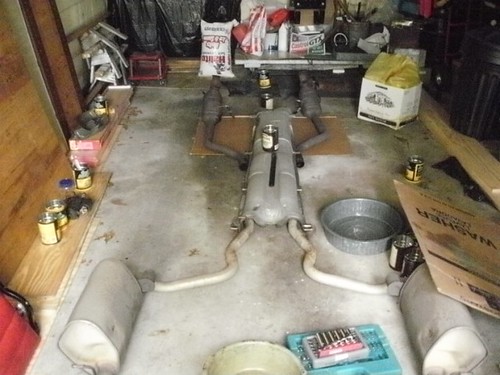
All I can say about that is thank god my Dad still drinks coffee.
So it was mid August before I could get back to working on the bike. Of course this was only a priority to me as my boy both had football camps, my Dad wanted to travel and my wife just kept saying "what's your rush?"
My rush was I trying to get ready for the WDGAH rally.
Of course it was still blazingly hot, so I worked until I was just about passing out in the heat of the garage.
Wednesday the 8th, just two days before leaving for WDGAH, the bike looked like this.
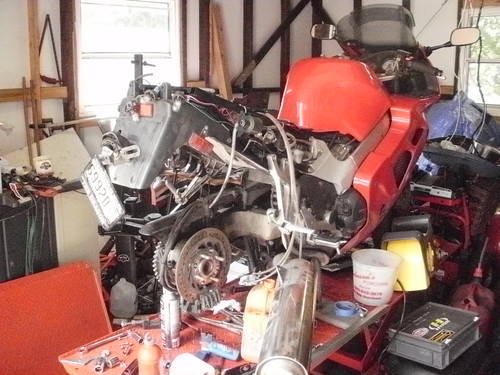
This time I shaped the sheets of the tray to make the front section lower and yet not able to hit the tire, It practically parallels the battery box angle and allowed the cell to sit closer to vertical. The main tank raised unit it just touches the bottom of passenger seat and the fuse panel sits just forward of that. The pump's location was okay, I shifted it back just a bit.
But the PCM, the PCV and the AutoTune had placement issues and I needed to fit a vacuum switch for the Autotune.
In the end I moved the map sensor forward by unbolting it and using the brackets rear mounting hole to bolt it to front hole in the subframe.
That left me room to tuck the pcm up under the bodywork on the right side, pretty much right under the franken bolt.
The PCV and auto are tucked into the left side subframe rail prettymuch next to the battery.
A couple of minor adjustments to the shock controls netted another discovery, The remote hydraulic preload adjuster hose was slightly weeping fluid, so It would not give the full range of preload adjustment.
Topping off the system and then tightening the fitting took care of the preload issue.
All this got put together with some time to spare, So I had time to lay out my route to the hotel and plan on how to make it up there in time for the BBQ.
I packed much less in the way of liquids for the bike and clothes, but much more in the way of tools, so the weight was pretty close the earlier trip.
Still I had no time to put together a serious trim for the Autotune, so I guessed at a close to stoichiometric map and loaded the PCV.
On the ride up again I had the odometer die out, it was strange as it seemed to be failing when the bike was hot and in traffic, but the speedo was working and the clocks were fine.
anyway I got to the BBQ with some of the early earlybirds and parked in the row with three generations of VFR's, My ride was sandwiched between a 1098 and a bmw

Again using the google maps and input from a couple of other rider's gps's, I calculated mileage on the trip up to be 43 mpg. Not bad considering I was running 85-90 for most of the slab sections, so the NJ turnpike from exit 4 to the parkway, the parkway to NY, the Palisades to Bear mountain and finally the Taconic were all done at that flogging pace. Even when I got off onto the secondary roads I was still running a good clip. I would have expected about 37-38 mpg on that.
That night I downloaded the trim tables and found huge sections had no adjustments from me really not running there.
So on Saturday, while we were flitting around on those wonderful roads, I was trying to run all sorts of strange rpm and throttle openings, to help fill out the tables.
My odometer was cutting in and out so much, that I gave up trying to get a mileage reading and I can't use the route maps because we were off them, cutting off little bits or doubling back far to often to work out a mileage by them.
On Sunday, I decided to run up to Grand Isle and check in with Dustin, It was much cooler that day so the odometer worked perfectly, but the trip was only 120 miles in one direction and I filled up in Burlington VT on the way up.
Still I showed the setup to Dustin and he noticed two things. One, the check valve between the main tank and my bubbler was malfunctioning, so the gas output to the bubbler was cycling or pulsing. That was replaced with a new check valve in a couple of seconds and then I had a steady stream of gas bubbling up in the bubbler. The second thing he noticed was that I wasn't drawing a full 10 amps with the cell, it seemed my electrolyte was too diluted so I was only drawing about 7 amps.
Still I a good quantity of gas flowing, enough to make noticeable differences in the idle speed and exhaust sound.
The run back to the hotel that night was marked by really heavy and near freezing rain.
I can tell you that my Rev'IT infinity did not lead a drop, but I nearly froze, since I had not taken enough layers with me. The suit does not let wind through, but it will get very cold on its own. An electric vest or just a couple more layers of fleece would have done the trick.
Monday came cloudy but dry and about 50 F, so I gassed up and headed home. I had checked the trims and found that the majority of the cells had adjustments.
The first tank of gas was great, pretty much everything you could ask for, but when I stopped for the second tank right before getting on the Taconic, again the odometer was not reading.
Still I got home without any other troubles, and calculated that the run home netted right about 46mpg.
Again I was running hard and fast on all the slab and managed to dodge the evening rush hour traffic bottlenecks on the turnpike.
A couple of days after I got back, went to add more electrolyte to the main tank and discovered that I did not have 12V at the fuseblock.
Digging a little deeper, I found that the even with the auxiliary fuse block disconnected the bike was properly charging.
It was hovering about 12.2 and would occasionally dip to 11.8, when it did that the Odometer would stop functioning until the bike was restarted.
I was floored, here I bad been riding around since July on a dying R&R.
So our own tightwad got my business as I ordered one of his hd R&R's and an old chunk of aluminum plate got cut to act as a mounting plate/heat sink for the new unit.
I did a short video of that installation along with the current HHO Install and posted it on Youtube.
Now I have not been riding much since, so I have not had a lot of time to get the Autotune dialed in more. I've been busy drawing up the next version of this cell (it will be thinner and more efficient at the same time.), a separate gas cell design where the Hydrogen and Oxygen come out separately (allowing conditioning of the two gases before injection into the intake), and a direct fracturing injection system (along with a cold fog expansion media).
So the 80mpg VFR is not here yet, but I have lots of work on the planning table trying to get us there.
Money has always been the issue, that's why we are trying for the Pepsi refresh everything vote. Please help.
go HERE and vote for the project.
A lot of that research is going to be needed to create the 80 mpg VFR or even a completely renewable fueled VFR.
-
so give ME the guys address.. there nothing in the law that says I cant yell at him for being a moron that nearly kills a vfrd member!!
I was thinking the same thing.
I get that you don't want to risk any of your retirement or career on this POS, but he's thinking that was just so funny and that he's free and clear.
He needs some one to scare him until he pisses his pants over what he did that night. Then I'd bet that he'll never do it again.
-
+1 on ear plugs,
I hate them, but they beat going deaf.
Also look at the helmet, make sure the shield seals to the eye-port all the way around and that the cheek pads are tight.
I still remember getting my Shoei multi-tec after years of wearing an HJC Symax.
First stop light, I was wondering what was that funny rhythmic noise, then the light went on,...
IT was my breathing.
That helmet was much quieter than my old symax it wasn't funny.
-
Any news on the dual beam units for 5th gens???
-
Most of the seats I have used are bonded with glue, it looks like they put the vinyl in the mold than set up the foam over it into the same mold then attached the plastic over that. I already removed part of the skin and dished out a good portion of foam cause I just cant take this seat as it is. I took a large sanding pad with 100 grit paper and smoothed away allot of foam. But before I did that I took a grinder and grinded off from the back and took off about and inch. all in all I took out about 2 inches from the center to and around the area where my pelvis sits. Remember I broke my pelvis 5 years ago I cant take an uncomfortable seat too long. The problem is it looks comfortable, the foam is very stiff however its flat and so your pelvis sort of digs in at the two bottom bones and you get pressure points. I formed a bucket to spread the load out better and have my weight spread out over more of the foam. the sanding disk did a good job of that and no it doesn't look so fancy anymore. I left the skin on over the triangle and the pillion part, then I am going to paint some contact cement on it to stick the vinyl skin back on, then start stapling it back on.
One last modification first before I stick the skin back on This just a little carbon fiber

Well I forgot about the pelvis issue, so I was wondering how and why was that seat bothering you.
I also have hip and pelvis issues, so I was pleasantly surprised when I sat on the VFR12 at the IMS show in DC. It was literally the only bike that I wanted to sit on at the show for more than about a minute.
I guess that is just more reason for me to find a demo days or work out the day trip to get a test ride.
-
When you get your 7th gen consider the Honda heated grips.
You may not like them from a cursory observation but they are wrapped differently and actually put the heat where it is needed and therefore may not need more adjustability.
OT, the bike is looking weerrry weerrrryyy niiiiiiice Miguel.
Well I thought the integrated switch was nice, but I like a dial your heat thermostatic control.
Also add in that I like the added thickness that my hot grips have. It really helps with my screwed up hands.
If I went with the Honda heated grips I'd have to get some sort of over-grip for general comfort.
Maybe if they made them for say the Stateline or something with a fatter grip, then I could install them instead.
Its pretty bad when you actually look for a fat grip so that you can keep you hand more open while riding.
-
Your welds look fine, if they are bothering you that much you could always hit em with a flap wheel to clean them up a bit.
as for removing the restrictions, nice job, who ever put those together did not even make a real attempt at matching holes.
I've jigged up a couple of really weird merged connections (for a turbo kit) and an x-pipe or two for cars. The guy who does my welding is always telling me I should just learn how to weld and finish the job myself. I would not have left that much of a mess behind. I would have had a small lip left because I'd be leaving enough metal for Ceasar to weld, but we talking 1/8 to a 1/4 inch tops, not that.
Poor quality control like that makes me want to do something crazy like apprentice with Ceasar and then start bending my own stuff.
Fifth-gen Bi-xenon Retrofit
in Modifications
Posted
I wasn't thinking about the heat from the HID in the projector, I was thinking about the heat generated by light focused on the headlight assembly glass. I've cracked headlight glass using a scratch and a magnifying glass on a bright sunny day (ssshhh don't tell).
Well I understand the need to seal the housing against the elements, but I thought the back of the g35 units were already weather proof, so you just needed a through gasket like the h4's use. Heck if the back of the projector is already sealed, you would just need to open up the oem boot.
I wasn't even considering copies of the oem projectors, but the mini Bi-xenon projectors caught my eye. They don't have aiming built into their housings, just the Hi/lo cutoff. They essentially bolt into the standard h4 bulb mounting with a pretty secure threaded clamp system and use the standard headlight housing adjusters for aiming.
Seemed a simpler solution to the issues of modifying the housing and then having two adjustment systems..
I did not mean light leakage, I was referring to moisture leakage. I just thought you would have tried some sort of misting or fogging test on the bench with humidfier and/or spray bottle.
There are lots of compact ballasts out there. I could check with my sources and see what they recommend for d2s capsules.
Those are the ones I was talking about, they do appear to be solidly mounted and their smaller size won't require some crazy huge bezel, so they can still retain a certain level of stealth. I'd seen a few projector conversions done on both cars and bikes, and they all screamed "ghetto" to me with the obvious retro fit looks of the final product. Particularly the ones on bikes where they fill the headlight panel and just have the small rounds for the projector (like certain Ducati's have oem).
I also worried about the HID conversions that just put a capsule in the standard housing.
But then I saw a some projector conversions done on a C14 (a police unit prototype no less) plus a couple of Suzuki's and now I'm sold.
Now that my state is not doing their annual (and anal) safety inspections any more, it is possible to install a projector system like this and not have inspection issues.
Before that the capsule conversions were barely legal; you had to get a guy that did not want to look too hard at what was in the stock bulb position.
One last question,.. Are you going to use a delay for starting (at least on the US VFR!), similar to the delay relay's that tightwad is using, to maximize the life of the HID capsules??