
magellan
-
Posts
381 -
Joined
-
Last visited
Content Type
Forums
Profiles
Gallery
Blogs
Downloads
Events
Everything posted by magellan
-
From the album: Motoczysz
-
From the album: Motoczysz
-
Very nice. Picture the shield gone with the pipes exposed (as in this pic) and with snaky heat shields (mentioned here earlier) cut to fit the exposed pipes and JetHotted to match. border='0' alt='user posted image' /> Badass 4th Gen That's the direction I'm heading. BTW, Tracy, your offer is generous and I hope someone takes you up on it, but I'll just send mine in and live with the downtime (getting cold and wet here).
-
Ooooohh, aaaaahh, I'd take the pipes over the gir.... OWW, stop hitting me! Uh, I have to go now... :o
-
She says, "Ah, it's too bad he doesn't live on Marathon Key or we might have a deal." Oh well, your loss... . Those pipes look good. You should attach 'em to something. :thumbsup:
-
Thanks, uh, I think :D . I remember you mentioning those welds and will definitely be porting them out. And I love the Sterling finish. Can't wait to see the whole thing dressed out from stem to stern. I'll make as much of it visible as I can. Now how do I hide all this from my loving, supportive wife who also wants nice things???
-
Now that's my idea of bling, Trace! Functional beauty. Can't wait to see it installed. BR, that pipe ought to flow a heck of a lot more than the flattened stock pipe. Have fun and let us see the results! I'm already thinking ahead to the next mods. Looks like I'll send the whole exhaust system to JetHot after fabbing up and installing heat shields for the rear head-pipes; remove the front turn signal pods and go with LED units on the mirrors; swap out my aluminum chainguard for an unpainted CF hugger/guard; polish and red-anodize the swingarm and get the same rear sprocket as ScootR with a chrome EK. With a short, dark-tinted windscreen, it ought to look about as sporty as it can get without an RC45 paint scheme. That'll take care of appearance; a PCIII and shift light should finish up the engine performance mods (I think a big-bore kit is overkill until we see what Honda has to offer for gen 7). That ought to get me through winter, and next summer I'll look at suspension swaps and a good luggage system (yes, it still has to be the do-all bike...).
-
Sure will. As far as the MV Augusta exhaust, which of their bikes would you want the pipes from? It looks like several of them might fit a 6th gen, but I doubt any would fit under Murphy. Do you have an idea up your sleeve, or just a 6th gen I don't know about?
-
You just had to bring Murphy into this, didn't you? (We're not worthy... we're not worthy... *bowing*) You know, Safe-T, my sisters live in Calgary and I intend to ride up there next summer. :beer: We may have to fab up an underseat exhaust for Murphy while I'm there and make him truly perfect... :goofy:
-
:D Bikes with that look just seem too damned perky. But at least they have room for a license plate way under the seat. I took my plate off and moved it around, playing with ideas, but there really isn't room anywhere toward the front of the undertray for a reasonably clear view of the plate; I'd draw unwanted attention from the popo if I tried. Nevertheless, as a concession to you guys who just have to see the back of the muffler, I raised the mounting angle of the plate so its bottom edge is about 3/4" higher than before. You can now see much more of the muffler's rear and the plate is still easily readable. I'm happy with it, so there... :P I also removed the understrap completely. All I had to do was drill a hole in the top of the decorative chrome endcap, bolt on a strap, run it through the undertray, and attach it using the bolt that holds the seat latch to the subframe crossbrace. I won't even bother to use up drive space with a picture because it looks like it did before but now without the under-strap. Even cleaner than before and just as firmly located. Now if JetHot will just respond to my inquiry... Jeez, it's been a whole 16 hours now. Where's the foot-tapping emoticon?
-
I'll definitely look at alternate plate locations, but there isn't near as much room under a VFR as under the "Bambi in rut, tail-in-the-air" Rs and CBRs of the world. As for JetHotting the whole system, I'm leery of removing the right side head pipe heat shield if it means roasted ankle syndrome, although some snaky custom JetHot Sterling heat shields to match the shape of the head pipes would be worth every minute of fab-time. Mmmmmm :goofy:
-
So what you're saying is that I should have the license plate JetHot coated to match, right? :goofy: And if the system ends up being so beautiful that I have no choice but to make it fully visible from behind, I'm going to be really irritated about hanging the plate off the side off the chainguard like on a H-D chopper, cause it ain't goin' under the muffler!! Oh, I thought of an invisible means of holding the pipe in place from above that still reaches around the bottom to securely hold the works. I'll do it today and post up later. **Hint: It involves fairy dust and eye of newt**
-
Damn, that yellow 5th gen and charcoal (?) 4th gen are the nicest looking examples of each that I've ever seen. Thanks for keeping the inspiration coming! I think I have a date with Jet-Hot coming up. Thanks for spending my money for me, ya bastidges! :D :P
-
Let's get a move on with those pics, Tracy! Can't wait to see what you've been up to. Is Jet Hot simply a product name for something I can have applied locally in Portland, or will I need to ship my pipe? I'd like to give the whole thing the deluxe treatment now that I know I'm sticking with it. My bike may not be a Murphy just yet (Safe-T), but she's definitely a keeper. As you so tactfully point out, Trace, the mounting strap is kind of the weak link in the overall appearance so I may go ahead and fabricate a mount hidden above the muffler. Took it for a good ride today and I love the sound and performance. If anything, it breathes a bit better than with the Staintune (I really gutted out the muffler before stuffing it with stainless steel wool), but is no louder. I too regret the placement of the licence plate, but it's kind of an essential part . IMO it's better where it is now than hanging under the muffler. The FlameProof paint I used on the muffler ought to hold up pretty well; I cured it per instructions and laid it on fairly thick. I like the red so much I can't imagine anything else and I've always got more for touch-up later. Thanks to all for the support. I'm sure I'll be hacking something else off soon! :goofy: :beer:
-
Just for the Phantom. Thanks for the suggestion. Now how do I keep it this way without making my wife feel excluded? Guess I have to buy her that 636 she wants... :joystick: border='0' alt='user posted image' /> 2000_0311_011020AA.JPG border='0' alt='user posted image' /> 2000_0311_011059AA.JPG border='0' alt='user posted image' /> 2000_0311_011117AA.JPG border='0' alt='user posted image' /> 2000_0311_011214AA.JPG
-
All done! Here are the pics: border='0' alt='user posted image' /> 2000_0310_130448AA.JPG border='0' alt='user posted image' /> 2000_0310_130422AA.JPG border='0' alt='user posted image' /> 2000_0310_130401AA.JPG
-
From the album: Motoczysz
-
At the muffler shop the guys agreed that it sounds like a small block with gear-driven cams on nitrous... and steroids... and maybe even methamphetamine :D Bloody awesome for sure. They offered to just run the pipe out the back, but I was pretty sure my wife might take issue with that... I used to have a Yammie FZR400 with a track-only Yosh on it, and man did it wail. But when I opened up the VFR on the way to the shop, it sounded far better than any inline 4.
-
Here's a sound file, but it comes off a little thin. The actual sound has more bass. At least you'll be able to tell how surprisingly well such a tiny muffler damps an otherwise bowel-emptying shreik... :D
-
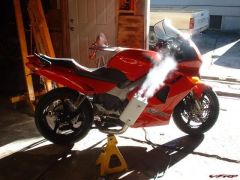
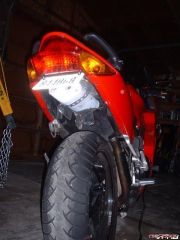
I went to the exhaust shop this morning and had the connection from the up-pipe to the muffler welded in and clearances ckecked. Less than an hour and I was out the door. For good reason, Kasey at the shop was worried about heat damage to the plate and maybe the light assembly above the outlet, so when I got home I cut another hunk of stainless sheeting from the 6th gen heat shields and used it behind and above the plate. Should do the trick. border='0' alt='user posted image' /> 2000_0310_050718AA.JPG Then I pulled the whole system off (so easy with the rear wheel off!!) and applied another coat of primer to the muffler. border='0' alt='user posted image' /> 2000_0310_050650AA.JPG I don't have a kiln for curing this paint, so I'm using engine heat to do it. Maybe I'll just leave it this way! :beer: Later today I'll finish with the red and hopefully get some pics of the finished product posted tomorrow. Oh yeah, the sound? It sounds magnificent! No louder than my Staintune was, but with a tone that's slightly more "raw", as though the exhaust pulses bounce around less in the muffler before exit (sounds better than ever IMHO). Because the outlet is further removed from my ears than before, the bike is quieter at cruise too. Total labor hours: about 20. Total cost: approx. $110 (exhaust shop charged $70) No complaints! :thumbsup:
-
From the album: Motoczysz
-
No, actually... I was fixated on the 6th gen VFR pipe (a friend offered his unused stocker cheap). Maybe I should have looked at other options, but I'm really happy with the result. Ratfink, you were one of my inspirations, bro. Thanks! VolatileVFR, the white is FlameProof primer (handles 1200 degrees F!), which I'll follow with flat red. Awesome stuff, but you really have to make sure it cures well. At the exhaust shop this morning I had a 200 Lb guy on back with me while we bounced the bike. Still had 1/2" clearance to the muffler, and that's with minimal rear preload. It was a major concern for me too... :beer: Update to follow.
-
Thanks for the support! Oddly enough it was precisely the idea of using the whole 6th gen rear end that got me started. But when I started looking at subframe mounting locations and seat-to-tank fit I realized just how insane that project would be. Pre-kudos to you if you tackle that one!! (Besides, I'll only have about $70 into this whole project when I'm done!) As far as the license plate, I think I'll just ride it without the turndowns for a few short trips and see how much heat develops under the plate and tail lens assembly at idle. I could either protect the underside with a bit more heat-shield mat or go with the turndowns. We'll see. There's plenty of room between the exits and the plate right now for unrestricted exit (about 1 1/2"), so no problem there.
-
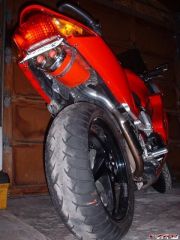
http://www.vfrdiscussion.com/uploads/1139666809/gallery_5128_669_217749.jpg[/img] Well, I?m well into the first of my winter projects. I ?bought? a 6th gen pipe and mufflers from a buddy here in town (a case of good local microbrew made it happen) and eyeballed the potential for fitment on my 5th gen. As you?d guess, a great deal of tail sub-frame and plastic modding would be necessary to make such a wide exhaust system fit, besides the fact that the stock 6th gen system is pretty heavy. I looked a bit harder and lo and behold, the 6th gen mufflers are symmetrical. So I cut them both free and started grinding the mounting and heat shield bracketry off, allowing me a better idea of what might be possible. border='0' alt='user posted image' /> 2000_0302_103411AA.JPG The up-pipe from the headers was a no-brainer to use, going up and under the seat as on the 6th gen. The ?only? thing I had to do to proceed was reassure myself that the muffler would fit under the seat and leave compression clearance for the tire with my pillion aboard (this proved to be a major difficulty). After a quick test-fit it was apparent that a single 6th gen muffler exiting just under the trailing edge of the taillights would look extremely cool. Time to go to work. border='0' alt='user posted image' /> 2000_0302_131641AA.JPG I started by pulling everything out from under the seat, including the ecm. Then I went after the undertray with a bare hacksaw blade (works better than anything else I?ve tried), removing bits and pieces to allow the muffler to ride as high as possible. border='0' alt='user posted image' /> 2000_0302_103434AA.JPG With a solder gun I plastic-welded the undertray back together as neatly as possible, creating a very flat bottom surface along with two mounting recesses for the pre-existing heat-shield mounting tabs to slide into. This provided a good way to locate (but not permanently secure) the muffler while I continued to eyeball things. The ecm now resides where the tool kit was and the tool kit gets scrunched in beside it. border='0' alt='user posted image' /> 2000_0302_131733AA.JPG I was a bit concerned about flow restriction and power loss through just one 6th gen muffler, so I drilled out the two inner chamber walls in a honeycomb pattern and opened the entry hole wider to free up breathing. So far so good. It was obvious early on that I wasn?t going to like the look of the license plate tacked on beneath the muffler, so I thought, ?Why not use some of the waste undertray plastic to make mounting tabs for the plate and stick it out at a 45 degree angle just past the muffler exits?? The plate now partially hides the muffler but I like the way it came together and I?m still able to use the Lite N? Boltz I bought for my fenderectomy. border='0' alt='user posted image' /> 2000_0304_082220AA.JPG border='0' alt='user posted image' /> 2000_0304_050110AA.JPG Then trouble struck. I needed a shakedown ride to check tire clearance and decided to go to my favorite muffler shop and have my buddy Kasey look at my work and see about welding in the connection from the up-pipe to the muffler. (You should?ve seen the looks on the faces of everyone around the shop when they heard the viffer with no muffler; even Kasey?s jaw dropped? and he owns the shop!) I was tempted to forget the whole muffler idea and go straight-pipe, and it sure didn?t help my resolve to use the 6th gen muffler that even the short ride to the shop had left scuff marks from the tire on the muffler... riding solo. Crap! So I went back home and cut the muffler in half to see if I could still use it. Turns out most of the sound deadening takes place in the back end of the muffler, which is good. I went ahead and shortened up the works by about six inches and stuffed the front chamber full of stainless steel wool. border='0' alt='user posted image' /> 2000_0309_153147AA.JPG border='0' alt='user posted image' /> 2000_0309_153300AA.JPG Then I re-welded the end-cap (entry end) to the muffler, at the same time flattening the bottom front end to match the contour of the tire for even more clearance. At this point I was out of welding rod and my wire-feed welder is terrible on thin pipe, but I used it anyway so the welds are pretty ugly where no one will ever see them. Oh well? border='0' alt='user posted image' /> 2000_0309_153420AA.JPG Tomorrow I?ll get the connector pipe welded in, then I?ll pull the completed system off and paint just the muffler with flat red Flame-Proof paint. I?ll post up pictures of the completed project in a day or two after the paint cures. :beer:
-
From the album: Motoczysz