


vic28222
-
Posts
32 -
Joined
-
Last visited
Content Type
Forums
Profiles
Gallery
Blogs
Downloads
Events
Posts posted by vic28222
-
-
19 minutes ago, bmart said:
No worries! We're all trying to help each other. Forum communication makes it harder sometimes. I was joking about the oil threads. Current oils are all pretty good...just like tires. Suspension is much the same, whether "right" or not.
I rode a friend's Tracer 9 the other day. I would have thrown the suspension out before ride #2, but he loves it. My best track day buddy likes his set up pretty rigid. I actually like my soft. We swapped bikes a few years back. He got off the track before completing a lap saying that my bike was unrideable. lol I felt like his had welded bits instead of suspension...but we ride nearly identical times.
Crazy sport...
Speaking of oil, a friend of mine in Houston is a retired chemical engineer who was on the team that developed Shell Rotella T full Synthetic. He use to ride a VFR too and they used his bike to test how well the additive pack in Rotella T would hold up in a VFR. At 10,000 miles the Rotella T was just beginning to look like it should be changed and Mike ran his bike pretty hard. In a conversation I had with him he said if you are running Rotella Full Syn and you change your oil any more often than every 5,000 miles or once a year you are wasting your money and good oil. I have run Rotella T Synthetic in mine for the last 50,000 miles following his guidance and mine has yet to burn an ounce of oil between oil changes. You are right though, there are many good oils out there now so run whatever makes you feel good!
-
 1
1
-
-
15 minutes ago, bmart said:
Me too (find common ground!). I wish that they still made the 2s, as I like them better than my 3s. They're more than adequate for any tipe of street riding and even a novice track day.
Nice! I hear the 4s are even better but they are more expensive. No complaints so far from me on the 3s.
-
1 hour ago, VFR750F3 said:
If you really want it to turn get some Pirelli Supercorsa or Rossa Corsa tires. You can play all you want with Sag numbers but a crappy tire is a crappy tire. I had some Michelin Pilot 2 or 3 road tire back in the day on my RC51 it would not turn. I always ran wide. I threw them in the garbage. The tire profile of these new high performance tire dictate how quickly you will turn. A older tire that has squared off will not turn. Tire pressure is also very important. I have Supercorsa on 2 of my bikes Rossa Corsa on another. On of my friends with a RSV4 tells me the new Michelin Power 5 is a upgrade to the Pirelli. It has these tiny dimples on the chicken strips to expel water.
Tires do matter for sure. I have 60+K miles on my VFR and have been through virtually all of the Sport Touring tires and some are MUCH better than the others. At one point I had a Michelin Road 2 on the front and a 3 on the rear and it was awful! The bike did not want to turn! I think the best tire I have had was a set of Metzler M3s IIRC and loved them but the rear was gone in 3500 miles and the front didn't make 6K. If you ride a lot, that gets too expensive for my blood. Right now I have a new set of Dunlop RoadSmarts on it now and so far they seem fine for a ST tire. I have never tried the Supercorsa or Rossa tires but I hear they stick like glue and wear like the Metzler I had did.
-
On 2/24/2023 at 10:02 PM, bmart said:
I don't understand your accusation. I'm glad that you like your setup...as I said a few times.
Sorry to have jumped you over your input regarding suspension setup. I never really intended to get into the finer nuances of suspension setups. Rather I was trying to focus on a simple, easy, quick and cheap modification that helps a 5th Gen turn in a bit better while street riding. I felt obligated to go through the process of setting sag before doing anything else since to do otherwise would be a sin.
It just got under my skin that you wanted to get into topics I considered well beyond the intent of my write up and did so in a way that, to me, suggested that you know more than I do. For instance, saying that my front sag was outside of a healthy range (although Penske and CW/RT agree with my sag figures) and then asking for my free sag figures and saying that 0-5mm which I used went against something like "long standing knowledge of 8-10/20-24mm free sag ... most suspension gurus" or something close to that. Again you said my figures were wrong and I should learn from you even though I got my figures from CW/RT and Penske and I haven't a clue who is in your list of "most suspension gurus." Maybe I was having a bad day and took your input as a case of "I know more than you do" and furthermore I interpreted it all as missing the point of my piece. Then when you said you were not going to get into an oil thread after, in my opinion, that is exactly what you had just turned my simple piece into was the straw that ........ well, you know how that goes.
If I misinterpreted your intent, I apologize. Maybe I was having a bad day.
Vic
PS. I have been riding for over 65 years & rode enduros for 13 years. I have ridden in every state in the lower 48, have ridden in British Columbia and Nova Scotia, in most of the northern half of Mexico, the full length of Baja and in Spain, France and Italy. And I still ride regularly and have three bikes in my garage now. This is NOT to say that I know all there is to know but it is to say that I have been around the block a few times.
-
1
-
-
Look, I was not trying to say anything other than A) if you have a 5th gen VFR and B) it does not turn in as quickly as you like, then C) you can sharpen the steering somewhat by simply and easily adding a $0.79 shim available at any of the thousands of NAPA stores all around the USA. I made this change and it had a very nice affect on the handling of my bike. Many people raise the fork tubes in the triple trees by some number like 5-8mm and that sharpens the handling. You can also raise the rear by an equivalent amount and get the same result. To me raising the rear was both easier and preferred because I am a 77 year old man and raising the rear makes getting the bike on the center stand easier. To me, at my age, easier is always preferred if all else is equal.
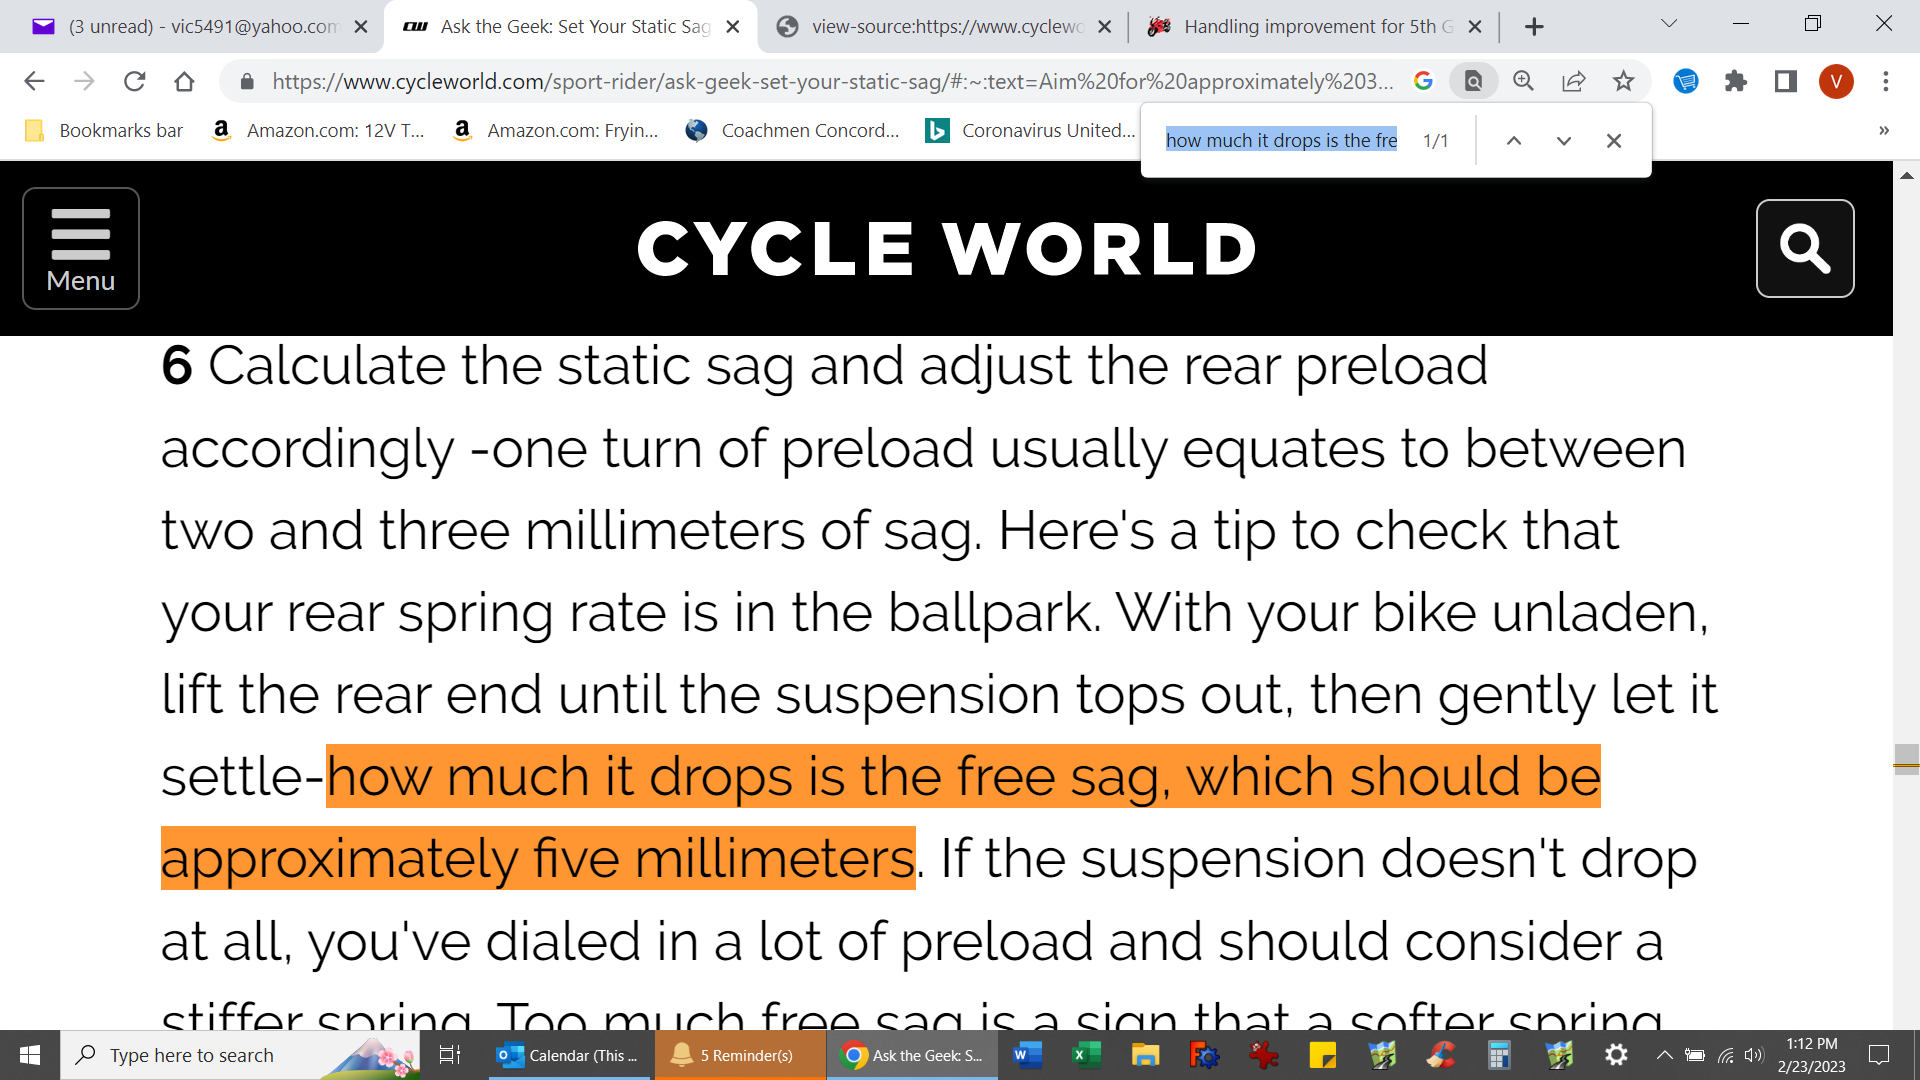
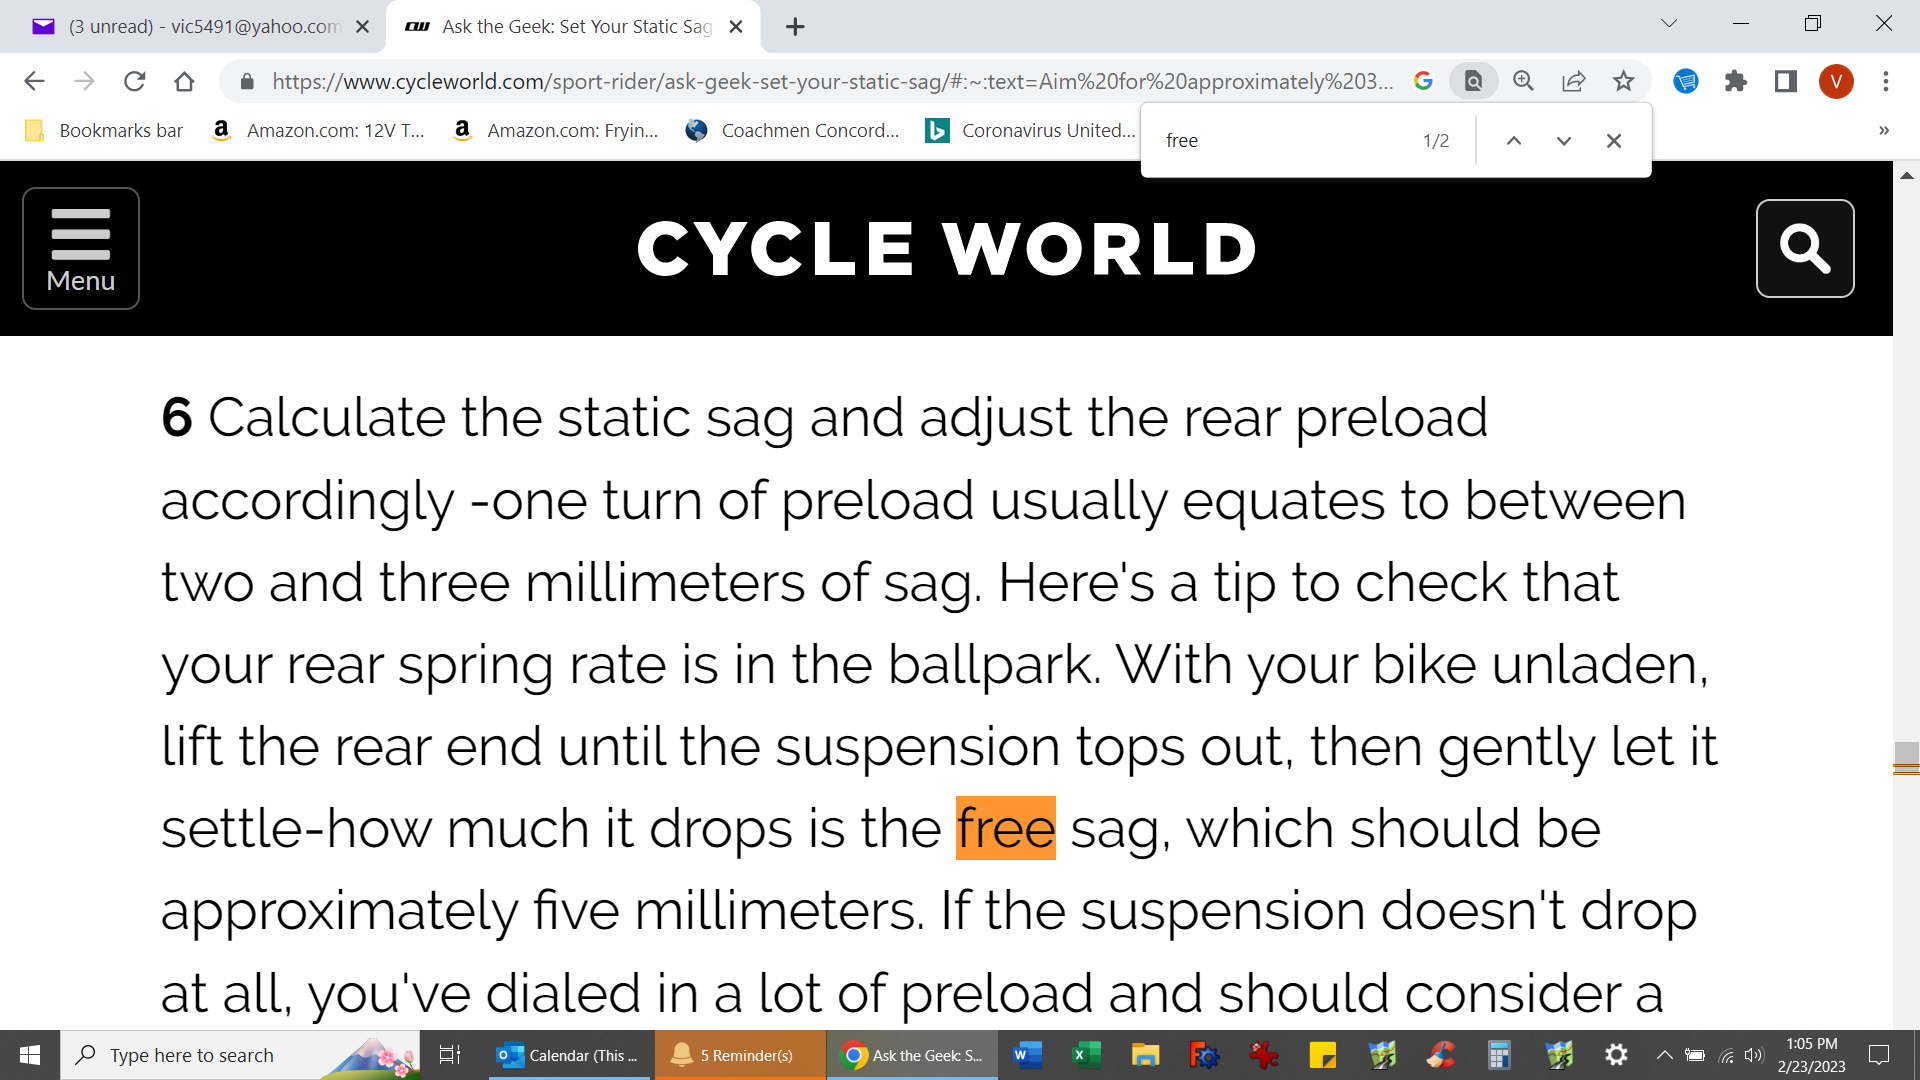
Before making any change to a bike's suspension, virtually all suspension gurus suggest you should measure and set your sag first. To do that you have to have some basic knowledge on how to do that and you have to have some target numbers to work toward. I used an article in Cycle World that explained step by step how you set sag that quoted RaceTech's method. https://www.cycleworld.com/sport-rider/suspension-setup-guide/#:~:text=For street use%2C you should,along with your preload setting. The article also gives some guidance on what sag numbers should be front and rear for both street riding and track time. According to CW/RT, the front should have a minimum of 25mm sag for the track and a minimum of 30mm for street riding. The article said specifically if you have MORE sag in the front than that not to worry about it unless you are bottoming the front out. The CW article did not give a maximum sag figure. I also read what Penske had to say about setting sag and they say that sag should be set to 30-35mm for the track and 35-45mm for the street. https://www.penskeshocks.com/blog/how-to-properly-set-your-motorcycle-front-suspension-sag-why-it-matters#:~:text=Depending on your riding style,comfort%2C and overall ride quality.
My sag number of 39 on the front is right in the middle of 35-45mm and my rear sag of 27.5mm was close enough for me especially because the bike was already a bit slow to turn in and lowering the rear to hit the 30mm number would adversely affect the results I was looking for. I said that the front felt good at 39mm and what I wanted to do was raise the rear more. And that is what I did using the shim method.
My initial purpose was to share a simple and inexpensive way to make a 5th Gen VFR handle a little sharper on the street. Since the parameters and methods used were well supported by Cycle World, RaceTech and Penske, I don't see the purpose of debating all the minutia that has come since. The concern I have over debating largely immaterial issues such as whether rear free sag is 0-5mm or 5-8mm or whether adjusting sag with preload affects spring rate is that someone without much experience will become confused over what is "right" and do nothing. The article was simply written to the street rider who feels his 5th Gen is handling a bit slow and it offered him/her a quick, easy and cheap way to go about changing that.
-
BMart, there is always one of you on forums like this. You say you don't want to get into an oil thread and yet you have been questioning and goading me over what I have said from the start. And none of it served any purpose but to inflate your ego by suggesting you know more than the next guy.
The main message I was trying to send is "IF" your 5th gen VFR seems slow to turn in there is a very inexpensive and easy way to help it some. I never purported to be a suspension guru but what I did use as my knowledge baseline was what RaceTech and Cycle Gear had to say and that was good enough for me. Sure there are other opinions out there and those other opinions may in fact be better if you are tuning your bike for a big race at Barber or Laguna Seca but that is not what I am trying to do. My bike felt a little slow to turn in and I wanted it to turn more willingly on the street. That's all.
Let's give this a rest. It serves no purpose and may well distract a reader from my basic initial intent. Again, that is "If your 5th Gen VFR does not turn in quickly enough for you, here is something you may want to try. It is super cheap and very simple to do."
-
This is what RaceTech recommends for Free Sag as quoted by Cycle World.


-
Actually bike only sag should be in the 0-5mm range.
BTW, while I inserted one 1/8" thick shim you inserted (3) 1/16" shims so you added 1.6mm more than I did. If you had not dropped your front end, your rear tire would have been on the ground when the bike was on the centerstand.
-
Front and rear sag with just the bike on the ground, no rider, was in the 0-5mm of sag. While my front sag was within the normal range at 39mm, I can easily raise the front with more preload BUT the front end feels good at this point and my objective was to sharpen turn in w/o compromising stability. So I left the front alone and raised the rear.
-
I have a 99 VFR800 that I have owned since it was nearly new and I love it but it has always turned in a little slower than I would prefer in the twisties when riding at a pretty good pace. Another way to describe it is to say the steering has always felt a little heavy to me. I assumed the rear spring was not up to the load and that I should get my shock rebuilt, revalved and a proper spring for my weight and was just about to do that. To establish a baseline I got a friend to help me and we measured the sag, front and rear, and to my amazement, everything was right where it should be! The front was 39mm and the rear was at 25. I backed off one level of rear preload and the rear went to 29.
I have dropped the front of other bikes over the years to get them to turn faster but that has always made it harder to get the bikes on their center stands. I'm 77 now and I need things to get easier, not harder! I have read about people shimming the rear shock to raise the rear to accomplish the same so I decided to look into that. I found that NAPA Auto sells two body shims that are perfect for doing this. One is 1/8" thick and the other is 1/16th" thick and they are both slotted so you can install one or both without removing the shock. https://www.napaonline.com/en/p/NCP2641037?impressionRank=2 ($0.79 each) and https://www.napaonline.com/en/p/NCP2641038?impressionRank=1 ($0.59 each).
I installed the 1/8" thickness first, by itself and found that it dropped the rear wheel to where it was only 1/4" off of the ground when on the center stand and that the bike leaned about as far as I wanted it to when on the center stand. My best guess is that when stock it leaned about 9 degrees and that it now leans about 15 degrees. I think if you put the 1/16" shim in there too that your center stand would not lift the rear tire and the bike would lean too far when on the side stand. Someone said that you could go to a 4mm spacer but I don't think so. 1/8" = 3.18mm.
To install one shim is very simple and only takes about an hour or two. First, put the bike on its center stand and remove the seat. Then loosen the bolts that hold the front of the tank in place about 1/2". Now remove the two bolts holding the rear of the tank down. Raise the rear of the tank several inches and put rags or something soft on top of the rear of the airbox to hold it up. I cut about 8" off of the end of a pool noodle and used it to hold the tank up. Now remove the bracket that holds the pivoting piece the tank bolts to. Then remove the large rubber flap that covers the area and then remove the larger bracket the smaller one bolts to. Note: When you do this last step there are two different sized nuts/bolts involved. The large one is a nut and is the nut that holds the shock to the shock cross member. The other one is a bolt and simply holds the other side of the bracket in place. When you remove the large nut you will notice that your rear tire goes to the ground but the stud remains above the cross member enough to put the nut back on easily. If you get a good flashlight you can see that the top of the shock mount has dropped about 3/16" below where it normally is when pulled up tight. At this point it is very easy to slip the thicker shim into place with the slot going around the shock's mounting bolt. Tighten it all back up putting brackets and rubber flaps back as they came off. Now your rear tire should clear the floor only about 1/4". This leaves the center stand fully functional and it makes it even easier to put the bike on the center stand.
I took the bike out for about an hour and ran some twisty roads and some higher speed interstates. The bike feels noticeably lighter and quicker to turn in and yet was rock solid at 100 mph. I hit a few small bumps at high speed and introduced some small but rapid steering inputs to see if I got any indication of instability and I didn't. Now I cannot guarantee that you will have the same results so if you make this modification to your bike, ease back into riding it to insure that it feels safe to you. But I will say that for less than 2 hours of time and $0.79 in parts, the result is very nice.
I do not claim having found out about this on my own. This has been mentioned many times in the past but not recently and not in this level of detail. I just want to share how easy it was, where you can get the part needed and how much it improved the handling of my bike. It is still not a 600cc race replica in handling but it is substantially better IMO than it was.
Vic
PS. Adding the 1/8" spacer raises the rear somewhere in the ballpark of 12mm which is roughly 1/2". In the world of suspension mods, this is a substantial change.
-
3
-
-
I have a 1999 Honda VFR800fi (red) and up until Memorial Day weekend it was in VERY good shape. I came home from a ride in rain and when I went to put it up on its center stand, my foot slipped off of the lifting pedal and I dropped the bike on its right side. Unfortunately the tank hit the foot peg of the bike parked beside it and put a pretty good sized dent in the tank. I WOULD LOVE TO FIND A NEW (NOS) ONE OR ONE THAT IS IN LIKE NEW SHAPE. I'm in the US but will even consider good tanks from Canada, Europe, Mexico and South America if you have or know of one in like new condition. I have searched ebay, honda stock, Facebook Market place, etc. with no luck.
Please let me know if you have one you are willing to part with!
Vic
-
If your son is still looking for a seat, I have a 99 seat in perfect condition. Send me his cell # if he is still looking.
-
PS. I am most interested in what pad is best for the rear on a 5th Gen. I like OEM pads on the front but my rear brake has always felt a bit on the weak side.
-
What pads do you recommend Hispanic Slammer? OEM, EBC, etc.
-
I am about to replace my rear pads. Any recommendations on pads? OEM, EBC HH Sintered, Galfer, others? I would like to get a little more bite on the rear than I get with OEM pads but I do not want to alter it enough to cause a problem nor do I want to put in pads that damage rotors.
I am seriously considering going with EBC HH Sintered. Please let me know if that is a good or poor choice.
Thanks,
Vic
-
I did pay a Honda mechanic to do the previous valve adjustment but he did it on the weekend from home at a greatly reduced price. I spoke with him about his excessive use of Hondabond and he said that normally he requires customers to buy new gaskets at the 36K service but since I resisted this, he put the Hondabond on to be sure "the old gasket" did not leak. Personally I think his doing so covered his ass at my expense but I was not willing to strain the relationship by arguing with him. I bought new gaskets ($94 with tax) and put it back together and have simply moved on.
The valves were still all in spec which is the main thing I was concerned about.
Vic
-
I finally got it off by spraying Liquid Wrench around edge of gasket for 2 days. What a PITA. The last mechanic that had the valve cover off put it back on with a generous coat of Hondabond all the way around the gasket. Did the same on the front too. As a result, I had to buy all new gaskets... $94. Getting them off ruined the gaskets.
BTW, what sealant is good to put on the half moon areas on the new gaskets when reinstalling them? I do not want to use Hondabond after this experience.
I am thinking I will use Permatex Ultra Rubber Gasket Sealant. Any thoughts on this?
Vic
-
I am in the midst of tearing my 99 VFR800 down to do a valve check and the rear Valve Cover (Cylinder head cover) will not come off. I have removed the plugs, the hoses, the coils to get them out of the way and the four bolts that hold the cover to the head and it will not come off. I have pulled on it and tapped it with a block of wood and a hammer and it will not come off!
The bike has 51K on it. At about 16K I checked the valves and did not have any trouble getting the cover off. Several valves (3) were close to the outer limits but were still in spec so I buttoned it back up. At 32K I had a mechanic adjust the valves and bring all of them closer to the midpoint of spec. Now at 51K I cannot get the cover off. I called the mechanic to see if he had used anything like Hondabond or similar all the way around the gasket and he said no. He said he did use Hondabond on the cam cutouts (half circles) but that is all. He suggested that I spray a little brake cleaner on the edge of the gasket to help loosen it up, which I did, but it still won't come loose.
Anyone else ever have this happen and, if so, how did you break the cover loose? I can't pull on it any harder and I am reluctant to hit it any harder than I have.
For the sake of time since I am in the middle of this project, please send any suggestions to vic5491@yahoo.com (vic5491 at yahoo dot com) so they will get to me asap as well as post to here for the benefit of anyone else who may have this problem at some future date.
Thanks in advance for your help. I am stumpted and stuck and need to move ahead.
Cheers,
Vic
-
In my quest for a cross country trip in the spring, it's time to buy tires for the bike.
I plan on riding the entire trip at an average of 6/10th's. I'm not looking to carve it up as much as take it all in on this trip, so sport characteristics of a tire aren't all that important. I want high mileage and durability in case I end up on the occasional dirt or gravel road out west.
Is it absurd to fit an adventure type tire to the VFR?
If you were going to ride like I've described, and if you were planning a 7500 mile + trip on the VFR, what tires would you use and why?
I did a similar trip summer before last.... 8100 miles .... and ran Avon Storms. I got 7100 miles out of the rear before I had to change it (and twice that out of the front). Much of the time I ran 80-85 with some higher and of course some lower. The bike was heavily loaded (60 lbs in two Givi E360s) and for 4000 of the 8000 miles I had my 110 lb daughter on the back. Since I am about 210, when I had my daughter on the bike and full luggage, we were pushing the rated weight limit for the bike. Had I not been so heavily loaded and had I kept my speed down to 75 or under, I would have easily made the full 8100 miles on one rear but what's the fun of that! LOL
My normal riding is a bit more aggressive and the Storm I put on the rear last only lasted 5600 miles which is about what I have gotten out of Metzler Z6s and Pirelli Diablo Stradas so much has to do with the type of riding you are doing. I suspect you could get close to the same mileage out of many if not any of the currently popular ST tires.
Vic
-
I put Buell pegs on my '98 over a year ago. They dropped the peg height a full inch. I had to do some minor grinding but, as I recall, it took less than an hour to install both sides. Inexpensive, too. I adjusted the shift lever and heated and bent the brake pedal. I've been very happy with the result.
You can save yourself $10 by getting the pegs as a package set #N0006.1AD. Also, go to your local machine shop and get a bronze valve guide. There is a common size that will adapt the peg to the bike. It will fit into the peg by heating the peg in the oven and putting the bushing in the freezer for a couple hours. I forget the size of the guide, just take the peg and pin with you, one guide cut in half will work. I did end up slightly enlarging the center of the guide. The easiest way to do this is to put the drill bit in a bench vise and chuck the guide in the drill motor, before you cut it. If you try to do it the normal way, you'll ruin the guide trying to hold it.
I believe I paid $32.00 plus tax for the pair at the local HD dealer. I did not have to use an insert bushing. Works great without it.
If you use the part number N0006.1AD at the HD, you get the pair together for $25.00. The valve guide gives a nice fit with no modes to the bike, using the stock pin.
The N0006.1AD package is for the XB9R and XB12R. While they work, they require some grinding to fit. One person said the Ulysses pegs fit without any grinding. Can anyone confirm this and give me the part number? It would be great if they offer the pegs as a pair at a reduced price as well.
When you say you heated and bent the brake pedal, please tell me how you did that. I have a propane torch but am not sure how hot to get the shaft, where to apply the heat, etc. I would hate to weaken the pedal and have it fail when I need it most.
Thanks,
Vic
-
This weekend i decided to put on my new foot pegs i bought a month ago(procrastinator). I also had my Corbin seat "redone" by someone who reforms seats for the crew at the ST-1300 site www.st-owners.com. Putting on the foot pegs was a breeze, to make them solid just use the washer that is normally on the outside of the OEM pegs and put them between the new pegs and the bracket, they are solid after that, not wobbly at all.
So when it came to adjusting the brake and shifter, the shifter was no problem, the brake, a bit more of a problem. I took off the adjusting nut to get more threads. I went for a ride today to test it out and to scrub in my new D220 rear. During the ride the rear felt like i was locking it up sometimes, a bit unnerving. When i got home, the rear brake rotor was HOT, and very difficult to turn. It was fine when cooled down.
I believe that the extreme adjusting of the pedal is what did it. I had the screw turned all the way in, and there was no delay before the cylinder was engaging, and i backed it off a little and it "seemed" the wheel turned easier. Has anyone run into this?
I am going to heat and bend the pedal to get it where i want and not turn the adjuster all the way, i want some slack.
The good news is that the seat and pedal combo has done the trick of eliminating "Butt Burn", something long legged skinny thigh people deal with on M/C. The seat reforming entailed of sending it to Fla, along with pictures of you sitting on the bike.
Basically he dishes out the seat area and builds up the thigh area. PM me if anyone would like to get a hold of him.
So, if I am reading this right, the Uly foot pegs can be installed without any grinding and did not require adding a bushing due to the holes in the pegs being larger than the VFR pin. Is that correct? If so, does anyone know the part # for a pair of Uly pegs? Apparently most people go with the XB12R or XB9R pegs (part # N0006.1AD which is a pair of pegs for about $26 + tax) but the pegs have to be ground and the hole in the pegs is larger than the VFR pin and a bushing has to be added to take up the slack. The less "rigging" the better in my mind.
Also, I am NOT a metalurgist. Please tell me how to go about heating and bending the brake pedal. I don't want to weaken it and have it fail when I need it most. I do have a propane torch. I just don't know how hot to get it before trying to bend it, etc.
I am an older rider (63 yo) and during the summer I often take long trips, sometimes coast to coast, and lowering the pegs on my 99 VFR should help my knees a lot on long trips. I have a Sargent seat, which I like a lot, but you sit lower "into" it which made the seat/peg distance even less than stock and takes a toll on my knees. I find I have to stand up and do other calisthentics (sp) from time to time while riding just to get circulation back into my knees. Has this conversion proven to be a good one for those of you who have made it? Any downsides to making it?
Vic
-
I am considering swapping my footpegs on my 99 VFR out for some Buell pegs but have a couple of questions:
1. Which Buell Pegs fit best? (From the reading I have done I think the Buell Ulysses pegs are the right ones to get but I am not "sure" so I thought I would ask. One of the listers who said he used the Uly pegs did not have to grind them to fit whereas one who used the XB9R pegs did. Which ones fit best
2. Did anyone ever come up with a brake pedal and brake light switch modification that lowered the pedal enough to work with the Buell pegs without having to "jury rig" anything?
3. How many of you who changed over to the Buell pegs have stayed with the mod? (ie. did you like the difference enough to stay with the change?)
4. Are the metal pegs without rubber like the OEM pegs comfortable? How much more vibration do you feel if any due to not having rubber pads on top?
Thanks,
Vic
-
Thanks to all who have chimmed in on this topic and offered helpful guidance! I do appreciate it!
I posted two different notes a couple of days ago requesting help.... 1) This note about simply flushing and changing fork oil and 2) How to change out my own steering head bearings. I got a lot of help with both and will be doing the work myself as soon as I find a little time and my garage is warm enough to work in without shivering!
I still plan to simply flush and refill my forks at this point but now know that I can easily do so using kerosene to flush and how to do so. I'll likely use the OEM Honda SS-8 oil and set the level as prescribed for stock. As I said earlier, the forks have been just fine thus far and the seals are not leaking so I do not feel the need to change anything.
When I got a quotes on having both the forks and steering head bearings done both mechanics advised against changing steering head bearings to tapered bearings and both wanted to totally rebuild my forks with new bushings, seals, etc. The cost of both jobs with parts were going to be in the neighborhood of $500. By doing the work myself, and simply flushing and refilling my forks and going to tapered bearings in the steering head the total cost will be less than $100 including a couple of tools I will have to buy. Assuming it all goes well, I will have saved a bunch of money, learned something new and valuable and picked up a couple of new tools along the way. All in all, this sounds like a win-win all the way around.
Thanks again to all for your help!
Cheers,
Vic
-
Tapping the races onto the steering head wasn't bad for me. I bought the colorful harbor freight bearing/seal driver kit, but i don't think any of the driver sizes were the correct size, I was still able to use the tool in an unorthodox way, however.
I also bought a fish-weighing device in order to set the tightness of the lock nut, and I made my own spanner wrench tool out of a dremeled-up hole saw drill bit.
I was going to buy the HF driver set until I saw your post. How were you able to use it in an "unorthodox" way to get the races into the steering head? (If anyone knows of an alternative way to do this that does not cost an arm and a leg and still does it right, please let us know. I hate to buy the wrong sized driver and still have to improvise.)
Also, with tapered rollers is it necessary to use a fish scale to set the preload? Somehow I got the impression that all you have to do is tighten them down until they begin to bind and then back them off just enough to free them up. Is my understanding correct or do you really need to use a scale to set the preload properly?
Vic
1999 Honda VFR800Fi For Sale - Atlanta Georgia Area - $3600
in Classifieds *use private messenger*
Posted
I have owned this bike for the last 20 years and have truly loved it for its versatility, that great V4 with gear driven cams, plenty fast for most mortals (0-60 in 3.2 seconds) and yet comfortable enough for a 70 year old to knock out 500+ mile days on. It has been meticulously maintained and not one single thing is wrong with this bike at 61,000 miles other than a few minor nicks, etc. Following are some of the many things that I have recently replaced as well as some add-ons to make the bike better. All OEM parts are included. 1/ New Dunlop Roadsmart III tires with less than 1,000 miles on them. ($450 for tires + mounting) 2/ New EBC-HH brake pads front and rear. ($120 parts) 3/ Brake fluid replaced with new less than 1,000 miles ago. 4/ Sargent Saddle ($500) 5/ New RK chain in box never installed. ($130) The sprockets and chain on it now are good. I only bought the new chain because I got it on a group buy at a good price. The countershaft sprocket was changed about 5,000 miles ago as it was beginning to show some wear. ($40) 6/ Shimmed rear shock to raise the rear about 1/2 inch for quicker turn in. 7/ Micron Slipon for when you want to hear the V4 sing! 8/ Tapered roller steering head bearings for a much improved feel. (Lots of work!) 9/ 2001 mirrors for better appearance. 9/ Bar risers for a more comfortable riding position ($100+) 10/ Lowered footpegs for more relaxed knee bend. 11/ Mosfet rectifier to solve OEM rectifier problems. 12/ Full Shop Manual in great shape. ($50) 13/ New battery 14/ Givi E360 side cases and Givi brackets (Over $500 when purchased.) I turn 79 in September and it is finally time for me to slowdown, quit riding this kind of bike and find it a new home! $3600 without the Givi bags. $3800 with bags. Firm. Attached is one picture with the Givi bags installed and numerous pictures taken in my garage on 8/9/2024. If you have any questions, please ask. I'll be happy to answer.