


tok tokkie
-
Posts
201 -
Joined
-
Last visited
Content Type
Forums
Profiles
Gallery
Blogs
Downloads
Events
Everything posted by tok tokkie
-
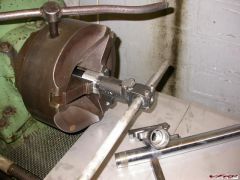
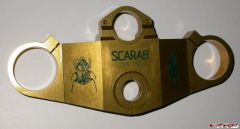
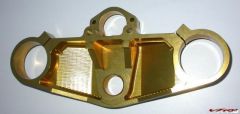
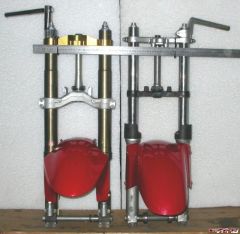
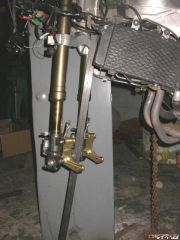
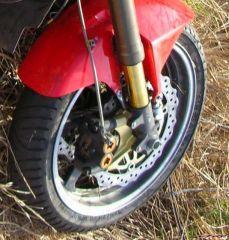
Titanium Nitride: I decided to have the slider tubes titanium nitrided just for the bling of it. You can screw the fork bottoms off. I made an aluminium split collar which I clamped in the jaws of my lathe and screwed the ends off using a pipe through the axle hole. They are screwed on really tight and it seems gasket goo is used instead of thread-lock. Sent them off and they came back a week later looking really smart. Cost $154. Unscrew fork bottom.jpg Fork Bottoms I had to take the fork bottoms off as just the bare steel tube can go into the TiNi autoclave. That suited me quite well because I wanted to see if it would be possible for me to make new fork bottoms because Veefer800Canuck had reported that he had ended up with the front end effectively lowered 10mm to quicken up the steering to compensate for the extra 11mm of trail that results from fitting the RC51 lower triple & CBR upper triple. I wanted to restore the standard VFR geometry which could be done by making new bottoms – longer than the originals and with the axle moved 10mm forwards. At the same time I could provide integral mounts for the Yamaha R1 calipers. Fork bottoms are available from PVM http://www.pvm.de/w/e/mo/products/zubehor/liste.htm# at vast expense. When I had the bottoms off I measured them & found that I should be able to make new ones but would have to buy some special tools (internal thread milling & o-ring groove). I would ride the bike with the R1 calipers on my adapters and decide what I wanted to do. Anti-Dive I also have plans for anti-dive front end. Tony Foale in his book ‘Motorcycle Handling and Chassis Design†points out that you can overcome the dive of telescopic forks by mounting the brake calipers on pivots around (or very close to) the front axle. To stop the calipers rotating with the rotor there can be a strut up to the lower triple so the caliper pushes up against the strut which holds the front of the bike up in proportion to how hard the brakes are applied. Depending on the lengths & geometry you can even make the front rise under braking like the old R50 & R60 BMWs with Earles folks did. Foale shows that a 1g braking force applies a 3g braking load onto the front forks causing the dive. Remove that load & you can run much softer springs with a more compliant ride. [
-
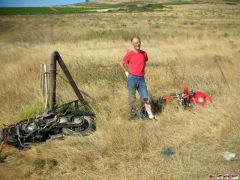
I found myself doing a Frankenviffer front end through ignorance. Shortly after getting my 5th gen VFR I threw it down the road & had to fix it up. I took the chance to get rid of the Dumbo Ears and also smooth it out a bit by closing the vestigial NACA duct and the fart vent under the seat. I also did the de-flapper & de-snorkel (since restored) and machined the standard brake rotors to be semi-wave rotors, stripped the wheels and had the black mirrors & inner fairing painted red. In my write-up I wrote that the Frankenviffer bug had bitten me. I thought Frankenviffering meant personalizing – now I realise it means screwing bits of several bikes together to make one. I was extremely fortunate in noticing that Safe-T (Rick) had a set of RC51 forks for sale. (Previously Yack had offered a set which I enquired about but I dithered & zRoyz jumped in). Rick went way out of his way to help me & collected all the components so I got almost the entire kit in a box freighted from Edmonton to Cape Town. I decided to stick with the stock wheel & rotors but go for Yamaha R1 monoblock radial calipers. Rick collected all the parts over a period of some months. I am extremely grateful for what you did Rick. Many thanks. Son of Frankenviffer There have been several threads about Frankenviffers – notably Veefer800Canuck. I will just discuss what I did differently and make my contributions to the database of data on this topic.
-
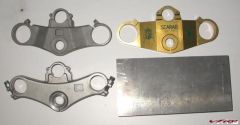
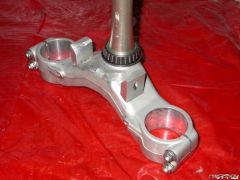
From the album: RC51
© ©vfdiscussion.com
-
From the album: RC51
-
From the album: RC51
-
From the album: RC51
-
From the album: RC51
-
From the album: RC51
-
From the album: RC51
-
From the album: RC51
-
From the album: RC51
-

From the album: RC51
-
From the album: RC51
-
From the album: RC51
-
From the album: RC51
-
From the album: RC51
-
 Brilliant lighting - not as in bright but as in perfect. Light on the facets of the 6th gen fairing is wonderful. Well done indeed.
 -
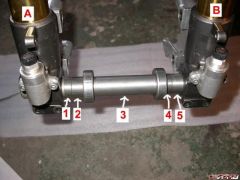
The 5G & 6G VFR axle is 20mm and uses a standard 47x20x14 bearing available from any bearing distributor. The RC51 axle is 22mm & uses a 47x22x14 bearing which you will only get from Honda. That is what Safe-T said & it is correct. I assume the 4G axle is the same 20mm as the later bikes.
-
Thanks Rob. I was writing from memory so got it wrong. I had noticed the tapped hole that shows in the bottom right corner of the second photo & asumed you had been able to make use of that.
-
Thanks for that listing. I have just started doing this for my 5th gen so this helps plenty (I have collected everything on VFRD that I have seen on this topic) 1. Veefer800Canuck did not need such a thick spacer under the lower stem bearing (just a large circlip) He has a 5th gen. I assume there is a slight difference on a 6th gen necessetating the slightly thicker spacer. 2. Veefer used the existing tapped holes in the lower triple for the steering stops. He screwed 8mm (?) cap screws into them. It is interesting that you did not need to do this. What finally stops the forks turning any further (what hits what?). Or do you simply not allow it to go to full physical lock & leave it at that?
-
1. What are your current thoughts on Jet Coating? 2. WHERE'S THE SOUND CLIP EVERYONE WANTS?
-
I had a look at my set-up after writing my last post. My last post is all rubbish. Muffler is behind the gearbox under the swing arm pivots. It is jacked up tight against the center stand lugs & can't go any higher unless pockets are made for the lugs in the muffler. Yours is the only option available at this stage. Starting again we could fab a differently shaped muffler with better clearance.
-
I am so relieved the back wheel wasn't levered off the road by that touch-down. I have had some scary thoughts of what might have been. The Phantom wrote me months ago suggesting a tapered shape ( \____/ is the ASCI diagram he sent). It was part of his suggestion for extending the fairing backwards but certainly a good idea for anyone else who makes one of these. Mounting is really close to the underside of the gearbox would also help; remember that from 2000 on there is the cat/con under there but it has a heat shield which both protects the gearbox & keeps the cat/con hot. Really close to the gearbox plus a thin heatshield may be the way to go. It is getting messy.
-
Have you really left the O2 sensors on? Now who is going to be first to extend the fairing right to the back? Would look nice but difficult with headers on right sticking out slightly but can on left even more in the way & also the side stand. Not high up my priority list but very high on my wish list. Your turn? You say it is noisy. What tubes have you got inside at this stage?
-
I am delighted with it as it now is- Mark 2. I have not heard the bike go by as only I have ridden it. Only clearance issue is left side outlet I have dragged a couple of times - I have a shorter outlet pipe which I will fit (muffler is offset to left) - remeber we also ride on the opposite side so this is when I am riding on the inside lane of a bend. I only go for day rides so centerstand is no issue - I have the paddock stand at home & chain block at work. With all those baffles inside I would make the body of 1.2mm stainless instead of 1.6mm if I did it again (as long as your welding technique is up to it) as it would make it quite easy to cold bend the body around the walls & baffles tacking it in place in stages. border='0' alt='user posted image' /> Mark 2 with baffles. Picture of walls & baffles before starting to bend & tack body around them - but fit the big tubes into the holes before tacking the guts into place so it is all correctly lined up - no need to ask why I say this. I wish Jet Hot was available here as the headers are crying out to be shiny silver to finish the job off.