


kaldek
-
Posts
1,317 -
Joined
-
Last visited
-
Days Won
11
Content Type
Forums
Profiles
Gallery
Blogs
Downloads
Events
Posts posted by kaldek
-
-
Yeah that's standard 50mm PVC pipe. I went through the local "Bunnings" (the biggest hardware chain where I live) with one of the sliders, looking for solutions. The PVC pipe seemed to be the best solution at the time, but then I decided not to use it for the following reasons:One piece of advice for anyone going to fit them, you should be able to get PVC piping from your local hardware store that exactly fits the frame sliders through with no room to spare. This is what I used for the coolant bottle mod.1. The fit was so tight that any mistakes in fitting it would cause problems
2. The PVC pipe is very rigid and has no give in it. Coupled with the extremely tight fit, I was worried that vibration might break whatever glue seal I put in place to keep the coolant water in.
Kaldek
-
I have just finished fitting my Motovation brand frame sliders to my VTEC. It was a pretty easy job in the end - so long as you have the cojones to drill your fairing you should be right as rain.
Here is a quick rundown.
Tools you will need:
- Dremel with grinding wheel or sanding drum
- 54mm hole saw (for radiator bottle)
- 51mm hole saw (for fairing)
- Some silicon sealant
What you will receive:
Two frame sliders (identical)
Two mounting bolts (one longer than the other - this is normal!)
Make sure the bike is on the centrestand on a level surface so that you don't drill holes on funny angles!
Stage 1 - The coolant bottle!
Fair dinkum, this is the hardest part of the job, which is a good thing because your fairings are what you want to worry about.
First, start by removing your fairings. On the left-side of the bike, we need to mark where to drill the hole in the coolant bottle, so remove the bottle and then loosen the engine mounting bolt. Mark the tip of the bolt with paint or something else that will create a good mark, and spin the bolt out a little. Re-mount the coolant bottle and push it up against the bolt-head so that the bottle gets marked with the paint. Remove the bottle and then mark the middle of the circle of paint.
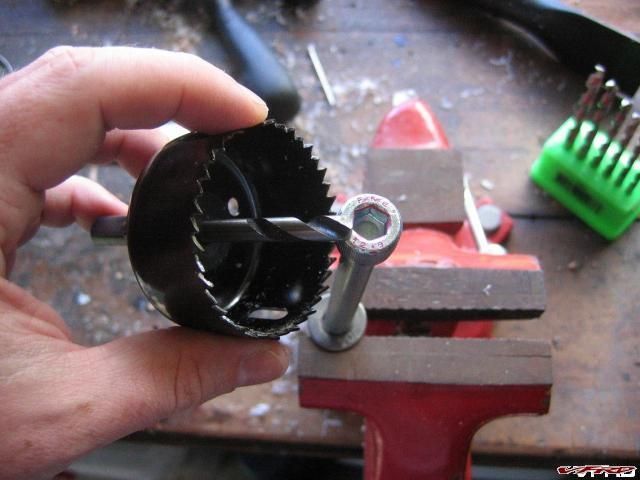
Take the bottle to a flat surface, and use a 54mm holesaw to drill a hole right through the bottle - using the centre of the painted circle as your pilot marker.
You now need to fill this hole in with a cylinder/sleeve of some sort. I used the cap from a spray can, which I cut down to size by slicing right through it and sliding it into the hole even though it overlapped itself a bit. Once I could see how much to remove, I cut it so that there was only a 5mm overlap, and then glued this cylinder of plastic back together before sliding it back into the coolant bottle.
It is unlikely you will find a plastic that will readily glue to the plastic that the coolant bottle is made of, so I recommend using silicon. It's waterproof and rubbery so that the join won't crack during vibration. Once the silicon dries, fill the bottle with water and see if it leaks. Note that if your cylinder/sleeve is made of thick plastic, you may need to enlarge the 54mm hole in the bottle so that the frame slider still fits through it!
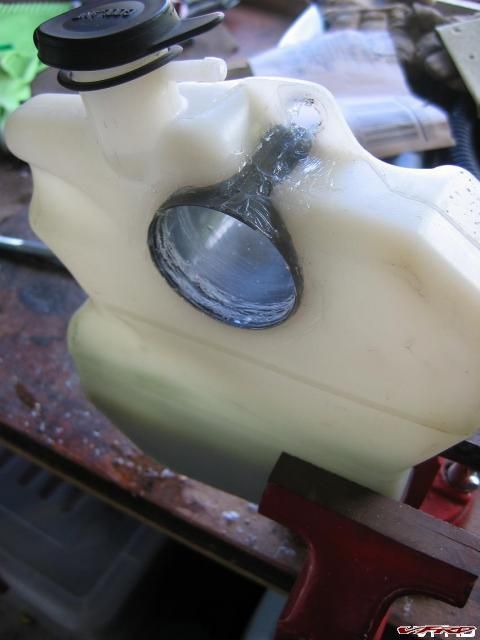 border='0' alt='user posted image' />
Radiator bottle - drilled with 54mm hole saw
Stage 2 - the fairings
Remove the existing engine mounting bolts and install the new bolts. The long bolt goes on the left-side by the way! Leaving the bolts loose, put the fairings back on the bike but only secure them using the bolt at the bottom of the fairing. This will ensure the fairing is in the right place and secure, but can still be "lifted away" from the frame so that you can get your hands behind it. You will also need to remove the coolant overflow bottle at this time if you have re-fitted it.
Using a soft-lead pencil, get your hands behind the fairing and spin out the new bolts until they touch the inside of the fairing. Carefully use the pencil to mark around the bolt head. Remove the fairing and then mark the centre of the circle you have just drawn with the pencil.
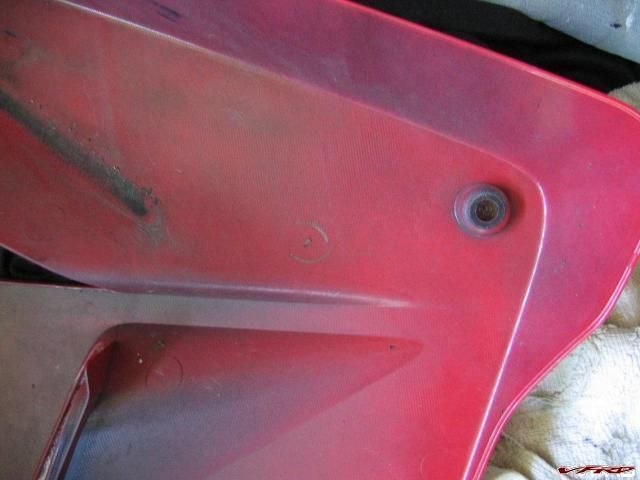 border='0' alt='user posted image' />
Pilot Hole marker
Now drill from the inside out using a small (3mm or so) drill bit as your pilot hole. The picture below shows the hole after I have just re-mounted the fairing.
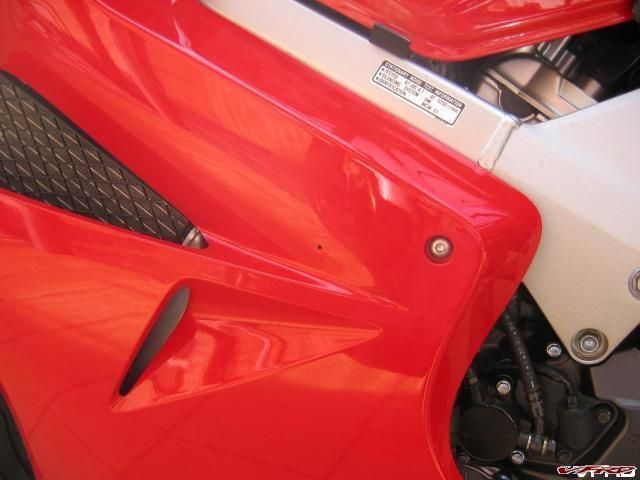 border='0' alt='user posted image' />
Pilot Hole - drill from inside out
Have a close look at the picture below. The hole saw centre bit fits inside the head of the bolt. This is an excellent way of centering your drill bit! With the new bolts still installed, mount the fairings securely and drill your pilot hole out to about 6mm. If you've marked the pilot hole correctly, the hole should be perfectly in line with the frame slider mounting bolts. If the hole is off a little, slowly grind your way towards lining up with the bolt by pushing the the 6mm drill bit sideways. Be aware that this takes a little while because the drill bit is obviously not designed to cut sideways! However because it's so slow, it's quite safe.
Also, you may note that the bolt has "12.9" stamped on it. This refers to the strength grading of the steel, which you can read more about at the Motovation website.
 border='0' alt='user posted image' />
Centering your drill
Ensure the bike is on its centrestand and on a level surface. Using your pilot holes you made in the fairing, drill the final hole in the fairing using a 51mm (2 inch) holesaw. This is the perfect size (and I mean perfect) for the motovation sliders.
 border='0' alt='user posted image' />
Left-small.JPG
If your new hole is a bit off-centre or a bit tight, use your Dremel to make the hole slightly larger or to add a bit of clearance. Personally, I found that I drilled the holes about 1mm too far forward and had to grind the back of the hole out a bit. The hole ended up a tad elliptical, but you can't tell!
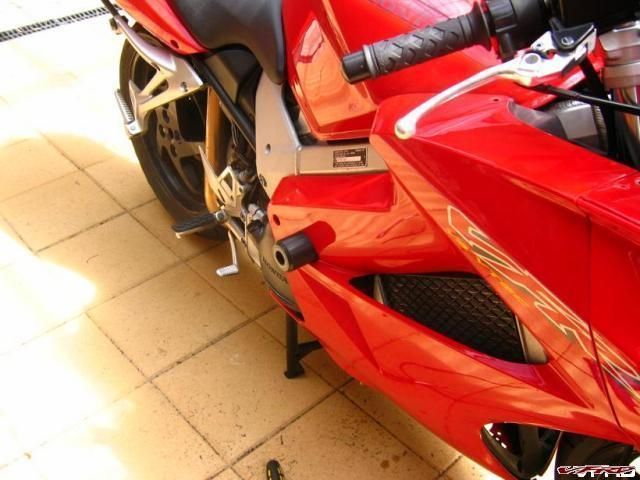
Looks good!
border='0' alt='user posted image' />Right-small.jpg
You can see the slight imperfections in the hole at this distance.
 border='0' alt='user posted image' />
Closeup of left slider
Many thanks to Das Bone for the advice on fitting methods!
Kaldek
-
Wow, that is a very nifty solution!
Kaldek
-
Wow these posts are wayyy old, but the other day one of my low beam bulbs blew out on my '02. ?I actually mis-read this post by Miguel, thinking that Miguel was saying that only one of the filaments are used in the low-beam bulb.
Anyway it got me looking at my lights on my VTEC model. ?Turns out that on these bikes, indeed only one filament is used in the low-beam bulb, and of course the high beam is a separate bulb. ?Now there is some definite scope here for wiring the low beam bulb up to use both the filaments. ?:D
With this wired up to a switch, this will provide some awesome light - the VTEC is awesome already, and that may well be because it does keep both the low and high beam bulbs on when you switch to high, unlike the 5th gen.
Kaldek
Motovation frame sliders fitted
in Modifications
Posted
Kaldek