


kaldek
-
Posts
1,317 -
Joined
-
Last visited
-
Days Won
11
Content Type
Forums
Profiles
Gallery
Blogs
Downloads
Events
Posts posted by kaldek
-
-
How did your injectors get "cleaned" to begin with?
They were cleaned on an ASNU ultrasonic injector cleaner by a mobile guy in a van. Nice fellow, but all the cleaning did was clear out the goop from the rust pits in the injector bore and cause the injector to leak!
-
We as a world are addicted to Gasoline and Diesel.
I don't buy this at all - we're on the process of moving away from oil dependency at this very moment.
You need to step forward hundreds of years mate, and look at it from the perspective of the people in the future.
You know what they'll say? They'll say this:
"Hey remember how the world used to power everything off oil?"
"Yeah, but only for about a hundred years. That's nothing!"
I'm sure you feel like you're contributing to the process, but unless you have some serious knowledge of chemistry and physics you're pissing against the wall mate.
-
Wow. I'm sorry I ever opened this thread, it has completely changed how I see this site. I expected this kind of shennanigans from other forums but not VFRD. Reading through this thread all I could think of was Craigslist and two people bickering about whether or not you can post a dog in the free section (though in my opinion it was a one sided fist fight). I recently met a MSF instuctor at a fair and we were equally surprised to find out we both ride VFR's. I pointed him to this site and I sincerely hope he doesn't read this. I completely agree with challenging new ideas- but to stoop to childish banter about snake oil and such IMHO isn't right. I'll get off my soapbox now.
Mate this is nothing - you should have seen all the debates about whether the new VFR1200 was a piece of crap or not back in October '09. One guy even called another guy a c**t!
Regarding the craigslist comparisons, you gotta see it on the percentages. Considering the sheer number of topics on VFRD, in the eight years I've been here I can count the number of threads which get heated on one hand. EIGHT YEARS!
Considering it is impossible to make everyone happy all of the time, those statistics are probably better than anywhere else on the Internet.
-
Fine. When we get to the 80+ mpg VFR we WON'T bother you.
OKAY!!! Last May this post came out about hydroxy or HHO or whatever. Much interest was generated, the tree huggers and Big Oil Conspiracy Theorists proclaimed JES_VFR a saint and visionary. Most other members adopted a wait-and-see attitude hoping for the best, and several others (including Mad Scientist and myself) immediately waved the BULLSHIT flag.
My position was that you can't get something for nothing, no matter how many black helicopters with Exxon emblems you think might be following you; or no matter how many pseudo-science bullshit websites you subscribe to. The assorted wackos out there might not like pure science, but just because your politics make you think that there is a conspiracy doesn't necessarily mean there is one. [And I don't exactly mean your politics, JES, I'm using the general "you" and "your", here].
You (actually it was mostly your followers) resorted to name-calling when the logical and scientifically-educated members questioned your HHO investigations. I KNOW that you're a good guy, a good member here and that you mean well, but I can't let pseudo-science and left-wing theory run amok without a challenge.
What say you now? How about that 80 MPG that you referred to? Frankly, I'd love for you to tell us it's working and making lots of power and giving big mileage improvements, so I can eat a bunch of humble pie.
I agree with you completely mate, and so does dave from DavidsFarm.
-
Another reason to love VFRD. A two-year-old thread ignites another man's passion and we're off again!
Good stuff.
-
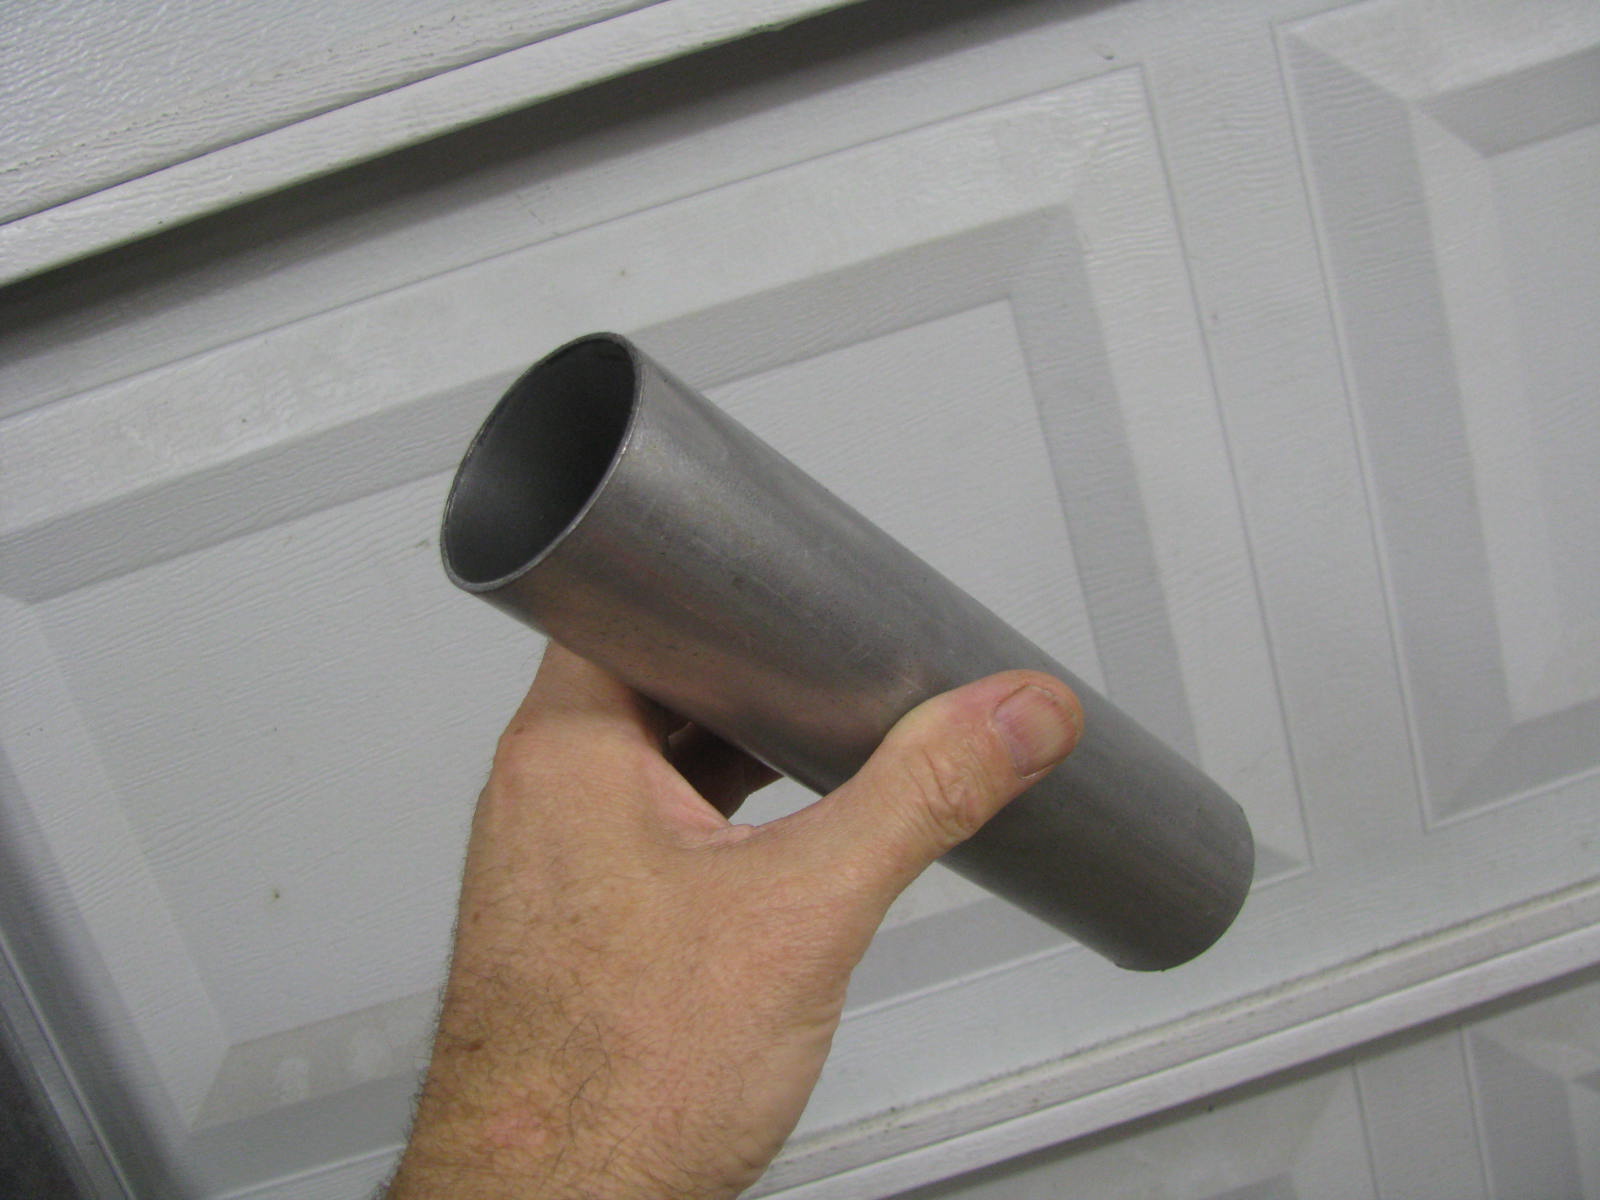
Yo, BR, can you please post a pic of what you used to pound in the bushings and washer, which lie directly under the fork seal? I presume you hammered those in, then gently hammered in the seal, correct? When I was trying to hammer the bushings and washer in using a PVC pipe, I had a hard time and had to take it to a shop to have them use their driver tool.
Here is my simple seal driver!

I think it's just a piece of 2"(OD) exhaust pipe, it works like a charm as I've used it for years w/o issue! :biggrin:
Thanks! I'll have to get something like that for future work. Like a true moron, I hammered the bushings, washer, and seal in simultaneously. It's what the manual said to do. That's probably why it didn't work so well.
PVC plumbing pipe also works well, and is soft so it doesn't damage the seals!
-
This mod is not working for a DCT.
I was just gonna say that I doubt this would work on a DCT model, and you've already gone and said it.
I imagine it would play all sorts of havoc with a DCT....
-
So as an interesting update to the Autotune discussions, I have just listed mine for sale on eBay.
Basically, after having a custom tune done, the benefits offered by the Autotune just didn't materialise. The only place I really cared about tuning were the throttle positions and rpms where the Autotune was unable to really make a difference. The main problem was needing to find the right AFR value - which is unique per bike for the best experience - and the need to use a vacuum-controlled switch to remove the problems caused by decelerating on an open throttle.
In essence, my tuning shop had to put values in my PCV map you wouldn't normally expect to put in, so that I have smooth throttle response. So rather than a computer working it out, my tuning guy sat there and thought "outside the box" to get me a good working map. And being a computer, the Autotune can't do creative thinking on the fly. So, given the cost of the Autotune ($375) versus the cost of a custom tune ($350), it was not able to make a level of difference that matched its price.
I suppose I migh get flamed by Coderighter and GPM for saying all this. Sorry folks!
-
So what's up with this lately?
You mean my problem? All fixed - new injectors and a dyno tune did the trick.
-
My previous words (fantasy) about them plugging in a laptop and being told what the problem is appears to have been a pipe dream on my behalf. I am prepared to eat all of my own words and take any ribbing from those willing to give it :)
Sorry mate, but the PGM-FI control unit on the VFR just isn't that smart. Only vehicles with the newer OBD-II (Onboard Vehicle Diagnostics) can guarantee such levels of diagnostic capability. Even then, if the problem is not considered an error it won't show up.
Having said that, a modern car ECU such as the Blackwood unit used on most Fords has very strong diagnostic capability, mainly due to the O2 sensor. They know what an engine which has no problems should show with regards to the O2 readings and such. In addition, nearly all car ECU systems use a mass air flow sensor for measuring air and therefore appropriate fuelling. Nearly all bikes - with possibly the exception of Ducati - use Manifold Absolute Pressure (MAP) sensors and are essentially an open-loop system (that is, they can't learn or adjust to circumstances outside of their preprogrammed maps).
A car with a mass airflow sensor can be practically blueprinted or fitted with hot cams without a re-tune, because these systems measure the airflow and apply the right amount of fuel in accordance, and then take readings from the O2 sensor to make sure they're getting it right.
To put it mildly, the VFR O2 sensors are next to useless. They only monitor fuel mixture at a very small window of operation (cruising rpms, less than 25% throttle) and as far as I know, they forget the data as soon as you turn the bike off. It's just not a true closed-loop system, unlike a modern car. The best way to make a 6th-generation VFR run well is to bung on some O2 sensor eliminators, a Powercommander (III or V - either will work), and a custom tune. I just had mine tuned and I told them I didn't give a toss about power, I just wanted smooth throttle response at cruise. And that's what they focused on - the results are pretty darned good too.
-
 1
1
-
-
Disconnecting the PAIR solenoid does not cause generation of any FI error codes. For reference, neither does disconnecting your flapper valve solenoid; both of these can be disconnected without concern.
-
OK I have a ride report for y'all.
It's definitely better. Each rider will probably find something different in their mind which makes it better, but for me it's the ability to short-shift easily. I do a lot of short-shifting on my ride to work (take off in first, drop it straight to sixth) and this mod makes it MUCH easier to short shift with smaller lever movements. Previously I used to find that if I didn't mash the gear pedal hard each shift, I'd end up dropping back to the previous gear. You can imagine how annoying that would be when you're trying to short-shift rapidly! With the new softer "cam" profile on the Factory Pro star, once you get past the peak it wants to happily roll into the next gear for you. Lovely!
In addition to that, the actual gear change experience is definitely smoother. It "feels" quicker and appears to require less effort to shift.
The only question for potential buyers is whether this change is worth the $200USD price tag. For me, it has fixed a long-term annoyance which I probably should have fixed years ago!
-
Job done. See my install guide (on a very dirty bike!) here for double reference!
-
Oh great. Now everytime I have trouble shifting I'm gonna be thinking about this mod. Give a little more incentive. How bout a ride report? Good no nonsence write up. :fing02:
As soon as the weather is dry tomorrow I'll be out there and will update the original post for sure!
-
Oh....what did you learn about "turning the wheel and keeping the clutch shaft stationary"? Was it like I said....nonsense?
Yeah, total nonsense. They were trying to say "spin the rear wheel a little bit so you can change gears, because you can't normally change gear when the engine isn't turning the gearbox."
-
This is a short instructional post on how to install the Factory Pro EVO Shift Star Kit, including the shifter arm and spring and also the shifter Star. The star makes the biggest difference to the shifting experience. :) For any missing pictures from this guide, see the other install guide (only for the shifter arm, not the star) and note that their bike is a lot cleaner than mine!!
The kit comes with four pieces:
- Shifter star
- Shifter arm
- Shifter Spring
- Replacement gasket
The kit is designed to provide more positive shifting, reduced dropping from 2nd back to neutral (i.e. missed shifts) and a general more snicky-snicky feel to the gear change. And so without further ado, let's get into it.
First up, remove your fairings and drain your oil. No pics for that!
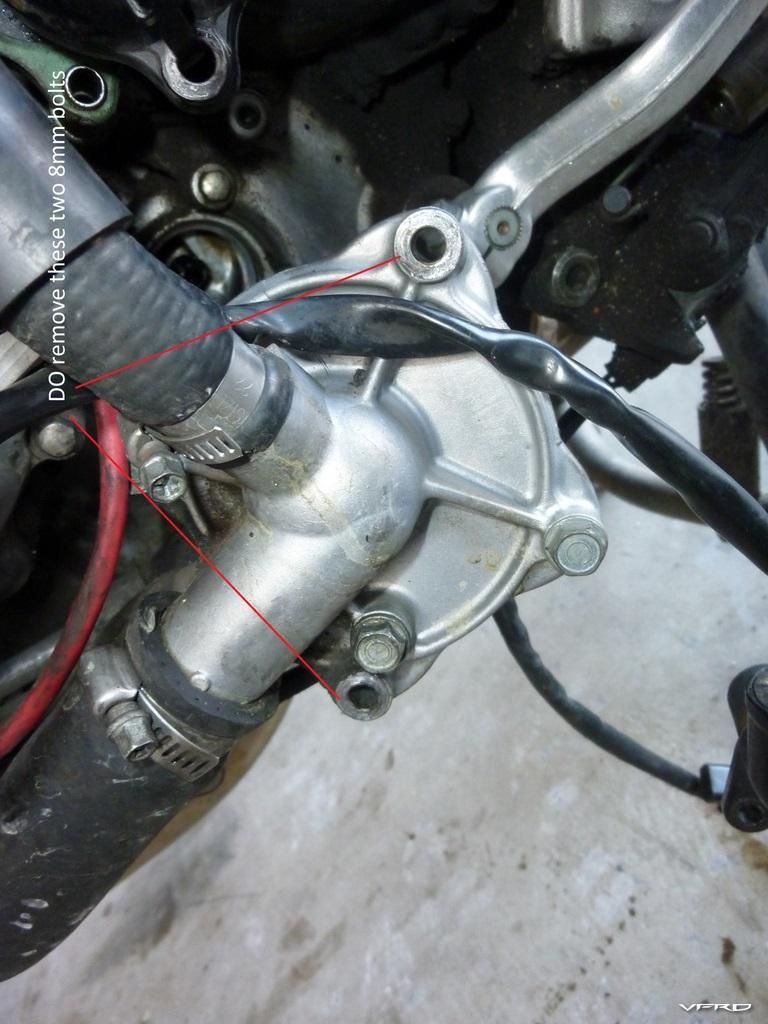
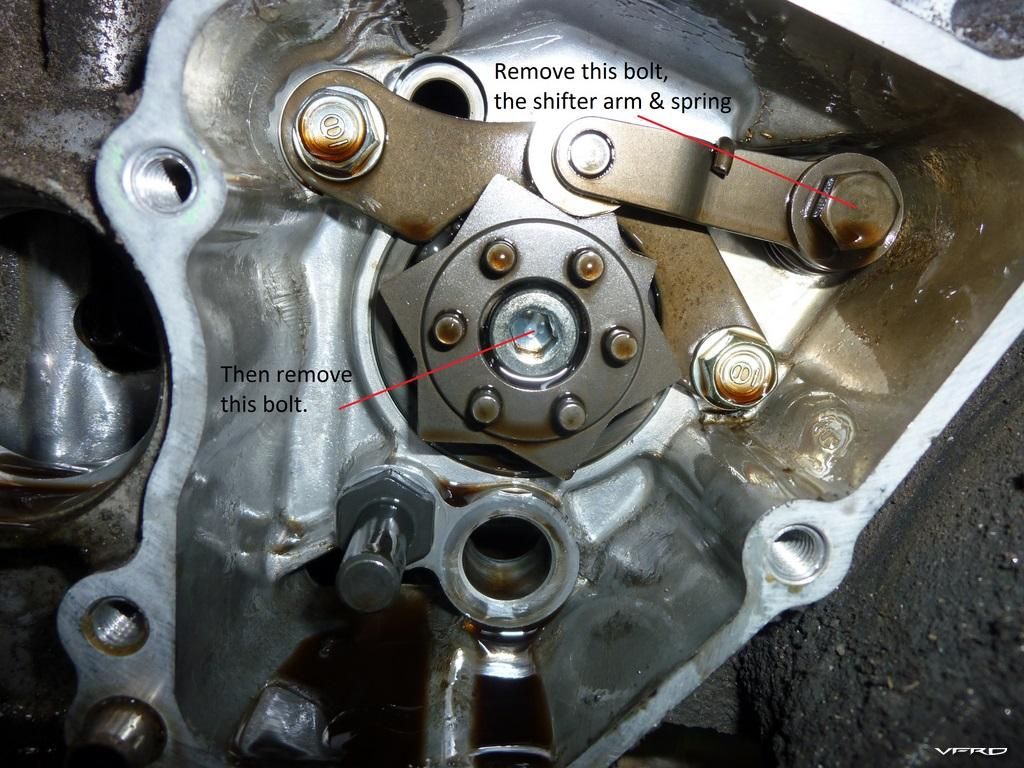
After that's done, you need to remove the water pump. You are ONLY removing the two 8mm bolts to do this - don't remove the 10mm bolts because they bolt the pump together!
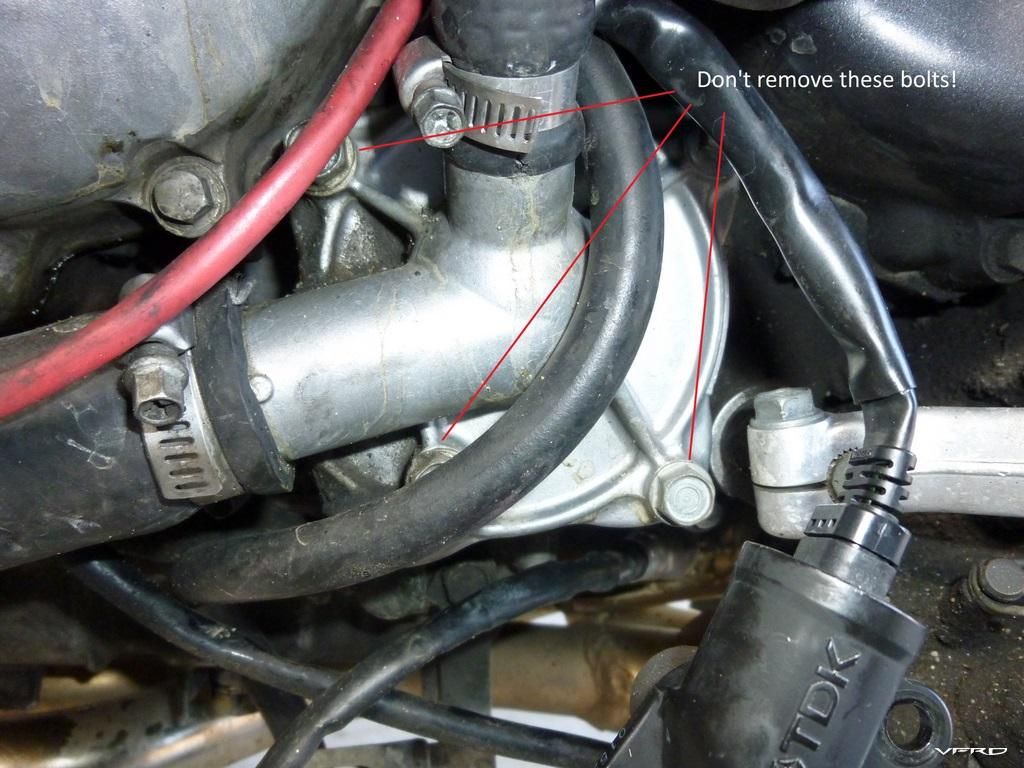
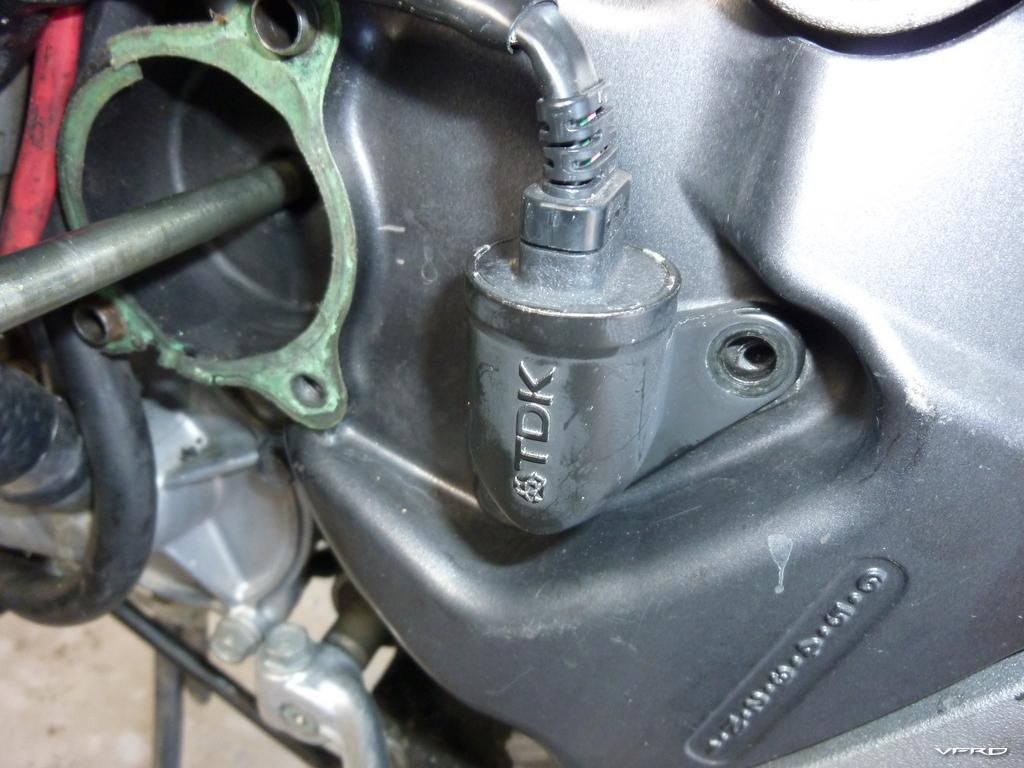
Don't touch these!
DO remove these!
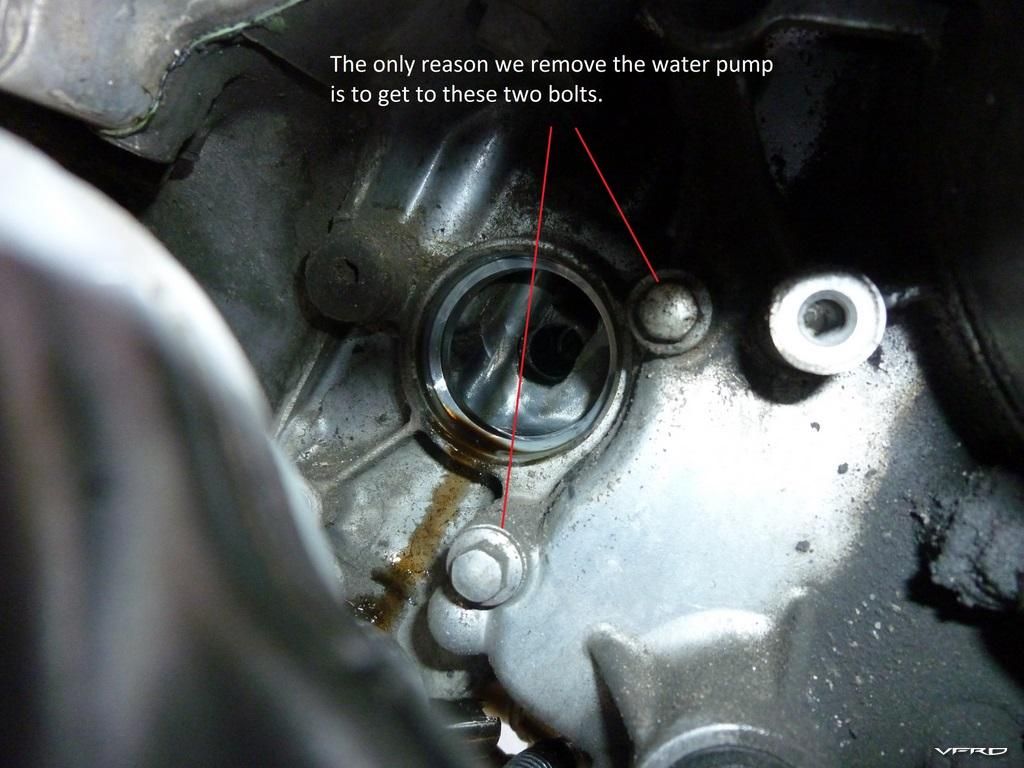
The water pump simply pulls out away from the bike. You don't need to drain the coolant or anything funky. Just remove it and push it to one side a bit, because all it is attached to now is flexible water hoses. They can take the slight bend no dramas.
The ONLY reason we're removing the water pump is to get to a couple more 8mm bolts that hold the shifter mechanism cover in place. Geez!!
Once the water pump is off, remove the clutch slave cylinder assembly. After removing the three 8mm bolts, it's a good idea to wrap a zip-tie around the cylinder so you don't accidentally hit the clutch lever and pop the cylinder out!
You may want to also use some string or another zip-tie to lift the clutch cylinder out of the way, because it tends to dangle in front of where you will be working.
Now we remove the speedo sensor. Two short 8mm bolts, nice and easy. Let the sensor just dangle from its cable.
The sprocket cover is next - but I was too stupid to take a picture of that. It's only a few more 8mm bolts though. Once off, you want to put the bike into 1st gear and loosen the sprocket bolt with a 14mm socket. Once that's done, loosen the pinch bolt on the rear axle - you know, the one you use to adjust the chain. Slacken the chain as much as you can, and then remove the front sprocket.
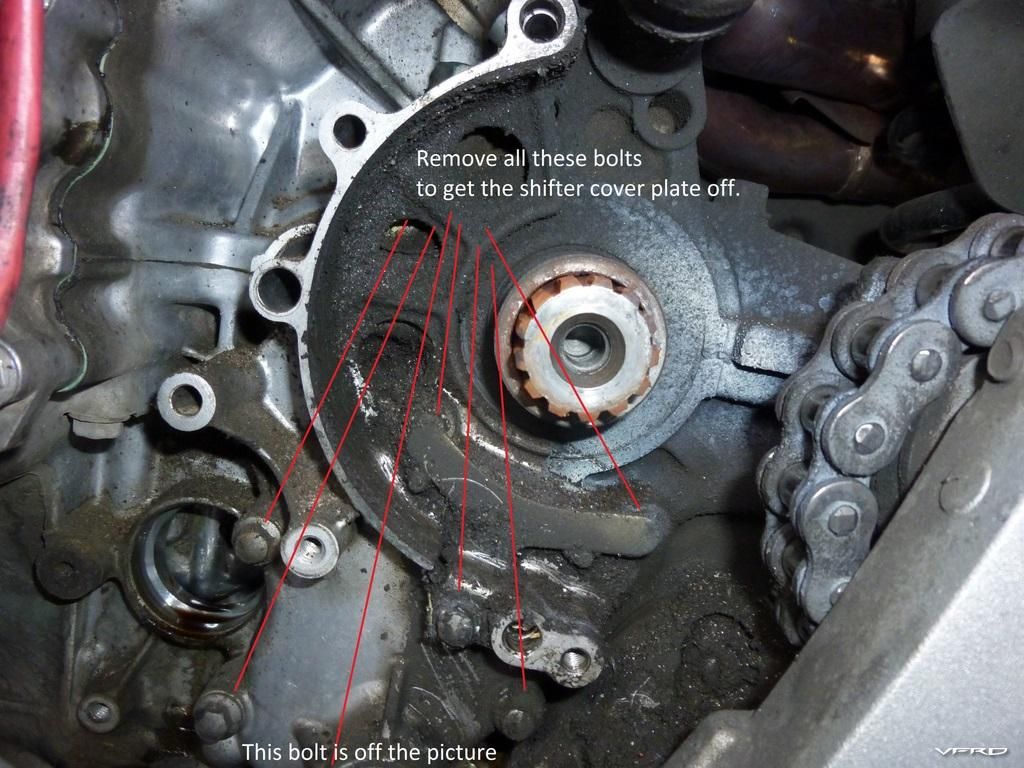
Once that's all done, you need to remove the shifter cover plate. It's a lot of bolts!
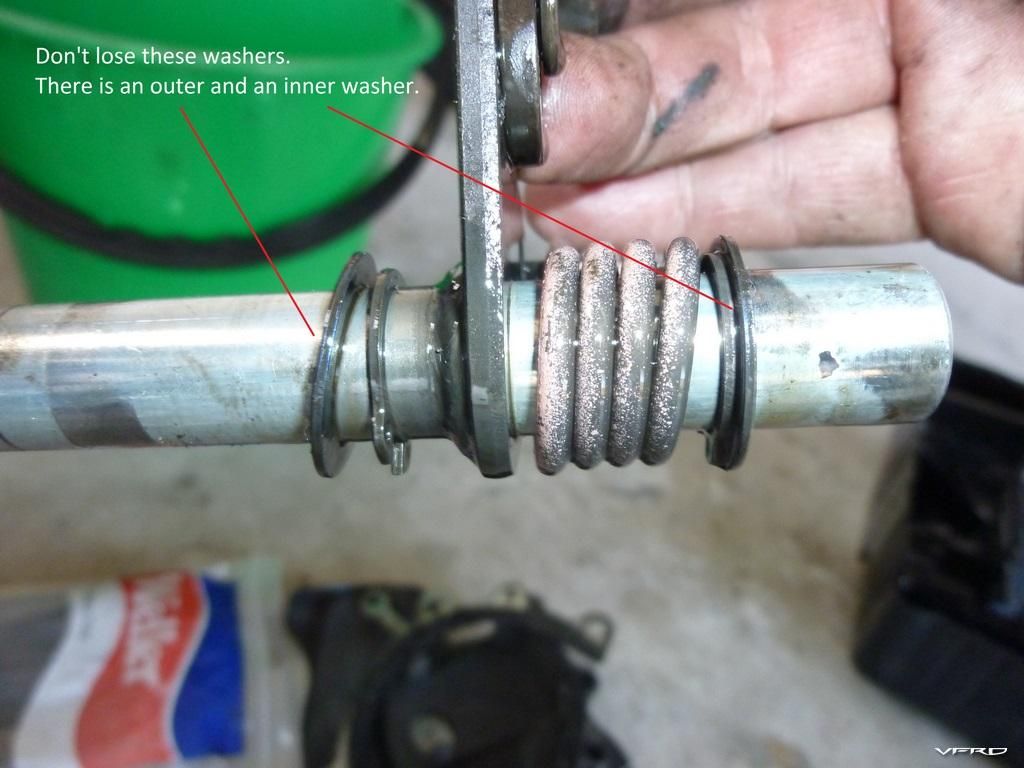
We can now see the shifter mechanism. At this point you need to just gently tug on this until it pops free. Don't lose the two (outer and inner) washers on the shifter though!
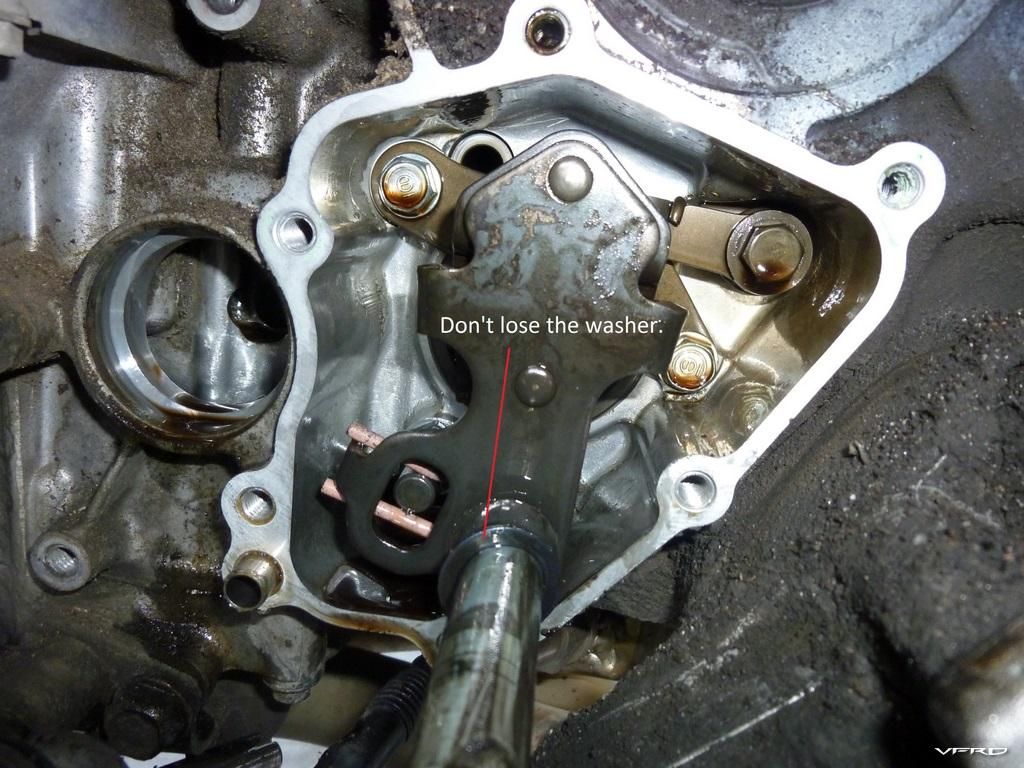
Note these two washers and don't lose 'em!
We now need to remove the bolt that holds on the shifter arm (10mm) and then the 6mm hex bolt which holds the star in place. This bolt is loctited in place so you will feel it "crack" when you loosen it off. Don't worry, the gear drum will only turn a little to the left and then stop securely while you are loosening this bolt
NOTE THE CURRENT POSITION OF THE STAR AND DON'T FORGET IT. THE NEW STAR GOES BACK THE SAME WAY. This picture shows FIRST gear, just so you know!
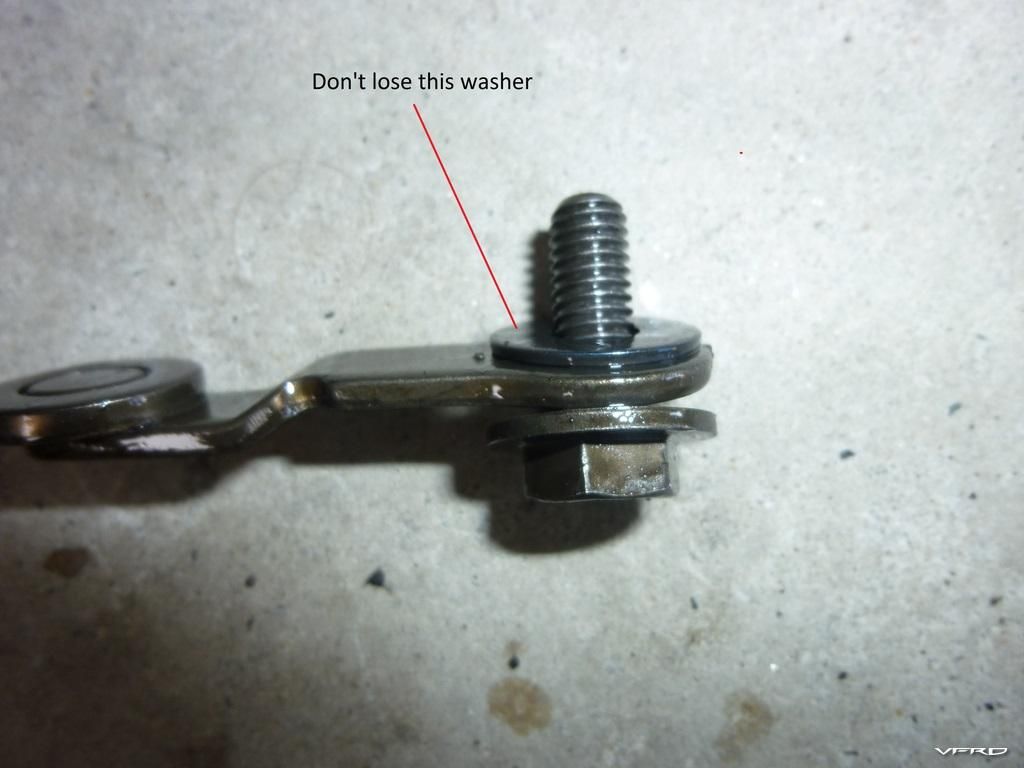
Don't lose the washer from the back of the shifter arm - we need to use it on the new one.
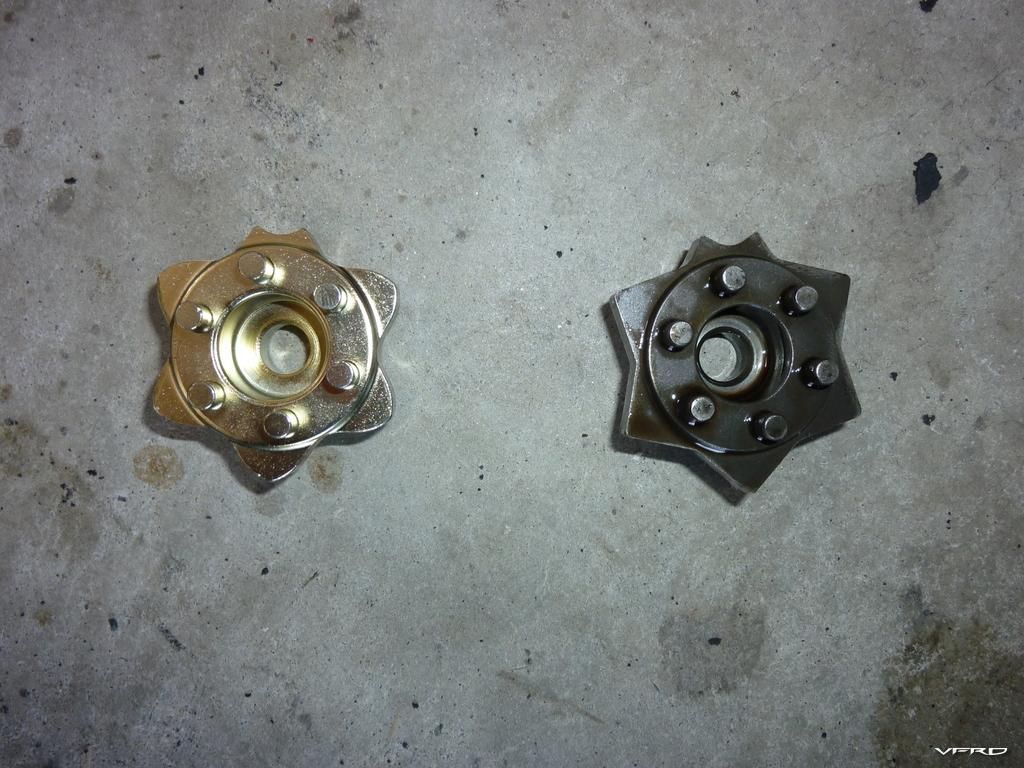
Here are our new and old shifter stars. Quite a different profile, aren't they! Note that the Factory Pro star only fits one way, using the locating pin which is in the engine already, so it's impossible to get it wrong.
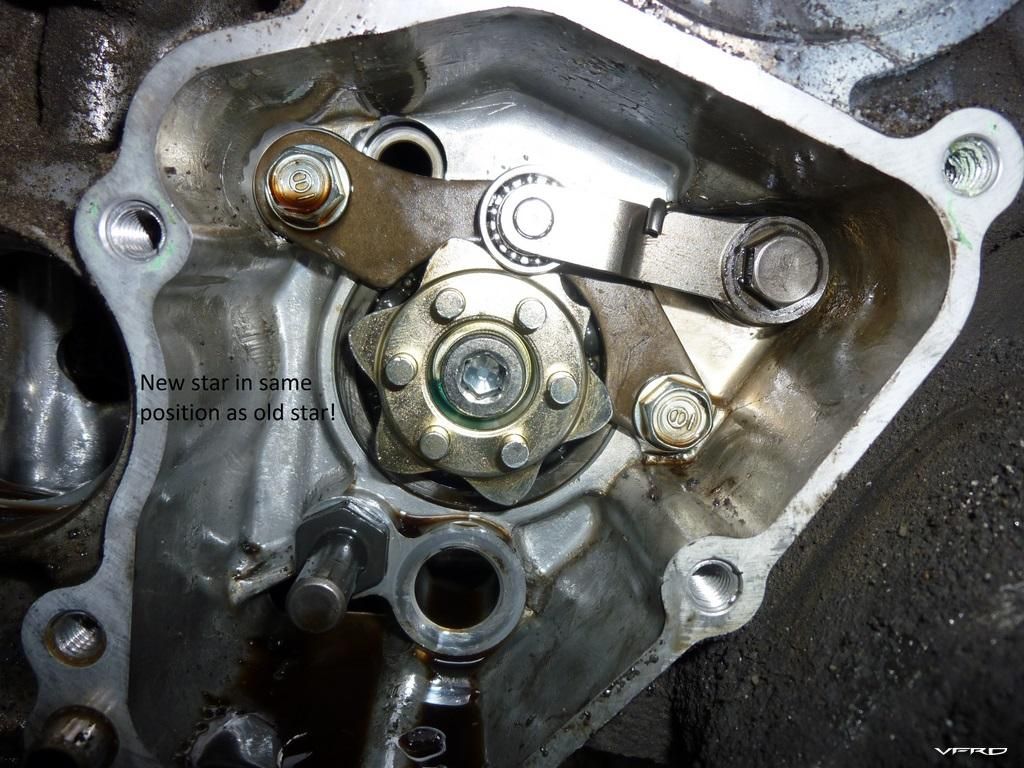
Last, we need to install the shifter star and shifter arm. You can do this in either order, but it's probably easier to install the arm first, and then use something strong to push it up and out of the way against spring pressure so you can get the star in place. When installing the star bolt, clean the threads and loctite them first, then torque to spec (24Nm). Make sure the shifter arm is resting on the star in the same position as the original was.
It's time now to install the shifter mechanism back into place and temporarily put the gear lever back on. MAKE SURE THE GEAR LEVER FACES rearward, otherwise you will think you have just created a race pattern gearbox and spend twenty minutes wondering how that is even possible... Don't ask how I know this!
Temporarily put the front sprocket back on, and tighten up the chain enough to spin the rear wheel and turn the gearbox over. Test going through all the gears - one down, five up. Do it a couple of times until you're confident that neutral is in the right place and the gears are engaging properly.
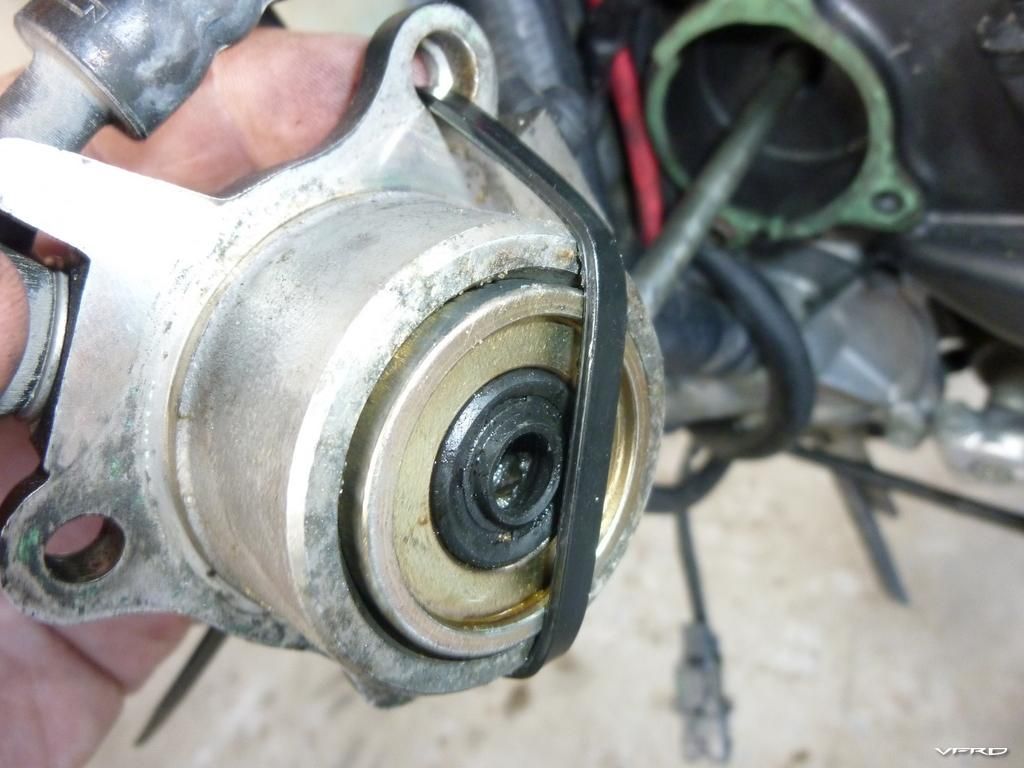
When that's done, install everything in the reverse of disassembly, PUT SOME OIL IN THE ENGINE, and go for a ride! If your water pump doesn't want to fit back easily, it's because the engine has turned over a bit since you remove the pump. You'll need to shine a torch into the hole to see which way the pump driver output shaft is aligned, and then manually turn the water pump's drive shaft to the same alignment. You also may or may not need to replace the shifter cover gasket - certainly mine was in good condition so I just left the original in place.
-
2
- Shifter star
-
Hi folks,
I'm about to fit the complete transmission Detent Star Kit to my '02 VFR and the Factory Pro instructions say to test the installation. They say "keep the clutch transmission shaft from turning and slowly turn the rear wheel. Shift through the gears to verify correct installation".
What the hell is a "clutch transmission shaft"? Do they mean the output shaft? Why would I keep that from turning if I'm going through the gears?
-
Thanks for the helpful info and video. Once replaced, please do post to confirm the replacements don't leak (or otherwise!).
Confirmed, sir! The replacement 2006 injectors were given to a reputable car performance workshop and cleaned three times, resulting in matched flow rates. After fitting them, all running problems are gone and the bike is back to its magical norm.
-
What's the deal with switching the stacks around in the air box? Does it work?
This has been done a few times for no benefit. Intake lengths are tuned to provide the best air charge at a given rpm, and Honda put a lot of thought into it.
Pretty sure the correct alignment is Short-Tall, Tall-Short.
Or by cylinder:
1# Tall
2# Short
3# Short
4# Tall
-
So your saying that good ideas can only come from the "best engineers in the world". Wait aren't these the same Engineers that gave us the Half-assed Vtec on the 2002? Or the mighty GM Impact? Or the Ponitac Aztek? Or another number of disasters, including the last wave of gas guzzling SUV's???
Hardly. I'm thinking more the folks at MIT, CalTech, Stanford, et al. These are guys that create the stuff which eventually makes its way to the corporates. I see none of those guys giving weight to the whole HHO idea.
It reminds me of some Aussie fellas who had "invented" a backyard perpetual motion machine. It used permanent magnets that - once you started spinning it by hand - kept it spinning forever and ever and generating electricity. They were TOTALLY CONVINCED it worked - TOTALLY. When actual physicists came in and PROVED it was total bollocks, they didn't accept it, because they were unable to actually comprehend the laws of physics properly.
The fundamental problem here is that the people coming up with these ideas don't understand physics enough to prove themselves wrong. They only know enough to keep proving themselves right, and are constantly surprised when they can't get energy out of the system. But they KEEP GOING because they don't have the ability to prove themselves wrong.
A good scientist knows when to call something a dead end. A bad scientist wastes his entire life on it with nothing to show for it except conviction.
Of course everything I say here will only make y'all think I'm "a suit", "the man", "brainwashed by big oil", "too stupid to understand the intricacies of the technology", etc.
-
My thoughts on how to verify the upgrade I still stand behind…if you are adding HHO AND a Powercommander, you have to test them individually…otherwise you have no proof that the additional power and/or MPG changes are HHO related and not PC related, right?
Absolutely - the Powercommander alone can corrupt the data because if you fit this thing and then get a custom tune, you could well end up with better MPG purely because of the Powercommander.
I still think it's all hogwash. In todays market if the best engineers in the world aren't working on this right now, it means it doesn't work. Saying different = conspiracy theory.
-
Hi folks,
The injectors on my '02 started to leak after they were cleaned. This is not uncommon on high mileage injectors and basically means they were already stuffed. If you ever want to find this out for yourself easily, here is the very simple process to do so:
Lift the tank and remove the airbox cover and air filter. Remove the intake stacks and set aside, then lift the airbox base gently.
Disconnect the IAT sensor, the MAP sensor (electric and vacuum) and flapper valve vacuum hose and electrical plug, then remove the airbox base.
Take a piece of paper towel and cut it into three inch wide strips. Tightly roll each strip into a "stick", and about an inch from the end, fold the stick back on itself into a hook.
Plug all the open vacuum lines and start the bike. Ignoring any FI warnings from disconnecting the MAP sensor and IAT sensor, let the bike warm up to operating temperature and then shut it off. With the bike no longer running, hold the throttle wide open and take a paper towel stick. Put the stick into the throttle body with the hook facing the injector port. Push the stick down until you can tell the hook has moved past the injector port, and then left the paper towel stick gently. It should hook itself into the injector port a little bit.
Now, prime the fuel rail by turning the key to the ON position (WITHOUT STARTING THE BIKE!) and waiting for the fuel pump to stop. Repeat about six times and then remove the paper towel stick by pulling on it gently. Don't rip it, because it will fallt into your motor!
Check the end of the paper towel for signs of leaking. It will be slightly darker spots on the towel, and you may need to unroll the stick to see it.
If your injectors are leaking, it's time to have them replaced. Even if you replace only one, you want all four to have matched flow rates. The easiest way to do this is just buy a set of four, either aftermarket or from Honda. 2006 and newer injectors have the same stated flow rate and are cheaper than 02-05 model injectors. 1998 injectors are apparently the same flow rate as well, however they are a pintle type rather than multi-hole type injector. New model injectors may still work fine on the '98 though, so feel free to do some research!
Lastly, here is a short video on how stuffed my injectors were:
-
You would think, after cleaning the injectors, that they would pressure test them to see if they leak????
Yes, yes you would. The guy didn't specifically do a leak test. I didn't think anything of it at the time.
He did say to me in an E-Mail yesterday that he does not guarantee that leaks won't develop. If there was a leak right away though, it would have been nice to find out because I've been faffing about for weeks spending money chasing ghosts.
-
UPDATE: It turns out my injectors were corroded and cleaning them has released the beast, and now they leak. It's not the fault of the clean itself - the injectors were on borrowed time.
Sourcing a replacement set of 4 injectors is my only real option to fix this. Unfortunate, but somewhat lucky I found this before I tried to fit a supercharger.
-
1
-
Fuel injector cleaning
in Maintenance Guides
Posted
Mate I have no idea. Nobody recognised or could even look up the part for me here in Australia. They had zero clue - at one point all I wanted was to buy some of these from an injector supplier to avoid the ridiculous prices Honda want to charge ($260 per injector) but had no luck.
The flow rate testing - as I understand it on an ASNU machine - is the number of millilitres of injector test fluid distributed in 30 seconds at 50psi and a specific duty cycle. What that duty cycle is I do not know, but could probably be gained by investigating the ASNU website.
I think in reality they use these readings mainly to confirm if the injectors are flow matched rather than compare them to a manufacturer's claim. They do pre-clean flow tests, clean them and then run a post-clean flow test for comparison.