


kaldek
-
Posts
1,317 -
Joined
-
Last visited
-
Days Won
12
Content Type
Forums
Profiles
Gallery
Blogs
Downloads
Events
Posts posted by kaldek
-
-
I am a computer nerd, plain and simple. The fact that I am even attempting to do any work on my bike is hilarious to my friends and wife.
LOL I'm a huge computer nerd too. But unlike a lot of nerds I guess I also love mechanical things.
Nerds are good for working on wiring harnesses and fuel injection too; most guys here focus on machining and construction (hi Seb!) but I focus my energies on what makes the bike decide to squirt fuel and when to make it go bang. Mind you I can strip a bike down to the frame and rebuild it so I guess I have some mechanical ability. It's all self-taught too, starting in about 2001 when I first pulled the carbs off my VT250.
-
Yep, if your bike is only fitted with a fuel light, bending the sensor float a bit helps.
I wouldn't do it to a bike with a gauge, but that's just me.
-
OK, I have stepped away from the bike and walked the dog to calm down.
Dude, seriously? You want something to get mad at, choose things like bent valves or fried stators.
Even if you *had* a mid oil leak - and I don't think you do - they can be fixed easily enough. Don't stress!
-
Funny thing is that one time when this started I punched the instrument panel and it fixed the issue for a little.
As the Mythbusters say - "Well there's yer prahblem!". Your instrument cluster wiring is dodgy, simple as that. Could be bad grounds, corrosion creating an unintended ground circuit or power feed where there shouldn't be one, etc. You'll probably spot it as soon as you crack the thing open.
-
Question, does the fuel filter have a vacuum line on it? If so it much be a regulator of some sort?? Maybe the kid has a clue~ Didnt sound like it when i talked to him.
The guy is a total muppet and has no idea what the hell he's talking about. Regulator my ass.
Anyway some carbie bikes do often have a vacuum hose on the fuel petcock as a safety valve to stop fuel entering the carbs when the motor is off (in case the floats are stuck open). The 4th-gen doesn't have one as best I can tell from the parts fiche.
-
Btw, are 6th gen COPS not an option? It looks like they have a very low profile which can be useful behind the radiator, and maybe they fit the 3rd-4th gen head well.
6th-gen COPs are three-wire plugs. They remain permanently fed by a common 12 volt source and the ECU sends a trigger command to the coil which causes it to charge up and then fire. The "ignition control module" is inside the coil, so there is no risk of the coil drawing too much current and damaging the ECU; it can only damage itself (the primary windings and transistor).
I suppose the real question is - how does the trigger circuit work and could it be connected to the 4th-gen ignition module? I don't know enough to say why it would be possible or impossible.
-
Today I learned success sometimes takes 22 tons of pressure...
Twenty-two.....tons.

-
Wouldn't do anything to the pulse width, the pulse time would be the same it would just deliver more fuel due to the higher pressure.
I would expect a closed loop system to trim down the pulse length.
That's assuming it's truly closed loop. There is no Long Term Fuel Trim (LTFT), only Short Term Fuel Trim (STFT) which only kicks in at certain situations.
Finding exactly when those are is one of my main tests to perform, so I should know in a couple of weeks.
-
the power delivery down low on tight corners the VFR1200 is a lump of junk. You simply can't ride the thing in tight continuous corners smoothly & get into a rhythm it is like riding a jack hammer
Really, I wouldn't exactly say the 6th-gen is much better in that regard. Look at the 10 year old threads on Bikers Oracle about the snatchy throttle and the sudden bursts of power, and all the problems I've had over the years trying to sort it out. Mind you mine's pretty good now so I suppose it *is* possible to make the problems go away. But still, the point is the 6th-gen has the problem too.
Maybe it's the same guy at Honda tuning engines the last 12 years and he's a total muppet when it comes to driveability tuning?
-
Is this OBDwankenobi thingy akin to the diagnostic tool they would use at Honda mechanical workshops/dealers?
Yeah pretty much, but like 1% of the price (or less).
-
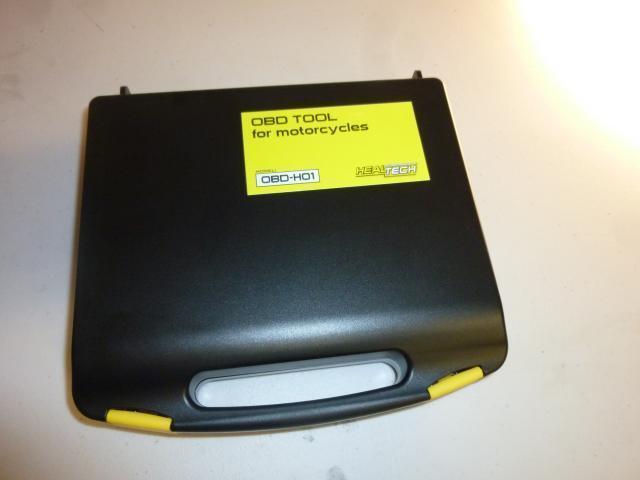
So far I only have this pic. Will post a video soon too!

-
The effect of using a higher pressure FPR on injector pulse width.
Wouldn't do anything to the pulse width, the pulse time would be the same it would just deliver more fuel due to the higher pressure.
-
The OBD tool arrived today. Nice piece of kit! Now I just need to plan out some tests I want to run, which include:
- When the airbox flapper opens
- When the PAIR valve closes
- If the PAIR valve activation is linked to the O2 sensors.
- When the airbox flapper opens
-
Like everyone else has said, get a voltmeter. The first sign of a dud stator is that it puts out low voltage at idle when hot, and then it starts to stop putting out decent voltage until 3,000rpm.
And then one day it just goes dead. Suddenly. Mine did that while I was synchronising the throttle bodies and idling the motor.
What basically happens with them is that the insulation on the wiring degrades due to heat. When it degrades, it short circuits the winding and when that happens a winding which may have been, I dunno, 100 feet long is suddenly 1 foot long. Ergo, no energy created when a magnetic field (the rotor magnet) goes past.
You can rewire a stator, but it's a bitch of a job and you need to make sure you use the correct type of wire with the right kind of insulation, and then you have to cover all that in heat resistant epoxy. Not for the feint of heart!
Also as has been said, it's better to draw more current out of your stator than to not. This is because the less power taken from it, the more the regulator shunts the power the stator generates back into itself. This causes heat, which causes insulation to degrade faster.
-
I remember sitting behind a mate on an RC-51 with Akrapovic pipes one day. I swear I could have put my whole arm down there (and the sound pulses caused my chest to vibrate). Phat, PHAT sound.
The straighter and more open, the better!
-
An 03 model should have the lastest flywheel, to my knowledge the stator flywheel upgrade was only for 02 models.
You're probably right. I wonder why the part code for the '03 changed mid-way through the year though. Odd.
-
There are various Exhaust Servo eliminator modules you can buy. I have one fitted to my CBR1000RR track bike made by a guy named Pat Fruth.
They generally cost around $25. Not sure if the CBR one will work on the VFR1200.
-
I love the 'tunes on my 6th-gen but the best sounding pipe I ever heard was a Madaz on a 5th-gen. I like a mix of rasp and bass and this pipe had the whole package.
It was also mentally loud.
-
The cooling fan system in later model bikes is not controlled by an electro-mechanical sensor but rather by the ECU based on the reading it receives from the ECT sensor. I have a 2005 CBR1000RR track bike which used to switch the fan on at 50 degrees C coolant temperature and it would come on and go off at what seemed like odd intervals.
My best estimation after thinking about it, is that the ECU monitors not only the current temperature but the rate of change. If the temperature is increasing higher than a specific rate, it kicks in the fan to slow that rate increase down. I'd hazard a guess this is more likely on new engines as they're still a bit tight. Even my dad said his 1997 VFR from new ran really hot and the frame itself was hot to the touch. Once it had a few thousand miles on it there was less heat soak.
Older bikes (VFR800 and earlier) use an electromechanical switch to activate the cooling fan, so they will basically come on at 100 degrees or so and switch off when the temperature falls below that. Those systems are actually higher risk because while the ECT sensor is connected to the engine block the cooling fan switch is mounted right at the top of the radiator. If your coolant is low, the switch may not read 100 degrees and your cooling fan may not come on even though the engine is overheating.
-
A. Where should I buy a new stator from?
For reliability, can't go past the OEM stator but there are alternatives such as those from Wire My Bike.
B. Do I have to replace the flywheel?
Depends what your engine number is - needs to be 2503808 or later as the part code changed at that point. Prior to that you might have the smaller flywheel/stator combo and need a new flywheel as well. You can measure the outer diameter of your existing stator to confirm. Old (small/underpowered) stator is 107mm outer diameter, new (improved) stator is 114mm outer diameter. If you need to pull the flywheel, use this tool from Motion Pro. It's about ten bucks.
If you DO need the flywheel and stator, Honda sells the combined kit for $290. It's part number 31100-MCW-325. FYI, if you do have the smaller flywheel and put the bigger stator in there without replacing the flywheel, you will smash stuff to pieces and possibly even bend your crankshaft.
C. Where should I buy a new reg /rect from.
Anywhere you like, but the MOSFET units are an improvement. Buy the FH012 model and order the connector set from Eastern Beaver.
-
Yup, gotta squeeze the connector before it will come off. You'll feel where it can be squeezed fairly quickly.
-
Hi folks,
HealTech electronics have released their OBD tool for the Honda EFI (ECU) unit as fitted to 2006 and newer VFRs (also any Honda bike with the 4-pin DLC connector).
I've ordered one from them and will make a video on its capabilities when it arrives, but you can download the software program now, and load some sample recordings
It's great - exactly what I was looking for. It tracks in realtime (and records) the following data:
- Engine speed
- Vehicle speed
- Intake air temperature
- Engine coolant temperature
- Manifold Pressure
- Throttle Position
- Battery Voltage
- Injector pulse width
- O2 sensor voltages
- O2 sensor heating element state
- Short term fuel trim values for each cylinder bank (finally we know the bike only has a Short-term trim!!)
- Bank angle sensor
- PAIR valve solenoid state
- Flapper valve solenoid state
- EVAP solenoid state
- Side stand switch state
- Engine stop switch state
- Fan switch state
- Bank angle sensor state
- VTEC valve solenoid state
- Starter switch state
- Gear position switch state
- FI lamp state
It also shows you live ECU OBD errors in the software, some of which I'm hoping are the ones that don'tt cause the FI light to flash. This will aid problem diagnosis greatly.
- Engine speed
-
I know the voltage is regulated by the R/R, but like I said the stator phases are shorting to each other.
I don't buy it. If it was doing that it wouldn't be generating ANY volts.
-
Also, sounds like your mechanic is a bit of a muppet.
Oil leak - don't know how serious - pics
in Maintenance Questions
Posted
Nah, it has an overflow pipe. If it fills up it will just spash onto the ground. The pipe is just below the reservoir lid.
I've not heard of a VFR overflowing its coolant bottle - ever.