

BonusVFR
-
Posts
2,104 -
Joined
-
Last visited
-
Days Won
7
Content Type
Forums
Profiles
Gallery
Blogs
Downloads
Events
Posts posted by BonusVFR
-
-
I didn't say crossing a border. I know people who rode trails or toured Alaska and have used a bleach jug. I didn't say I condone it recommend it or plan on doing it, but when you have a two hundred mile stretch between gas stations the next day and you only have a 170 mile tank range, you do what you do.
http://www.cycleworld.com/2014/05/21/tips-for-carrying-spare-gas-on-the-trails/
My point was there are alternatives to that monstrosity on page two. A Rotopax would be my choice.
Rotopax is a slick solution.
With my KLR in Alaska I packed two MSR bottles plus stove fuel if things were really bad. Most folks up there who do a long run with temporary gas just use an approved plastic fuel container ( One gallon or so) that you can buy at almost any gas station . They just strap on top when not in use. You fill it up just before an 'anticipated" long run without gas and then empty the contents after 60 miles or so to minimize the container risk. I had one 250 mile run without gas in Alaska but did not use the emergency gas.
I always carry at least a MSR bottle on tour. I have been over 200 miles several times without a gas station to include Nevada and West Texas.
-
DD ...here is another shot of the "Tool Tube".
I think I got these at a hardware store but they are available from Twisted Throttle. http://www.twistedthrottle.com/twisted-throttle-tool-tube-w-mounting-kit . The one liter MSR bottle fits perfectly. I mount them on my SW Motech racks.....there was not enough room to put them inside the racks.
I see that I have another flask in one of my bags but that is for me not the bike.
-
 1
1
-
-
Is there a way to rig a small bottle/canister under the left bag similar to what I have done on my 5th gen here? This one liter bottle is my emergency and stove fuel.
Out West in the USA, tank range is a big deal sometimes and several times I have been faced with 200 miles between petrol stops. I always carry a siphon hose as well and usually ride with ST oil tanker bikes.
-
Several folks have mentioned it already but the beads and contours are different on a car rim. I just recently waded through pages of threads on car tires on goldwing rims and the legality of it (let alone the merit). The Darksiders persist.
Here is a very recent release from the RMA on the subject.....mostly about car tires on MC rims but the point is the same.....wrong type tire on rim.
RMA REVISES ITS BULLETIN ON MOTORCYCLE RIMS
WASHINGTON, D.C., July 6, 2012 - The Rubber Manufacturers Association (RMA) recently revised its Tire Information Service Bulletin (TISB) Volume 28, “Never Mount Passenger Car Tires on Motorcycle Rims Fitted to Motorcycles or Sidecars.”
The recently revised bulletin cautions against installing passenger tires on motorcycle rims. It explains that motorcycle tires and corresponding motorcycle rims are designed with a bead seat diameter and flange contour that are different than passenger car tires/rims, therefore any attempt to mount a passenger car tire on a motorcycle rim may cause inflation pressure loss or the beads to break with explosive force. The result could be serious injury or death.
“Not every tire is meant for any rim,” said Charles Cannon, RMA president and CEO. “Caution needs to be taken to ensure motorcycle tires are mounted on motorcycle rims only,” he continued.
For a copy of the newly revised TISB Volume 28, Number 3, and other service bulletins, visit RMA’s website at www.rma.org.
The Rubber Manufacturers Association is the national trade association for tire manufacturers that make tires in the U.S.
As somebody else relayed "Be careful out there"!!!!!!!!!!!!!!!!!!!!!!
-
Has anybody run both front PR2s and PR3s on a 5th or 6th gen. Compare mileage, performance etc???
-
The key stat to figure out if your tent will stuff is the folded pole length. Most web site do not list this number. If you are really interested in a tent go to place like REI and have them set it up for you and then measure the individual pole section lengths. If you really like the tent however you could always stuff the tent in the hardbag and carry the poles elsewhere...but beware some have lost their poles when they separate.
Come on over some day and we can see if my tiny North Face Tadpole will fit. I suspect it will...... the only thing I can not stuff in these days is me!
-
Symtec for me.........maybe 8 years?? I use a rocker. Run my grips from an aux fuse box.
-
I did the Y2K update on my 5th Gen. Cleaner look. Make sure you get the hardware kit that comes with the updated mirrors as the old mounts do not work well with the new mirrors.

-
I pretty much use the hard buttons all the time unless I really need a screen touch. The newer 660/665 do not have as many hard buttons so be careful.
Here along the border the dust can get really bad especially during the dry summer.

Screwed up my RAM camera too.

-
Two things on the Zumo front.
As reported earlier my Zumo barely managed to get thru my Alaska tour this summer. I opted for a refurbished unit instead of going the do it yourself digitizer replacement "route". I forget but the exact price was in the $150 range. So my Zumo 550 (RIP) lasted from Dec 2006 - July 2010. Again, I believe most of my screen damage was due to my dirt riding in the last two years. I now use a screen protector and try to use the hard buttons to minimize screen touches especially when the screen is covered in dirt.
I was hoping for new maps on my refurbished unit. However, the returned unit had my 2009 maps....so what to do?
Since I had in essence a new unit, I elected to purchase the nuMaps Lifetime from Garmin (actually I picked them up at Amazon). There are several updates each year. I had received one time updates in the past years.
Like my waistine, the maps girth has expanded over the years and the North America mapset will no longer fit in the unit in its entirety. I stripped the unit of all unessecary files. (BACKUP before you do this!). The newer 660/665 units have enough space on the unit so this is not a problem.
There are of course lots of options on how to manage the download on the 550. Since you are downloading the updated Maps from Garmin instead of using a DVD you need a fast connection. And since you downloading and backing up to the Zumo unit itself over a slow USB connection plan on spending some time updating your maps. I did this while my wife was at school so I could not blame her toooo much. I was cooled off enough when she returned so our marriage is still intact.
There are three options on the download using the Mapinstall application from Garmin: to the unit, unit and you computer and lastly to just the computer. I opted for just the computer and planned to use Mapsource itself to send the maps to the unit after I had a bird in the hand with the maps on the computer and in Mapsource. Regardless you need to have the Zumo on the wire so that Garmin can check the serial numbers to make sure you are legal and such.
Important - in order to make room for the new maps, I had to remove my old 2009 maps from the 550 unit. It is the biggest file on the Zumo "gmapprom.img" and depending on the year of your last update will be at least 1 gig. Double check this and backup!!!! Read the Zumo forums first - warning!!!! If in doubt call Garmin tech support!
So now the maps were on my PC. By selecting map regions from within Mapsource, I was able to mark about 1.1 gigs of maps for download to the 550. Obviously you will select regions where you travel the most. In my case, I selected the USA plus Western Canada where I have MC toured in both 2009 and 2010. After using the Map Tool to select the appropriate map areas, I sent the maps using the "Send to the Device" tool to the unit itself . You could send the entire mapset to a SD card but some have complained that the screen redraw is a bit slower than with the maps on the unit itself. After the download to the unit , then I selected the remaining areas (rest of Canada and Mexico) and sent those to the SD card in the unit.
BTW this is the same procedure (Mapsource Map select Tool) you use to load Topo to your SD card except that in my case the original 24K Western Region Topos came from a CD.
I ended up with about 200 megs of CItyNav maps on the SD card. So my 8 Gig SD card will have the following on it:
1. Left over City Nav maps
2. MP3s
3. Supplemental POIs
4. Topo
After my PC and Zumo were remapped I used the same Mapinstall application from Garmin to update the maps on my Laptop. Again on a high speed cable connection that took a little over half an hour.
Having a general familiarity with Mapsource was helpful when updating the maps. Note - there have been a few threads recently on using another application besides Mapsource to plan routes. I continue to use Mapsource to plan my tour daily routes. Most times I use Microsoft's Street and Trips first to do a master tour plan as it now has the GPX export capability.
-
My 550 packed up. The screen digitiser failed; if you touched the screen it kept getting the input after you lifted your finger. Had to wait an age for the false input to go away. I did a little Googling & found there is a $28 spare part available. I have it on order from Hong Kong. Thread with pictures of how to fit it here:
That is most likely the problem with my unit too. I have one of those on standbye ..........depending on what Garmin says.
-
Thanks DIMford.
I just did my last Zumo 550 tour.......................... My Zumo finally bit the dust (really) in Alaska. It survived rain every day (except one) but my recent dirt riding back in CA and AZ did too much damage to the screen so I lost the ability to use screen touch commands. THank goodness for the hard buttons.
I will report on what Garmin does for me?!
Anybody want an Alaskan KLR tour report?
-
THe barbell extension with either two med arms or short arms.
-
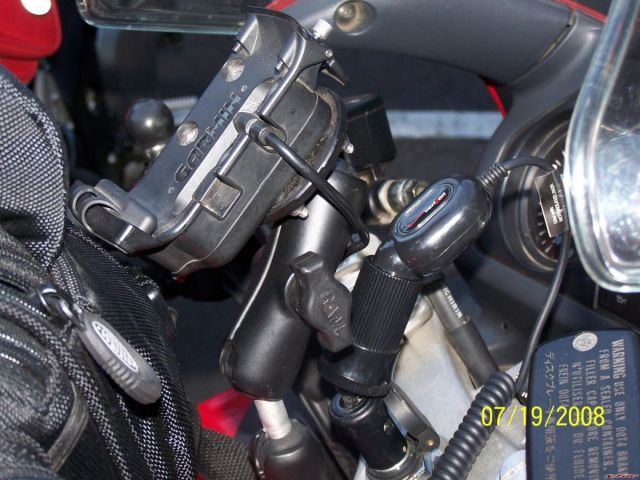
What is the part # for the Ram mount and where did you get it, i'm looking for a mount for my nuvi200. I've been using the suction cup on the tank, but don't like it. I am heading to the gap in august and want to get set up. Thanks for any info you can offer.
I ordered at GPSCITY.CA, but they also have the same thing at GPSCITY.COM
RAM-B-149Z-GA32U (28$CAN) mount kit and
010-11143-07 (21$CAN) power cable kit.
As I said in original post, the cradle with the cable kit is a better design than the one included in the mount kit. You can order the parts in the mount kit (without the cradle) separately, you'll save around 5$ overall.
BI
I bought a Nuvi 550 and the recommended mount kit and cable kit. Obviously got an extra cradle but maybe I can use it on my Buell. Installation looks straight forward. My only question involves electric hook-up. Can positive red wire be hooked up directly to positive battery terminal? Should black wire go to negative terminal of battery or should it be grounded. I know these are pretty elementary questions but I haven't done much electrical work on bikes and I really don't want to fry the bike. Any help from anyone would be appreciated. Thanks
Phil
Red to red...black to black..right to the battery. I have wired two bikes like that till I put in swithched aux fuse boxes
-
I finally broke down and dropped the coin on a 550. Just got it yesterday and so far it's everything I expected. I haven't mounted it on the VFR yet b/c of the weather and not having a garage. But I have a question already. I was reading the manual (go figure) and it says something to the effect that if you opt for the bare wire connection, it has to be done by a professional who has knowledge and experience with automotive electronics in order to not void the warranty. What's up with that?! I planned on doing the bare wire rather than the power outlet but now I'm a little concerned. What do you guys think?
No problem is you can match the red Zumo wire to the red battery connection. Black to Black! The Zumo wire kit comes with the right fuse...You are done. That gives you a powered connection all the time. Just do not leave the Zumo in the mount all the time.
Later you can put in fusebox or something that is switched if you want.
I ran my Zumo direct to the bike battery on my KLR for a while till I put in a switched connection. Some folks actually prefer the direct hookup method....it is all good.
-
I weigh about 155 lbs.
Looking at the Racetech site, do I just get the Gold Valve Kit and the springs? Those 2 things are in the $300 range. I see a Gold fork rebound kit for $169. How necessary are the rebounders?
Seems to me you are in the ballpark as to what the OEM springs can handle. How many miles on your bike?
I just did both gold valves on the front but changed springs too as I am heavier rider. That I did the rear too as the bike would be out of balance.

-
Not sure how many miles you have but I would consider suspension as a top priority.
-
I wonder if that was my problem. I had just under 20K miles on my Zumo without a hiccup, then at the Sum. Sum. it erased my Steamboat Springs route and continually got worse. By the time I got home from that trip, the GPS was about worthless as far a navigation goes. You couldn't press the correct button, and often times it pressed buttons on its own. My new Zumo should be on the way from Garmin. I wish you would have found this out about 6 weeks ago.
The story of my life ..............a day late and a dollar short! :blush: :happy:
My problems started with "getting dirty". How did that happen?

-
Well I have been doing some touring on my Wing and VFR but...........recently I have been using the Zumo/KLR for more dirt stuff as the weather has cooled a bit.

Lots of dirt road stuff by the border................and with the Zumo I have experienced the first really weird behaviour from my machine.
Turns out if you do not clean your screen routinely dirt/dust/sand gets caught in the bezel on the outside of the screen. Sometimes this will cause the touch screen to act up.
Solution - Wash the corners or use a business card/something similar to get the crap out. A certain sign is if you get a warning on start up ..."Do you want to erase all data" or you seem to be punching in different letters in than you thought you touched. Screen may require recalibration too which is described in the manual.

Another indication that your screen is dirty is if your camera is clogged toooooooo!
The whole cleaning thing is antithetical to a KLR rookie but a guy has to do what he has to do! :happy:
-
VFRCAPN - I got the 72 inch Insultated air core in 20 inch width Big Agnes. Did not really camp in cold temps this time but that is the purpose of the insulation. The Agnes pad is a nominal 2.5 inch thick but I was much more comfortable than the 2 inch Thermarest pad (72x20 too) I bought last year....which replaced a old thermarest and then a 1.8 inch REI version. If you want a thermarest thicker than 2 inches you really have to go to the wider 26 inch styles which are HUGE. The BA packs in less than half of the room as even the smaller of the THermarests.
I may give this a try on my next camp trip, I need to stay with the 20" width since I have the BA sleeping bag. It's nice with REI's return policy that you can try something out like this and return it if you're not satisfied. Thanks!
Yes on the Return policy. They just openned a store about two miles from my house. Candy!!!!!!!
Check out this one too.................. Not sure what it packs but the same idea as the BA ....but with a built in pump thingy. Was not there when I got the BA....but I am happy/set. I actually got a good night's sleep in a backpacker tent which is good for an old man.
Another option - Exped DownMat 7 Air Pad with Pump - Regular
-
VFRCAPN - I got the 72 inch Insultated air core in 20 inch width Big Agnes. Did not really camp in cold temps this time but that is the purpose of the insulation. The Agnes pad is a nominal 2.5 inch thick but I was much more comfortable than the 2 inch Thermarest pad (72x20 too) I bought last year....which replaced a old thermarest and then a 1.8 inch REI version. If you want a thermarest thicker than 2 inches you really have to go to the wider 26 inch styles which are HUGE. The BA packs in less than half of the room as even the smaller of the THermarests.
-
Well I know what bike I would take for two up camping.................
But that is not my reason for posting.
I finally had a chance to test my Big Agnes insulated air mattress in the Sierras last month. Much more comfortable than my thermarest. And it packs smaller than anything around. Only downside is puffing it up. My next purchase is a camp chair...can you say Kermit!
My Tadpole tent tucked in the back ..............which makes it look even smaller than it is. I use the same Cortech seatbag (for all the camping gear) as I do on the VFR but more room now as I am using the Big Agnes Pad.

-
A heated vest to keep the core warm helps toooooooooo!
-
For those of you who never really clicked with Mapsource .....................there is perhaps another option with the new version 2010 of Street and Trips. It now has GPX support. I still use the S&T Product for the Master Plan ...........I certainly will upgrade this year to the 2010 S&T........maybe even with a Sirf GPS unit.
Some of the new features:
Microsoft provided a list with the features that Street and Trips 2010 brings to the table:
“- New map data from NavTEQ - a world leader in premium-quality digital map data and content.
- 348 pushpin icons! (back by popular demand)
- Ability to share data with your Personal Navigation Device (like your Garmin)
- Full GPX support (import and export)
- Click'n'Drag rerouting
- Improvements to help with pushpin management and control
- Return of the Back (and Forward) functionality
- 5 new POI (points of interest) categories
- Ability to copy latitude and longitude coordinates to your clipboard (ctl+alt+c)
- Ability to rename your route waypoints
- Ability to show or hide individual pushpin sets
- Displays the distance to your next stop as well as your destination
- Ability to search for Highway Exits
- Easy customization of your map view
- Ability to pause Windows Media Player during spoken instructions
= Plus numerous other improvements, tweaks and bug fixes.”
From the MSFT site
New!―Save time by setting your map to always start at a particular location.
New!―Share trip details or itineraries with friends and family.
New!―Send your route to your GPS device.
New!―Easily delete or hide groups of pushpins.
Improved!―Choose specific roads to use on your trip just by dragging and dropping the route.
Improved!―Streets & Trips now includes more than 300 unique pushpin images to choose from.
Improved!―Comes with more than 1.7 million points of interest including post offices, pharmacies, and more.
Bigger Fuel Tank
in Seventh Generation VFR's
Posted
The Tool tube works for me.