

apexandy
-
Posts
333 -
Joined
-
Last visited
-
Days Won
6
Content Type
Forums
Profiles
Gallery
Blogs
Downloads
Events
Posts posted by apexandy
-
-
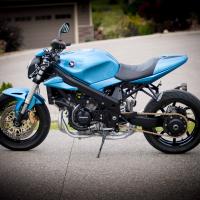
Here's a little taste of what occupied most of my winter modding time:

-
 2
2
-
-
I might've missed it if someone else asked, but what handlebars/conversion setup did you use?
I recently crashed my 4th gen and am using your bike as a launching pad of sorts for the rebuild, so you might be hearing from me quite often :)
I am using driven brand bar risers mounted to an RC51 top triple clamp which I reinforced with aluminum plates and JB weld on the underside of the triple. Then a low bend dirt bike bar.
I'm happy to answer questions and help out! Also don't forget the search function. A lot of what I did was already researched and done by others here and other places on the web. Post up a build thread to get feedback and to show others how you've accomplished different mods. We like looking at pictures :)
Good luck!
-
Well I'm glad they're working well for you! I'm probably imagining things :) Bike sounds sweet by the way!
-
Not running them anymore… back to stock coils. They definitely weren't unseated. Did the same thing after uninstalling and reinstalling multiple times. Has your bike always had the "tick over hiccup" or is it more recent. And does it only start happening after the bike is up to operating temp?
-
KGS, after listening to the video a few times after the 7 min mark I am somewhat suspicious of you having a similar symptom to what I had. It is hard to tell from a online video clip but it seems as though after it warms up it starts to idle a little less even and when you rev it, unless I am hearing wrong, it seems to "clear it's throat" a touch as it revs higher. As in it doesn't just rev cleanly straight from idle towards higher RPM. Would you say it does this after it has warmed up past 80* C?
My bike worked great on the GSXR cop's for 700kms… then I started having the same issues I just described to you… however they got worse and worse. At about 800km's (I was on a 1000km ride) while stuck in traffic I had to rev the bike at at least 4000rpm to keep it running but once at 100km/h it would run decently enough… and even strong under higher throttle and higher rpm (though even this started to suffer closing in on the 1000km mark). A few times in town I had to pull over and let the bike cool below 75*C.
When I got home I could recreate the problem easily. Bike would run fine until it reached operating temperature then it would start to cough and misfire at low to mid rpm's. Switching to factory coils solved the problem immediately. So I ran the last 4000km with the stock coils. I have done some reorganizing and have found good spots to hide the factory coils… so that's what I'm going to use now.
I figured it's possible the coils I bought were just on their way out… although I find it strange I had 700km of the engine running great and then had two of the coils start acting up after the bike was warm.
I'm not trying to discourage anyone from doing the mod… just adding to the discussion. KGS do you think it's possible your bike has started stumbling after reaching operating temperatures?
I am wondering if the CBR coils might be a better option as they do have a different internal resistance… but I don't understand the science behind it.
-
Maybe you mentioned it before douglas, but what coils are you using? Also, out of curiosity do you have a voltmeter on your bike? If so, would you be able to let us know what your readings are at idle before and after the mod? I'm still confused why certain aspects of this mod didn't work so well for me. And let us know how it goes!
A good ride on the weekend....
Still had a rough bottom end.. but not an issue when on the go...
Bike was running very well indeed.
Best handling outing so far as i dropped forks from 19 to 15mm showing above top yoke. Stabilized the high speed running no end. The lack of weight was obvious pulling the front up out of tight bends and clearly having power to hit passed bikes down the straight. Enough to get moved up a group after first session to get some competition..
When i got home i checked bike over only to see the RR was showing signs of meltdown on one of the stator 3 yellow wires.. hmm. Caught just in time i hope before more mishap?
But more notable i saw one of the COPS had come loose a little..
I released the bottom boot on the COP and reconnected it to give a more positive connection. Might be the problem?
I thought maybe it is a tad too long and does not sit well enough, maybe only by a few mm, maybe the rubber boot pushes the good connection loose a touch?...As when i fired her up, the bottom end roughness was gone! Tick over fine....hmm...
After i find a fresh RR connector and rewire i will test some more...
How is yours functioning KGS? After fixing the loose coil has the stabling issue disappeared?
-
Nice upgrade!
On a semi-related note… what kind of specifics can you give on the stiffer clutch springs? I'm assuming it provides a more solid and positive clutch engagement? I find my clutch a little "soft" when shifting hard and sometime when clutching a wheelie. Do you think stiffer springs would help in these situations? I especially notice it with hard shifts… it seems as though the bike takes a little longer to recover after a shift at high rpm… not a solid engagement of the next gear. Does that make sense? What are the downsides of the stiffer springs?
-
+1
-
About the fuel reserve light I think that it's not working properly because of the "indicator light check unit" that is on the original tach. I think that it's an hysteresis device to avoid the blinking of the light when the fuel is moving in the tank.
For the RPM i'll check with mine if I have the same problem with the original wire. I'll start the work on the harness tomorrow !
The fuel reserve light is connected to a "thermistor" in the tank. The fuel acts as a coolant, but when the fuel level drops below that of the thermistor sensor, the sensor will heat up and the low fuel indicator will light. The 5 watt bulb in the stock gauge provides the correct resistance in the circuit for the thermistor to function properly. It's possible the "indicator light check unit" has something to do with this as well. With an LED the light will always be on. I saw someone that used a 150ohm 5w resistor fix the issue, but haven't tried it myself. I just use the fuel level gauge as the reserve warning. I find it to be consisted, but not very accurate to the actual percentage marks. a 70% reading is half a tank, and I have my reserve light set to come on at 30% because after that the gauge drops quickly.
As for the tach glitches... this thread might help:
http://www.vfrdiscussion.com/forum/index.php/topic/76055-koso-rx2-gauge-on-4th-gen/
I haven't tried it yet, but intend to.
Hope that helps :)
-
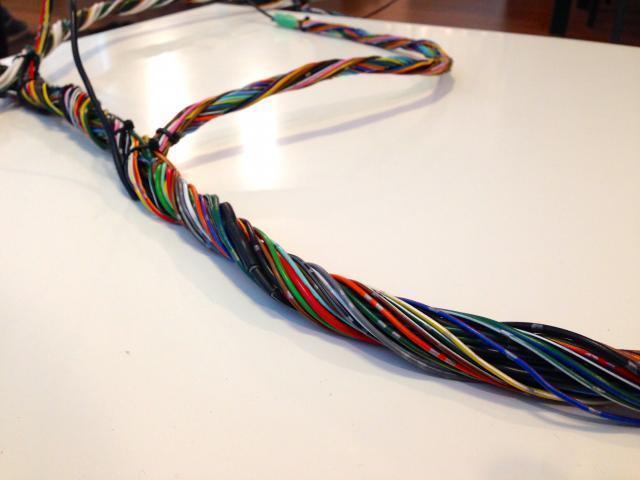
Some have been asking about wiring up the Koso gauge. Here is some information I put together that might help.
The only 2 things that don't function properly on my gauge are: fuel reserve light, and Tach is slightly jumpy from about 6500rpm-9000rpm. But I have attached the tach wire directly to the factory wire, not the coils. I might try the coils this winter.
Not sure you have the wires labelled yet your factory loom. But these are what the wires correspond to and where you will run them on your gauge. I left the speedometer wires out of the equation as you are using the magnets, but you could splice into the wires in the factory loom if you were running your koso pickup off the rear wheel. Also, the fuel level wire wasn't labelled on my Koso wiring diagram... it's the wire paired with the tach wire connector (black I think).
Red: Any wires that will go directly to the gauge (Run a dedicated ground)
Pink: Wires that would go to the left side of the indicator panel with one ground wire (switched positive)
Green: Wires that would go to the right side of the indicator panel with one switched power wire (switched negative)
From the Left on the VFR wiring diagram:
Green Connector- (Not in order of wires in actual connector block)
Bl/Br Clock Switched Power
O Left Turn Signal
G/Bl Speedometer 1
R/G Clock Constant power
Bl/Br 12v Switched Power
G Ground (Run a dedicated ground to the actual gauge)
Y/G Tachometer (Unless you decide to wire directly to coils)
Bu/Bl High Beam Light
P Speedometer Signal 2
Y/Bl Side Stand Light
Blue Connector
Bu/R Oil Pressure Light
Lb Right Turn Signal
Gr/Bl Fuel Gauge
Bl/Br Switched Power
Lg/R Neutral Light
Br/Bl Checklight
G/Bl Ground
Br/W Meter Lights Switched Power
Br/Bl Fuel Reserve Light (Needs correct resistance to operate... could try a 150ohm 5W resistor)
G/Bu Coolant Temperature (I ran the koso wire with the attached temperature sensor directly from the thermostat housing to the gauge)
-
The LED light bar acts as the run/brake in red and turn signals in amber.
Though I might add turn signals this year just to make sure they are nice and visible.
-
And since it's winter and I can't be out riding... I'm going to post some more VFR-SF related pics :)

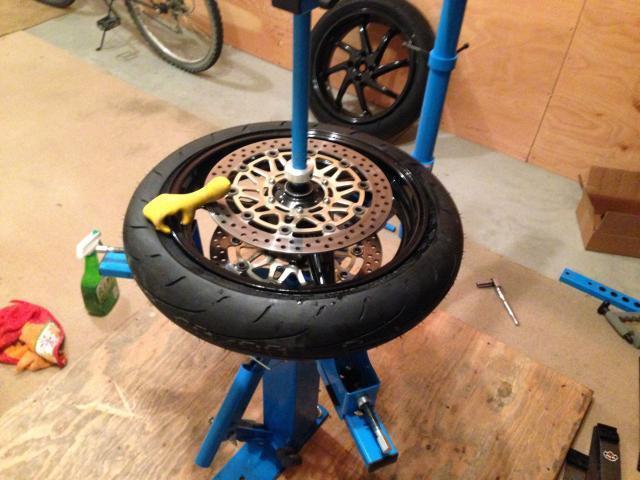
My dad bought a cycle hill tire changer used and the guy delivered it to my house, so before sending it off to my dad I changed out my PR2's for dunlop Q3's

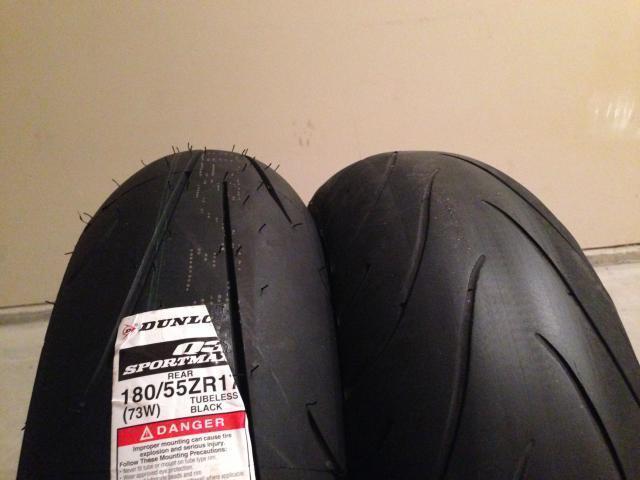
This gives an idea of the different profiles of the two tire types. You can't completely trust this pic as the dunlop hasn't even been mounted yet, but the PR2 off the rim here.

And all mounted up. Road a few hundred km on them before putting the bike into hibernation mode. They handle quick yet still nuetral and predictable and have loads of grip! I wasn't really lacking for grip with the PR2's in cornering (although I could tell the rear was starting to slip a touch at the end of it's life) but I will say I find the front tire has a lot more grip under very hard braking. Instead of the front tire chirping a touch (even after nicely warmed up) on the PR2, the Q3 just lifts the rear tire. And they look boss... I know, a great reason to buy a tire.

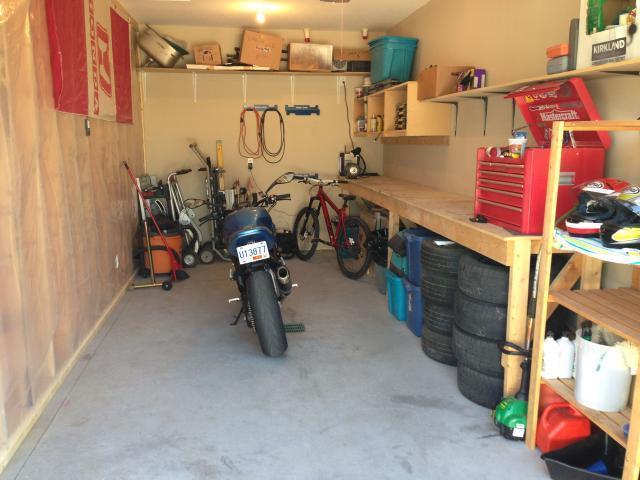
This is where the whole build was done

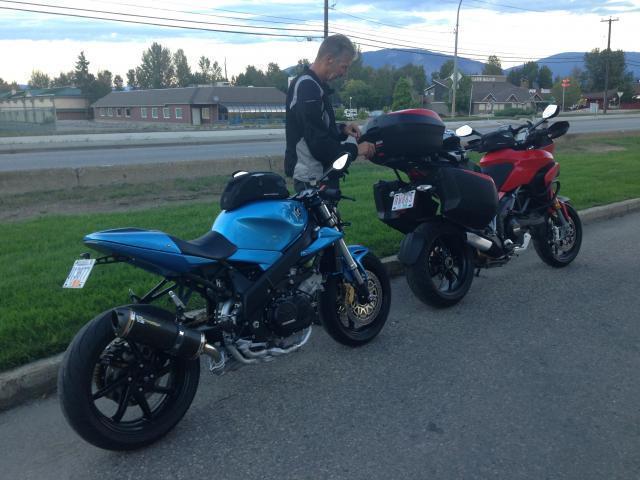
My dad lives 650km away, but we got to do a little riding together this summer :)

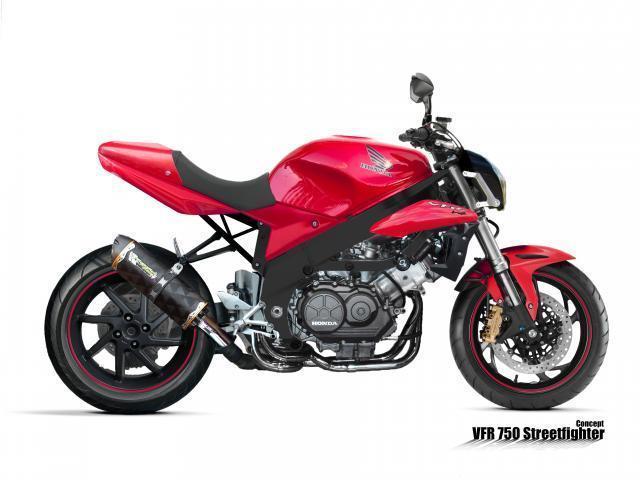
And here is the photoshop concept I put together of the build before I even had the bike tore down from it's stock form.
-
2
-
-
Are you running with a fan on the radiator or does opening up the engine do away with need for one? Where did you relocate the coils and fuel pump too? Sorry for all the questions, the more I look at it the more work I see. What part of the build gave you the most grief? Cheers, Brett.
I am running a fan. It only comes on when the temps go above 102... which is very handy sitting at a stoplight on a hot day. I relocated the rear coils to the battery box and the front under the left side rad shroud. The fuel pump is also in the battery box.
What part gave me the most grief? The bodywork...
In other news... I threw together a few video clips of just the beautiful V4 music and a bit of a walk around of the bike.

-
1
-
-
The oil cooler was bypassed. I cut off the stock metal pipes, flared them slightly and looped the rubber hose from the inlet to the outlet (the oil pump needs the cirucuit to be maintained... you can't just block off the ports). A number of people I found online had bypassed the oil cooler with no apparent significant downsides. The stock cooler is quite small and without the fairings the bike gets a lot more cooling air anyway. In 5000km the engine heat hasn't been an issue at all, with temps normally in the 75-85*C range. That being said... it doesn't normally get above 30-35* here in the summer and I don't spend a lot of time in sitting in traffic. Also, I know it's not the best solution to remove the oil cooler as it does more than just try to keep overall engine temps down, and I do have plans to fit either a "filter cooler" from another honda if I can figure out one that fits, or I might find a better fitting cooler to fit in a chin spoiler. But for now, the bike seems to be just fine without it.
Here is a short rundown on parts from other bikes:
-Speed triple seat/solo cowl (modified)
-GSX-R passenger pegs
-ZX14 clutch and front brake radial master cylinders
-complete front end and brakes from CBR929/954
-RC51 upper triple clamp
-CR low bend dirtbike handlebars
-Ducati streetfighter mirrors
-CB1000r master cylinder mirror mount brackets
-CBR929 rear shock
-Yamaha MT-03 headlight
-Tail tidy made for MV agusta F4 (modified)
-Front brake lines for made for CB1000R (not the best fit, but they work)
-Two bros muffler and link pipe from speed triple (cut and welded to a VFR delkevic link pipe)
-ST1100 throttle cables (strangely enough, wrong free length... needed to modify the carb attachment for the cables)
-CBR900 choke cable and lever
-CBR1000 Front fender
-CBR1000 Tank badges (backwards)
-ZX10 Mosfet regulator/rectifier
-
Looks great!
-
Im so angry you posted pictures of my bike on my build!!!!!

It looked less clean after the rainstorm on the way home however...
My friends idea to throw our bikes in his truck and head down to California this winter is looking better and better all the time :)
-
1
-
-
Thanks guys :) I wish I had more cool modification to post in here but have just been enjoying riding it! It honestly works so well. It's the most comfortable bike I've owned, (even better than my 6th gen), has completely smooth air on the highway (I've alway preferred smooth air over turbulent air from a windscreen), is refined and smooth but still agile, responsive and full of character. And I can't help turning to look at it a few times as I walk away from parking it... every time.
This weekend looks like some decent fall weather (been pretty cool and wet for enjoyable riding already up here) so I hope to get some good riding in. This winter I have plans to work on some things so I will definitely keep this thread updated.
Again, I appreciate all the comments and if this build has inspired you then I hope you have fun taking on your own project!
-
I believe rangerscott did that on his 5th Gen to test things out? I think it worked fine for him. Im too lazy to read through the thread again...
-
Made up a little video for fun. I know there isn't a lot of "off bike" footage... I guess I need to hire a cameraman.
-
1
-
-
Did a little engine heat blocking under the tank/subframe/battery box area with the rubber heat guards I had from the stock bike. I think I have improved the issue but I'm not sure I can make it any better. Because there is much less in the way of fairings and plastic blocking and redirecting heat behind the engine and above the headers the hot air will get to my seat/legs anyway. Its not uncomfortable really... I guess I've just never had a bike that really does this. On Italian bikes they call things like this "character"

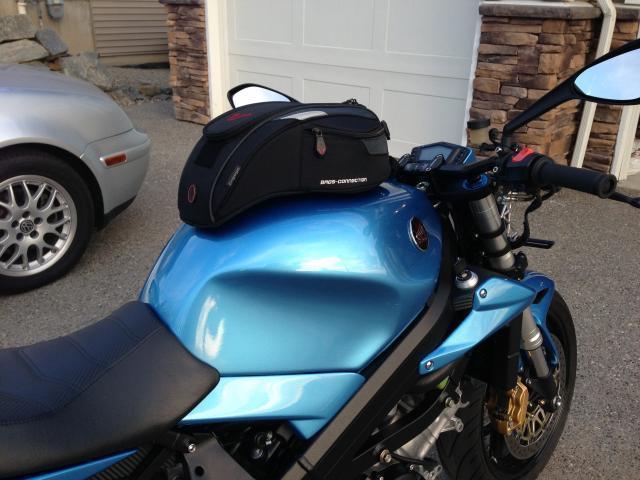
Other than that... just riding! Oh, and my new tankbag came in: SW Motech Engage. A nice bit of kit! Amazing, sturdy quality, easy to get on and off, and doesn't touch the paint. Not cheap... but my last tank bag lasted 15 years!

-
I finally got around to adjusting the sag on the suspension with the help of my dad who is visiting for a few days :) Completely confirmed my suspicions that the spring rates are quite soft. With front and rear preload maxed out I could only get 40mm sag. I will probably look into suspension upgrade options this winter. I'm thinking revalving and re-springing front forks and maybe an aftermarket shock... but we'll see. Also vacuum bled the front brake again to get rid of a bit of mushiness in the lever... firmed it up quite nicely... now the brakes feel even more powerful :) My dad took it for a ride today... it's cool to see and hear it drive away when I'm not on it. Gave me goosebumps. And to top it off he even washed it for me while I got some other things done... what a dad!
-
These stupid badges...
Thanks for the tips zoomzoom, do you think I will have any luck removing the remaining adhesive on the badges and using 3m moulding tape to put them back on? That is if I don't crack the badges during removal. And thanks again for all the kind words about the bike.
-
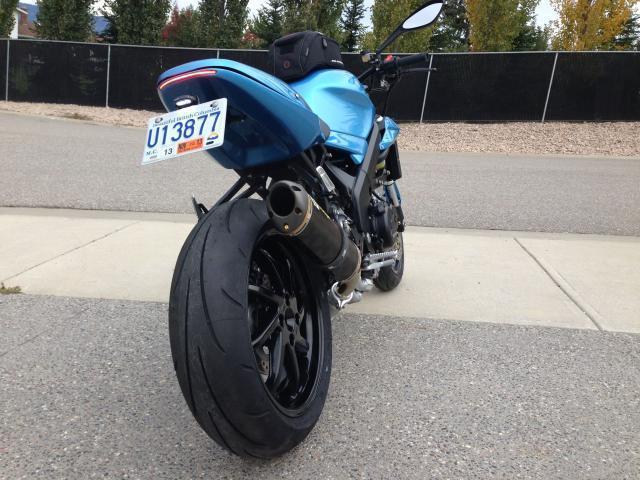
Digging the license plate holder.
And yeah, those 330mm rotors are like tossing a piano out of your pocket, right?
Good description! I'm loving them. I have been practicing "emergency stops" to get my brain used to the amount of braking power available. I don't want to grab too much... which would be easy with these brakes.
How are the badges doing?????
Oh they're just fine... still backwards however. I've been avoiding fixing them out of fear of damaging my new paint and possibly cracking the badges :( Riding is more fun anyway!
-
There is a pretty direct channel from from under the tank into the battery box area on my subframe... I think if I block this off it will help. I've removed quite a few heat /weather shields so that probably doesn't help.
My 95 Vfr-Sf Project: The Process
in Modifications
Posted
I'm not at home to check but I know fuel gauge should be on 100 ohm. Tach... Hmmm. What are the options again? It think it might be 4 cyl 2 pulse high-act. And I set the scale for 15,000rpm.
If you aren't getting any reading on both I would think it's very possible something is wired incorrectly.
Also, I did the resistor and diode mods to my tach this winter and it's working perfectly now.