


Lifesaver
-
Posts
35 -
Joined
-
Last visited
-
Days Won
1
Content Type
Forums
Profiles
Gallery
Blogs
Downloads
Events
Posts posted by Lifesaver
-
-
Which do U think iz zee Best?
Later, Ian
:fing02: :happy: :angry:
-
Mine came to me while in flight, back in January 2002.
There was a cover shot of the VFRs rearside, and a 3-4 page spread about the NeW VFR this upcoming (allready arrived year)... Thats what did it!
I had sat on one of them 5th gen models in one of those stores in Seattle, and from that there experience, I had went on to decide, and purchased a new dual sport 4 stroke (mountains were 20 minutes in each direction around me from where I was living) at that time. I dismissed the trail-worthy 4stroke eventually, because military service was ending for me soon. And, I just knew that the streets was where my grounds needed to be..
After being catapolted from the A/C carrier (on my way home from the 911 Emergency), I finally was put on a real plane. Prior to boarding, I picked up that magazine! The one with it on the cover. Also, including one particular shot of a rider looking at ya through his windscreen saying: "This my Friend, its yours!". I knew it then and there! I did not waist no time (other than the 6 or 7 stops in other countries for new passenger pick-up, and multiple bottles of Duty Free Liqour to be later mixed with DR. PiB cola... 4 days later I landed in W. Virginia, with a mission, a mission to get that bike of mine!
Took one day. I was in the Cleveland Akron Honda store in OH during that week of their sales! (lucky me) Purchased the 6th gen VTEC with abs for the price of same VFR minus the abs. That lower model was also 1 thousand below cost too though. So, a tough decision on wether Id sacrafice added safet for a grand cheaper of what is otherwise the same bike? NNAaaHhh, Take advantage, right?
Paid for it, sat on it, layed it down to the left side to rest on its kickstand (except the kickstand was up still throuout the gracefull movement). New 6th gen knocks over a case of meticulously displayed oakley sunglasses (all went flying). VFR laying on its side (atop of carpet), and me standing there with the help of 3 others to get it back upright! A mean gu/employer got in my face saying that I MUST now by that bike I destroyed (hardley). I immediately called him an asshole (bad me...should have not done that..I know better), because that WAS allready my bike, bank approved, with papers signed previouse to the incident. $500 more deducted by manager for said employees behavior, whilst he not tried to right the bike up with me (the customer -dumb yeah - irregardless - the costumer who owned that newly purchased bike laying there on the floor)...
I guess thats my story? Rode 100 miles home that day without insurance. Parked it in the garage to look at and shine it up real good! Got the insurance, and been ridding the VFR ever since!
ote name='SEBSPEED' date='Aug 9 2008, 10:57 PM' post='537326']
Oops, I chose a few reasons...
At the time I didn't realize Honda was still making VFRs until one day I got a new issue of Cycle World (January 2002, the "New for '02" issue). In the middle of the front cover amongst a bunch of other bikes was a rear 3/4 shot of the new VTEC model Interceptor and my eyes bugged out of my head, I vowed to have one! When my finances and insurance company allowed, I finally got my wish in February '06 with a brand new Winning Red 2005 model(lucky me, I got the faster red color and a better bike without most of the early problems too!). I wouldn't trade it for the world except maybe for a brand new one just like it!!!
Didn't know I could pick more than one.... Never said I was intelligent, but I know what I like in a bike! :comp13: So, I picked the SSSA. That's what brought the bike to my attention years ago. And I had always lusted after it, for many years. When I divorced, I decided it was time to treat myself, so I started looking and I found my 02 wanting to be loved. The original owner had abandoned it when he moved, so boy was it eager to please! :idea3: I have been riding it every possible moment ever since! I love the engine and have always been a fan of the VTEC. Had a Civic SI, whoo!, and a Acura TL and the rush of power, although different has the same whoop ass kick that my VFR has. My wife laughs and/or screams everytime it kicks in. So much so that she's now getting VTEC for her next ride, an 08 MDX. Whoop, whoop! :fing02:I still remember the day, in 1985(6) when the original VFR 750 was introduced. I wanted one so bad. For years I watched as there were two in my areaand just loved it when they went by. One guy picked up an '87 in white and slapped a Supertrapp on it. Woooo the sound!! I knew one day it would be
mine. Even remember finding an '86 in a crate in the early '90's but opted to go to college instead (actually, was talked into it by my then boss).
Then, as the years went by, the SSSA appeared - my heart jumped. In 2002 the re-vamping: boo-hoo for the gear driven cams gone but oh ya! for the under
tail exhaust. Finally, set the wallpaper on my computer, started a side account and started dropping $$ there instead of other non-essentials.
Fall of 2005 I secured my bike. Why?
The comfort. The V4. The heritage. And later I would seriously come to realize, it's a different kind of person who rides them. We are a cult. We are VFRD!
Just started riding mine again... Took some time off It is still as fun as day ONE!
-
Who knew two versions?
Mine have two screwable bolts for each hand. That means 4 total. Yourz?
-
I Have The Helibarz on mine...
Sorry though, cannot compare to stock. Simply because stock to me is like Jello, without the solidity...
HeliBars will rust. The'll last forever though...
-
That's the best mod I have seen thus far. :blush: Keep up the good work. :rolleyes: :pissed:
F for
fail!
-
:thumbsup:
-
fake Old Navy underarmor
sweatpants
fleece balaclava
REALLY?
Rev It pants with liner in
Tourmaster Cortech with liner in
Powerlet Proform heated gloves
Gerbing socks with top elements only
still need overgloves and rain booties
aA LITTLE MORE THAN THAT TOO...
I just bought the heated gloves and a dual temp controller from Powerlet at the Seattle MC Show, then meandered over to the Gerbing booth to buy socks (since Powerlet doesn't make 'em yet), where I learned that I had saved $30 by getting the dual controller from Powerlet. Sweet.
I DO NOT REMEMBER WHY (With this 130 pound 5 foot 9 inch tall blond maniac woman over my souldr - seeing me type... so, you know what she is gonna lead to after I'm ffinnissheedeed typing 2 U, U know what I meanszzZ?, right?
My legs and core never get too cold as long as I layer up properly, but hands and feet were bitterly cold last March riding in a Colorado sleet storm, even with the "water-proof" boots and gloves I had then. HA! They didn't let any water escape... <_<
It was due to the CORE being cold is all...
My experience, if you not only want to be warm but stay warm, stay away from cotton. Layer with synthetics and if ya add heated gear, ride'n below freezing is no problem...Other than traction. :goofy:TracTTTion? :thumbsup:
Thats all you need for those situationzS!
:goofy: on that!!! I don't have much experience riding in cold weather, but my camping experience tells me that a single layer of cotton will make you freeze your tail off!
Layer with synthetics, silk, or wool, and you will be much better off.
I am bringing up this topic again because my gloves suck! Actually they are fine to 35 or so, when combined with the heated grips, but my fingers totally freeze after that. The heated grips keep my hands warm but not my fingers.Anyone have a review on the Powerlet gloves? I might try them if they are pretty good.
No!
Although, If they can still be found, then the under-the-grips-generic-or-name-brand heated grips will (I've tried them on my BuDDies Bike's-plural-solved any problem... point blAnk!!!
I have found that a sweatshirt under my MotoGP jacket(not leather) with the rain insert keeps me fairly warm, only where the jacket zips together do I feel the cold. MotoGP overpants with quilted liner keep my legs warm enough, I start to feel the cold at 25 degrees, but not uncomfortable. Socks take care of the worst of the feet issue, I haven't needed to upgrade to wool there yet.
Always be sure to keep the leather ON!!!
I freeze below 40F as all my gear is built for hot weather riding out here in AZ. But when I lived in Michigan I wore a thick traditional leather biker jacket with a sweatshirt and long johns underneath, leather chaps, pants and long johns. Some water proof snowmobiling boots, bacalava and gloves finished me off. I often rode in 25-40 degrees dressed up like that.I'm telin ya, a heated vest would change everything U just said
Anyone have the Motoport liners? They are suppossed to be rated down into the negatives and are waterproof.... I should just buy them as I already have the mesh pants and jacket.
Just get a heated vest . Just be sure to check the zippers out before you purchase, unless... Get the Stitch. They have ike 4 versions... Get the vest with the most warmth/draw from the battery!
-
I installed and tested the grip warmers tonight and I can't believe I've ridden sixteen years without them.
One of the best "Bang for the Buck" mods out there.
I headed out and it was 45 degrees which I can handle without warmers, so it wasn't bad. Felt good to try out the new warmers and see how they work.
The ride home was 33 degrees, and the warmers were definately helpful. Along with all my riding gear (layers), I was very comfortable and could've ridden a long distance in relative comfort if I had to. The half hour ride home was great.
I was actually surprised how hot the grips get. Riding through town the High setting was too hot, so I switched to low. But on the highway, the hot setting was perfectly adequate to do the job.
Here's what I wear whenever the temps get below 50 degrees. It took a while to figure out what works best. The key is layers and making sure there's no exposed skin. The Under Armor is awesome. It's like a second set of skin. But you have to use the tight fitting synthetic stuff that's not very breathable, it works the best. Here's what makes me comfortable down to at least 30 degrees:
Under Armor
Cotton T Shirt
Turtle Neck Sweater
Icon Leather Jacket w/ Liner (Sleeves of liner cut off so my arms aren't too bulky w/ the sweater, etc.)
Icon Timax Gloves
Balaclava (like a ski mask, w/ no mouth hole and one oval eyeport made of synthetic material)
Icon Helmet
Sweat Pants Under Jeans
Boots w/ Thick Cotton Socks
Symtec Grip Heaters
Every year I will ride regularly until the first real snowstorm brings out the salt and sand trucks. Then the road surface is pretty much shot until spring. I'll still ride on the occasional nice mid-winter day though.
Goodnight...
Sorry about not reading any posts but yours.. I've never tried grip warmers, and have ridden in 0 degree climates daily for years with just a heated stitch vest (5 years worth of winters), and I think that warming the core, the spot with most of your circulating blood helps the most. Although, I'd think that the couple of times I got to my destination with hurting cold numb hands should have prompted me to get the grip heaters long ago!
-
December 2007, 4 less than a month... 2008 is here!
-
ANy,. SSuggestionz??...
I would like to be able to ride in all weather conditions on 2 weeelz! So far, So Guud!
I happen 2 b-leev that SKiNNZ R SUUpeeriorar to Textilles in alL respects. Give me a far greater pair of front pant zipper japaniZZze leather overpant that deflects all of the expected minor road rash'Z, that involving soft tissue irregularities... Especially since it is justably significant, and doesn't need to be said.
And, Knowing that I'm waiting 4 A reply...
Ha!
How could my VFR be a suitable riding machine 4 winter cold sleet rainy windy conditionsszZ!!!
CCEEEeeee???
?
YEP!
-
i had no idea you could put leather in the wash machine...
No,
Don't!!!
-
Sounds like a friend of mine talking...
Uhh, I know, because I was informed by a friend, a former convict - grand theft auto - that this should get any vehicle going...
:unsure:
Hopefully it gets a permanent fix, not that I helped with that! :goofy:
-
To help you,
Cupping sucks, and is the sole reason why I will not ever again use Dunlops...
Hop that helpd. All other brands are OK! Just Dunz... They SUCCKK!
IAN
-
Yesterday, I dipped paper towels from aside the gas pump at the gas station into the bin of washer fluid hanging near the same pump... Wiped & dried with more paper towels.
I have also applied Rain-X from time to time... Although, no real problems riding in the rain... My Arai does not ever fog it seems like...
I need a helmet AC unit or something now though... It is getting hot inside there!
Later
-
To me, the 46 seemed 'mushy', for lack of a better term.
Funny thing is, I liked it! Low speeds, less than 20ish, you can definitely feel the deep grooves... Great tire in the rain! I rode it in winter, and even once through a coastal NC snow blizzard (took me thru 2 - 3 inches of slush)!
-
I have a Metzler sport rear tire, and a Diablo front on mine now. I have logged about 1,100 miles on that setup. No complaints at all. Its like those high-tech, 300 mph, magnetic, floating trains!
Aren't the rear tires sometimes seen as the more important of the two? Just so long as the front has a good reputation for stopping power when applying the brakes? Otherwise, if you replace the rear three times as often, at least every time you'll know that your rear sticks! I like to manipulate my bike with peg force & body position. And many times I could just stick the rear, and just slip the front on through a turn, just hairs off the ground!
The rear tire is loaded much heavier than the front tire for most all technical fast maneuvers, except for braking (which is just a quick get up really)...
Later
-
Three or so years ago I installed mine, and must have been lifting weights too often or something... cause I broke off one of them four bolts that go through the grabrails. It's still in there, and no problems so far with only having three of the four bolts actually installed.
So, if you need to, you could probly just use one bolt per side, for these bolts... just kidding.
Other than that, the instructions should have everything covered, except for.. leave all bolts loose, and then tighten them all once they are all where they need to be. And do not go crazy on the passenger peg drilling. Just a little does it there...
Later
-
B)
OK, I really wanted to think about this first to see if I wanted to respond... Nah, I'll just say my peace & step aside...
Pretty much, some have, and some have not... Some care, and some do not care about what they saw!
If you could only see the end results of a ride gone bad, for a human who decided not to put on even a small piece of minimal gear... his gloves. I will not describe the site. Or the other guy who just had on jeans, and who fell off his bike at speeds less than 45 mph... Or the other guy, who still rides, who lost his lower left leg... whom now has a prosthesis (leather would not have helped him)
It is a risk to even turn that key.
-
Wanna hear something funny? I remember asking about, and hearing the dealers explanation of why it costs so much more to do a vtec v adj... That was in 2002... So, for the hell of it, I threw a few questions at them again when just shooting the sh%t, AND they STILL have no clue! It has been 4 years & they have obviously still never done one yet...
They STILL maintain that they have to check the normal valves, stop, (this is where it gets wierd) and then run the bike up to temp's several times, so that they can check measurements on all the vtec valves. LoL! What the heck is that?? This is almost as old school as when people were claiming that the engine was required to be removed from the frame in order to do the work! Remember that?
Plus, they do not even own an outside micrometer... Wouldn't trust em myself, to do any work really...including front tires...
Later, Ian
-
http://i56.photobucket.com/albums/g188/shilofrinkles/valves154.jpg[/img]
How to perform a Valve Adjustment on a VFR VTEC 6th Generation Honda. A step by step pictorial of the procedure to ajust your valves
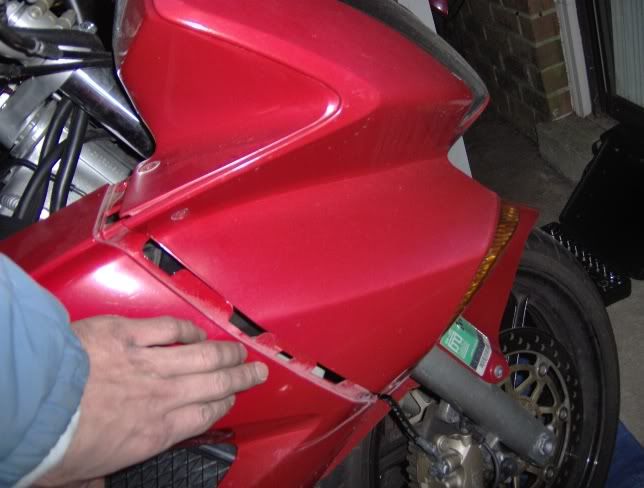
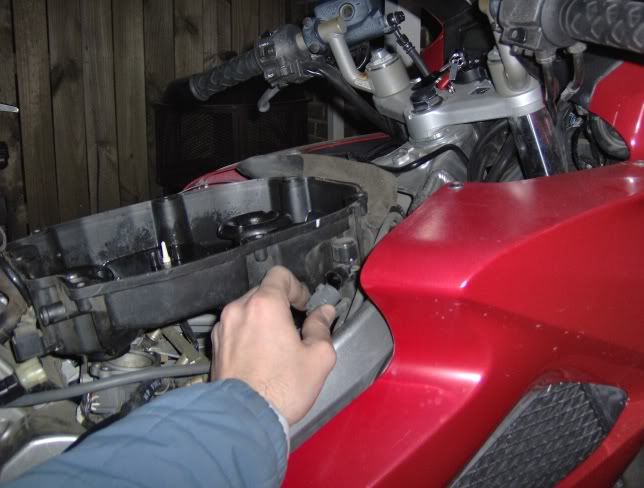
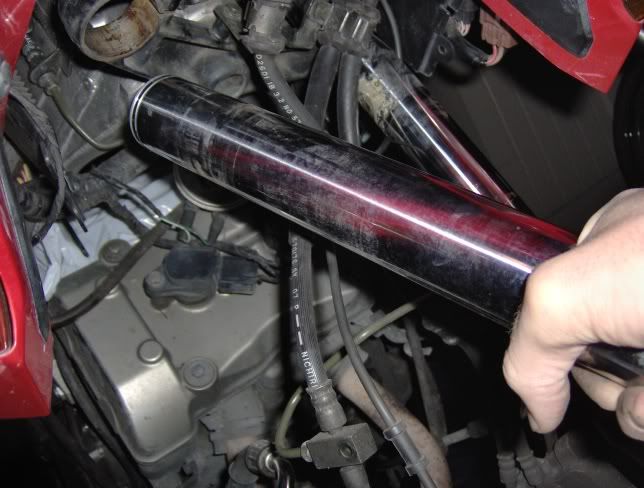
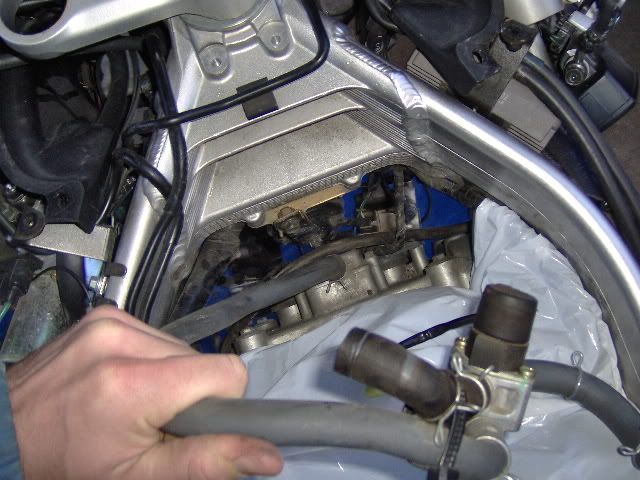
Take off both side cowls. Push in here once all the bolts are out to slide the cowls out with minimal struggle.
Also, disconnect the battery & remove both the seat and the inner half cowl (black plastic behind front wheel).

Remove these.
Remove these.
http://i56.photobucket.com/albums/g188/shilofrinkles/valves023.jpg[/img]
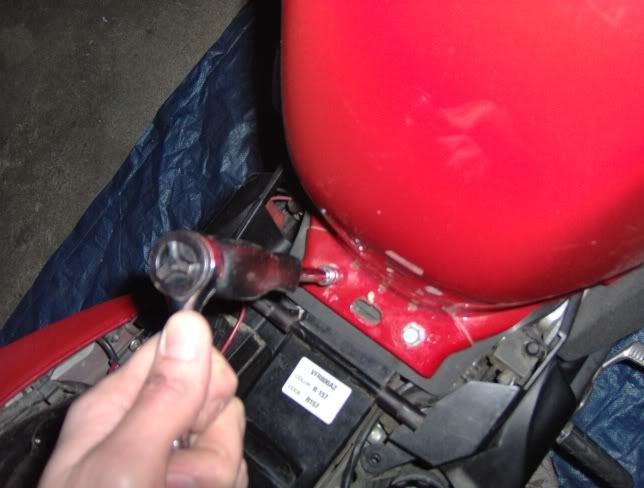
Hold the tank & disconnect the wire that normally prevents you from lifting the tank too far. Disconnect all electrical connections, as well as all the lines/small hoses that prevent you from fully removing the tank. Do not worry too much about spilling a little fuel (empty tank is nice). These connections/lines are really self explanitory... Just remember their orientation for reinstallation. The brass looking banjo bolt has 2 little washers that could easily be lost... Be careful.

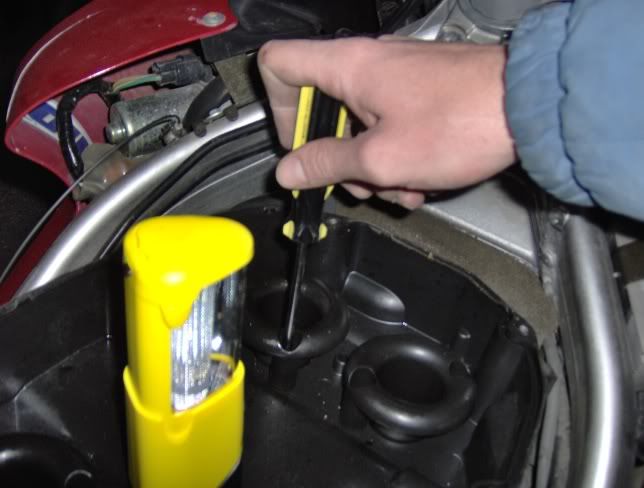
Remove the 7 screws that hold the airbox lid on.
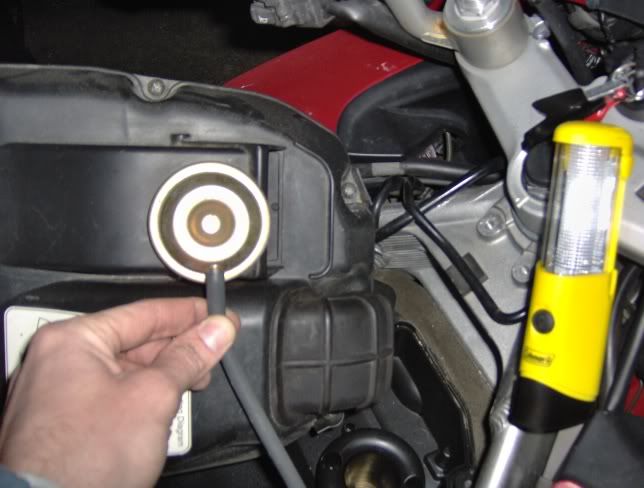
Disconnect the vacuum line.
Remove the 8 screws (2/stack) that hold the velocity stacks down. Set the stacks aside. Remember, for reinstalation, 2 short stacks in front & the 2 tall stacks go in the rear.

Disconnect this hose.
Disconnect.
Disconnect.
Disconnect.
Disconnect.
Disconnect... This is attached to the airbox base & just slides up & off.
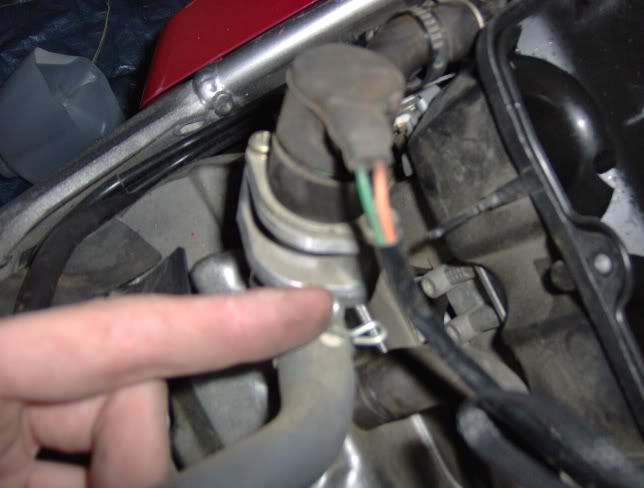
Turn the airbox base over & disconnect this.
Unscrew this sensor from the base of the airbox. Set the airbox base aside with the velocity stacks.
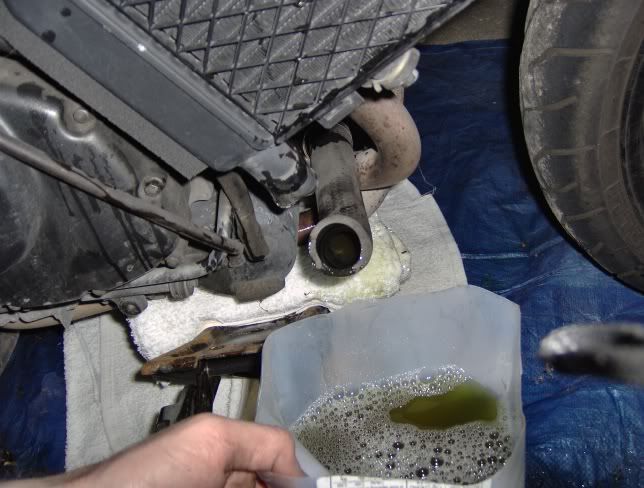
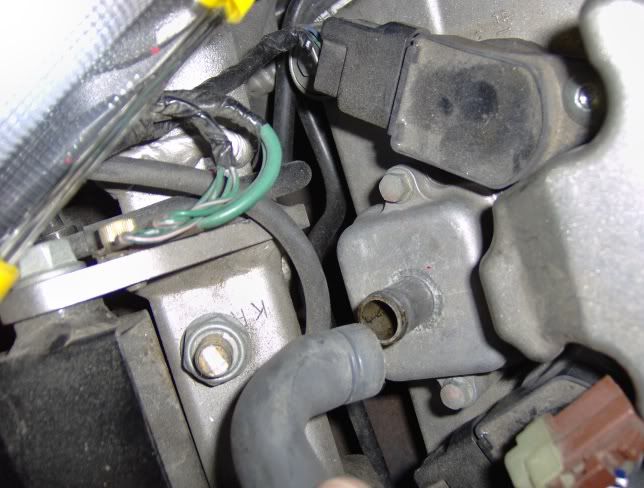
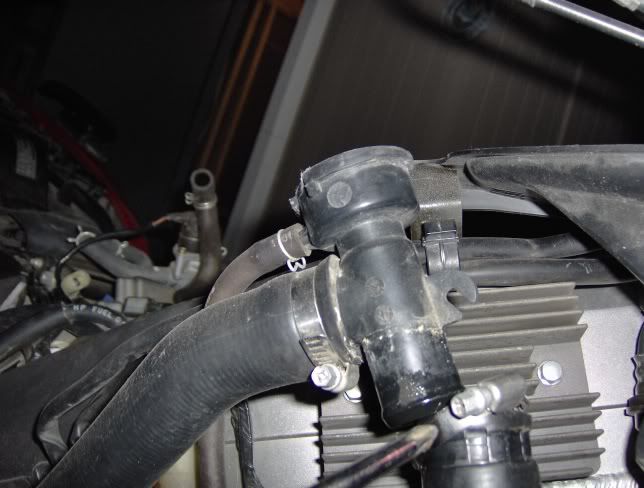
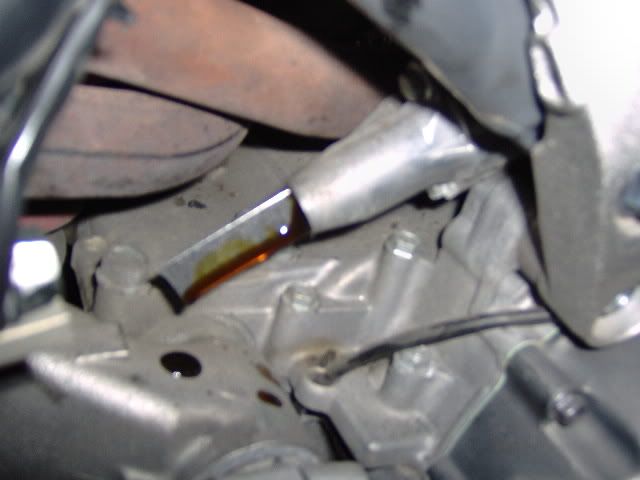
Remove the radiator cap. I just disconnected this hose & let most of the coolant flow out. Try not to make a mess. The radiator & its hoses will spit out coolant as you remove the different pieces. I just had a large mug to catch the stuff in as I removed hoses, etc...
Disconnect.
There is only 1 bolt holding each radiator on. Remove both of them.
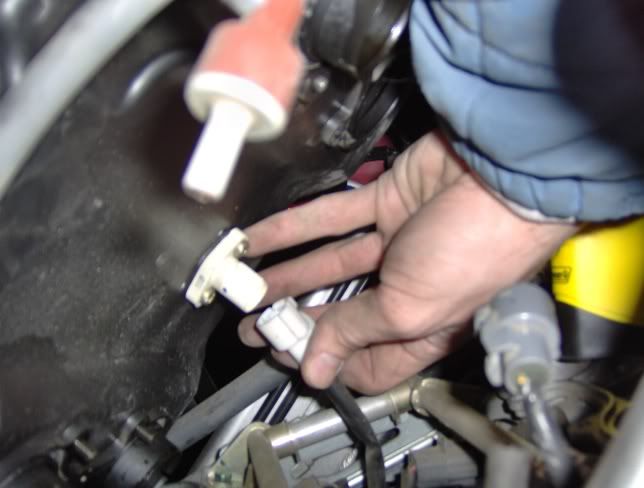
On the left side (facing forward from rear of bike) there are 2 electrical connections that require disconnecting. They are located where I am pointing in the photo. Also, on the right side, there is a small diameter hose that is located on the inner side of the radiator. Disconnect that too.
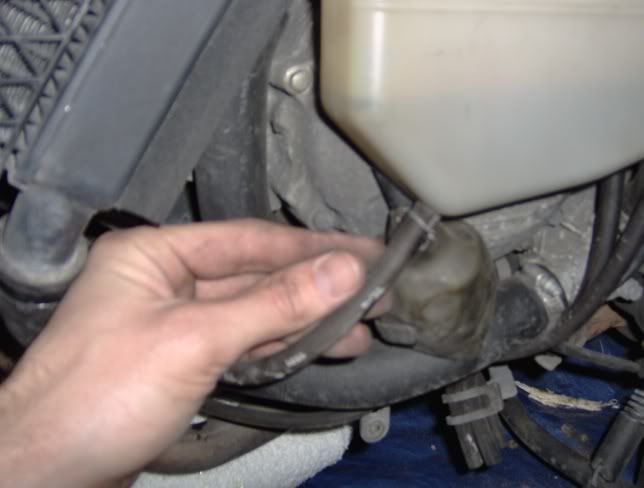
Disconnect the overflow line from the resevoir. I caught the fluid in my mug. May have to disconnect 1 other radiator hose to make removing the radiators easier. Remove the radiators & their hoses. Set them all aside.
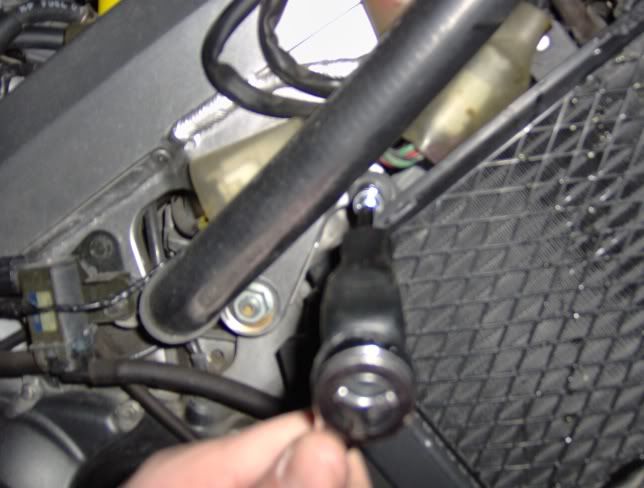
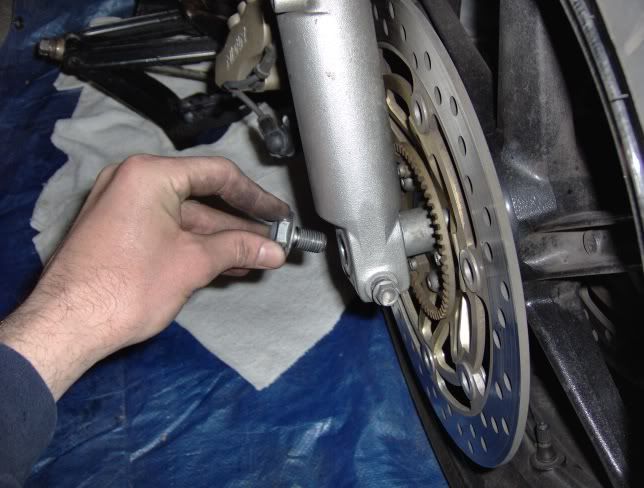
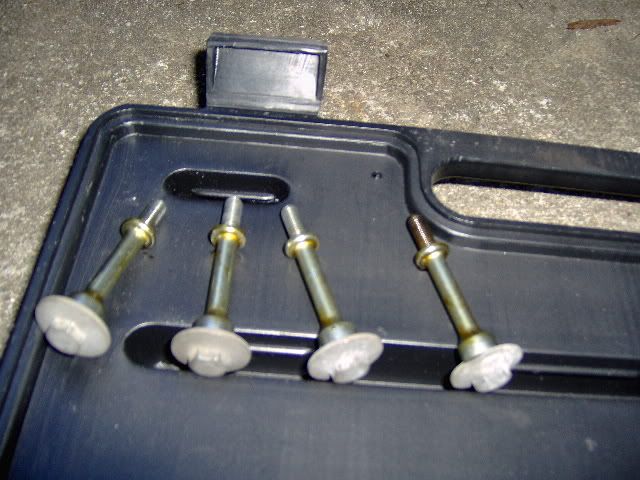
Remove the 4 bolts holding the front fender on. (2 on each side).
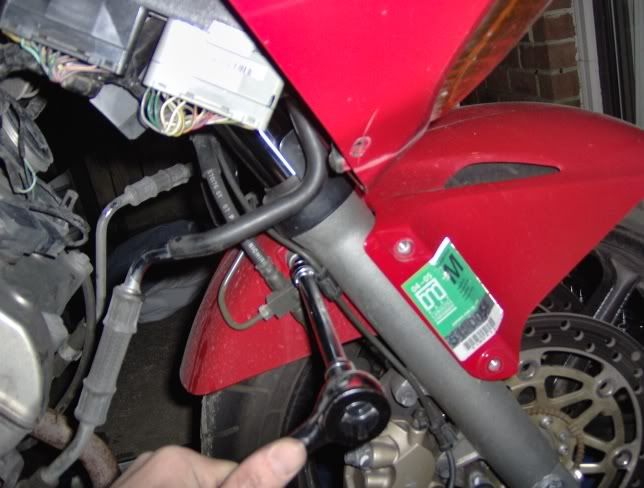
Remove this bolt.
Remove this bolt. Now you can slide the fender off, and set it aside.
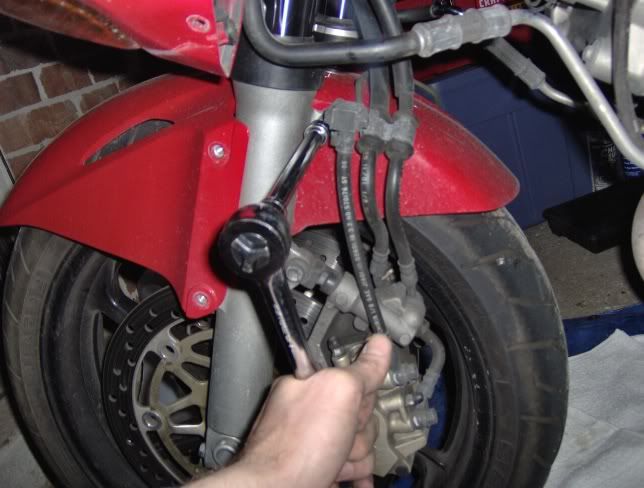
Remove this bolt.
Remove this bolt.
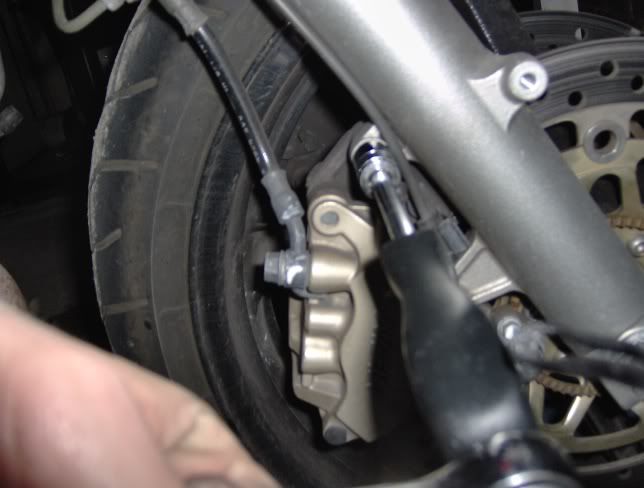
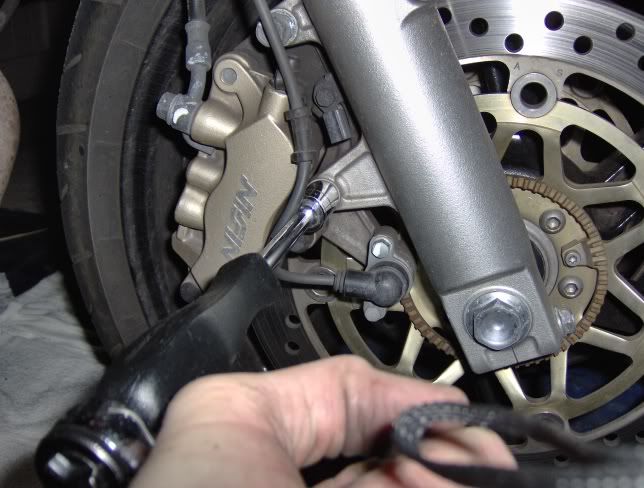
Remove this bolt. After you remove the last bolt from the calipers (2 bolts/caliper), Remove the calipers from the rotors & tie the calipers up & out of the way.
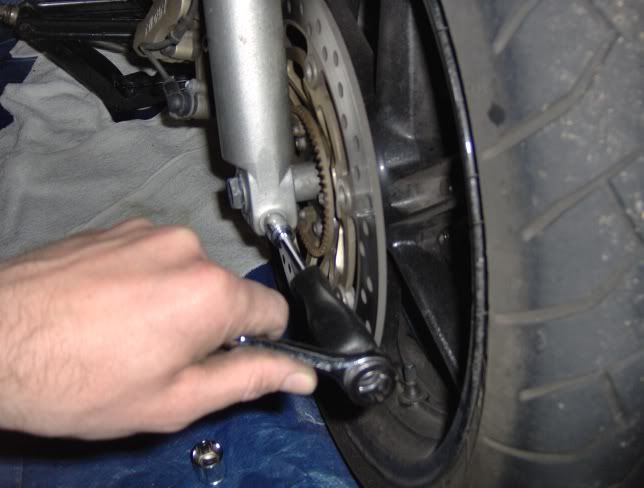
Loosen this pinch bolt...Loosen the same pinch bolt on the lower end of the other fork as well.
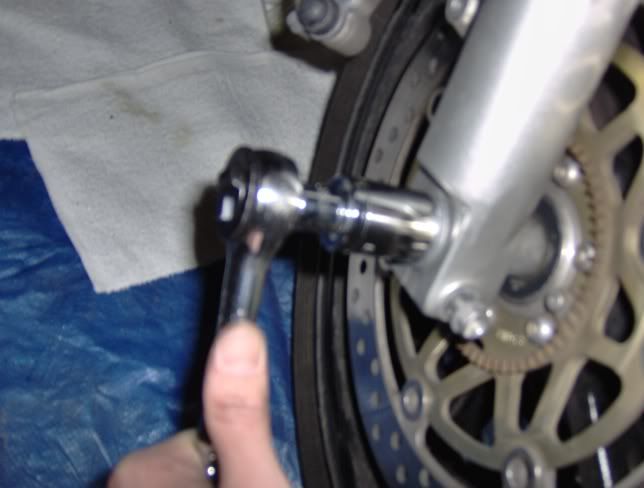
Remove this bolt.
Above bolt removed.
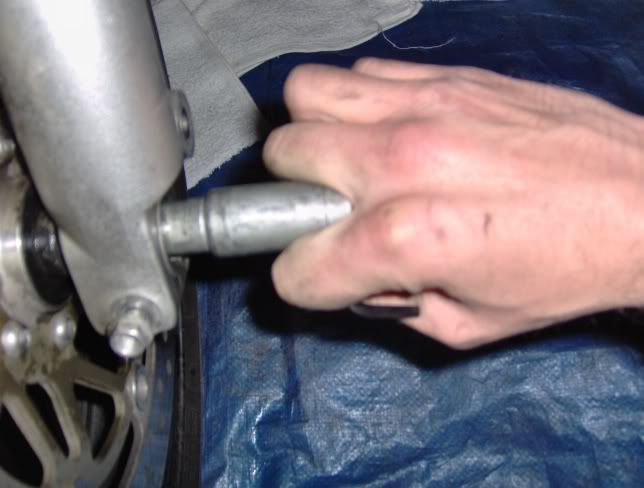
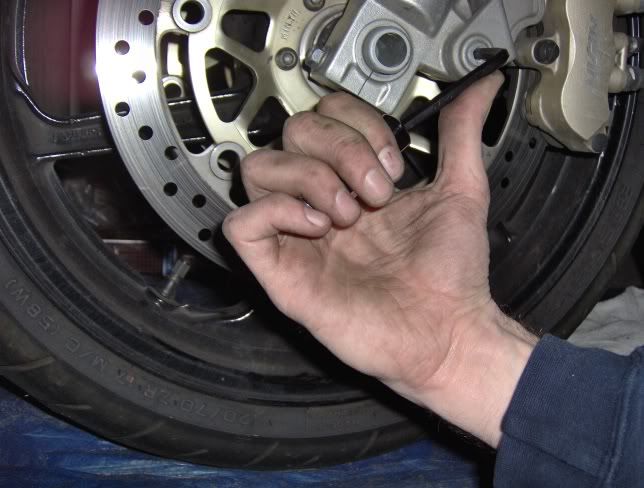
Put an allen wrench through the holes & pull this out. Remove front wheel, and set it aside with the spacer(s) oriented in the position they need to be in for the reinstallation.
Forgot to mention: Need to jack the front wheel up off of the ground to remove the front wheel. I used a car jack with wood between the header pipes & the jack, and cranked the front end of the bike up off the ground...
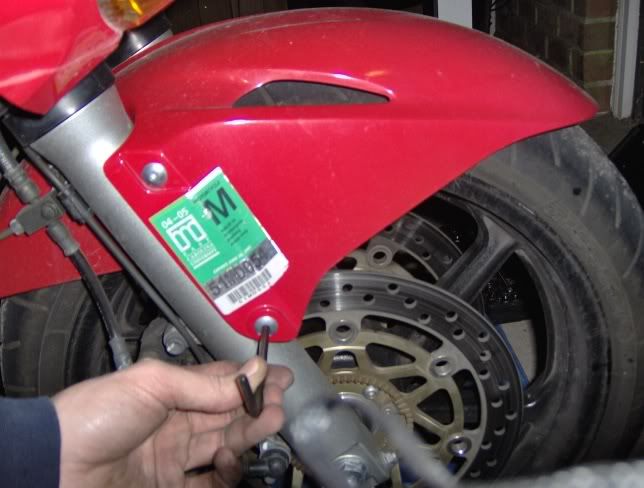
I have heli's. Remove the 4 bolts holding them on. Stock may have a little C type-wire clip to remove as well... Let them dangle off to the side of the bike after removed.
Loosen this bolt (2 total..1 bolt up top for each fork leg). However, if you are going to refurbish the fork fluid... Before you loosen this bolt, loosen the 2 fork caps... or else own a vice...
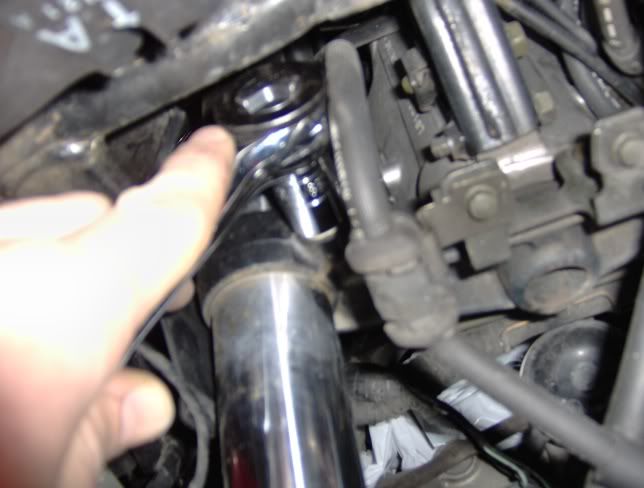
Loosen this bolt (2 total..1 down low for each fork leg).
Remove both fork leg's, and set them aside.
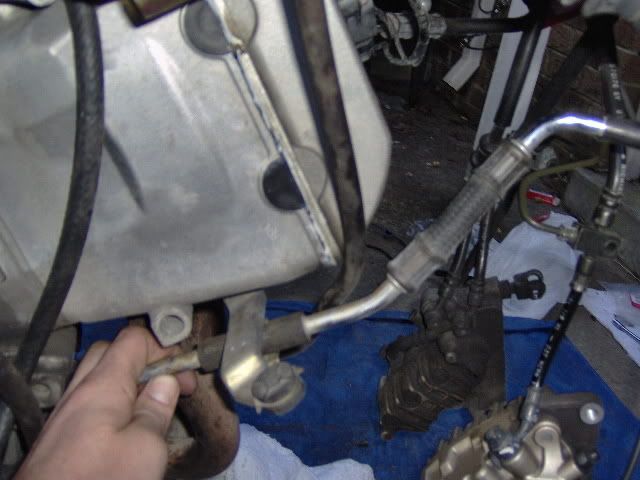
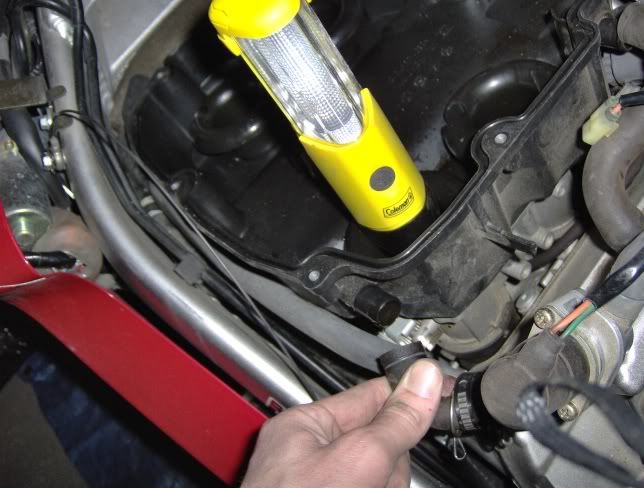
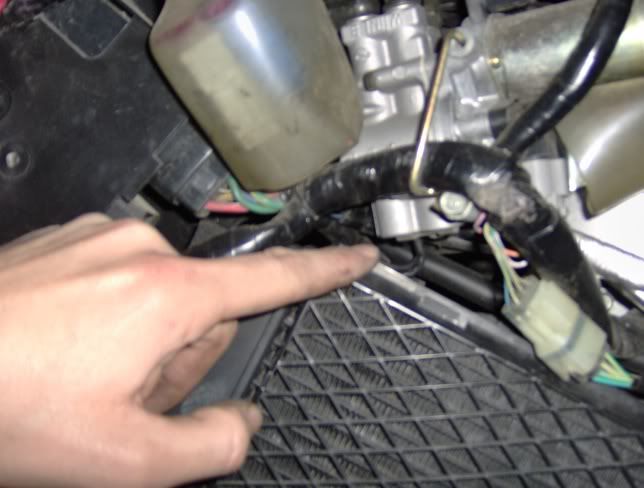
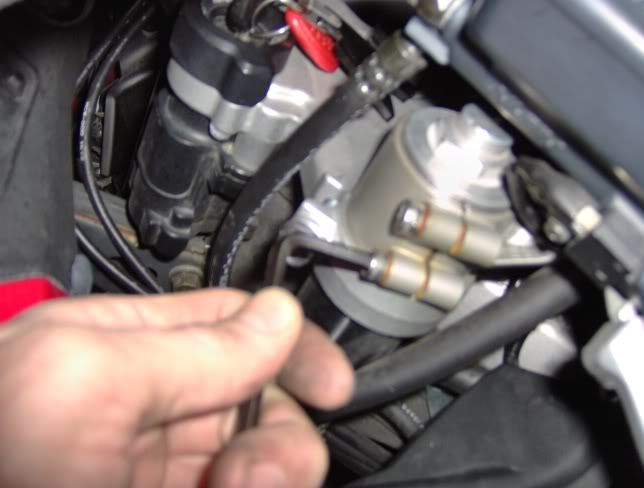
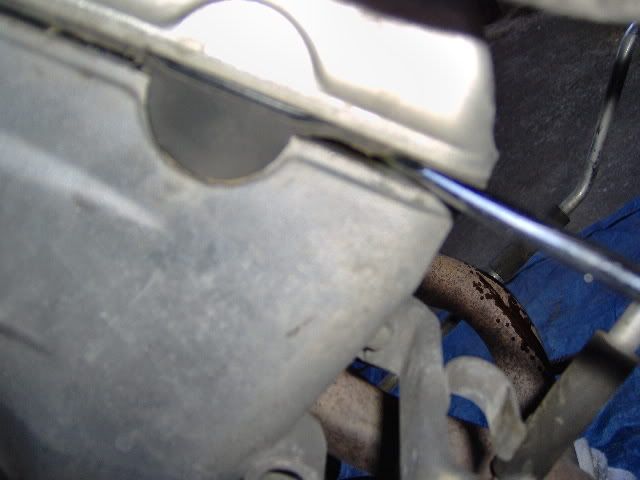
Remove the oil cooler lines from their stays (no bolts to remove)..both sides.
Looking up from under the leading edge of the upper cowl, you will see the 2 bolts which secure the oil cooler. Remove them both, and drop the oil cooler down & out of the way.
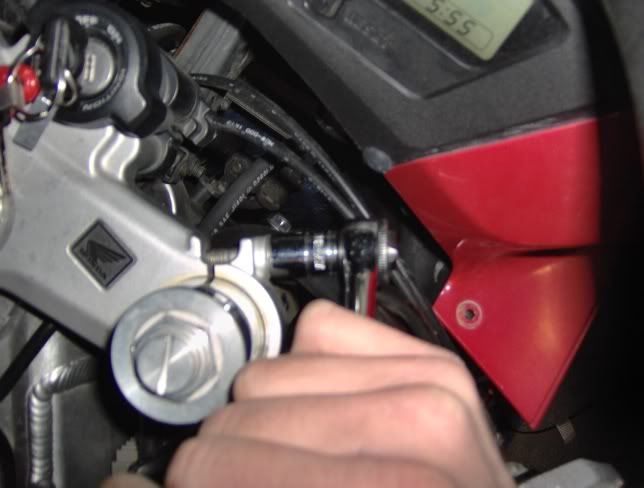
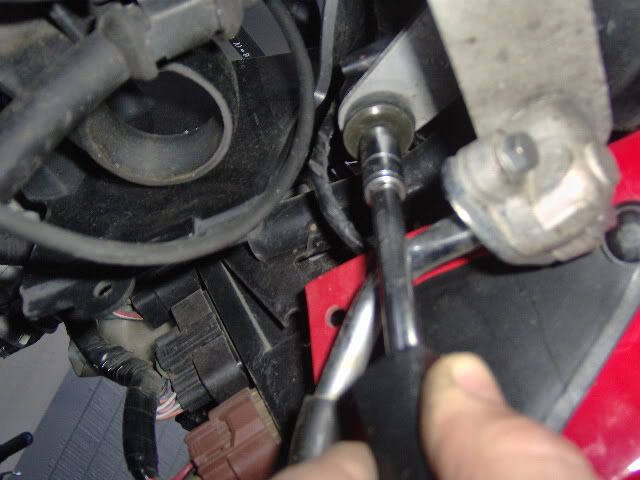
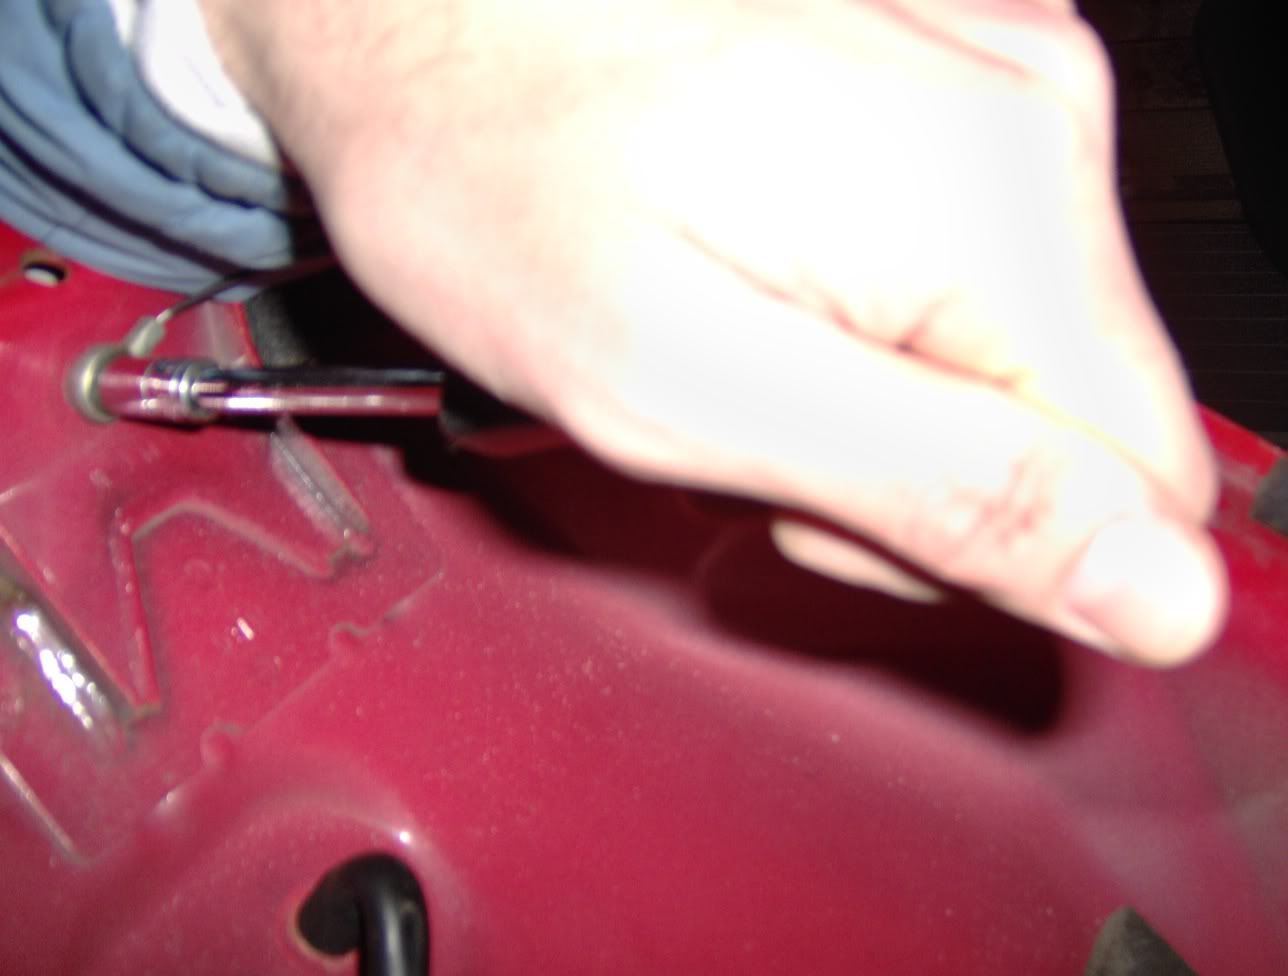
Remove the horn (1 bolt holds it on).
This is in the way. I just removed it & set it aside.
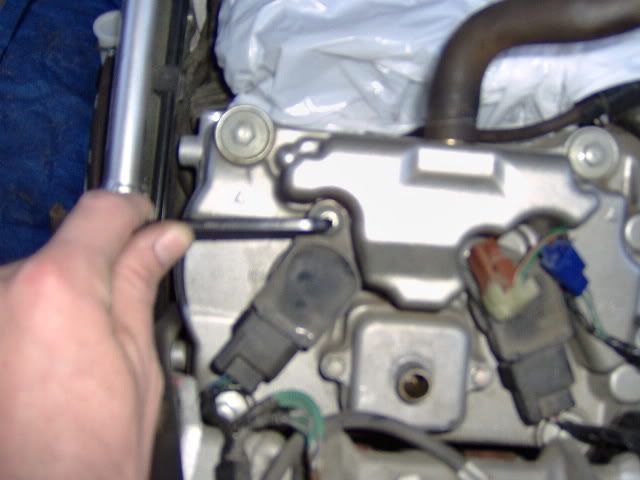
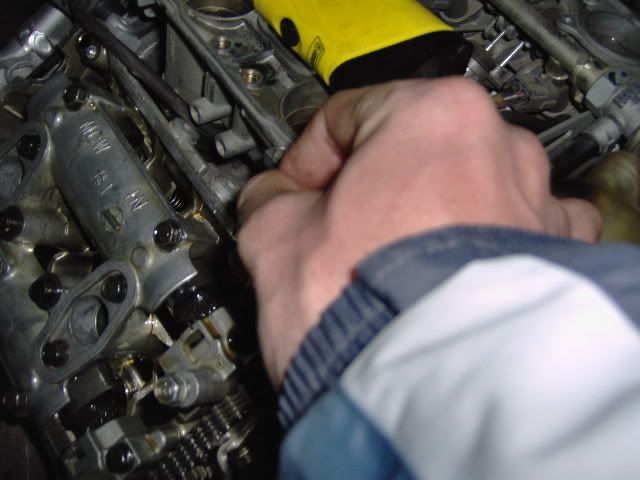
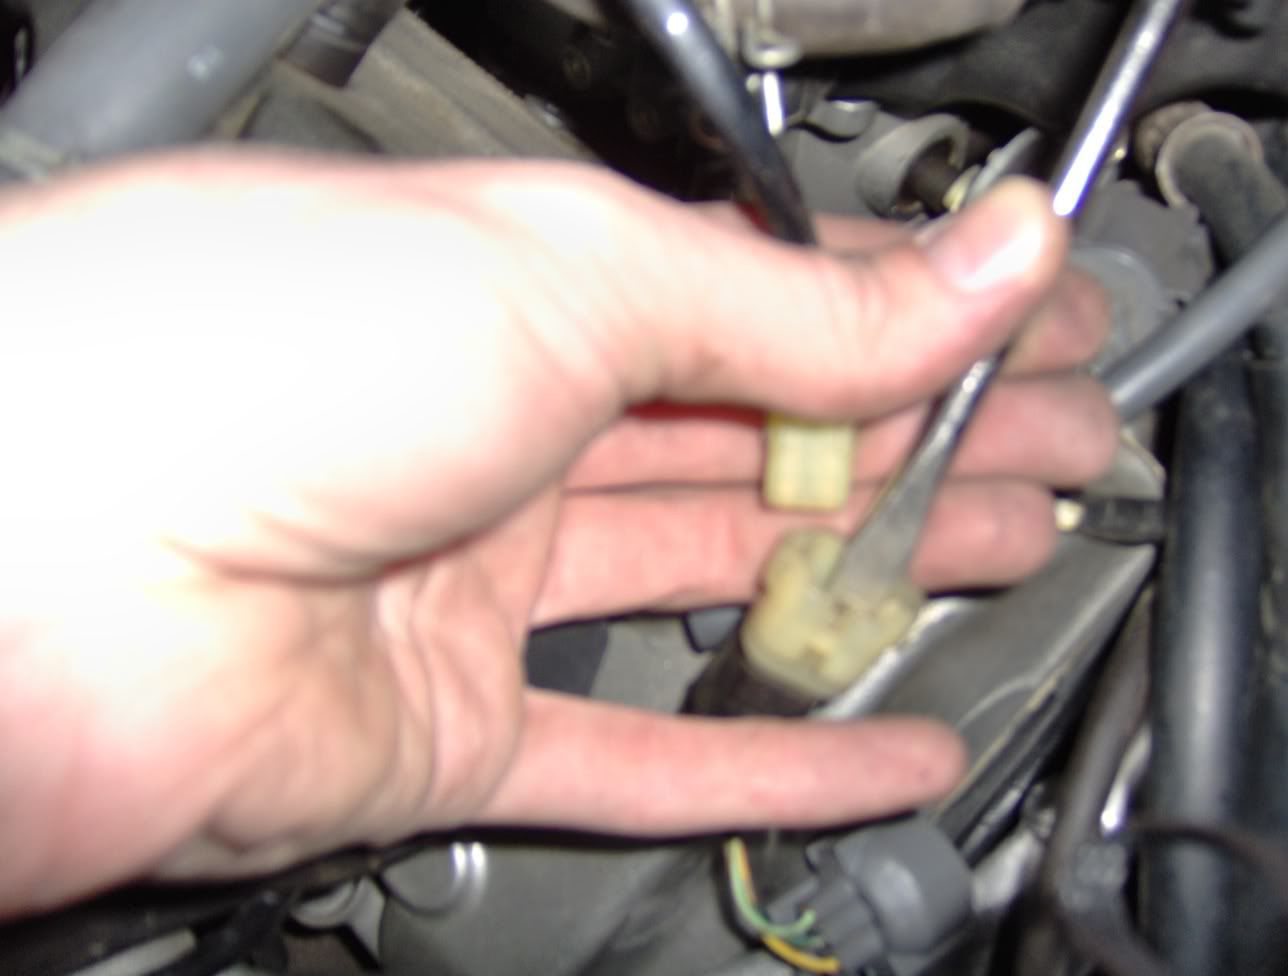
Remove the 4 bolts holding the spark plug housings down (1 bolt for each spark plug... The rear plug & the front plug housings have different types of bolts. Position the spark plug housing things out of the way once those bolts are removed.
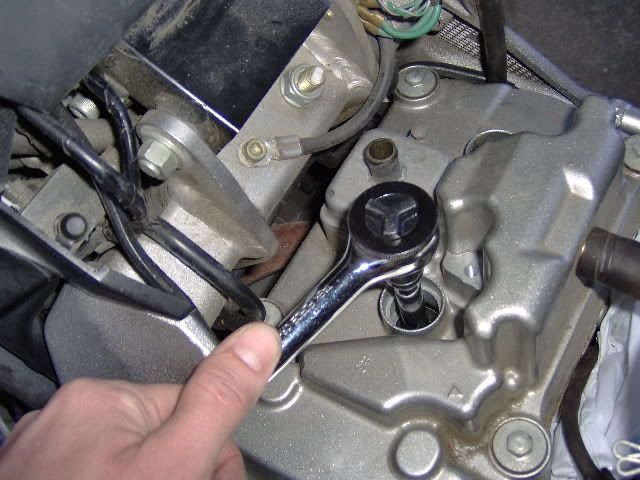
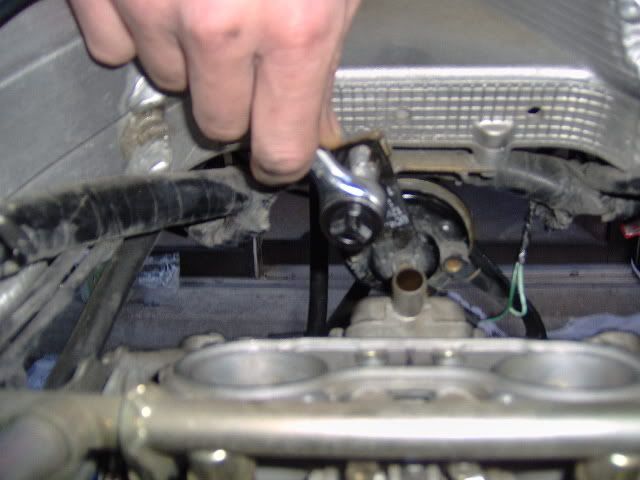
Remove all 4 of the spark plugs with a plug socket wrench.
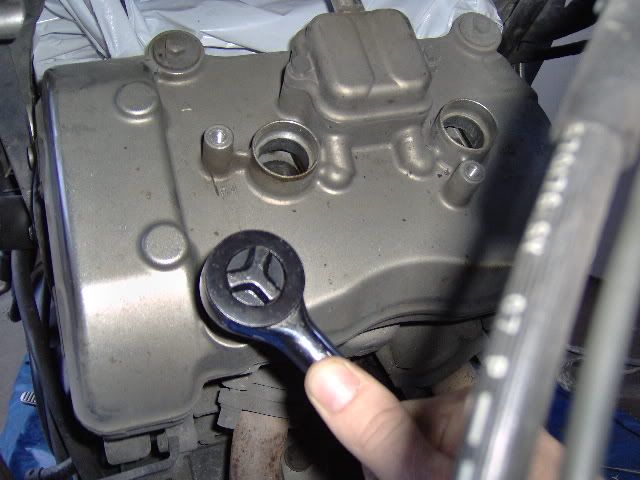
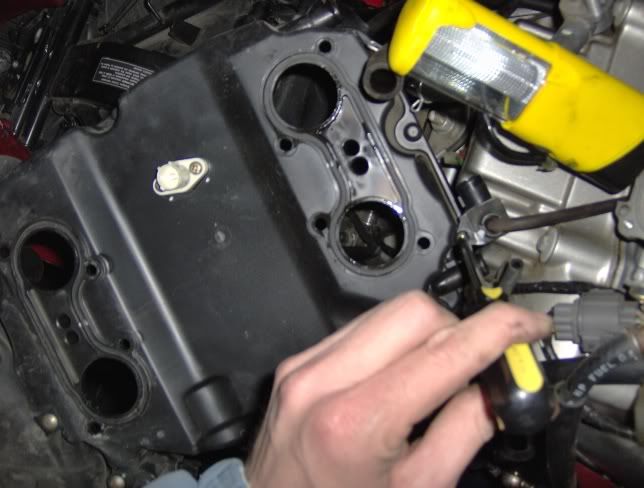
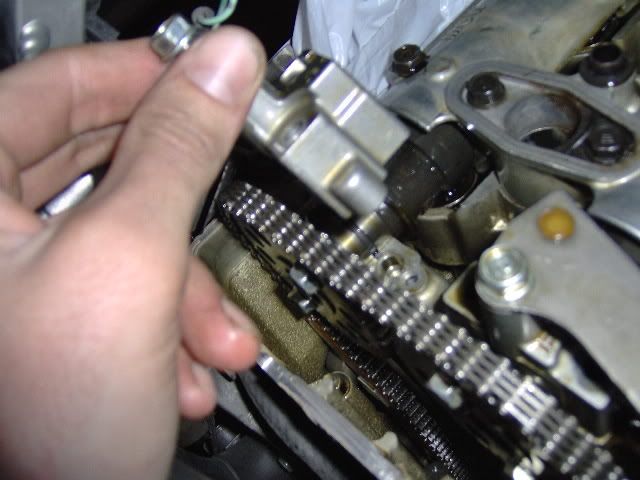
Remove the 8 bolts (4 per head cover) from the valve head covers.
4 of those bolts per head cover.
Crack open both front & rear cases.
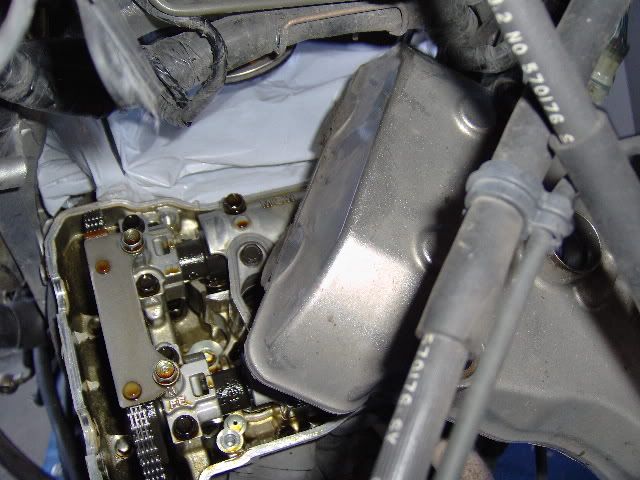
Remove both front & rear head covers & set them aside. I put them inside clean kitchen trash bags for safe stoage.
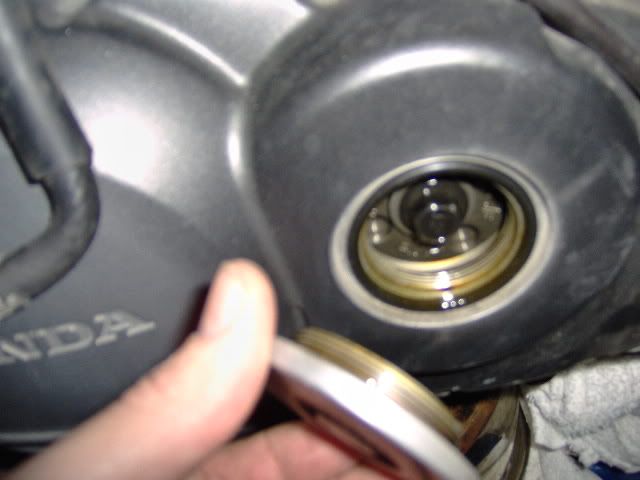
Pop off the cap for crank access on the right side of the bike.
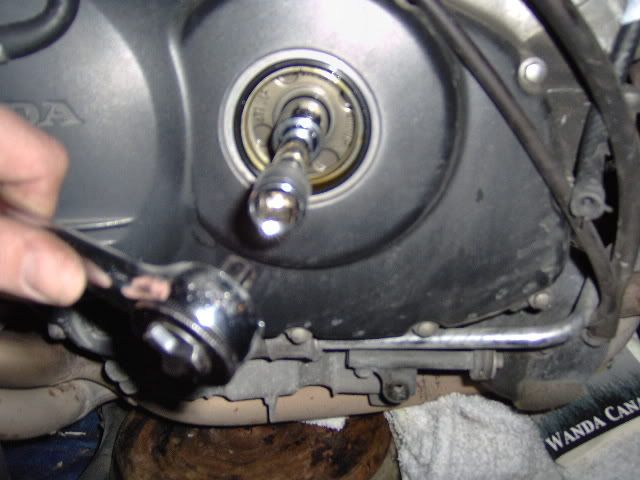
Now, you have to crank it (CLOCKWISE) & align up the index marks as explained in the service manual on page 3-10 & 3-11... pm as many trusted people as you need to, if you are in the least bit uncertain about how things should be lining up. Feel free to pm me for this step too.
4Tl index mark aligned. I align this 4Tl mark up for the front head/valves. The pictures below show how the cam sprockets index marks should be oriented when this 4Tl index mark is aligned at the crank. You may have to wind the crank (CLOCKWISE) more than one full rotation to get these alignments. Only do one bank/head/cam sprocket at a time to ease this step up, and never lose your timing...
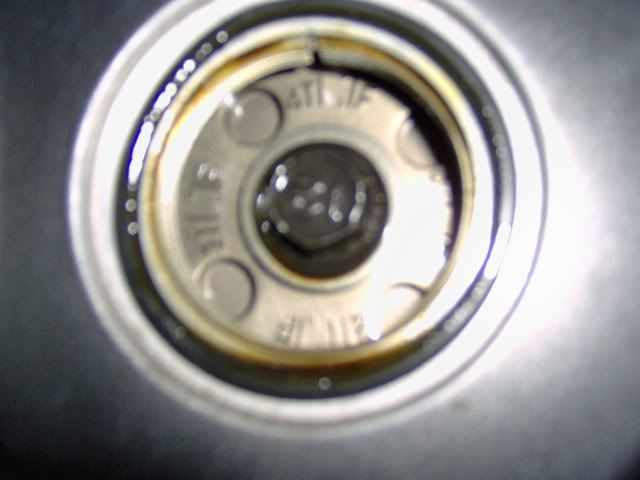
Upper cam sprocket index mark oriented as it should be for crank at 4Tl (front head/valves). That pic shows the FI mark facing outward & exactly parallel with the ledge of the engine casing. Picture below is also with crank at 4Tl, but shows the lower cam sprocket.
Lower cam sprocket on front head. See the FE index mark in perfect alignment with the ledge of the engine casing.

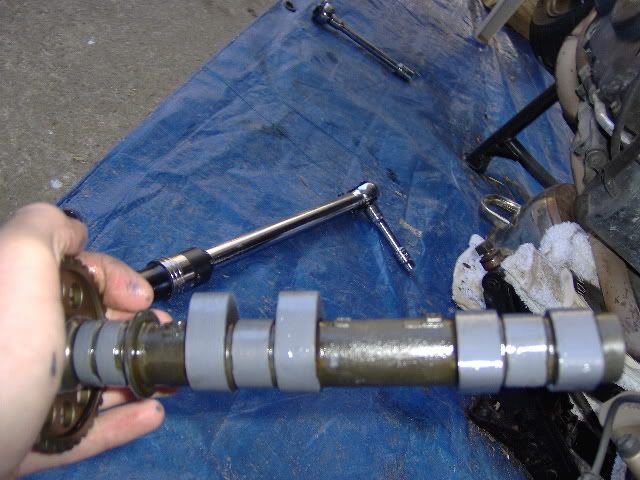
Got to make that special tool for the cam chain tensioners now. I used the thickest feeler gauge for making this tool.
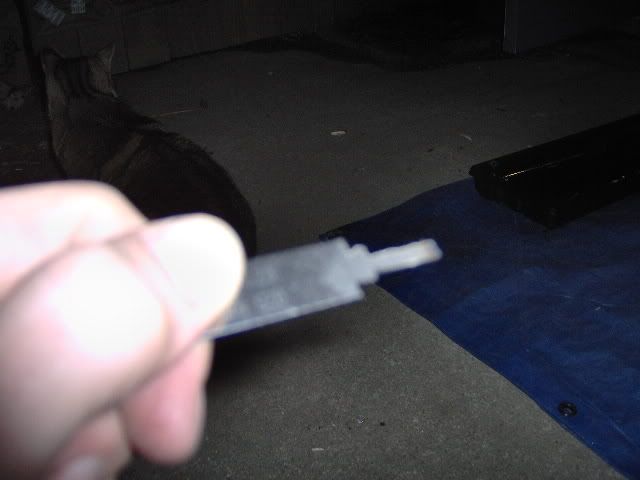
After I took a dremel to the above mentioned feeler gauge. Just cut and compare to the picture thats in the manual (page 8-13) as also shown in the previous picture above until you have an exact match.
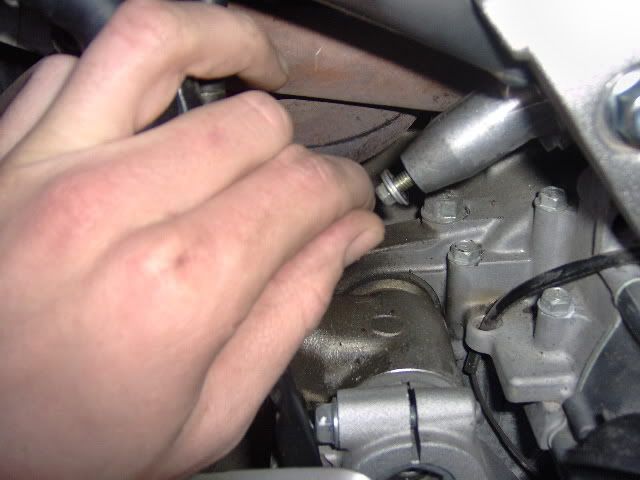
You have to remove the bolt from the cam chain tensioner in order to instal the homade f. guage tool into it. This pic is of the rear cam chain tensioner, not the front.
This is the front cam chain tensioner (located on right side of bike, next to throttle bodies area. You can see the homade tool installed. Install the tool. Turn it clockwise (against pressure) until it no longer turns, then lock it in place by fully inserting the homeade tool.

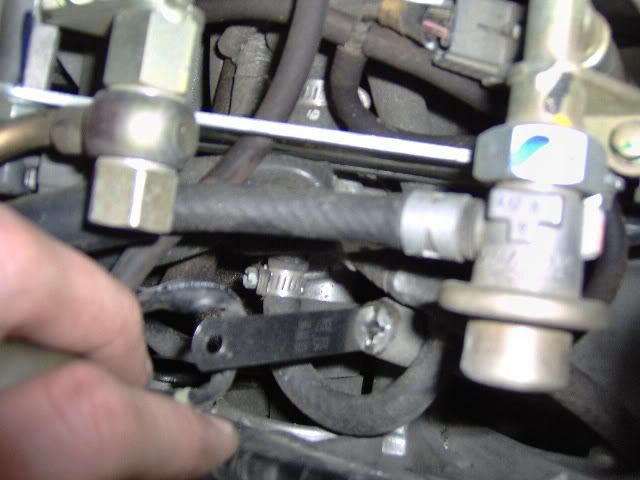
Remove this bolt. Loosen the other bolt that holds it on, and situate this piece out of the way.
There are 2 bolts holding this on. Remove those 2 bolts and set this piece aside.
Remove the 2 bolts that hold this piece in, then remove this piece & set it aside.
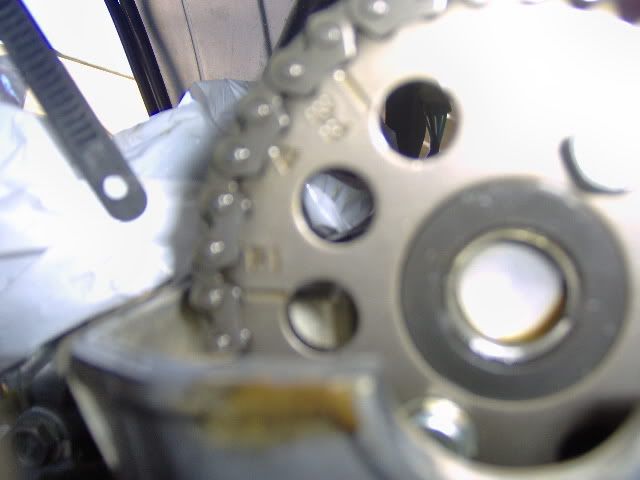
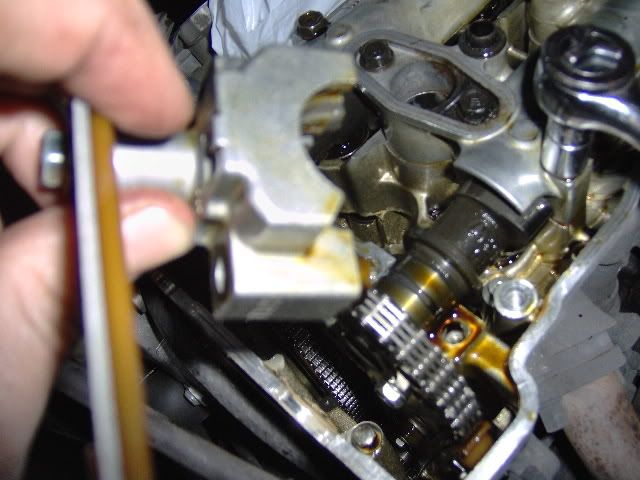
8 bolts hold this piece on. Remove all 8 of those bolts. Make sure you remove them in a criss-cross pattern, a little bit at a time for each individual bolt... So you do not damage any parts of your cams.
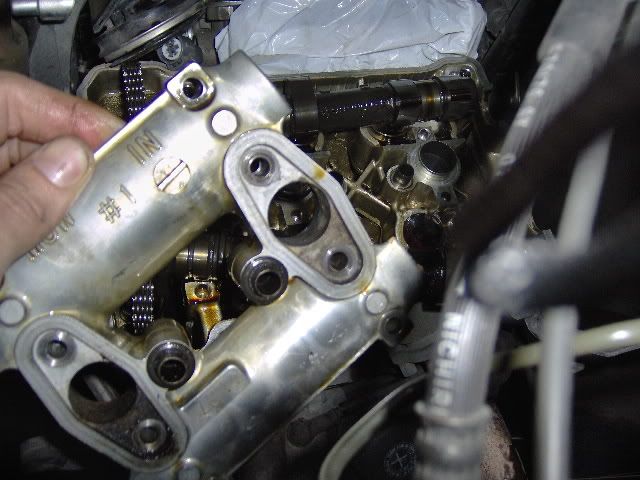
Remove & set aside.
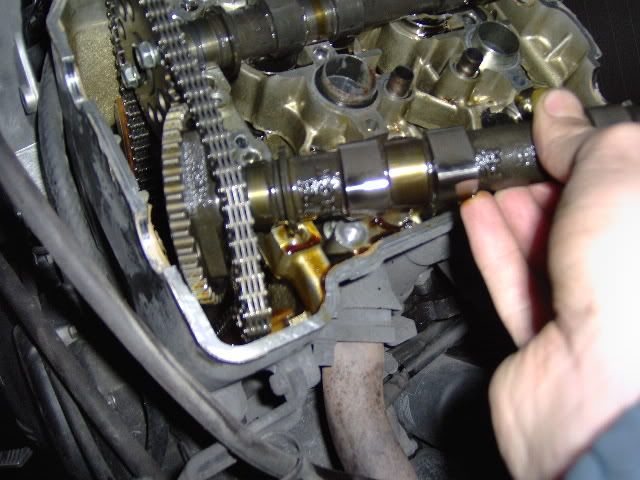
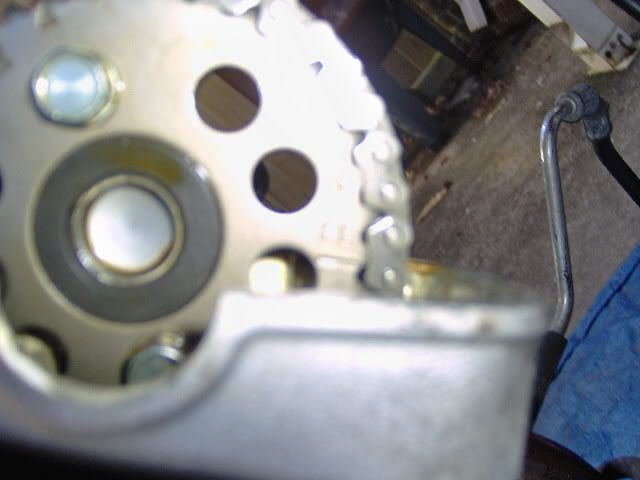
Take these out and set them aside. This is up to you... I take both of them out at once & I am certain to realign them correctly when I put them back in. Other's take only one out at a time, effectively maintaining their timing, because one of the sprockets' teeth will always be situated correctly on the cam chain...
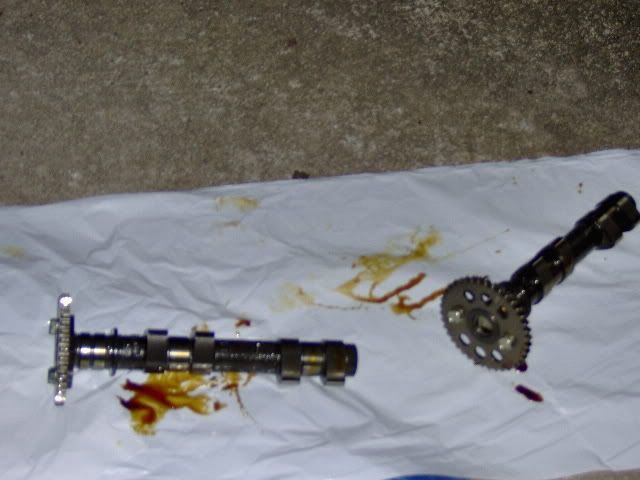
Here they are out of the engine.
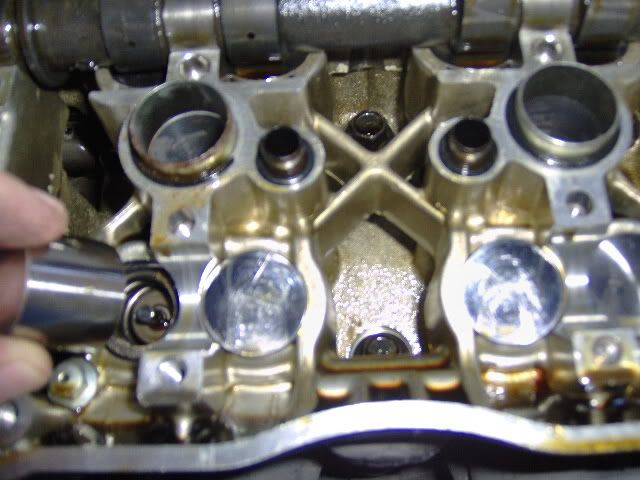
Take out the vtec lifters.
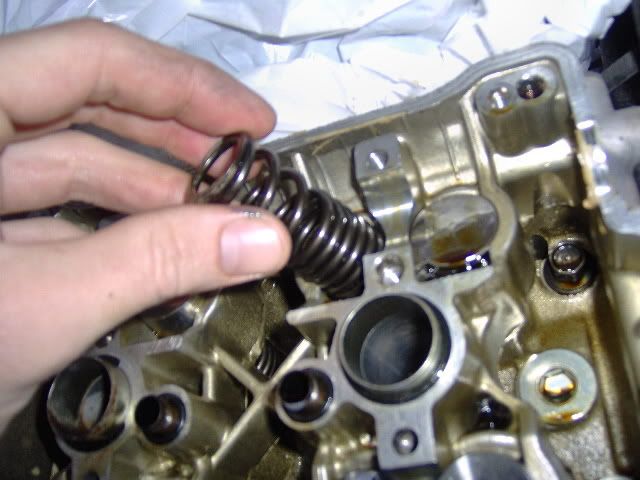
Take out the vtec outer springs. Be certain to maitain original spots within the engine. Put the same springs back into where they came out of when you are done... Stretched out part of the spring faces up when installed...
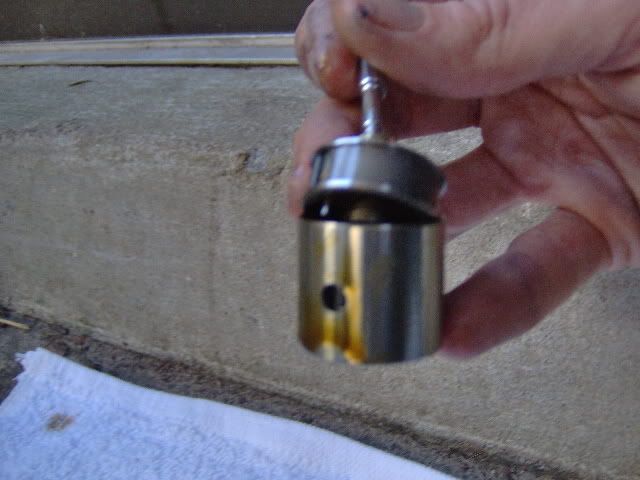
Take this thing out of the vtec lifters.
These are the slide pin stopper tools that need to be in hand (ordered) before you start the adjustment.

Put a slide pin stopper tool into the spring loaded hole designed to accept them, and then slide it all back together. The hole on the side of the lifter is simply to allow oil pressure in so as to activate the valve when normally operating the bike. Make sure that the inside piece is pressed all the way up against the upper inside plane of the lifter & not stuck in the hole on the side of the lifter.
Put the whole contraption, with slide pin stopper tools installed, back into their original location within the engine. Leave the outer vtec springs out of the engine for measurements. Realign cam sprockets index marks with the engine case ledge, and put cam chain back on them (take your time) before you continue with the next couple of steps.
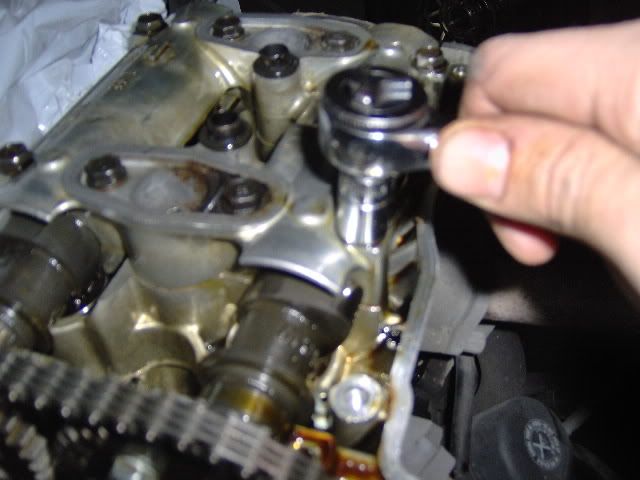
http://i56.photobucket.com/albums/g188/shilofrinkles/valves160.jpg[/img
Put this back on. I use 10 ft/lbs torgue for the 8 bolts. (I know this is not what the manual says..I think it says to use 9 ft/lbs).
Put this piece back in, as well as it's brother (the other piece that looks just like it). 10 ft/lbs torque for the 4 bolts.
Reestablish tension on cam chain by removing the homade key from the cam chain tensioner BEFORE EVER TRYING TO ROTATE THE CRANK when taking measurements, etc..
Use metric feeler guages to take measurements. Bend them a bit so they can access between the cam lobes & the lifters. Record the measurements. (Bottom of this post has the optimal specs & tolerances needed...so does service manual on page 3-11... Nevermind, here you go: Intake: 0.200mm for all valves (+/- 0.030mm for normal valves & +/- 0.08mm for the VTEC)...Exhaust: 0.350 for all valves (+/- 0.030mm for normal valves & +/- 0.080mm for the VTEC valves).
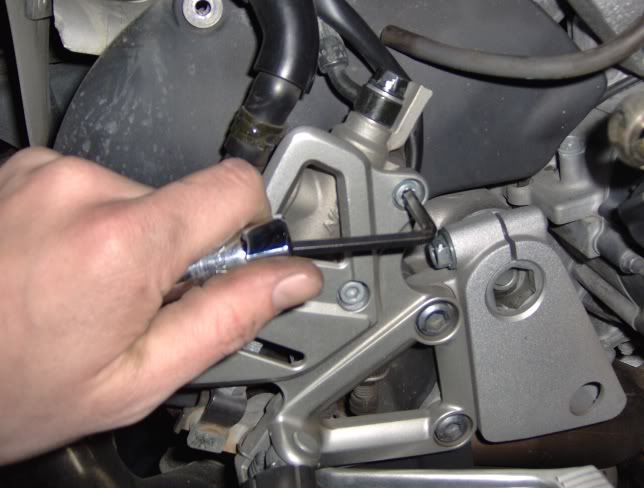
For the rear measurements. You have to remove the right side passenger peg & black heat shield to gain access to the cam chain tensioner that is hiding out back there. Remove this bolt, plus 3 others (easy to figure out which ones) to get the pegs off (hang them out of the way), & for completely removing the heat shield.
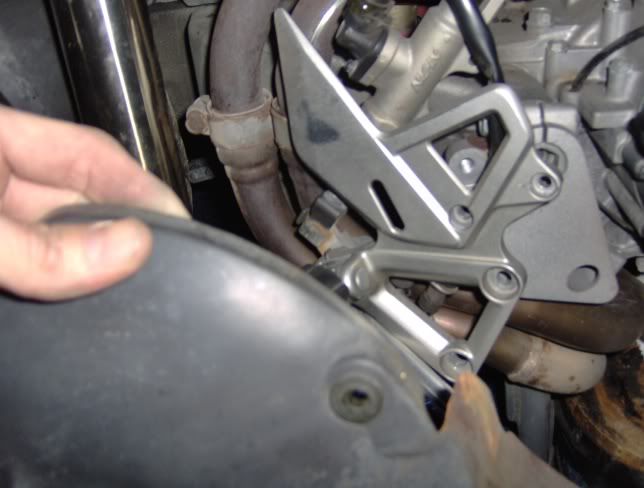
Remove the heat shield.
Put the homade tool in after you take off the bolt, and relieve tension on the cam chain by turning clockwise, then lock it by pushing the homade tool all the way in.
See the above pics & steps for accessing, installing slide pin stopper tools, removing VTEC springs and taking measurements. Everything is the same with one exception..THE TIMING. Consult someone (me if you have to) to be certain that you get it right. The difference is that while aligned at 3Tl (for cam removal), the sprockets should be indexed with the RE mark facing down (bottom sprocket) & outward. The RI mark should be facing towards the front of the bike (upper cam sprocket) & outward...both parallel with the engine casing ledge. Aligne them back up this way when you put things back together for measurements & final time, etc.. Do not forget to remove the homeade tool & reapply tension to the cam chain before you crank it for measurements too...
If all your valves are within specifications, all you have to do now is remove those cams again to get those slide pin stopper tools out. Then, reinstall the cams again & reverse steps mentioned above to get back to square one. Check your gaskets to make sure that they are in good shape & reuse them. I replaced mine at the 2nd inspection & not for the 1st one. Also, be sure to use dielectric grease for all electrical connections (not absolutely necessary though), lock tight medium for the brake caliper bolts if you want to, and slab on some moly paste as pictured below for the cam journals & lobes... Fill up the radiator, drain & replace oil soon after finished if not beforehand & then again soon after, and replace the airfilter, head/wheel bearings, fork fluid if doing that, etc...All of which already have a how to in this forum for them.
Cams lubed up with moly prior to final install.
If you need to adjust. Measure the shims & lifters with a micrometer (mine measured differently even when I measured the brand new shims... (1.80 stamped is actually a 1.775...). The equation is A = (B - C) + D. A:New thickness needed (lifter or shim) B:Your recorded clearance C:Specified valve clearance (either 0.200 or 0.350) D:Old valve lifter thickness as measured with micrometer. Order replacements, wait, replace, check measurements again to be sure that they are now within specs. Reverse steps above...
ALWAYS VERIFY THAT YOU DO INDEED HAVE ALL * SLIDE PIN STOPPER TOOLS OUT OF THE BIKE* I once had to unbutton everything because I forgot about one of them...not fun...but helped me to learn!
Later, Ian
-
 1
1
-
-
I should recommend getting some of that SEALY advanced foam bed mattress stuff. Slice off some stock foam, and glue in the Sealy stuff... Replace the stock vinyl cover.
-
Any luck with this yet?
Did you go out riding on that 80+ degree day we had? I was out and meant to call... Got pretty far from where I live & got off the bike, to realized I had not brought my phone with me. I just kept going.
Later, Ian
-
I had to make that same decision, and went with the non-air. I cannot even remember why, I just know that the SIDI non-air get no complaints from me, 0 to 100 degrees.
Air would be cool though!
-
OK,
I sent you the pm...
Later, IAN
$50 Paint Job - Tremclad (rust-oleum) Paint
in Body and Paint
Posted
Just posting to say thanks for this information is all.
I think I am just about ready to start with the painting process on my 2002 (been thinking about it for awhile now). Mine has spent much of its life exposed to the sun. So, it has basically turned from the "fast" red to a subtle pink'ish color in certain spots. Plus, I let the insurance lapse over the winter. So, the weather has began turning nice once again, and now that I am ready to enjoy my bike, the DMV says that I have to turn in my plates for 30 days... Oh well, that gives me the time needed to do this correctly.
I just have to decide on a color scheme now. Been thinking about all black. Not sure though (wouldn't want to slow it down too much, ya know)?
I am soo looking forward to riding again! Been on a break for awhile now (about 2 years)... Can't wait!
Also, I see that my oil thread was closed down... Me, I like to put in some AMSoil myself! Good stuff in my honest opinion. Much better than that extra Virgin stuff that came soo highly recomended....
Later