Jump to content

elizilla

Member Contributer
  • Posts

    289
  • Joined

  • Last visited

Blog Entries posted by elizilla

  1. elizilla
    This isn't a VFR story, but I had such an awesome time last weekend that I wanted to share it with you guys anyway. I got to go scooter racing! I didn't make this video and I don't know the guy who did, but I'm in it. You can see me at around 5:45, getting off to a lousy start. I'm wearing the same leathers as in my userpic.


    So here's the story:
    My friend Erik at Current Motors invited me to go scooter racing at an event called ThunderDrome. Current Motors makes electric scooters and they had an extra one that I could ride. It sounded pretty fun, so I got up earlier than I ever normally get up on a Saturday morning, and rode the NT out to Dorais Park, on the north side of Detroit.
    The event parking was in a lot on Mound Road that obviously didn't belong to the park. I suspect there might have been a building there at one point, but now, all that remained was concrete, with weeds and small trees growing in the cracks. The lot had a huge fence around it, a serious fence, fifteen feet of chain link and a second fence about half that tall, and about two feet between the fences, with spirals of barbed wire. There were several mechanical gates whose mechanisms had obviously not been used in years. Once upon a time, someone really didn't want people getting in there. But one of the gates had been torn down, allowing entrance. The cars were all clustered in the south end. I picked a course that avoided the worse of the large weeds, and made my way down there and parked. All the pedestrian traffic was going through a hole in the fence, into the park, and I followed. This corner of the park was overgrown and shaded by small trees, but someone had cut the grass at least once this year. There was one large pile of trash but other than that it wasn't too bad. I liked it, it felt like trespassing. On the other side of the trees, there was a path that was probably once paved, but it was well on its way back to nature. It led towards all the activity.
    The race course was a velodrome. Velodrome bicycle racing was hugely popular in the late 19th and early 20th centuries, when indoor courses with wooden tracks drew large crowds to watch as bicycles with fixed gears and no brakes raced. Velodromes are steeply banked ovals, and they're steeper at the ends, so steep that you never get onto the sides of your tires. There are still velo bicycle clubs here and there, but it's nowhere near as popular as it was in its heyday.
    The Dorais Velodrome was built in the 1960s, and is concrete rather than the traditional wood. Like much of Detroit's infrastructure, it had been abandoned and neglected for many years, until the Thunderdrome organizers got interested in it. They spent a lot of volunteer hours there to unearth it, remove the weeds and small trees that had grown up, clear debris, and patch the pavement as best they could. It was still fairly bumpy, but not unmanageable. As they said, the bumps won't kill ya. And at least they didn't put down any tar snakes. Dorais Park also featured a big grassy hill with a ramp at the top, where soapbox derbies were held in more innocent days. (Check out the Thunderdrome website, it is interesting to see the story of how they unearthed the track.)
    The pit was to the left side of the path, in a bowl at the bottom of the soapbox derby hill. The grass was tall, and other folks reported it had been slippery earlier with the frost, but by the time I arrived, a little after nine, the sun was well up and it was nearly dry. The track was a little farther up the path. Imagine a small football or soccer field, in a bowl of stadium seating. Now imagine no seating, just a sloping paved surface where the seats would have been. This was the Dorais Velodrome. There were a hundred or so people milling about, but it was by no means crowded. There were people of all ages there, but a large portion of the crowd were in their early 20s and had facial piercings, retro eyeglasses, chucks, and ironic t-shirts. I guess scooters are the new skateboards.
    I found the Current Motors banner on an EZ-Up shade awning in the infield. Erik was there, along with Terry (also from Current), Erik's son Jacob, and friend Clarissa. They had a large Current Motors bike there for people to see, but the bikes that would be racing were smaller, and were out in the pits. We went back out there and looked at them. They had four bikes to race, altogether. Three were painted black and obviously well used, and the fourth was a red one that looked brand new. It was agreed that I would ride the red bike, because while I feared I would be the slowest, Erik thought I was least likely to crash, and this was their display bike. :) Terry said he had already had all the bikes tech inspected. The organizers told us to go ahead and start our practice laps, so we all went out on the track.
    I have rarely ridden the electric scooters before. They're pretty nifty. They don't make a sound, when you're sitting still, but when you roll on, they jump to life. It was a little unnerving riding my scooter on the tall grass, over uneven surfaces, to get it up to the rim of the bowl. The worst part was actually trying to fold my legs up and tuck my feet into the floorboards area, it just felt *wrong* not to have footpegs! There was a lot of debris scattered about, for example a piece of 2x4 about three feet long, and lots of large rocks and pieces of broken pavement. Also, there were bikes (with and without motors) milling around, and pedestrians, and camp chairs scattered about. There was a shortage of flat level ground, and all of it seemed to be occupied. Since the electric scooters are so quiet, pedestrians didn't hear them when you came up behind them. But since the electric scooters are so quiet, you can stop at any time, and talk normally to the pedestrians. The scooter was light and very maneuverable, so it was actually not so bad to navigate all that, once I got used to it.
    I've been to a few track days in the past, and normally there's a designated person exercising strict control over who enters the track, and when, and where, and how. There's usually a pit lane that no one is in except people whose sessions are starting/ending, and a fence, with just one entrance and exit from the track. Tire walls, etc. But they didn't do this here. Everyone was going counterclockwise, but other than that there wasn't much order. People were clustered all along the wall of the bowl, and you just cut through where you could and got on the track. But everyone was relaxed, cheerful, friendly, and polite. No "race face" here.
    The track was bumpy, but manageable. The first few times around, I didn't go fast enough to get a proper angle with the banked track, so even though I was going counterclockwise I was wearing the right side of the tires. There was a nasty bump in the racing line, in the second turn. I made a mental note to stay higher there. Round and round! Whee! The electric scooter is so quiet that you can hear every bump as you hit it, but the suspension soaked them up well enough, I didn't feel they were impairing the handling any.
    After a few laps, I was comfortable so I came in off the track. Not long after that they called in all the motorized bikes, and let the bicycles have a turn to practice.
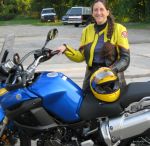
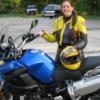
    I got checked in and received my wristband, then I was instructed to get the bike teched again, since I needed the tech inspector to initial my wristband. The guy at tech recognized me; we had been at American Supercamp together. He had me put tape over the headlight, taillight and signals. It already had clear packing tape on it, but he handed me a roll of white duct tape to hide the lights. He also wanted the killswitch marked, but the electric bike doesn't have a killswitch. :-) Erik marked the ignition switch. The rules described some riding gear requirements, but no one asked any questions about my riding gear - looking around, I was probably closer to dressing like a racer, than 90% of the people there.
    I put the bike back in the pits, and went back to the Current EZ-Up. Ate some snacks, and talked to Clarissa about riding, then wandered around checking out the other few vendors. There was a bicycle shop called Sweet Bikes, and something called Suicide Squad. I asked the guy there was it was, and he said they were called that because they were crazy - they don't obey traffic laws, they run stoplights, etc. He reminded me of the people I used to meet at the hardcore club I sometimes went to when I was in college.
    A rider for the last Current Motors bike arrived, Andy. Andy is a champion racer, so Erik and Terry were hoping he'd be able to finish well. Erik said the bike that Andy was going to ride was similar in performance characteristics to mine. The one Terry was riding was the fastest bike they had that met the requirements to compete. (The bike parked by the EZ-Up was just there to display, because it was too large to compete.)
    Finally it was time for the scooter race. They had all the scooters pull up on the rim of the bow to be counted. There were fifteen. They divided us into three groups of five. Each group would race for fifteen laps, and the top two finishers in each group would do a second race of 20 laps. They used a LeMans start, which means that the racers would stand across the track from their bikes, ready, set, GO! and the riders would run to their bikes, leap on and take off.
    The first group started. No electric bikes were in this group. One rider quickly opened a comfortable lead, and a second rider opened a comfortable second place. One bike was so slow that it was very quickly lapped.
    The second group was called, and we realized that three of the four electric scooters were in this group. Terry quickly got one of the gas bikes to take his place so they wouldn't all be together. Erik and Andy were in this group. They came in third and fourth, respectively. Andy was giving second place a run for his money until the last lap or so, but the electrics have a very specific top speed and that's as fast as they go. One of the gas bikes in this group had something wrong with it that required the rider to ride with one hand down on the motor, holding something, to get any speed at all. He was lapped by everyone, I think. Partway through this race, the announcer said "I've just been told there's an electric bike our there! Which one is it? Two? There are two electric bikes out there! Why doesn't anyone tell me this stuff? Which ones?"
    Then it was my turn, and Terry's turn. I'm afraid I don't run well in leathers, and the bike was still not familiar enough for me to get on quickly, so I got off to a poor start. I was in last place, but I don't think it mattered that much, really. I quickly passed one of the others; his bike was very slow. I heard the announcer asking if there were two women out there? Someone must have answered in the affirmative, because he started blathering about the two women on the track at once. I tuned him out, because she was right there in my sights. I think we must have been one of the better contests that day. I passed her, she passed me, I passed her again. We were neck and neck, lap after lap. I discovered the passing trick, which was to go into the turn on the outside, and then turn sharper and dive to the inside and pass the other bike there, where the slope gave you just a little boost in speed. Just like they taught us at American Supercamp, except without the sliding. :) Unfortunately she learned it too. I had the throttle pinned to the stop, lap after lap. When I got the lead I could never open it up; I could hear her right there on my tail. Finally she passed me, and when I tried to take her again on the next turn, she dove first and I had to brake to keep from hitting her. At which point it was all over - I lost about 20 feet on her and was never able to make it up again.
    But Terry won our group! So, at least one of us got to the finals. :)
    In the last session, the guy in the yellow and red 'stich, on the pink scooter, did not finish. His bike died in the second lap. He got it going again as the other riders were finishing, but he wasn't a contender. Of the remaining five machines, Terry came in third.
    Next up was the mountain bike race. There were twenty or thirty bikes in this group but they decided to have them all run together. They would do a different course - they'd go 3/4 of the way around the velodrome, and then go over the lip of the bowl, and up the grassy incline to the soapbox derby ramp at the top of the hill. Then back down and into the velodrome. They'd do four laps. Once of the mountain bikes opened up a huge lead very quickly; by the end of the first lap he was about 50 feet in front of the guy in second place, who was also comfortably ahead of the guy in third. By the fourth lap, the leaders were passing lots of the people at the back of the pack. The bicycles looked slow after watching the scooters.
    There were a couple of road bicycle classes that stayed in the velodrome. I'm not sure how they split them up. I decided it was time to call it a day, so I went back to the NT and rode on home. The NT felt large, unwieldy, and powerful, after my time on the scooter.
    All in all, I think this was an awesome event, and I can't wait to do it again. I suspect everyone else there felt the same, and that it will get a ton of positive word of mouth, so it will get much more crowded in the future. The cheerful chaos was terrific fun but I suspect it will give way to more order, if the crowds get larger. I'm glad I got to attend the first one.
  2. elizilla
    Today I removed the Pro-Oiler from the VFR. Not because I don't like it. I do! But I am selling the bike, and the new owner doesn't want it. Better for it to stay here where it can eventually get used again, than to go in the trash when the new owner of my VFR comes to pick it up next weekend.
    Meanwhile the TDM has been laid up all season waiting for brake work. First it was waiting for parts, and then the parts came in but by then it was full summer and I haven't wanted to take time away from riding the other bikes to work in a hot garage. While the TDM has been sitting there, the Scottoiler has leaked all of its oil out onto the garage floor. I have not worked on it, but my guess is that when I had to apply vacuum to prime it again, after I let it run dry last year, I drew in too much oil and I plugged the breather. As my garage heats and cools every day, it sucks up a little oil each night, and pushes it out onto the floor the next day. I'm sure it will be an easy fix, if I would just get around to it. But instead I intend to move the Pro Oiler to the TDM, since it is cleaner and easier to maintain and I now have one sitting on the bench just waiting to go on the bike. I'll be writing to the Pro-Oiler folks to see about getting the parts needed to fit it to the TDM.
    The oilers worked very well to preserve the chains; they made chain drive almost as trouble free as a shaft drive. I intend to install oilers on all my future chain drive bikes. They are definitely worth having.
    The winner of this comparo is the Pro-Oiler, but the Scottoiler is also a worthy competitor and you could do a lot worse than to use either one.
    Since I started this comparo I have seen two other interesting oilers reviewed in magazines. Note I haven't tried either, or seen them in person. But this is what I think, based on the information available.
    Cameleon Oiler
    This oiler has an electric pump, like the Pro-Oiler (and the Hawke Oiler). It is not as complex. It is programmed by choose a flow rate that will apply anytime the unit is powered up. You just attach it to switched power; no need to wire it into the speedometer circuit. So it's easier to install, but not as fine-tuneable. It also has an unique and ingenious oil reservoir; the oil is stored in a wide piece of tubing that you can attach to a frame spar or other out of the way spot. Which I think is clever. But the applicator is a single nozzle, and the tubing that leads down to the chain is a larger diameter than I think is optimum. I therefor predict that the Cameleon oiler will leak more than average, because you'll have to feed more oil to get it distributed, and because oilers that use that wider tubing leak more while parked. Not a big deal, just something to be aware of.
    Scottoiler eSystem (see image at top of entry)
    This oiler has an electric pump, like the Pro-Oiler, Hawke Oiler, and Cameleon. But it has a novel control mechanism. It uses a triple-axis accelerometer to determine when the bike is moving, and it uses this info to meter the oil. If it all works as promised, it should be easier to install and still offer very precise metering of the oil. I know that Scottoiler uses the small tubing that I have decided is preferred, so it seems like there is nothing in this package to dislike. It also displays the ambient temperature, which is like getting two farkles in one. The Scottoiler eSystem intrigues me, and if I were buying another oiler today I might go for it, in spite of it being the most expensive oiler on the market.
  3. elizilla
    Last spring I wrote about installing three different chain oilers and that I planned to compare them. Here are my results so far.
    I have not had to lube a chain all summer. I have not had to clean a chain all summer. I have not had to adjust a chain all summer. Yet my chains all look clean and new. This is awesome and I am very happy about it. However, all three chain oilers drip on my garage floor. I have developed the habit of pushing a piece of cardboard under the chain, each time I park a bike in my garage. I feel this is manageable and beats the heck out of constantly having to fiddle with chains at gas stops.
    Hawke Oiler
    The Hawke Oiler is out of the running, because the V-Strom is gone. I only put about 500 miles on with the Hawke Oiler, before I sold the bike. This bike spent half the summer sidelined due to unrelated problems (water pump seal). During this time it marked my garage floor more than either of the other oilers. It never stopped leaking no matter how long the bike stayed parked, and it wasn't just a few drops - it was a puddle. I think the reason it never stops dripping, is because the aquarium tubing it uses has too large an inner diameter. I've been told by other Hawke Oiler users that the manufacturer will provide some sort of choke to put in the line, to stop this from happening. So I wrote to them and asked for this. I never got a reply.I am also not convinced that manually managing an oiler by pushing a button is the best plan. I am liking the "set it and forget it" aspect of the other oilers; automatic chain oilers should be automatic, IMHO! But it works fine once you push the button, the oil goes onto the chain, though the applicator is not as precise. I cannot confirm whether it would improve chain longevity since I stopped the trial so early, but I think it would help - the chain never dried out, which is the goal, right? If you prefer an oiler you manage manually, and you don't mind the mess, the Hawke Oiler is likely OK. But really, the ability to place the button somewhere easier to reach, is the only improvement it offers over a cheaper option such as the Loobman, or this home brewed oiler I found on the V-Strom forum. Or this one posted to VFRD by JETS.
    ScottOiler
    The ScottOiler, on the TDM, has now run for about 1500 miles, and run through about half a quart of ScottOil. The chain was already close to shot when I installed it, and I hoped the ScottOiler would keep it going a bit longer. But I quickly gave up on eking it out, and I replaced it about 900 miles ago. The ScottOiler has kept the new chain nicely wet and clean. It drips just one drop of oil on the floor every time I park the bike, so the mess is very slight. At one point I ran the reservoir down too low, and it turns out that when you do that, just refilling it is not enough - you have to bleed it. I ended up using the mityvac to pull oil through the applicator to get it started again. Note to self - add oil *before* it runs low. Apart from having to bleed it when it ran out, I like the ScottOiler, I think it works very well.
    Pro-Oiler
    The Pro-Oiler, on the 4th gen VFR, now has about 6000 miles. I have used less than half a quart of oil in this time. I installed a new chain and sprockets at the same time I installed the oiler. It uses a lot less oil than the ScottOiler, but it still marks spots on my garage floor. The spots are not nearly-clean oil dripping from the applicator, like they are on the other two oilers. The floor spots are thick, black, tarry sludge that drips from the end of the chain guard or the countershaft sprocket area. The Pro-Oiler seems to be getting every bit of cleaning ability from every drop of oil flung. I have turned the Pro-Oiler down, down, down, to deliver ever smaller amounts of oil. I've now got it set on table 21, level 1, when the recommended setting for clean dry weather is table 17, level 3. The chain continues to look perfectly clean and not at all dry, and I have not had to adjust it.
    My big complaint may not have to do with the Pro-Oiler; I think it is a characteristic of the bike's geometry: Oil keeps getting on my tire. No matter how much I turn the oiler down, I keep having to clean oil off the tire, and I don't like this at all. I am considering filling the Pro-Oiler with ScottOil, since it would be easier to wash off. (Right now I am filling it with the same 10w40 synthetic I put in the engine.) I am also considering modifications to the chain guard, to try to change the way the oil flings. And I think that I might do well to swipe the spots where the tarry oil sludge collects, with a paper towel, at gas stops. Remember, the oil from these oilers is supposed to fling off and take the dirt with it - it's a total loss system. It's just not supposed to be deposited onto the tire! (Note: brake cleaner is the hot ticket for scrubbing oil off tires, much better than degreasers and soaps.)
    The photo at the top of this post is a close-up of the VFR's chain, and the oil on the tire, at 6000 miles. I last cleaned the tire about 700 miles before taking this picture. I have never cleaned the chain, and I have not adjusted it since the day I installed it.
    Conclusion
    I like the dual applicators in both the ScottOiler and the Pro-Oiler. They deliver the oil precisely where it needs to be, instead of squirting too much and then counting on fling to carry it around. The Pro-Oiler's dual applicator is smaller and more elegant, but the ScottOiler dual applicator works just as well and you can order it separately. If I hadn't sold the V-Strom, I might have ordered up a ScottOiler dual applicator and retrofit it to my Hawke Oiler - I am sure it would have reduced the mess.The Pro-Oiler just barely nudges out the ScottOiler, as my current favorite, because it can be precisely tuned to use so much less oil, and because the parts are more elegant. The ScottOiler is a very close second. And I think the TDM is a better bike to run an oiler on, than the VFR, due to the issue with oil on the VFR's tires. I will post another update when I have put more miles on these remaining two oilers.
  4. elizilla
    In my last entry, I described the install of the Hawke Oiler. Next up is the Pro-Oiler.
    The Pro-Oiler is made by a company in Belgium. But they delivered it to me in the USA without any trouble. The packaging was very good, with things in individual bubble wrap bags. There was a stack of instructions, about 50 sheets of paper. I was relieved to note they were stapled into three bundles, because I figured this would mean that two of them must be other languages and I could throw them out. Alas, my hopes were dashed - all three were in English. One section was the installation and operating manual, one was troubleshooting, and the third was the FAQ. And now that I've been through it, I can say that this is definitely not a project to attempt without reading the instructions carefully first.
    The Pro-Oiler components are first rate! The picture at the top is the contents of the kit.
    Interesting that the reservoir appears to be the exact same Nalgene type bottle that came with the Hawke Oiler. However, instead of coming out the cap, the oil feed line comes out of the shoulder of the bottle, which will make it possible to remove the cap without moving the bottle, nice. Like the Hawke Oiler, the feed line has a tube inside the bottle, that reaches to the bottom. The vent is a second tube sticking out right next to the feed line, rather than a simple hole in the bottle, so I suspect it is a bit less likely to leak.
    The tubing is much stiffer, and much thinner, than the aquarium style tubing used in the Hawke Oiler. The pump is smaller, and has an arrow on it indicating the direction the oil flows.
    The controller has a shielded cable coming out of it, that has six very small wires in it, black/blue/green/red/white/yellow. The yellow wire is never used in any configuration - I am guessing this shielded cable simply comes with six strands and they only need five of them.
    The junction box is a little project box with a small circuit board in it. It doesn't have any holes pre-drilled for wires - the instructions say that this is so you can drill your own holes in the best location for your install.
    There are three Posi-Tap connectors, a couple pieces of Dual-Lock, and a number of zip ties in several sizes.
    The applicator has dual nozzles and a bracket that attaches to one of the screws that holds the chain guard, and points it perfectly with one nozzle on each side of the sprocket. (The kit is bike specific.) No need to wrap zip ties around the swingarm, and no need to heat and bend tubing to get it to the correct angle. Here's a closeup picture of the applicator:

    And here is a picture of the applicator, installed on the bike:

    I routed the tubing along the brake line, and zip tied it in place, to get it up to the underseat area. I decided it wasn't necessary to drill a hole, since the tubing is so thin and stiff, and the VFR had plenty of access to route the tubing up under the bodywork.
    The most difficult part was finding a spot to stow the reservoir bottle. The underseat compartment in the VFR just isn't very deep, and it was hard to find a spot where I could orient the bottle properly, and still have reasonable access to it. In the end, I decided to velcro it to the outside of the seat rail, inside the bodywork, on the right hand side. I decided to use standard velcro instead of dual-lock, because dual-lock is really only sticky a half dozen times before those little bristles start to wear out, and because it's a huge pain to pull it apart when it isn't worn out. I cut a strip of velcro about eight inches long, and applied one side to the seat rail, where it runs for a couple of inches on either side of the spot where the bottle attaches. The other side, I wrapped all the way around the bottle. This should keep the ends from peeling up as I take the bottle in and out. The weight of the bottle rests on the bodywork. I think this should hold it well enough, but I will definitely keep an eye on it! Also, I've failed to follow one part of the instructions - they want me to have a 30cm vent tube. I don't know where I would put that much tubing, so I shortened it. Another thing to keep an eye on, I guess. I have more tubing in case I do need to lengthen it, though finding a spot for it to stick up and out would remain difficult.
    The pump needs to be within 40 cm of the bottle, and not more than 10 or 15cm above or below. I could have put it very close to the bottle, but the tubing is too stiff to bend that much. I tried heating this tubing with my butane torch and bending it to a more convenient shape, and had limited success. So I put the pump about 30 cm away, near the center of the underseat compartment. I put the junction box next to it, so I wouldn't have to splice longer leads onto the pump.
    The Pro-Oiler needs a tap into the speedometer sensor wire, to determine how fast/far the bike is going, so it can meter the oil accordingly. On the 4th Gen VFR,the speedometer sensor wire is pink, and runs from a sensor on the countershaft compartment, to a three terminal plug that is one of several that are held by a bracket on the outside of the seat rail, under the bodywork, on the left side. This seemed the most convenient place to tap into it with one of the Posi-Tap connectors, and attach the blue (not yellow) piece of wire from the kit.
    Four wires from the controller cable, are connected to terminals in the junction box. For a bike with an electronic speedo sensor, they are black/blue/red/green. If you have a reed switch, you use the white wire, and nothing uses the yellow wire, whose very existence is confusing since the instructions keep referring to a yellow wire, when the wire they provided to connect to the speedometer sensor was blue! The yellow wire in the cable was already cut off short, and I cut the white one short as well, so I wouldn't have to deal with either of them - there isn't a lot of room in the box! The four wires from the cable, and the blue-that-should-be-yellow wire from the speedometer sensor go into five of the terminals on one side of the board. The two black wires from the pump (which are interchangeable), the red power lead and the black ground lead, go into four terminals on the other side of the board. There's a nice clear diagram in the instructions showing what wire goes to what terminal.
    Here's a picture of the underseat compartment with these various components installed, the lid off the junction box so the circuit board inside can be seen, and the tubing routed:

    The controller box, I first placed on the fairing, where I could easily reach it with my left hand. But when I did the EMI check, it failed miserably - the pulse counter was seeing about a dozen pulses a second. I spent several days trying to figure this out. There's a troubleshooting flowchart for this, that includes a lot of discussion of how/where to connect the ground ("earth") wire, none of which helped. I eventually determined that there is a bad EMI spot on my bike, on either side of the fairing, just in front of my knee, and when the cable goes through that spot, it finds EMI there. Probably the coils. There was no way to route the cable in such a way that it would stay out of the bad EMI spot, yet still allow me to place the controller box right side up in that spot on the fairing. In the end, I placed the controller box on the instrument panel, and routed the cable along the center fairing stay, over the top of the airbox and under the gas tank. I'm not sure I like having the controller there, but I guess I'll see how it goes. If it turns out that it drives me crazy, I'll find someplace else, somehow. I could mount it back on the tail, under the Givi rack. Or maybe sideways or upside down in my original spot.
    (Edited 5/20 to add: I have since discussed this with a friend who is an electrical engineer. He thinks that the EMI problems would be reduced by adding a ground wire that connects the cable's metal sheath to the frame. I haven't tried this yet. I didn't see anything like that in the instructions, but maybe I missed it - there are an awful lot of instructions!)
    (Edited 9/25 to add: Turns out the cable did not have a metal sheath, it was just heavy plastic, so there was nothing to ground. In midsummer I relocated the controller box to a spot on the tail of the bike, protected by the support bracket for the Givi rack. This completely stopped the EMI problem, and I actually like it better, since it's more unobtrusive. But it does mean that I can only adjust it when I am stopped.)

    The instructions describe setting a correction factor, that tells the Pro-Oiler how many speedometer pulses per wheel revolution. You spin the wheel ten times, and the system counts how many pulses that is. You divide by ten, and that's the correction factor. I discovered that the VFR doesn't produce any pulses unless the engine is running - simply turning the key so the Pro-Oiler has power, is not enough. And if you don't have a correction factor set, the Pro-Oiler gives an error code of "CF-Err". Turning on the engine and leaving the bike in neutral allowed me to turn the wheel and count pulses properly.
    The Pro-Oiler's pump came with some red liquid (ATF?) already inside it, plus the controller has a prime function. This made it much easier to prime.
    This is a far more complicated installation than the Hawke Oiler, in spite of all the slick purpose built parts. Just installing all the parts and getting them working was a tough job, and programming it is complicated. There are charts and diagrams enough to please the geekiest engineer. It was a little overwhelming, actually, but I got through it. And I am very impressed with the quality of the components, and the hard work that obviously went into the design. I have high hopes for this oiler.
    Here's another Pro-Oiler install description from Rad, that I found helpful when I was doing this.
  5. elizilla
    Next up, we have the Scottoiler. This is the most commonly available oiler, the one that everyone else compares themselves to. It's the only oiler in my comparo, that is sold by multiple vendors here in the USA. I found it was available from a vendor I already know and think highly of, Adventure Motostuff in Carson City NV. Chad at Adventure Motostuff hooked me up when my V-Strom's chain went bad on a trip, a couple years ago. It's an awesome store, with things in stock that I would normally have to order. When they came up in my search for a Scottoiler vendor, I looked no farther.
    There is a basic, Universal Scottoiler. Then there's a Touring Scottoiler with a larger reservoir. And there's an optional Dual Injector Kit. I decided to get the touring version and the dual injector. The items in the kits I ordered are pictured up above. The things on the white paper are the contents of the dual injector kit, and the rest of the things are the contents of the touring kit. As you can see, there is an intimidating array of stuff! Don't let this scare you off, though - you don't use all of it. It just comes with all these pieces, so you can fit it to a variety of bikes.
    But even with all that, it doesn't have everything for every bike. The instructions list several bikes, including the VFR, that they offer extra special parts to fit. They say they'll send them for free, just write and ask. So if you are installing it on a VFR, make sure you drop 'em a note and get your free extra parts before you start trying to fit it. I was fitting it on a Yamaha TDM850, so I did not have to write for the extra parts.
    So the first thing I did, was fit the Dual Injector Kit. This turned out to be pretty simple - there's a bracket with several holes in it, that you can turn whichever way you need to, to line it up so the fingers brush lightly on either side of the sprocket. You could attach it to the spot where the spools go in, except this bike doesn't have the fittings for spools. You can glue it on (they provide glue). Or you could do what I did, and just zip tie it in place. They provide lots and lots of zip ties.

    They provide a lot more of the stiff black tubing than you need, and in the instructions there is a method to make replacement applicator fingers out of it. So I've squirreled the extra away on the end of my workbench with all the other extra parts I keep accumulating.
    Note the clean chain and sprocket. The VFR had a brand new chain and sprocket when I installed the Pro-Oiler. This bike is not so lucky; its chain has about 8000 miles on it, and I had let it get pretty filthy. I cleaned off as much of the accumulated dirt and grime as I could, not so much for nice pictures, but to reduce the chance of that gunk clogging up the ends of the applicator, and to reduce the amount of truly filthy crud available to be flung all over the wheels and bodywork when the oiler rinses it through.
    Next, I fit the reservoir. This is actually a bit easier than it was with the previous two oilers, because I didn't have to find a place to hide it. That big square thing in the kit picture, is designed to bolt on under the license plate. In Europe, bike license plates are square and exactly that size. And since most bikes sold here are also sold there, the stock tail section on this one had plenty of room for the square box. If you've bobbed your rear fender, you won't have space for it, so don't buy the Touring Scottoiler - get the Universal one instead. Note, my Michigan plate doesn't hide it, so the box looks kinda goofy. I'll hafta find something else to augment my license plate, I guess. Or just leave it exposed even if it is funny looking; I guess it will make it easier to keep an eye on it. I had to enlarge the holes in my license plate slightly, since they were about 2mm short of matching up with the attachment holes on the Scottoiler box. And I had to drill one additional hole, at the bottom of the fender, to attach the box.
    The box has a compartment in it to hold the oil. It's got a yellow thing in it that floats on top of the oil and is easily visible, so you can monitor the oil level through a window on the left side. Or through the even larger window on the back, if you live in the USA and your license plate is too small to cover it.
    There's a bracket on the right, to hold the RMV, which is a syringe-like thing that meters out the oil. Here's a photo from that side, so you can see it mounted on the bike:

    Note the yellow tube sticking out, top and center. This is the tube you use to fill it. It pivots to hide in a little compartment, and the license plate bolts over it. You take the license plate off anytime you need to fill it. According to the instructions, that would be every 4000 to 8000 miles. I plan to just top it off every time I change the oil in the bike.
    The arching yellow tube runs from the reservoir to the RMV. The blue tube that comes out the bottom of the RMV and loops up and around into the tail of the bike, is the tube that goes to the dual injectors and applies the oil to the chain. The black tube that comes out the top of the RMV and goes into the tail of the bike, connects to a vacuum port on the carbs, one of the spots you would normally connect the mercury sticks to when you synch the carbs.
    There's a dial on the top of the RMV. At one end is prime, and the other end is the slowest possible feeding of the oil. When vacuum is applied at the top, the valve opens, and oil starts feeding out the bottom of the RMV. The oil in the RMV is replenished by oil that siphons over from the reservoir - it's important to prime that hose by getting it free of bubbles. The fill hose at the top of the reservoir doubles as a vent.
    The kit came with a half liter of Scottoiler oil. This stuff is blue, and according to their literature it is water soluble. I decided to test this claim. I squirted some on my fingers and tried to rinse it off in the sink. It's not that water soluble. It didn't feel like it rinsed off my fingers very much at all, even with hot water. But hand soap did seem to cut through it a little more easily than it cuts through motor oil.
    The instructions recommend that once you fill it up, you prime the hoses by running the bike to get vacuum, and using the Scottoiler fill bottle, push air into the fill tube, which pushes oil from the reservoir to the RMV, and this pushes oil out the bottom and into the feed tube. Personally I would prefer not to sit sniffing the tailpipes of a running bike for that long, so I used some of the extra black hose to run from the top of the RMV, to my mouth, and applied vacuum that way. And I used my Mityvac to apply pressure to the filler hose, because it was kinda awkward using the Scottoiler bottle to do it. It took about ten minutes to push the oil all the way through the tubing.
    One I had the lines filled with oil, I put the vacuum line back in place. I started the bike with the dial still set to prime, and oil came out both sides of the dual injector. Yay! I then adjusted the dial until oil came out at a rate of about one drop per minute. Seems to work! I'll take a test ride tomorrow in daylight.
  6. elizilla
    This Hawke Oiler has been sitting on my workbench for a couple of years. Last Saturday, I finally installed it on my 2003 Suzuki V-Strom, as part of a chain oiler comparison I have decided to do this summer.
    Above is a picture of the contents of the kit, along with a few handwritten labels so that people looking at the picture can tell what the various items are, and a ruler to show the relative size of the items.
    I don't think anything in this kit, was manufactured specifically for the Hawke Oiler. Instead, it's cleverly cobbled together with off-the-shelf components. The installation instructions are on the website.
    All in all, the installation was fairly simple. The V-Strom has a lot of room for such things, which also helps.
    It came with some little gray stick-on cable routing brackets to hold the applicator, but I didn't feel they were very trustworthy, so I augmented them with some long black zip ties as you can see in the picture below. (White zip ties would look prettier here, but I used contrasting black ones so they would show up well in the photo.) The instructions recommend using heat to mold the tubing to the correct shape. I used a little butane torch, and this worked well. Then they suggest you use GOOP to glue the applicator in place, to keep it from pivoting. It seems effective enough. Here's a picture of the installed applicator:

    Then you route the hose along the swingarm, and up into the bike, taking care that it has enough slack for the swingarm to move up and down, and that it won't get caught on anything. I ran it up and into the space under the seat. I drilled a few holes, to route the hose into the underseat box, and to run small zip ties through, to tie the hose and pump into place. After examining the oil reservoir bottle, and thinking about how I would fill it, I decided to include a bit of extra hose between the pump and the reservoir, because I'm going to need to pull this bottle out sometimes to fill it, and I want enough slack that I can do this without spilling.
    Here is a photo of the underseat compartment, with the hose, pump, and reservoir bottle:

    I drilled a 3/8" hole in the fairing for the switch. The switch is just a push button.

    I routed the wire along the frame, from the pump to the switch. The wiring is a bit nuisancy. Both the positive and negative leads coming off the pump, are enclosed in a heavy gray plastic sheath. This sheath was difficult to peel apart, to separate the wires. The red wire attaches to the switch, but the black wire is simply a ground. If the two wires weren't both in the sheath together, I would have grounded it to something close to the pump. But since the sheath was so hard to peel, and the red wire had to go to the front of the bike, I routed the black wire along with it, and grounded it up near the switch. The red wire attaches to one side of the switch. The fuse attaches to the other side of the switch, and then I had to splice in a little extra wire to reach the switched accessory power panel that I already have installed in the front fairing. (Unlike, say, grip heaters, I don't think it matters whether the oiler is run from switched power, but since I already have a switched accessory block set up, it's convenient, and it will prevent pesky children pushing that button and dumping oil on the ground while the bike is parked.)
    The Hawke Oiler website recommends using synthetic oil, so I filled the bottle with a little Mobil One 10w40, and I was ready to try it out.
    The Hawke Oiler depends on the rider to decide when to oil the chain, and how much. When it's time, you simply push the button, and it oils the chain. But before this will work, it needs to be primed - there is a lot of empty hose between the reservoir and the applicator! Priming it turned out to be kind of difficult. Every time you push the button, it cycles the pump just once. This is not enough to draw the oil from the reservoir. In fact, pushing the switch a hundred or more times doesn't move any oil, though the pump got kinda hot. This was very frustrating and it made me think that perhaps I had not hooked it up correctly. It turns out, though, that the secret trick is to prime the hose by sucking on it. I used my mityvac, first on the hose between the reservoir and pump, and then once that hose was almost full, I plugged it back in to the pump, and used the mityvac on the other side of the pump to pull it right on in.
    Once there was oil in the pump, every time I pushed the button, the oil traveled about an inch down the hose. Eventually it came out of the applicator tip. So it appears to be working! I have not yet taken it for a test ride, because the V-Strom is currently waiting for a new water pump seal. I have that seal on order and I look forward to testing it soon. In the meantime, oil did drip on my garage floor. I am not going to assume this is normal, though - likely it's the result of me testing it by pumping until oil came out. If you pumped it while riding, and didn't immediately park, I don't think the bike would mark its spot like this.
    Supplies needed for the install, that were not included in the kit:
    Extra wire
    Connectors to link the pump to the switch, the switch to the fuse, and the fuse to the extra wire.
    GOOP
    More/longer zip ties than the ones that were included, in contrasting colors if you want to take nice photos
    Things to know, that are not covered by the directions:
    Leave some slack in the hose so you can get the bottle out.
    Prime the pump.
    It took me about six hours to install it, but half that time was spent trying to figure out why I couldn't get the oil to come through, before I got out my mityvac and primed the pump. I was also taking things very slowly and carefully, and taking a lot of pictures. Knowing what I now know, I could probably install one of these in an hour or two. Of the three oilers, this one is the simplest to install.
  7. elizilla
    Two weeks ago I attended American Supercamp. I'm here to report that this was more fun than any other rider training I've ever done.
    The class was held at a place called Vail Equestrian Center, near Toledo OH. It was an indoor horse riding arena. There was a large rectangular riding space with a dirt floor, and bleachers along one side. Nothing fancy, but plenty of space.
    They provide the motorcycles and any gear that you need. The motorcycles are Honda XR100 dirt bikes. They're all alike. Remembering my experience with the MSF bikes, I was relieved to find that these bikes were all in perfect condition, with no quirks to learn. It truly did not matter which bike you got, because they were all good. They also had a trailer full of gear, and you could just go in there and they would lend you whatever you needed; the gear was in good condition and plentiful. I brought my own helmet and gloves but I used their gear for everything else.
    The class started out with a little orientation talk. Danny told us a bit about the history and mission of the school, then had everyone in the class introduce themselves and explain why they were there. I told him I was there because my friend Mo Draper said it was the funnest thing you could do with your clothes on. He said "Ohhhh, you know the Drapers? Have you met his father? Ol' T-Bone Draper?" I said I had, and he started telling the class, "This guy is 70 years old, and he kept stuffing people on the inside. We couldn't get him to stop, he wouldn't listen. Totally into it. A mad man!"
    One of the guys sitting near me introduced himself as an MSF instructor. Danny said they wouldn't hold that against him. This turned out to be a recurring theme. A lot of the things you learn elsewhere, are wrong for this type of riding. There's no countersteering, for instance. You almost never use the front brake, instead you use the rear brake even as it makes the rear lose traction and slide - a controlled slide of that type is not undesirable. Instead of putting your body to the inside to reduce the lean angles needed, you push the bike down and keep your body upright. The racing line is different. The goal is to make the turns shorter and tighter so you can make the straightaways longer. You sit as far forward as you can, practically on the tank, and slouch, hunching your back and rolling your shoulders. In the turns you take your inside foot off the peg and put it on the ground.
    One thing they stressed in this orientation talk, was that it was OK to crash. In fact they made a big point of challenging us to break their bikes. The bikes have upgraded handlebars that are nearly impossible to bend, and they have a whole truckload of clutch levers and other parts. Push your limits, it's OK, because crashing is good for you.
    They handed out clipboards with diagrams showing the racing line, and dividing the turns into several sections, where we were to focus on a particular thing in each section. Sometimes they even went out and drew lines on the track, marking the sections where we were to be on the throttle, on the brake, cranking our heads backwards to look through the turn, etc.
    They had originally scheduled two classes, one for racers and one for non-racers. But they hadn't had enough sign-ups, so they had combined the two. They divided us into three groups, which is what they always do, but if they'd had two classes the groups would have been much closer in ability levels. As it was, they had one group for racers, one for the more competitive non-racers, and one for people like me. :-) I actually enjoyed the chance to see how the racers do it. It was startling to see that the average age in the racer group, was about 15 years old. All these young boys, and they were crazy competitive! So crazy that they would stop them periodically, make them get off their bikes and do pushups, just to slow them down.
    So anyway, for the first exercise, they made a little tiny oval out in the middle of the big horse riding ring. Just two cones, and we were to ride around and around them. I got on the little bike for the first time and was terrified. I had to kick start it. Eep! I never kickstarted anything in my life and I had no idea how. But it took them about ten seconds to show me, and it roared to life on the first try. Whew! Then it was time to ride out on the bike. This bike felt so foreign, I felt like a complete fool. For a moment I really regretted signing up for this. This was not my home. I was going to be exposed as an impostor. The guys running the school were hollering at me to get moving, go faster, etc, and I was tempted to just leave. What was I doing here? But I kept going, and before I knew it, I was able to adapt to the bike. By the end of the session I felt much happier, and I never felt so out of place again.
    That first moment was the low point of the weekend, I think. I was always the kid picked last in gym class, and every riding school I attend has moments where I want to fall back on the tricks I used to survive high school gym. "Sorry, I can't play, I forgot to bring my gym clothes." Finding excuses to not get out there, hanging back to avoid engaging, etc. I'm physically stupid, I know it, and just getting out there is huge. I always feel like a loser, an obstacle to the other students. But here I am, and I want to learn. I may be the slowest student, but I'm persistent. I've sought out a lot of rider education over the years, and I have to say that this class felt the least hostile to me, as a physically stupid person, of any course I've ever taken. The only way anyone can fail, is to refuse to try, because it doesn't matter if you crash. The instructors are enthusiastic and encouraging, and the environment is like a rubber room full of charming chaos; you can go bonkers without any consequences at all. And unlike the track schools, they didn't mind that I am a slow learner. They just kept pushing me, without ever seeming at all impatient. And I learned tons.
    So you ride around the oval. The racing line resembles the late apexes you use on the racetrack, but the turns are very different. You shorten and sharpen the turn, get it over with so you can nail it back into the next straightaway. As a street rider, I would manage my traction pie by not letting the turn tighten so much, but for this, you just want to get the bike leaned over hard, fast, spin through that turn, and then bring it back up fast so you can nail it. Suppose you're doing it right, and you're trying to pass someone who is doing it more like a street rider. You are outside them, coming into the turn. You make your turn really quick and tight, outside and behind them, and then you can go straight while they are still turning, and pass them on the inside at the turn exit, because you're straight and on the gas while they are still leaned over and turning.
    Round and round the tiny oval we went. At one point they videotaped us, and it was really helpful. I was able to see that I was slowing down way too soon, and that I needed to stay on it as I went deeper into the turn. Once I saw that, I started to feel like less of an obstacle out there, I started to keep up with my group.
    After lunch they started wetting down the track, and we got to slide around in the mud, still doing more of the same stuff. It got faster and more fun. Then they had us do donuts! We learned to slide the bike in a circle with one foot on the ground and we just pivoted around it until we got dizzy, then we would switch and go around the other way. It was a blast!
    We'd go around the oval counterclockwise for half the session, then clockwise for the other half of the session. There was a lot of body positioning stuff, you sit on the side of the seat, outside elbow up, inside arm straight, elbows practically in front of the bars. This was great, but I started to worry about how one would learn to switch sides, since we only ever went in one direction at a time. I must have been learning how to do it, or I wouldn't have had room in my brain to wonder about that. And whaddya know, just as I was starting to wonder about it, they reconfigured the track, using much more of the ring. The new track layout was a U shape. Going counterclockwise, you'd turn left, left, left, RIGHT! left, left, and so on. The transition was very challenging, and when I finally crashed, that was where I did it. But it was OK, I got up laughing. This is just how you crash at American Supercamp. There's no drama at all, you just crash, laugh, get up and ride on.
    At one point they set up a cone weave on one of the long straights, and we got to practice switching left to right even more. I could have done this cone weave a lot more, I could feel myself learning with every pass. It was really challenging, and really good for me to do it.
    They also had an exercise where they had us line up at one end of the arena, and one by one we would ride in a straight line, accelerate as hard as possible, then brake as hard as we could the minute we passed a cone. They had the door open at the end, so if you failed to stop, you would just go outside, no big deal. After two passes like this, they had us hook a turn as we were braking, turn as sharp as we could, and ride back between a couple of tires and cones. This exercise seemed purpose built for people to lose traction and slide sideways, and people did. People crashed but that's OK, no one was hurt, they all got up laughing. We all got faster and more agile with it.
    Early on the second day, I was slow and stiff, and one of the instructors came running out and hopped on my bike behind me. He had me put my hands on top of his, my feet on top of his, scoot way forward onto the tank, and we went flying around that track, sometimes practically riding sideways. Who knew that an XR100 would carry two people and go that fast, lean over that far? And when I was alone on the bike again I discovered something else. Did you know that you can ride right over tires and orange cones on an XR100, and it hardly upsets it at all? Easy! Those bikes are amazing.
    In the email they sent us to tell us how to prepare for the class, they said we should do leg lunges. And in the orientation they told us to expect our legs to ache. Other people reported that this did happen to them. But for me, the place I really felt it was in my forearms. I really had a death grip on the bars, the first day, and that night I really knew it. The second day, I was able to consciously relax my hands, and I didn't feel so sore that night. I also amassed quite a collection of bruises, which purpled beautifully the following week, but they've faded now. I wish the class were longer than just the two days. I think I was just barely getting physically adapted to it when it ended.
    Anyway, it was worth every penny and I intend to go again as soon as possible.
    I'm posting this in several communities that I belong to. Apologies to anyone who is seeing it more than once.
  8. elizilla
    I recently I took the VFR to the racetrack for two days.
    For those who don't know, here's the basic scoop on how this works. The group that organizes these events is called Sportbike Track Time. STT divides the riders up into three groups, Novice, Intermediate, and Advanced. Each group gets to be on the track for twenty minutes each hour. The Novice group is for beginners and those who seek continued instruction; in addition to 20 minutes on the track each hour, Novice riders are required to attend a 20 minute classroom session each hour, and they are given strict rules for how to ride during each track session. If you've done Novice before, and you so choose, you can go to Intermediate. Intermediate usually has the most crashes, since it's less structured and has more people who are trying to prove something. Advanced is for people who have racing licenses, or who STT invites based on how well they ride.
    The other cool thing about STT, is that they offer discount pricing to women riders, so it's pretty cheap for me to ride with them.
    I've done STT track days before, so I'm eligible to go to Intermediate. But I am slow and I know it, so I have continued to ride with Novice. The lessons are the same every day, and last weekend was my fifth and six time with these lessons. I just don't learn this kind of stuff very fast. And after this past weekend I am still slow.
    Here is how the STT day goes:
    7am - Tech and registration open. Everyone needs to have newish tires, good brakes, and a throttle that snaps back on its own, and they must remove/tape mirrors, tape their lights and speedometers and license plate edges, etc. Intermediate and Advanced have to replace their coolant with water but Novices don't.
    8:30am - Riders meeting, required for all three groups. The guy in charge of the track day, Monty, gives a speech about the rules, how to enter and exit the track, things you should know about this particular track, what the various flags mean, what to do if you crash, don't be a jerk, the evils of "straight line bombing and corner camping", the importance of staying hydrated, the various available services, lunch, etc.
    9:00am - Advanced and Intermediates dismissed from the meeting. Intermediate riders get the first 20 minute session. Novice riders stay for further instruction. Instructors are drawn from the Advanced group. The Novice riders are divided into groups of four to six, and assigned to individual instructors. They try to sort them according to who is likely to be fastest. The fastest riders go to Group 1, and they work down from there, with the slowest in the last group. The Novices are told that the first thing to do, is to examine the entire track. You do this by mentally dividing the track into three lanes, and riding around the track, at a moderate pace, three times, once in each lane. Each group follows their instructor. After the three trips around, the instructor will lead you and show you the racing line. You're supposed to choose things along the track to mark where you want to turn in for each curve, and memorize them. All passing is done as groups, based on the hand signals from instructors. Stay with your group, don't pass within your group.
    9:40am - Novice riders get their first track session.
    From then on, every hour there is twenty minutes of instruction and twenty minutes of riding. Here's what they cover:
    - At 60mph, you're traveling 88 feet per second. Can you make a plan and execute it in a second? No. If it's within 88 feet of you it's already happened. Looking at this stuff just feeds your brain bad information. Focus your attention farther down the track, where you can still do something about it. This slows things down and makes it so your brain can keep up.
    - Each turn is divided into entry, apex, and exit. Set the proper entry speed, pick the proper apex, and power on through the turn.
    - Staying in the sweet spot of the suspension, keeping the bike's weight properly balanced front to rear.
    - How the bike turns, the rear wheel is key. Countersteering, leaning, throttle steering, etc.
    - If you don't use the throttle properly and pick the correct apex you'll run wide.
    - Body postioning demo. There's a bike on stands and each student sits on it. Put your toes on the outside edge of the pegs. Keep your forearms parallel to the ground, put your chin over your right forearm, rotate your hips around the gas tank and point your right knee out, while resting left knee and elbow against the tank. Take your weight off your hands. Now switch sides, and once again no weight on the hands.
    On Saturdays they're very formal and do this all in great detail. On Sundays they rush through the lessons more quickly and let things slide a bit, probably because the majority of the students are there for both days and it's just a review for them. Still, there are always a few Sunday-only students. My advice to anyone going for the first time, would be to get a Saturday session, because they're more thorough on Saturday. But if you've done it before and wish they'd stop lecturing so much, Sunday's the best.
    The track I went to, Gingerman, has some unusual rules. There are two churches on neighboring properties and the track has to observe quiet time from 10am to noon on Sundays. So they run until 6pm each day, to give back those two hours. (I was also pleased to hear Monty criticize the guys with straight pipes. He said that many tracks are starting to enforce decibel limits because this excessive noise causes tracks to be shut down. IMHO too many people who run loud pipes do it solely to show off, and these people need to realize that their peers are not impressed, so it's good that Monty is speaking up on this issue.)
    Other unusual things - There is a group that is trying to turn this Gingerman STT weekend into a big Ducati festival, and for this purpose they had a trackside dinner, a band, and a movie scheduled for Saturday night. This was sponsored by Red Bull, so there were scantily clad pretty girls wandering around giving away free cans of Red Bull on Saturday. There were also demo rides on Ducatis and Triumphs, which I did not take advantage of since I was too busy with the classroom sessions and the track sessions.
    Unfortunately the weather did not cooperate. It started raining at around 3pm Saturday, and rained most of the rest of the weekend. The movie had to be canceled because of the rain. By the time I was ready to set up my tent, the whole grassy area where I might have put it was awash, so I decided to sleep in my truck instead. I woke up a number of times during the night and it was always raining. During the day Saturday, I'd been good about staying hydrated, and therefore I had to get up in the night to pee, three times. Each time, it was raining harder. By the third time, it was raining so hard, and it was so dark, that I decided not to walk up to the bathroom. I just peed on the ground near my truck, and got back in. I got soaked to the skin in the thirty seconds it took me to do this. Yuck!
    On Saturday afternoon, I was a lot less distressed by the rain than a lot of the other Novices. So I came closer to holding my own, than I had all day.
    On Sunday morning, about half the Novice students did not even start the day. And with the rain, lots of them quit as the day wore on, and a few more crashed out. By the last session, there were only two of us left, me and Cheryl. The one remaining instructor, Travis, basically turned us loose. I passed Cheryl! And I opened up a half a lap on her by the session's end. But before you get too impressed, please realize that my VFR750 is just plain faster than her EX500. By a lot. I could run away from her in the straights, but I suspect we were pretty evenly matched in the corners. So I'm not going to take a lot of credit for mad riding skillz just because I was able to get away from her.
    The thing that was cool, was that I finally managed to hang off. This has been my bete noir at past track days. Of course it didn't make me any faster, in fact it was basically useless, since no one was getting knees down in the rain. Also I think I'll need a lot more practice at it before it will be smooth enough to do anything useful with it. But just being able to do it at all is a huge change.
    The thing that was bad, is that I was repeatedly singled out and lectured for my failure to follow other riders closely enough. There are reasons I reflexively refrain from following too close, and on the street these reasons are highly valid. Unfortunately, on the track, this is not a useful habit. I fought it and fought it, but it was an uphill battle, and I think the instructors thought I was arguing with them when I tried to explain why it is so hard for me. Maybe I should find a trustworthy riding buddy or two, and get them to work on this with me on the street, let me follow them closely so I can get past this fear? OTOH, this is just a bad idea on the street, for many reasons. I will have to think about this some more.

×
×
  • Create New...

Important Information

By using this site, you agree to our Privacy Policy.