Member Contributer Rush2112 Posted February 2, 2016 Member Contributer Share Posted February 2, 2016 Very well done!!! Excellent craftsmanship on the coolant reservoir and the build. Bike looks amazing! Link to comment Share on other sites More sharing options...
barcas90 Posted February 17, 2016 Author Share Posted February 17, 2016 Hi, great bike, like what you've done. I am new to the forum and would like to ask, where did you relocate the front 2 coils, and how much did you have to modify the Monster seat at the front? I'm just starting a similar project and like the look of the monster rear unit Thanks Hi there I am sorry but I havent been on the forum since a while. I sure want to help you when having questions. I bought my ducati seat brand new and the only thing I had to do was cutting of the "lips" so they dont touch the vfr tank. The seat fits almost good but you have to make sure you use the right angle and pressure to the tank to have a excellent fit. Its a matter of searching ;). I dont know what you mean with the coils. My language is actually dutch ;). Grtz Hi, great bike, like what you've done. I am new to the forum and would like to ask, where did you relocate the front 2 coils, and how much did you have to modify the Monster seat at the front? I'm just starting a similar project and like the look of the monster rear unit Thanks Hi there I am sorry but I havent been on the forum since a while. I sure want to help you when having questions. I bought my ducati seat brand new and the only thing I had to do was cutting of the "lips" so they dont touch the vfr tank. The seat fits almost good but you have to make sure you use the right angle and pressure to the tank to have a excellent fit. Its a matter of searching ;). I dont know what you mean with the coils. My language is actually dutch ;). Grtz Very well done!!! Excellent craftsmanship on the coolant reservoir and the build. Bike looks amazing! Thank you ?! Link to comment Share on other sites More sharing options...
koekum Posted February 18, 2016 Share Posted February 18, 2016 <Translation-intrusion> Coils => bobine/bobijn De vraag is dus waar U de voorste 2 bobines heeft geplaatst. <\Translation-intrusion> Link to comment Share on other sites More sharing options...
barcas90 Posted February 18, 2016 Author Share Posted February 18, 2016 <Translation-intrusion> Coils => bobine/bobijn De vraag is dus waar U de voorste 2 bobines heeft geplaatst. <\Translation-intrusion> Dank je :). Dacht even dat dit een afkorting was van iets. Link to comment Share on other sites More sharing options...
barcas90 Posted February 18, 2016 Author Share Posted February 18, 2016 Hi, great bike, like what you've done. I am new to the forum and would like to ask, where did you relocate the front 2 coils, and how much did you have to modify the Monster seat at the front? I'm just starting a similar project and like the look of the monster rear unit Thanks on this picture you'll see the two "lips" that have to be cut off. The original intention of these lips are to hook up under the ducati tank so the seat can't get up at the front. When I made my subframe, I made sure I have to use pressure on my seat against the tank at the front to lock my seat. I hope you know what I mean. And for my coils I made a kind of U-shape in stainless steel that can be mounted up at each side behind my radiator. Link to comment Share on other sites More sharing options...
RudV4 Posted April 12, 2016 Share Posted April 12, 2016 Hi barcas90, apologies for my delayed reply, been busy building! Thanks for the information about moving the 'coils' - i may end up with them both under the tank next to the air filter intake pipe, it looks like there is enough space. I currently have built a complete rear subframe similar to yours, (Steel box section, welded) and have fitted a lithium lightweight battery, re-wired the components under the seat and made new brackets for the fuel pump etc. I've fitted a stainless steel exhaust and fitted a Micron race can, but this may get cut down to give a 'short, stubby look' later! I've made a small number plate bracket that also houses a Ducati style rear light. The front forks, rear shock and brake calipers are now being stripped, serviced and re-painted. The wheels will be powder coated next. I have 'hidden' a lot of the wiring, and re-routed various wires and fuel pipes to give a 'cleaner' look I'm keeping the standard handle bars to start with, as i want to concentrate on the mechanics first, to ensure the bike runs and rides well. I will now have to fit a better coolant bottle, having seen your excellent version! I also had to cut off the 'lips' of the Ducati seat, but have added my own 'lip' to the front that wedges underneath the front of the tank. I'm currently re-spraying the engine covers, and have made an oil cooler link pipe as I removed the original cooler. I must say that i often look at your bike as inspiration, and to see how you modified things to give a really clean look to the bike. Thanks very much for your information. I'll keep you updated as i continue my build. I intend to have it running ready fro the English summer! Just one question... just how and where did you put all the wires when you fitted the single headlamp?? - as that will be my next job. Thanks Link to comment Share on other sites More sharing options...
barcas90 Posted May 29, 2016 Author Share Posted May 29, 2016 On 12 april 2016 at 2:50 PM, RudV4 said: Hi barcas90, apologies for my delayed reply, been busy building! Thanks for the information about moving the 'coils' - i may end up with them both under the tank next to the air filter intake pipe, it looks like there is enough space. I currently have built a complete rear subframe similar to yours, (Steel box section, welded) and have fitted a lithium lightweight battery, re-wired the components under the seat and made new brackets for the fuel pump etc. I've fitted a stainless steel exhaust and fitted a Micron race can, but this may get cut down to give a 'short, stubby look' later! I've made a small number plate bracket that also houses a Ducati style rear light. The front forks, rear shock and brake calipers are now being stripped, serviced and re-painted. The wheels will be powder coated next. I have 'hidden' a lot of the wiring, and re-routed various wires and fuel pipes to give a 'cleaner' look I'm keeping the standard handle bars to start with, as i want to concentrate on the mechanics first, to ensure the bike runs and rides well. I will now have to fit a better coolant bottle, having seen your excellent version! I also had to cut off the 'lips' of the Ducati seat, but have added my own 'lip' to the front that wedges underneath the front of the tank. I'm currently re-spraying the engine covers, and have made an oil cooler link pipe as I removed the original cooler. I must say that i often look at your bike as inspiration, and to see how you modified things to give a really clean look to the bike. Thanks very much for your information. I'll keep you updated as i continue my build. I intend to have it running ready fro the English summer! Just one question... just how and where did you put all the wires when you fitted the single headlamp?? - as that will be my next job. Thanks Nice to hear your project is building up that nice! I am sorry for not being on this forum that much, I am renovating my house at this moment...? Feels good to hear I am inspiring you for your build! I will take pictures soon from my headlight when you still need them? The wiring was done by a professional electrician because I dont have any knowledge of electricity. Excited to see pics! Link to comment Share on other sites More sharing options...
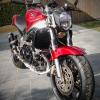
barcas90 Posted September 2, 2016 Author Share Posted September 2, 2016 Seems like someone has exactly the same taste... How unique? Link to comment Share on other sites More sharing options...
barcas90 Posted September 2, 2016 Author Share Posted September 2, 2016 Link to comment Share on other sites More sharing options...
Redbull99 Posted September 5, 2016 Share Posted September 5, 2016 Hello , can you send me the deatils from your frame (Rear) + the exact dimensions ( to reconstruct the rear) (sketch) ? where do you get the seat and the ducati rear ? Email adresse : pascal.plihal@gmail.com Thanks Link to comment Share on other sites More sharing options...
MorrisJ879 Posted November 15, 2016 Share Posted November 15, 2016 Could I ask were you mounted the oil cooler mate? Link to comment Share on other sites More sharing options...
TheCommando Posted August 10, 2017 Share Posted August 10, 2017 On 9/5/2016 at 2:51 PM, Redbull99 said: Hello , can you send me the deatils from your frame (Rear) + the exact dimensions ( to reconstruct the rear) (sketch) ? where do you get the seat and the ducati rear ? Email adresse : pascal.plihal@gmail.com Thanks Good morning barcas90, I am wondering if you could send me details of your rear subframe as well as I am looking to build a similar bike!! Thanks Link to comment Share on other sites More sharing options...

Recommended Posts
Archived
This topic is now archived and is closed to further replies.