

rdguy
-
Posts
258 -
Joined
-
Last visited
Content Type
Forums
Profiles
Gallery
Blogs
Downloads
Events
Posts posted by rdguy
-
-
Levers are cheap - if you shop around around $20 or a bit for the pair . . . but priceless if you're on a trip in a remote area and one breaks off in a tipover. Small vicegrips can work as a crude shift lever if that ends up being broken. Either can definitely save a vacation.
Too true. You've saved all year for the vacation - take a few spares!
That said... If you drill a 1/16" or 1/8" hole in your levers inboard one or two inches from the end, they will be more likely to break there. Then after your embarrassing tipover, you can carry on to your luxury hotel where the Swedish Bikini Team will change the lever for you.
Or so I'm told, not ever having had an embarrassing tipover...
Glenn
-
I'm in Florida and only need heated hands about 2 months a year. Question is do I go through the trouble to wire and install heated grips, if so whats best or get some battery powered gloves [liners] for the short time I'll be using them? thoughts and recommendations on brands and your experience would be appreciated. Thanks!
Grip heaters:
1] You're not going to forget them at home.
2] Turn them on whenever you need them without stopping.
3] Buy gloves for protection, heaters for warmth.
I'm using some cheepo ATV heaters over the OEM grips and under grip puppies. The most useful thing is a good controller. A pulse width modulated controller is the way to go here, and can be made cheap if you're handy. Maybe that's a post I need to write.
Glenn
-
PS now, if non-VFR owners have to stand last to fill up, buy the first round and so on, think about those who trailer their bikes..... Hehehe.
Uh, so trailering the VStrom would be a reeeeely bad idea, I guess?
Glenn
-
 1
1
-
-
Seriously though, deer are forest rats and with so may PETA-files around they now over populate and half of the ones that don't try to commit suicide in the road starve to death in the winters.
PETA-files... You know I'm just itching for a chance to use that, don't you?
Glenn
-
... it was like back in the day when the RD could kick sand in the face of something with twice the engine displacement.
Remember this ad?

Geez, back then you could put beer in a bike ad. Simpler times...
Glenn
-
I do not engage in road rage.
It is pointless, unless I am under the erroneous impression that my job is to change the world one driver at a time.
But if I was, I'd start with myself.
I've started trying to change the world one driver at a time. Occasionally I'll meet a driver who waits until I'm past before turning when they could easily have scooted in front of me. They get a nod and/or a wave. Why not increase the world's supply of goodwill when we can?
Glenn
-
Congratulations!
[sniffs]
[dabs eyes]
Sorry, I always cry at weddings...
Glenn
-
All, I have been talking with Warwoman and Bailyrock and volunteering my services to organize rider groups while at the event. A rider group board will be created and on display at the event.
......................A PM response would be best
Thanks!!
Thanks for doing this. I had planned to lead some slower groups this year, but it won't be happening (Sorry, Kevin!). No drama, I just got a rescue Jack Russell cross and I don't want to leave him in alternative care for a week quite yet. There's a small chance I'll make it, in which case I'll sweep as required.
I'll PM you the routes I used last year and some I thought of for this year, as soon as I dig them out.
Glenn
-
Thanks Glenn,
I've gone to that Site and even registered, but can't access anything.
All can see is the classified page and a list of members email addresses.
Can't find any content or a place to post.
I assume that you are a member, what am I missing?
Never mind, think I've figured it out. Never had any experience with an email based forum like that. Now that's three vfr websites to keep track of, getting hard to keep everyone straight. Thanks again for the tip Glenn. Where are you located?
Email based forum? Back in my day we were happy to have fax machines...
I'm in K-W. I'm up for group rides, but I mostly do solo tours. Have you checked the TMac thread?
[Note to self: Register for TMac, already!!]
Glenn
-
Despite the current weather, riding season is not far away here in Ontario, so I'm trying to compile a list of local riders.
Anyone from Windsor to Toronto (and beyond ) with a VFR that's interested in getting together for rides please post up. I'm in London and only know of a couple so far
Please pass this on to anyone you know that may be interested.
Or if such a list already exists could someone point me in that direction.Thanks, RickEnjoy,
Glenn
-
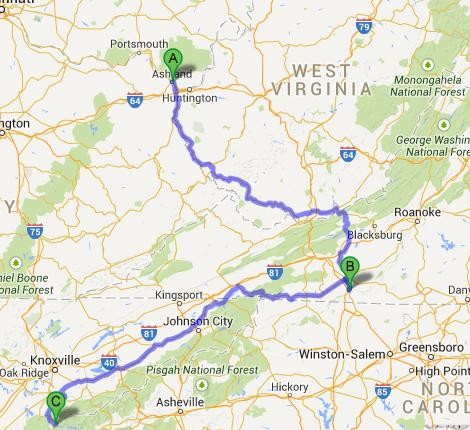
Here's the suggested route from the gps, any route suggestions are welcome!
Go to Google maps. Ashland to Fancy Gap VA to Deals Gap. Set options to 'avoid highways'. Puts you on the Blue Ridge Parkway for the last half.
535 miles of twisties!
Glenn
-
-
Google tells me it is some 545 miles but I reckon that is interstate.
545 Kilometers, no? 330 miles or so.
Torch, weatherproof matches, Dunny paper, Multi-tool / Swiss army knife, spare key... useful stuff!!! Wet weather gear. Spare gloves. Baby wipes (great for wiping down the helmet visor and getting bugs off the bike, there are all sorts, try for ones that don't leave residue on the visor. Energy bars. Bottle of your favourite liqour... Whatever!!!
Tyres? Maintenance: fresh oil, brake pads, spark plugs etc checked out and/or replaced.
And TAKE LOTS OF PHOTOS!!! and post em up here with a ride report!!
Good stuff right there. I dunno what your schedule is like, but I'd find back roads to the Blue Ridge Parkway the first day, and ride the BRP the next. Takes the distance up to about 600 miles, but they're good miles.
Oh, and we're holding you to the ride report...
Glenn
-
My usual tire installer is packing it in. Given that lots of shops don't install tires if they didn't supply them, anybody have a suggestion for a shop in the K-W area or nearby?
Glenn
-
My question is, has anyone fixed this with a heli-coil?
Is it advisable to use a time-sert instead of a heli-coil?
Can it be done safely on the bike?
If done on the bike, I've seen suggestions to
A) Put the piston half way back down after the compression stroke then just vacuum or blow the swarf out. As shown here.
OR
B) Place the piston on the intake cycle and blow air in the intake while cutting the threads.
OR
C) Put grease on the cutter and hope none of the grease laden swarf falls into the combustion chamber.
Can someone who has done this successfully tell me what the acceptable method is.
Ages ago I did a bike using a helicoil and both B) and C). Seemed to work. I have no experience with time serts.
Glenn
-
I think I caught him with his guard down. The keg was tapped and I just helped him load a bike on his trailer.

Did you really ride my bike up the ramp into the chock?
Never mind. What happens in Franklin...
Glenn
-
Yep, storage matters. There were some tires on offer at TMac with the stickers still on (ie, unused), but a 2010 date code and irridescent blue sidewalls. They'd apparently seen either high heat or a lot of heat cycles, despite not being mounted.
CornerCarver and 007 point in the right direction in a couple of ways - you don't get a price break for mounting an old/used tire, so factor in extra mounting charges for more frequent changes and the cost savings starts to go away. Plus plastic, leather and plaster costs more.
Glenn
-
This isn't much help to you now, but I never use glue on grips, partly because of what happened to you.
I make sure the grips and bars are really clean (acetone or similar), and then wet the grips and bars with more acetone. Slide the grips on while everything is wet, and wait for the solvent to dry. It would probably work with water if you can wait a day or two for it to dry.
To remove, I stick that little red tube from WD40 in as far as I can and spritz in a few places. If you can get a small screwdriver between the grip and the bar, that may work for you now.
Glenn
-
You said NO Dragon this time . What happened ? And you waved like a rookie at the camera's.. WTH !!!
To be fair, the first time through he was leading me. He had plenty of time to wave, stop, turn around and go back to look at the preview before I got there.
Glenn
-
Just voted again. 270:245 . . .
How the h3ll did that Camaro just get 400 votes??? C'mon folks, we got work to do.
Glenn
-
Doesn't seem to let me camp the site and upvote anymore. Anyone else? The like button goes away after that.
I had to delete the us129photos cookie, and refresh. I'm going to try turning cookies off and bump the numbers.
Glenn
EDIT: Turning cookies off worked for me. Vote, refresh, vote... Get out there, people!
-
I suppose this is the most suitable place to thank Norm (screen name Bedman??) for giving up a bunch of his cocktail hour to drive a rider back to the Microtel.
Much appreciated.
Glenn
-
None VFRD event hotel guest to the girl at the front desk... "Excuse me, I have a complaint"
Front desk girl "Yes what is it?"
Non-VFRD "There seems to be a beer keg on the luggage cart"
Remind me next year - I have a dolly which would be perfect. If Ken has room.
Glenn
-
Pictures from TMAC 2014....Had a blast!!!!
Hey! Turner's Corner's Cafe! That would be a great destination for a novice ride.
.... which I apparently just volunteered to lead again...
Glenn
Thanks aging Glen and for volunteering so far ahead to do it again!!!
Aging Glen? AGING GLEN??? Geez, I thought Kimbal's daughter was bad...
Oh, and get off my lawn.
Hmmph.
Glenn
Official 13Th Annual Texasmac Event Thread 2016
in VFRD Spring Memorial Ride (TMAC)
Posted
So, is this likely to put a damper on things?
http://abc11.com/travel/speeders-beware-law-enforcement-is-cracking-down/1257209/
I'm asking for a friend...
Glenn