


rickdick80
-
Posts
44 -
Joined
-
Last visited
Content Type
Forums
Profiles
Gallery
Blogs
Downloads
Events
Posts posted by rickdick80
-
-
Well! It's been a year and a half in the making, but the project is done (and tested!). In May I took the bike to my parents' house, and my dad finished up the brackets. Unfortunately I didn't stop and take many pictures of the brackets in process, but here are some of the finished product.
Originally I had planned on mounting at the pillon pegs, the rear cowl side bolts (not sure the proper name for them; the ones that are made for attaching a bungee net), and the passenger grab handle bolts. However, instead of tying into the passenger grab handle bolts, my dad used the little screw on the underside of the rear cowl, near the tail light. I was a little nervous about using this as a mounting point, since this only goes into the rear fender (plastic) and not into any rear seat subframe structure.
But, I rode it around for two days with just the empty bags, and there were no problems. Three days later, I did a trip around Lake MI, fully loaded up with camping gear. The bags worked great! My buddy followed me to breakfast the first day (about 50 miles) and said that even over frost heaves, the bags didn't move around much at all.
So after all this, I'm glad that they work. Unfortunately they do add over a foot of width to the bike (yes, a foot wider than the mirrors!!!). There will be no lane-splitting with this setup. My total cash outlay for this project was under $75...I did a little trading for the aluminum material. I personally spent over 120 hours in the design and fabrication of this project, and my dad had somewhere between 40 and 60 hours in it. There's a VERY good reason Givi gets the price they ask for a luggage setup!
Thanks to all who contributed ideas to this project. I'm glad it's finished!
The mounted bags.
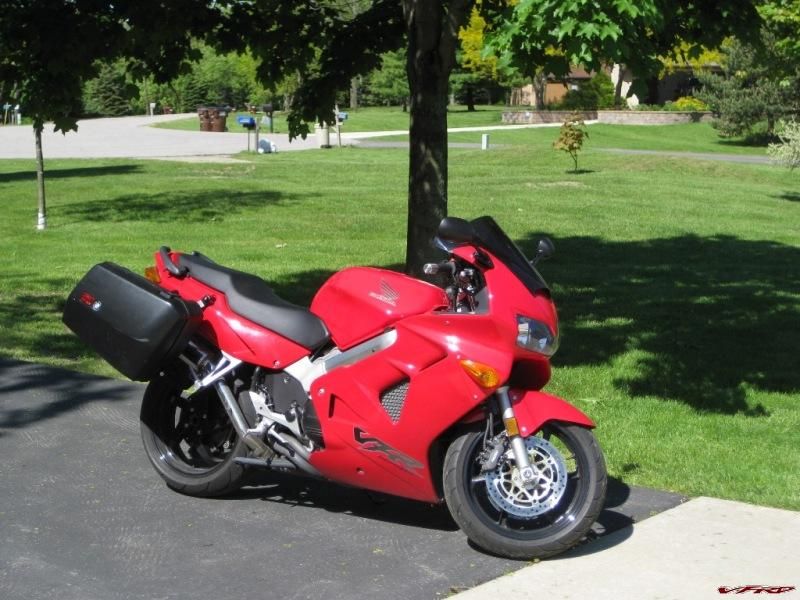
IMG_1111.jpg
That's a big ole fat azz!
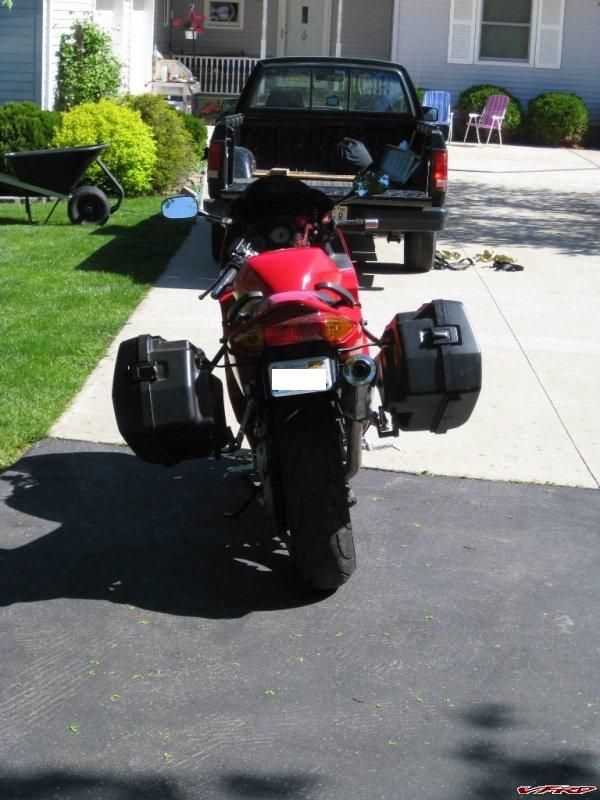
IMG_1114.jpg
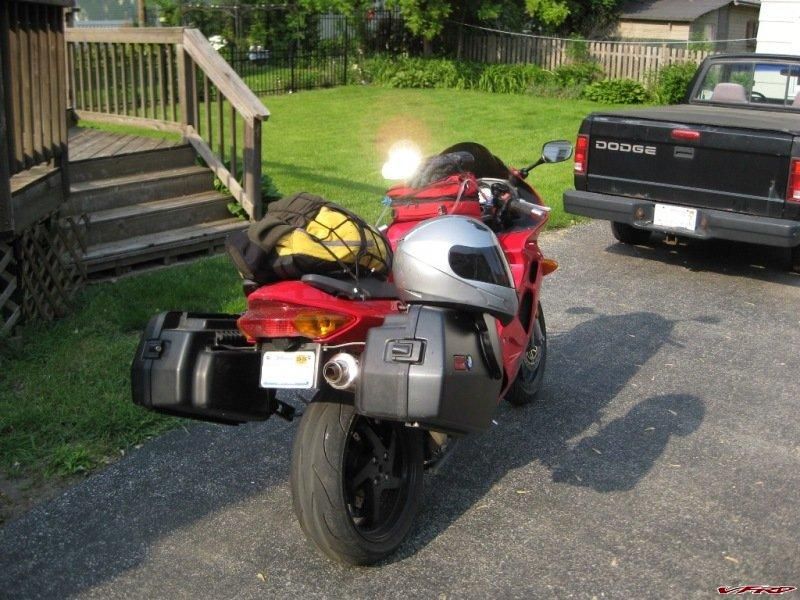
About to depart for a Lake MI circle tour.

IMG_1119.jpg
Safe at home after soloing around the lake.
IMG_1200.jpg
-
Time to knock the dust off this thread! It's been too long since I've worked on this, but I'm back at it. Reason being, I plan on doing some motorcycle camping this summer, and I'll definitely need some luggage for such travels. Considering the cost of a Givi setup, this is the way I'm going.
So as a status update, when I left off I had reverse-engineered the portion of the BMW bracket that attaches to the bag, and have not designed the portion that attaches the bracket to my bike. While I've got it apart for a rear shock upgrade (amongst other things) I'm taking some measurements and looking at mounting points. Right now I've got four places identified:
1 & 2: Rear passenger handle mounting holes
3: Seat cowl/rear cowl bolt hole
4: Rear passenger peg pivot. I think I can use this by replacing the clevis pin with a shoulder bolt.
Thoughts? Questions? Suggestions? All are welcome. Hopefully I'll have a more complete design by next weekend. Today I'm making measurements on the bike so I can make a CAD model of the mounting point locations. Once I've got that, I can place the bracket CAD model (shown above) near the bike, and then fill in between with bracket

-
Hi all! I've read through this thread a couple times and would like to do this mod over winter. I have a '99 VFR that is all stock as far as this mod is concerned. I do have a couple questions though:
929 questions
The 929 shock reservoir is nice and far from the exhaust, but does it require trimming the battery box? It sounds like yes; can anyone confirm, or perhaps tell me how much the battery box needs to be trimmed? I don't really feel like trimming my battery box.
Are the compression/rebound adjustment screws accessible when everything's installed?
954 questions
The 954 shock reservoir sits very close to the exhaust (less than an inch) but this might not be a real problem.
The 954 spring is stiffer than the VFR/929 spring, yes?
Does the 954 shock require any bike modification other than the upper mount?
Are the compression/rebound adjustment screws accessible when installed?
-
Well, my new r/r came in yesterday from GDL Cycles. It ended up being $120 + shipping. They claim it's a Rick's regulator, but I have no way of verifying that, and Rick's claims they don't sell to other retailers. Anyhow...
I put it in, started the bike, and after a few seconds it ramped up to 14.6 ~ 14.7VDC. After about 10 minutes of running, it had settled down to about 13.9 at idle, and 14.2 ~ 14.4 at 5k RPM. Looks like this solved my problem.
So I now have a rideable bike. The only question I have now is, how long will this r/r last? I really need to get prepped to do an R1 R/R conversion for the next time this one goes. Also, next time I go to my parents' house I'll mill the old r/r down and take a look inside.
-
Pinnage? This is a nice and easy read/how-to.
Really? Thanks Travis! I think the Electrosport link I posted does a better job, and is more thorough. The only difference is that my writeup is 5G VFR specific.
-
2 a set of ducts that will keep the heat from the headers and the engine block from 'pre-heating' the cooling air that get flows through the rads.
Probably the best (but not the cheapest or easiest) way to keep header heat out of the engine compartment is to have the headers ceramic coated. I know JetHot coats the inside and outside of the tubes, so you get a double wall of insulation.
Alternatively, you could use asbestos header wrap tape to insulate the headers and keep the heat out of the engine compartment, but I wouldn't recommend it. Several people have told me of their header wrap experiences that ended badly. Basically, the pipes get eaten from the inside out since the heat can get into the pipe but can't escape to the outside, which drives up the temperature of the pipe wall. Ceramic coating prevents this by having an insulating layer on the inside of the pipe.
Of course, either method requires pulling the headers off your bike, which would make it a winter project for me.
-
I might be interested in that. Let me replace mine, then open it up and we can talk about sending it to you.
Ricks backorder is now at least another month....thats where I get the ones from that I sell.I have a guy I know who builds R/Rs who is looking for dead units to use for development. If you haven't junked your old one, and are planning to, I would like to pass it on to him.
-
Here I was thinking I'm clever. Electrosport already has this written in a nice tidy PDF:
http://www.electrosport.com/technical-reso...sting-guide.pdf
-
Background
I have a ’99 VFR with about 8,000 miles on it. A few weeks ago I found out the battery wasn’t charging while riding…the tip-off was slow cranking when I went to start it after a short ride.
Since I bought it (August 2007) I have not done anything to it electrically…no battery replacement, no r/r replacement or anything. I don’t know the age of the battery, but it checked out fine (I’ll get to that later). As far as I know, the electrical system hasn’t been touched. I don’t have any aftermarket accessories on the bike, save for the battery tender.
To check the electrical system I bought a cheapo DVM from Radio Shack and wired it to the battery (fused, of course). It plugs into my Battery Tender connector, so it can be removed easily.
As mentioned later, I wired a cheapie Radio Shack DVM to the bike. My main multimeter is a Fluke 88, which I use for everything except battery voltage while riding.
About me: I’m an automotive mechanical engineer working for a large tier-1 supplier. I’m one of a handful of mechanical engineers in a mainly electrical engineering building, so there is a lot of good advice to be had from people I work with. Normally when I tell them the problem I’m trying to solve on this bike, they’re shocked (no pun intended) at how bad the r/r’s are (hmm…try saying that one out loud).
Electrical Checks
I’ve put these in the order that I should have done them, rather than the order I did them in. The first step was to wire in the DVM, and then I doubled up the red and green wires coming out of the r/r (I have a 7-wire: 3 yellow, 2 red, 2 green) by going directly to the battery using buttonhook joints. Again, I put an inline fuse on the positive.
I have to give big ups to Chris2992, as his stator check post was an enormous help when diagnosing this issue.
1) Battery check: I took the battery to a local motorcycle shop. I’ve never had them do work for me but the guy seems knowledgeable, he’s been doing it as long as I’ve been alive, and he helps me out. Anyhow, he put a gigantic fattie resistor on the battery (which I had pulled off the Battery Tender) and checked voltage. Battery voltage dropped by about 0.25V when the resistor was hooked up. According to him, that’s a good battery. I’m with him on this, since the voltage didn’t drop much when I left it off the Tender for a week while I was on vacation.2) Voltage check: Battery voltage when I pull the Tender off is about 13V (12.96VDC). When I start the bike, voltage goes up to about 14V for a minute or two, then drops to 12.0 ~ 12.3V…obviously not enough. My theory at this point is that the reg/rec heats up quickly from all the extra current coming from the stator, and that causes a fault (short or open circuit) within the r/r. Just a theory at this point.3) Regulator/rectifier check:a. Circuit diagram: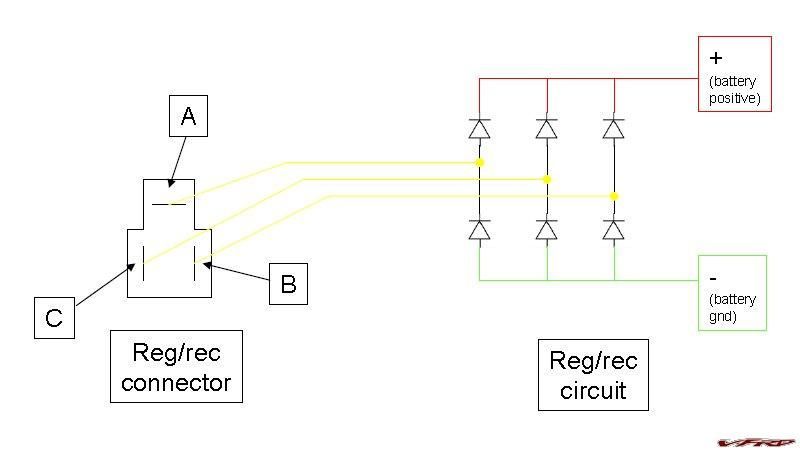 07-06-2008 - reg-rec circuit.jpgI’d appreciate it if someone more knowledgeable about these things than myself checked my circuit diagram. Based on what I was told by an electrical guy at work, I think the above is how it goes.b. Talking to the same sparky at work, he suggested I do a diode check on the r/r. For this I completely disconnected the r/r, set the Fluke 88 to diode check, put the black on the stator wire I wanted to check, and the red on the green wires coming out of the r/r:Bottom diodes, fwd bias Top diodes, reverse biasi. Leg A-gnd: 0.013 VDC Leg A-pos: openii. Leg B-gnd: 0.462 VDC Leg B-pos: openiii. Leg C-gnd: 0.500 VDC Leg C-pos: openc. Diode check part II. For this I simply reversed the red/black leads, which reverses the bias on the diode you’re checking:Bottom diodes, rev bias Top diodes, forward biasi. Leg A-gnd: 0.500 VDC Leg A-pos: 0.012 VDCii. Leg B-gnd: 0.500 VDC Leg B-pos: openiii. Leg C-gnd: 0.500 VDC Leg C-pos: opend. I also checked resistance, just for esses and gees:i. Leg A-gnd: 12.8 ohm Leg A-pos: openii. Leg B-gnd: 129 Kohm Leg B-pos: openiii. Leg C-gnd: 1.564 Mohm Leg C-pos: openNow we’re getting somewhere! One of these things doesn’t look like the others…Leg A has a much lower voltage during the diode check, and much lower resistance to ground. I’m guessing the diodes between leg A and ground and positive are smoked.4) Stator check: With the engine cold (about 75deg.F) and the r/r still disconnected, I checked stator coil resistance, then checked each coil for shorts to ground.a. Each coil to ground resistance measurement showed open. Damn straight!b. Resistance between all coils measured 0.2 ~ 0.3 ohm. (spec is 0.1 ~ 1.0 ohm).5) Stator check, part II: With the r/r disconnected and the engine cold and idling, I checked AC voltage off each stator leg:a. Leg A-gnd: 19VAC @ idle, 60VAC @ 5k RPMb. Leg B-gnd: 19VAC @ idle, 60VAC @ 5k RPMc. Leg C-gnd: 20VAC @ idle, 63VAC @ 5k RPMThese all seem reasonable to me.6) Stator check part III: With the r/r disconnected and the engine warmed up to about 170deg.F, I again checked AC voltage off each stator leg:a. Leg A-gnd: 19VAC @ idle, 60VAC @ 5k RPMb. Leg B-gnd: 19VAC @ idle, 60VAC @ 5k RPMc. Leg C-gnd: 20VAC @ idle, 63VAC @ 5k RPMNo change due to temperature. Maybe the stator needs to get hotter than that to cause a problem, but I consider it good for now.7) Stator check part IV: I pulled the stator cover off and found that, like almost everyone else on this board, my stator coils were a dark brown around 2/3 of of the stator’s circumference. I’m going with what Duckeater said, in that a dark brown stator coil does not necessarily mean a short. If my new r/r fails in short order (again, no pun intended) I’ll replace the r/r and have Rick’s rewind my stator coil.
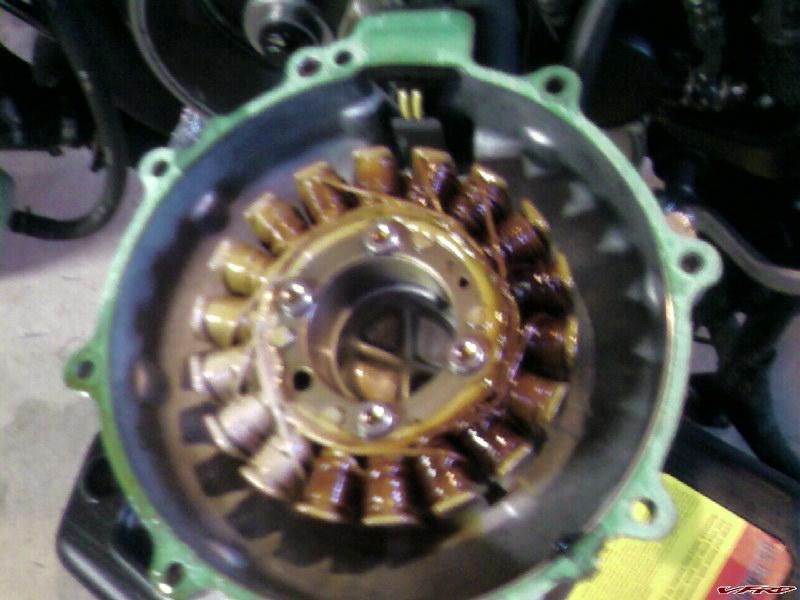 Photo-0107.jpg
Conclusion
Replace r/r. Unfortunately, Rick’s has a 3 week backorder and I had to go to fleabay. Had I to do it over again I would have spent the extra $10 and gone to wiremybike.com. Anyway, when the r/r comes in, I guess I’ll see if the diagnosis was correct!
Once I get the new r/r installed, I plan to take the (assumed) bad r/r to my dad’s shop and mill away the aluminum case until I find diodes. I’m gonna guess that both diodes on Leg A are smoked.
-
I'm having similar issues to what Chris was having, except my charging voltage is 12.3V. I'm replacing the reg/rec since the troubleshooting diagrams point to that. However, my stator looks JUST LIKE all the brown ones on this forum: dark brown 2/3 of the way around the circumference. And yet it checks out fine...
So my question--is there anything to be gained by checking current through each of the stator wires? I've checked voltage, and I get around 20VAC at idle, 60VAC at 5k RPM, both on a cold engine and with the coolant up to 170ºF. It seems that measuring current would only give you as much information as checking the voltage, but I wanted to throw this idea out there. Can any electrical engineers chime in?
-
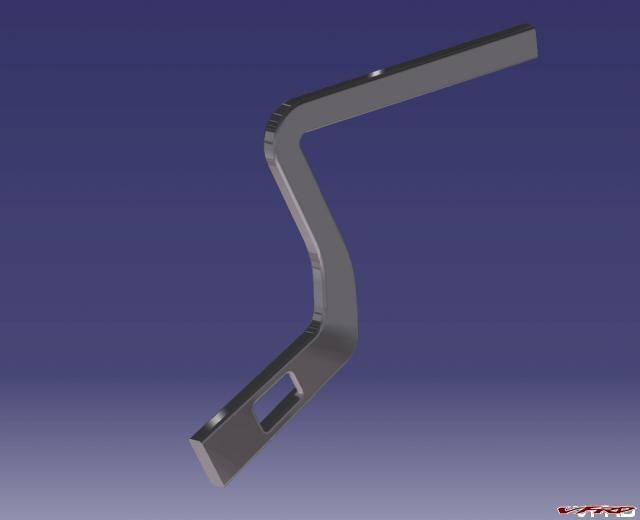
Alrighty, today I worked on the CAD model to split it into three pieces. Screen grabs are below. Again, next step is to make a cardboard mockup and fit it to the bike. The design so far only mounts to the bags--I haven't figured out anything yet to mount the brackets to the bike. Once that happens, I can kick out some drawings and start making the first bracket!
Oh, also, when I broke the model into three pieces, I added chamfers for better weld penetration...that's what the chamfers are for.
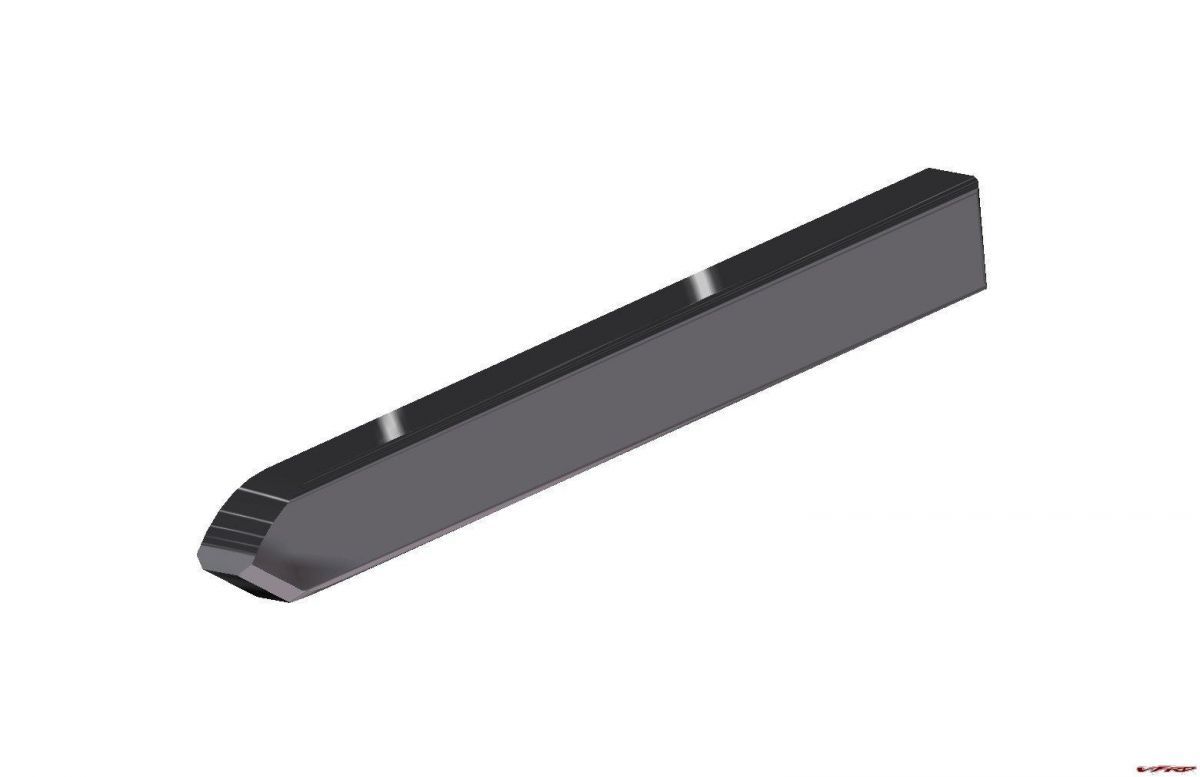
Top mounting rail
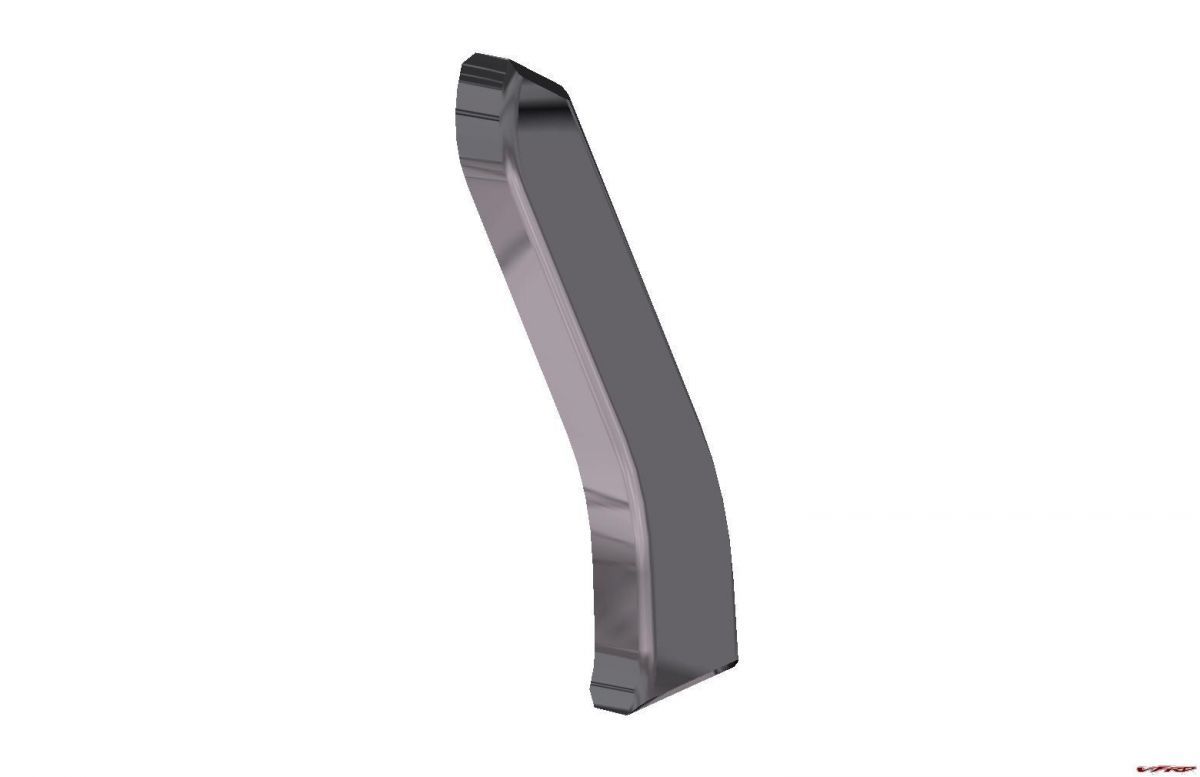
Mid rail
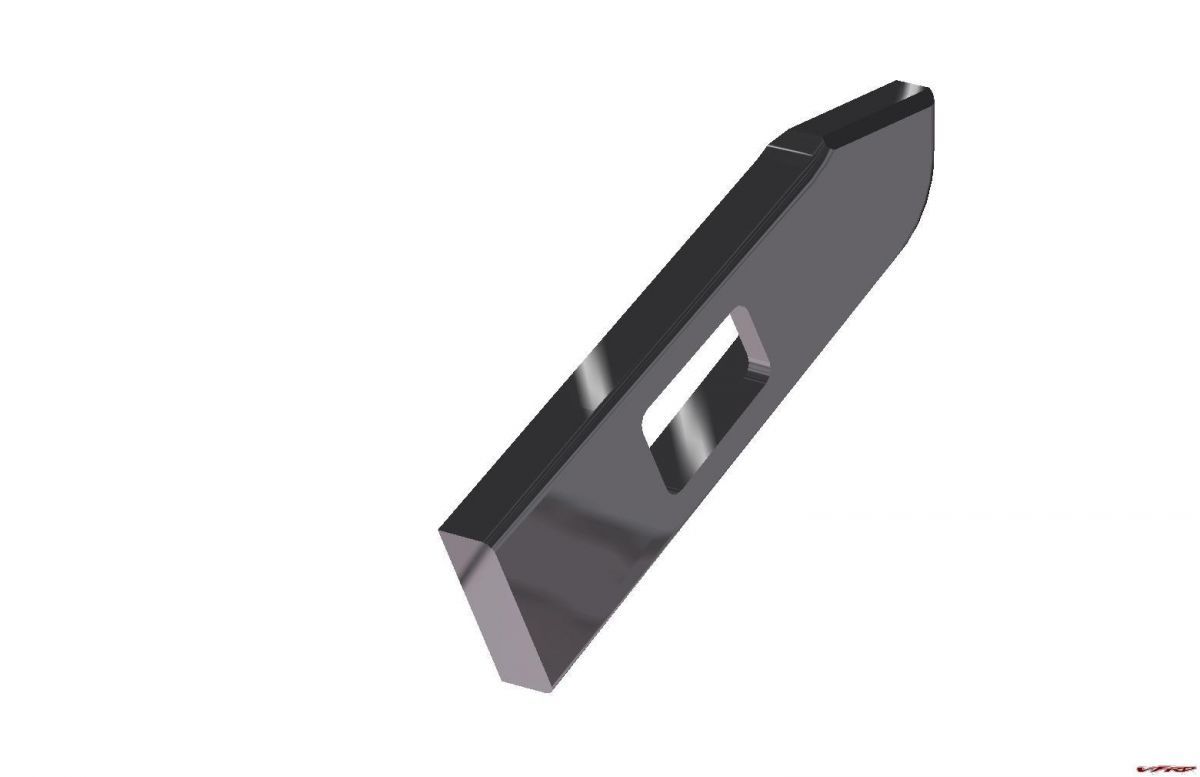
Lower rail, including feature for the bag lock to clip on
-
<snip>
So thats about where I am. Comments, critiques appreciated.
Travis Gintz
1986 eVFR
Cool project, and ambitious :thumbsup: Not my cup of tea, but it should make for an interesting ride. Since the tank was rusty inside, did you gut the bottom piece for some packaging space? Seems like using just the top stamping would give you some room for...stuff. And shave a bit of weight.
Can you program your PDA to pipe V4 exhaust and cam gear sounds to a set of headphones? :unsure:
Oh, one last thing: Would a VTR-250 be a good place to start? Seems like that would be a lighter bike to start with, and the rear wheel would be set up for a smaller (ie, more efficient) chain drive. What are you doing for final drive, btw? Stock-type sprocket? Toothed belt? Toothed belt would be the cat's azz.
Good luck! And I can't wait to see youtube videos of this thing!
-
What was the price and how was the install?
The price is 169.95 but i had a gift certificate for $140. I haven't installed them yet but it looks very easy. If I had it all over to do again without the gift certificate and all my own monies I probably would've gotten the DiamondStar modulator. i had that on a F4i and it worked great. A little more work for the install and there is also a switch that can turn it on/off and three modulation modes. I think Kisan is so expensive because it is so compact and convenient to install.
What makes the DiamondStar more difficult to install compared to the Kisan? For the $100 it would save, it seems like DiamondStar is the easy choice.
However...my concern is that if I flash my high beams or toot the horn quickly, that can the settings on the DiamondStar. Maybe not a big concern when considering the price difference. But since you have experience installing both types, what are the big differences in installation?
edit: I'm going off prices of $70 for DiamondStar and $170 for the Kisan P115W-D. This is the right one for 5th gens, right? Not the P115W-DHL?
-
Cool, sounds like we have a lot in common. I get to use Catia V5 at work too(version 17, I think we're up to) as well as SurfCAM, Cadkey, Autocad, Pro/E, AS3000, and some others. I think my favorite though, is Scan2Cad, it allows you to scan an image and convert it from raster t ovector, so basically I can scan an image, the nturn it into a waterjet program, and cut away. Then take it to a mill, lathe, press brake, assembly dept, my tig station, etc. My problem lately, though, is that we're growing real fast and finding a machine free that I can hop on and use is getting tough. Like only if I come in on a Saturday or Sunday afternoon tough. <_<
Yessir! I first picked up AutoCAD at age 13. Couldn't do much with it for awhile, but still. My last job I got spoiled as we had designers to do the CAD work, and engineers basically told the designers what to design. Now I'm in a position where I have to do my own CAD work, and when I have to fumble through a design I feel like a bear cub with oven mitts, ya know what I mean? Also, at my current company, I don't yet feel comfortable requesting gubmint jobs, whereas the last place I worked didn't really care as long as you didn't break the equipment or blow yourself up doing it. Fortunately my dad has an awesomely stocked garage workshop and a lot of good fabrication skill, so I've got that going for me. Trouble is, his garage is 330 miles away. But at least I can do design work while I wait...
-
women are so unjust. they complain when a thread goes sexual (and offensive to them) . yet turn around and use that same sexuality to their own advantage in situations just specified. had the cop acted on the sexuality he would have been arrested for sexual harrassment. maybe men should try the above method in our daily lives.... perhaps with the grocery store check out lady we can pad our jeans and get a discount on milk. :beer: :unsure:
im done ranting now and i feeeeeeeeeeel much better!
Hehe, can I just say that I do rant about the same things? :beer: In america, I have encountered countless number of women who are full of controversies. Those women make me want to scream and tattoo on my forhead "I am not with them". They expect to be treated in any matter as men, yet they refuse to split the check on date, yet the like to be 'taken out'. They want the same job and responsibilities, they feel offended if someone regards their gender, yet, couple hours later, they feel offended if they are not treated like a princesses. I am so happy we don't have them in such large numbers back home...
Let me just say, I think women deserve the same treatment as men. They deserve the same job, the same opportunities and same respect. But each page has two sides. They should also offer the same responsibilities, ie. be able to take care of their own crap, not to expect everyone to do things for them, be able to pay for their expensise, split the check on the date, make sure that if they want to be treated as princesses, they treat their men as kings too ..
However, we have to understand that men and women are different. We each have different strengths and different weaknesses and we should not pretend that we are alike. We are not. We can do different things. But we can use our differences and create great cohabitation!
High five on that!!! Equal means equal, not just when it's advantageous!!! There isn't a bigger turn-off than 'princess syndrome' in my opinion.
Rant over, on to the small bit of contribution I have: Regarding padded bras, the padding in them isn't very stiff, as compared to elbow/shoulder armor. My thought is that if you wear a padded bra and buy your riding gear to fit over it, the bra will compress with very little force, essentially acting as an air gap when it comes time to, ahem, 'use' the jacket. We all know that a close-fit with your protective gear is a good thing in order to prevent the jacket from twisting around as you skate down the road at whatever speed. So my $0.02, skip the padded bra if it means you can go one jacket size smaller and fits you better.
-
Hey, looking good!
If I were you, I'd go with cutting and welding. Cheaper than having them cut on a waterjet, and I'm sure they'll be strong enough. Your dad will tig weld them, right?
What software did you use to draw up the parts, the screen reminds me of Catia?
Yes, my dad has a heliarc (TIG) and he knows how to use it! I can't weld for crap myself, mainly because he's always done my welding for me.
Well, I might be able to get waterjetting done for free, or laser-cutting, but I'm not sure if laser can cut material that thick. I know a guy :thumbsup: But you're right, I think cutting and welding would waste a LOT less material than cutting each from a solid piece of plate. I don't even want to know what the raw material would cost if it were cut from one piece...but wouldn't that be sweet?
Also, cutting and welding would make fluting the pieces easier...I'm thinking a ball end mill to scoop out some material where it isn't needed. The BMW bracket is glass-filled nylon, I'd estimate 20% glass. So aluminum is big-time overkill. Maybe I can skeletonize a bit rather than ball-end milling.
But again, I'm getting ahead of myself. Next task is to decide how to fill in between my mounting points on the bike and the parts I have now. For bike mounting, I'm doing something like what vman932 did:
http://www.vfrdiscussion.com/forum/index.php?showtopic=38329
edit: Yes, we use CATIA V5 at work, altho we're still transitioning off of Pro/E. Figured this would be a good CATIA skillz-building exercise...for work, ya know? :thumbsup:
-
Cool. Keep us updated on the progress. :thumbsup:
Thanks! Will do...but progress will be slow. For now nothing is going to happen til the next time I see the bike. That could be a few weeks.
-
Alright, I've done a bit of work during Christmas break. I started an album of this project:
http://www.vfrdiscussion.com/forum/index.p...&album=3554
My plan is to cut these out of aluminum plate, then put the small bend in it. If I can get them water-jetted, I'll do that, but it is more likely I'll get my fair share of band saw time. The bend is not visible in these photos; I measured it at 4.2deg. Anyone know where I can get 21/32" or 17mm aluminum plate on the cheap? :unsure:
Alternately, I could cut each bracket out of 4 pieces of aluminum bar stock, miter-cut them, and have my dad weld them together. That would likely be sufficient for this project and save quite a bit of material and cutting. Maybe I'm getting ahead of myself here, but has anyone ever had something anodized? I'm curious what it would cost to have these anodized black or dark gray. That would be a nice tough finish that would resist corrosion and look pretty spiffy.
On my next trip home I plan to make this part out of cardboard and start work on designing the portion that mounts this part to the bike. Comments welcomed!
[edit to add pics]
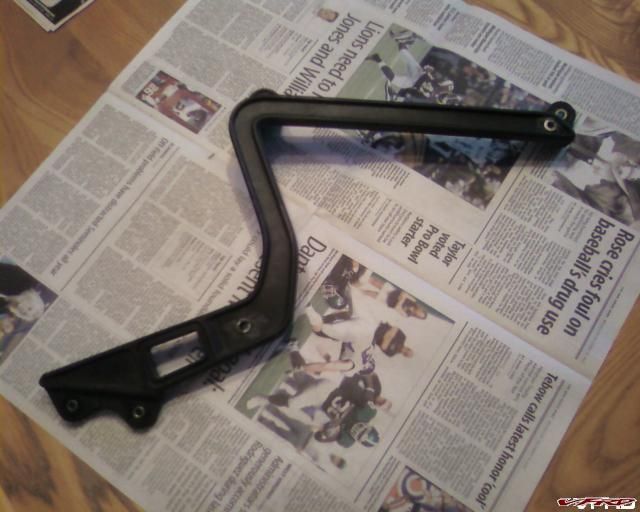
LH side BMW bracket (it's a little greasy, hence the newspaper)
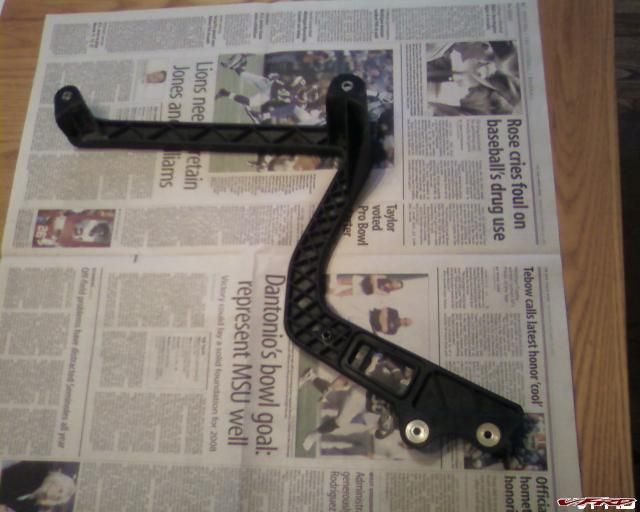
Same bracket, inboard side.
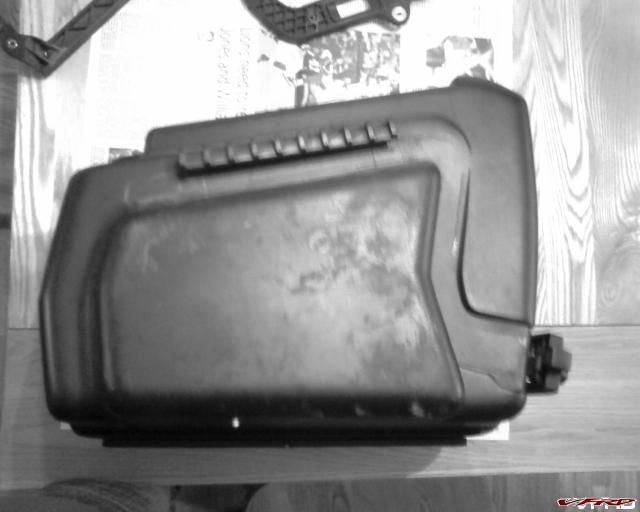
Inboard side of LH bag. Note locking mechanism on bottom RH side and mounting finger/rail across the top.
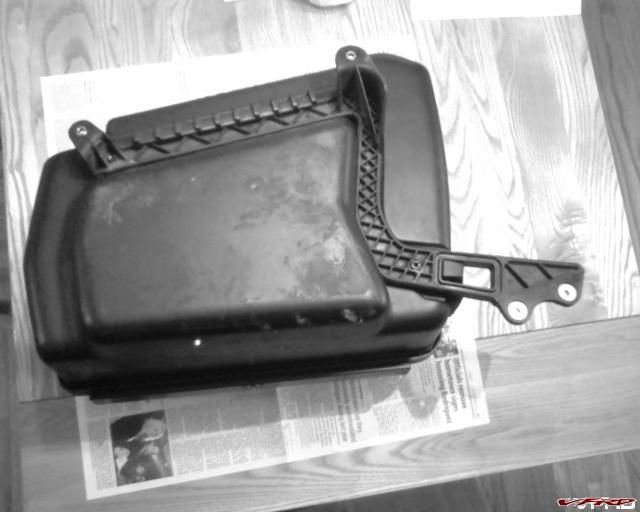
Bracket mounted to bag.
Outboard side of bracket CAD model.
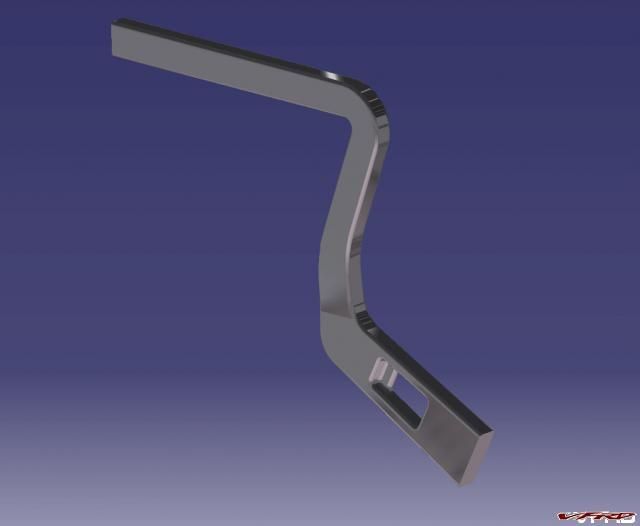
Inboard side of bracket CAD model.
-
My experience, if you not only want to be warm but stay warm, stay away from cotton. Layer with synthetics and if ya add heated gear, ride'n below freezing is no problem...Other than traction. :goofy:
:beer: on that!!! I don't have much experience riding in cold weather, but my camping experience tells me that a single layer of cotton will make you freeze your tail off!
Layer with synthetics, silk, or wool, and you will be much better off.
-
Thanks, man. There's a lot of good info here. I've also looked at the Hepco & Becker site; they make brackets for my bike that look very similar to what I need.
Also, I'm home now and have looked at the bags; the name on them is JDEHA, a German company. They didn't have anything on their website as far as their products, so no luck there. But I think a set of racks will be nice and simple to make.
-Rick
-
OK, this thread been opened before, but here goes.
Yes, it can be done, you will need the BMW mounts. You will need some 1/8" X 1" stainless flat stock for making straps to your mount up points. A little patience, a good sharp hacksaw, a drill and some bolts, and you're all set. I usually use the series from the 80's, but it can be done. There are some bosses already in the VFR tail section for bolting to, so it can be easy. I made mine where I can unbolt the mounts and remove them when not in use without removing the tail.
So, good luck.
Larry
VFRrider
Ah, thanks. I searched BMW and didn't find anything...time to hit up the archives. Tools are no problem; my dad has a well-equipped shop in the pole barn and is one of the finest fabricators I know. Did you use the bosses for the grab handles, or are there other bosses back there?
Sorry for all my questions; the bike and bags are about 5 hours away from me.
-Rick
edit: I looked for archives to search, but didn't find anything. Can you post pics of how your luggage is mounted? Thanks for the information.
-Rick
-
Hi all,
My dad just picked up a mid-'90s BMW K1100, I think an LT. It's not an R. The bike came with three sets of side bags, and at least two trunks, all of which have BMW logos on them. I haven't seen them yet, but my dad said there are no markings other than BMW on them.
Does anyone know if these were made by Givi or some other aftermarket luggage manufacturer? If I can get these to bolt up to my VFR I'll have a set of luggage on the cheap!
-Rick
Bmw Luggage On A 5th Gen?
in Luggage
Posted
Thanks, man! My dad did the hard parts...welding and the more tricky parts of fabrication. It wouldn't have happened without him!