(repost since the db died and the original disappeared)
Hello, my name is Damon, and I'm now a track addict.
I know it's the middle of October, and summer is long gone. But after 2 days in the warm Vegas sun, it was like summer vacation as a kid all over again. I've been home for 3 days, and I'm still geeking out over the session. Oh yeah, my quads are still fracking KILLING ME. But it's a good sort of pain.
The first thing Nick Ienatsch said to us on the van ride to the school was, 'Trust us', i.e. whole heartedly trust the instructors. The first thing Freddie Spencer said to us at the begginning of class was 'Trust me: you are going to unlearn everything you know about track riding and riding in general. There's a reason why I was a three time world grand prix champion'.
I am now a true believer in what Freddie and his instructors teach. I get it, though I have a verrrry long way to go in executing it, but I do get it. Yeah, a bike can/does steer with counter-steering. Before I took this class, I primarily rode with counter-steering force first, body and weight distribution second, and maintaining lean angle through counter-steering force.
But after two days; 2 days of watching and listening to Freddie, Nick, Jeff and Ken Hill talk about body/head position and trail-braking; 2 days of painfully forcing myself to unlearn my riding style and rebuilding it from square one; 2 days of building upon each new skill set, and at the end feeling it all start to come together and saying to myself 'Holy sh*t, this is how it's done!'
In my class, there was a fellow student who had taken Code's class earlier this spring. The guy I sat next to in the van ride over and in class had taken Pridmore's class twice. On the last day in the van ride back to the Orleans Casino, I asked both of these guys "Well, what do you think?" They both said all of the schools have valuable skills to teach, Pridmore and Code are great guys personally. But Freddie has got it, they felt safer with the skills presented by the Spencer instructors, and felt like they could truely reproduce consistent lines and times with the techniques presented.
I get it now. I just had to experience it for myself.
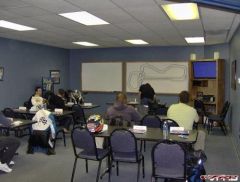
Class room at the Vegas school.
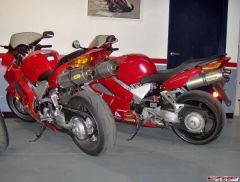
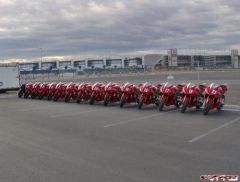
Just an awesome site seeing them lined up like that, 05 and 06 CBR 600RR
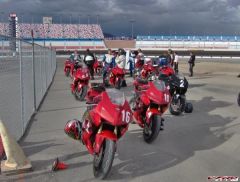
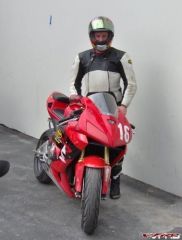
Me on #16, I gotta get one of these things...
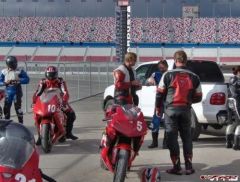
Break and water time in the pitt. Chance to talk with the instructors and stretch those aching quadriceps
Day 1
At 7:30 am, instructors Nick Ienatsch and Ken Hill meet all of us at the Orleans valet pick-up. Class has now begun. After introductions are made, we get our gear and semi-nervous selves loaded on the van and head out to Las Vegas Motor Speedway. For a few of the students, this is their second, third, and even fourth time with school. And for a couple of us, it's our first time ever on a track. In the van, Nick starts with overview of the class, rules to follow and a history of the school. We arrive at LVMS, and the van heads out on to the north end of the Outside Road Course. Instructor Jeff Haney is already at the school, and rides out on a 1000RR. We visit each corner in the van, and Jeff demonstrates the correct and incorrect executions of each corner. During this demo, Nick provides narrative on the skills we'll be learning, and get us engaged by picking out the correct and incorrect techniques.
Back in the classroom, Freddie teaches the first hour of the class going over our mental attitude, relaxation and focus. He emphasizes moving away from having a dependency on hard upper body counter-steering and sustained lean-angle, and more on body position and minimizing max lean angle time. Nick then introduces our first set of skills: body and head position, and zoned execution of a corner. We go over the concept of trail-braking and how it helps steer the bike, along with body and head position. He draws out the line to follow on the north track, and identifies the areas where we'll be implementing trail braking and the stages of body position.
Track Time
We get geared up, and our bike and instructor assignments for the first half. Our warm-up laps are used to follow the instructor slowly through the line, cones placed at apexes, and practising an exaggeration of the body position and trail braking up to apex. We pick up the pace and start experimenting with trail braking, and what happens with a too early or too late of an application. More laps where each student swaps pack position and spends time following the instructor line, receiving hand signals to correct our technique through each corner.
What is truely amazing to watch with the instuctors, is how extremely little force they are using for counter steering. During our right hand corners, they are actually reaching over with the left hand and operating the brake and throttle, and giving us hand signals with the right hand. While waiting in the airport for the flight home, I read this months article in Sport Rider about the school, the journalist points out the same thing.
We do cone drills emphasizing body position and bike position coming out of a apex. We do exaggerated trail braking drills with Jeff and Ken.
Break for Lunch, then move to the South Outside race course. Warm up laps to learn the track, more practise with trail braking, body position, smooth throttle and brake control. Now the video taping begins. And when the video camera's come out, old habits kick-in again. We wrap-up with critique of each riders laps, and learn from all of our collective mistakes.
Day 1 Evening
Jeff Haney has invited us to the buffet dinner at the Orleans for an extra Q&A session, and just general hanging out. I was a little intimadated by Jeff at the start of the day, he has kind of a tough New York Bronx look to him. But by day 2, I end up spending most of my lap time with Jeff, and I really got to like him. All of the instructors are very articulate, fantastic teachers. They are strict when they need to be strict, and always supportive when you get it right.
Day 2
Freddie starts the class with Q&A about areas we had problems with on Day 1; particular corners giving us problems, stressing the importance of getting trail braking down, understanding the apex and not missing it. Freddie also talks about how to overcome and correct mistakes, how to deal with bike geometry getting out of whack and how to correct it. Nick then takes over discusses our new track, the Inside Race Course at the Nascar complex. This particular track got beat-up in a rain storm last week, it's still a bit dirty. All the more reason to limit lean angle time and get the body and head position right.
Track Time
Same bikes, new instructors. Yesterday I was with Ken Hill, today I'm with Jeff Haney. The instructors lead their groups with the warm up laps, cones are placed at the apexes, and we practise more body position and trail braking. We then form two groups, one group with Jeff doing oval work with body position adjustment through the apex, both left and right directions. Second group does apex work with Nick and Ken on the other half of the track. Each group gets feed back from the instructors, we then switch.
Video tape time, I feel a little jittery, but I actually improved A LOT on this run. Ken provides me feedback after the video taping on the radio. During the video taping when it's not our turn to be taped, we get free time to ourselves to practise laps at comfortable speeds. Break for Lunch.
Freddie was watching us during the video taping runs, provides us with his feedback during lunch. We watch the video and get feedback from the instructors, and also watch the instructors video session of what the correct line looks like, and what a bad line looks like. Pretty cool watching Nick exaggerate the bad line, man that guy can ride. And so can Jeff and Ken.
After lunch, do warm up laps and we do hard braking drills, in between rain spurts. Break into two groups, and each group gets the track to themselves with the instructors. Do a couple of warm up laps, then all of the instructors lead each student watching with the mirrors and providing feedback at higher speeds. At this point, the epiphany occurs and I realize this is what's it's all about. There wasn't enough day light left for the two-up ride with Freddie, but that's okay, more track time for the rest of us.
Head back to the class room, get final feedback and graduation. My quads are seriously killing me, I'm afraid to sit down or walk down stairs. But this grin on my face makes the pain all worth it. Best 2 thousand dollars I've ever spent, and I'm going to do it again as soon as the bank account makes it possible.


")


 It's so cool seeing how perfect form was just text book execution to the greatest riders of all time. Thanks for sharing the pic!