


toro1
-
Posts
470 -
Joined
-
Last visited
-
Days Won
2
Content Type
Forums
Profiles
Gallery
Blogs
Downloads
Events
Everything posted by toro1
-
From the album: The New Mods
-
From the album: The New Mods
-
From the album: The New Mods
-
From the album: The New Mods
-
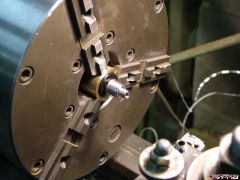
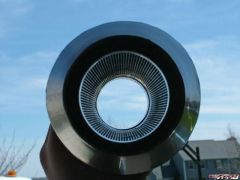
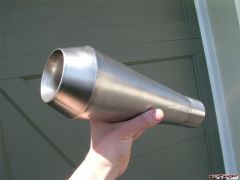
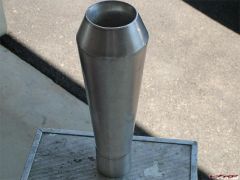
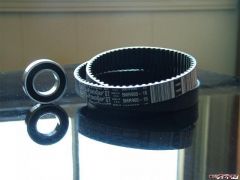
Okay, time for some updates. I've got the crank interconnect and pulleys all designed, and they should be well underway by next week. I'm having my dad's shop cut the teeth and splines, so the price should be right :D Here are some shots of new items that have arrived. First up is the belt and bearing. Not too exciting, but another step closer nonetheless. Also, I mentioned earlier that I was having a custom exhaust made, and guess what arrived yesterday... new_pipe.jpg new_pipe2.jpg straight_through.jpg The reverse cone muffler is the end piece of the exhaust. The first part consists of a stock VFR exhaust pipe cut at the muffler section and stuffed with a Car Chemistry 3-disk insert. To say the sound is awesome is a huge understatement, and it's completely unlike any VFR I've ever heard. I had Doug up at ARC Fabrication make it custom for me from a drawing I gave him. His work is awesome and his prices are great. Really nice guy, too. The pictures don't do it justice, it really looks like a factory race part when you see it in person.
-
From the album: The New Mods
-
From the album: The New Mods
-
From the album: The New Mods
-
Bearing for outer support, belt to drive the blower.
toro1 posted a gallery image in Member's Gallery
From the album: The New Mods
© ©vfdiscussion.com
-
From the album: The New Mods
© ©vfdiscussion.com
-
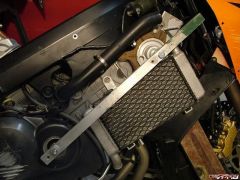
I realized that the next step to getting everything properly lined up, and getting some good brackets designed, was to rigidly align the blower with the crank. I figured out where the rotrex could be nestled, determined the center-to-center distance, drilled a piece of extruded aluminum, and bolted everything together (with the proper spacing, of course). Here's what it looks like: mockup2.jpg The question becomes, is there any way to get the radiator to fit behind the belt? mockup2with_rad.jpg Yes, but it's gonna be tricky. The tougher part is going to be getting the radiator to fit around the blower itself, and running the coolant hoses such that they do not interfere with the drive or the supercharger intake & air filter. Actually, the toughest part of this whole project has been making everything work without modifying (read: hacking off, grinding away, or welding onto) existing parts and/or the frame. I want this kit to be built so that if I ever need to go back to stock, nothing will be stopping me.
-
From the album: The New Mods
-
From the album: The New Mods
-
From the album: The New Mods
© ©vfdiscussion.com
-
From the album: The New Mods
-
From the album: The New Mods
-
From the album: The New Mods
-
Thanks for the warm welcome guys. Matt - that is indeed photoshopped. I seriously considered chopping the tail & changing the suspension (and still do), but I'd rather have more go than show, so right now, those mods are on the back burner. I am however making a custom exhaust, but unlike that picture, it will be a muffled reverse cone, so it should be much quieter and fit the lines of the bike (and stock tail section) better than the slash cut. Very scientific testing has taught me that a VFR sounds better muffled than not... I'm definitely looking forward to the stealth element the Rotrex will provide. Due to the internal design (it uses a planetary roller friction drive, not gears), it will be nearly silent while operating, and is also very efficient. The model I have can spin up to 150,000 RPM! Since it's centrifugal, the power delivery will be very easy on the drivetrain and very controllable with the wrist, and I'm looking to get a realistic 140-150 RWHP out of it when I'm done. I'll keep you guys posted with my progress. I've learned a tremendous amount of information so far, and can't wait to get this thing back on the road.
-
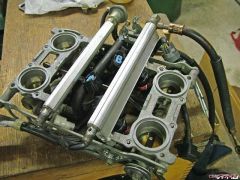
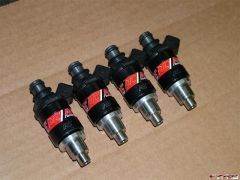
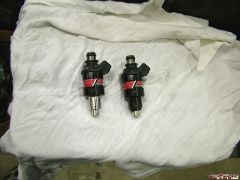
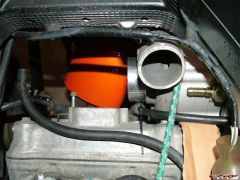
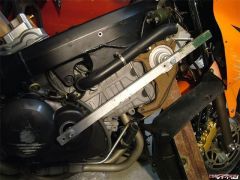
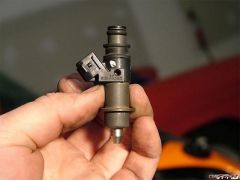
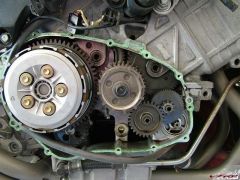
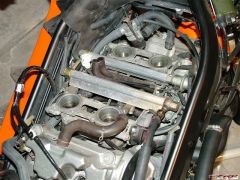
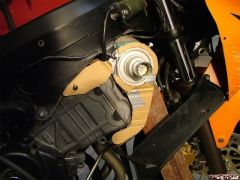
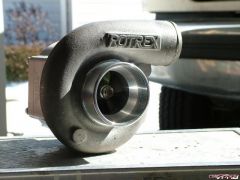
It's official -- Supercharger Kits are finally here. See post #113 for details, and be sure to visit www.aaperf.com for pictures, videos, and tons of information, including pricing. T H E B U I L D U P Background Info The following is a condensed version of the original 30 page, 889 reply thread of the same name. The amount of feedback and quality of discussion that took place was incredible for all those involved, but, unfortunately, made it very difficult to follow the buildup. Therefore, only the key steps remain - along with pictures and dyno results - with some video highlights linked here: > First startup video > Blower video > Dyno Results: > Dyno Pull #1 > Dyno Pull #2 (N/A Bike Comparison) -- begin thread -- rotrex.jpg Yes, it's a supercharger. Yes, it's going on my VFR. And yes, it fits. This story begins at the end of last year. Heading out for one last good ride of the season, I pull out of my driveway, wave hi to the neighbors, look for oncoming traffic at the stop sign, and look back straight again, only to become blinded by the setting sun. When I finally realize where the road is, I am happily greeted by the curb and end up dumping the bike right there in the street, effectively destroying months of hard work and the right side of the bike. You can see pre-crash pictures here. Completely disgusted by my utter stupidity, I put the bike out of sight & mind for a week, but my inner hot rodder doesn't stay quiet for long. I realize that because of the crash, I can do some things differently than I did before -- tweak the bodywork a bit more, build a custom exhaust, and most importantly, if I have to take all the body panels off again, why not add one of these: it_fits.jpg Thought I'd add a few new pics. If anyone has ever wondered what's behind your clutch cover, here ya go. inside_case.jpg The connector will bolt right where the "12" bolt rests and proceed out the timing cover (which will be modified to house a sealed bearing). no_airbox.jpg The image above is what everything looks like with the airbox removed. The emission controls and most of the vacuum tubes will be gone before long. Now to get those injectors out... basic_initial_mockup.jpg Finally, here's a shot of a very basic bracket mockup, a pre-beta bracket if you will. I'll refine it with some thicker material (particle board maybe?) before coming up with a CAD drawing of the final aluminum piece. By the way, if anyone does not yet own an official Honda shop manual, I highly recommend buying one :thumbsup:
-
From the album: The New Mods
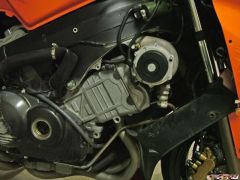
It fits! I actually knew it would fit before I ever purchased the unit, but it's still nice to see it on the bike.© ©vfdiscussion.com
-
From the album: The New Mods
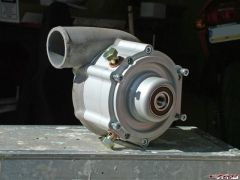
This is the smallest unit available on the market today, which makes it a perfect candidate for the tight confines of a VFR.© ©vfdiscussion.com
-
From the album: The New Mods
Yes, it's a supercharger. Yes, it's going on my VFR.© ©vfdiscussion.com
