Leaderboard


Popular Content
Showing content with the highest reputation on 06/17/2020 in all areas
-

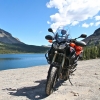
From the album: Summer 2012 Trip
2 points -
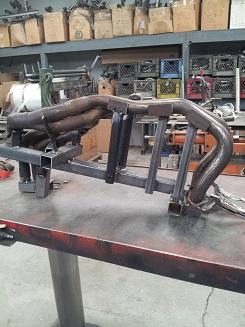
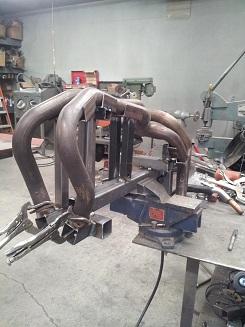
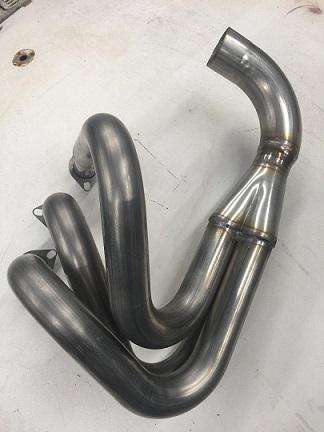
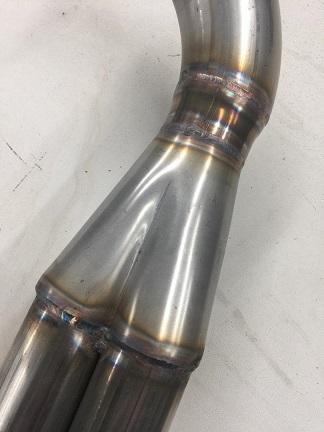
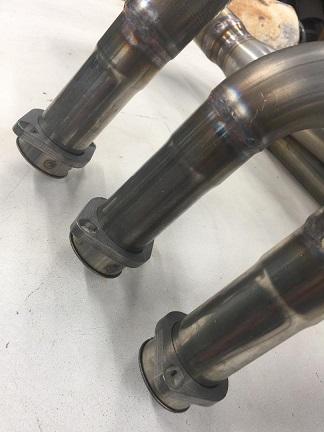
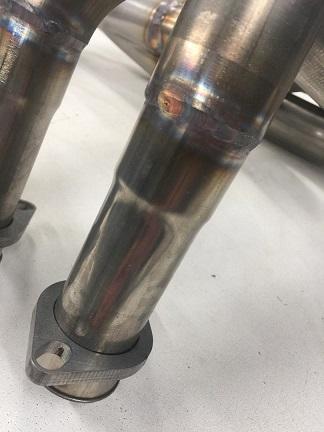
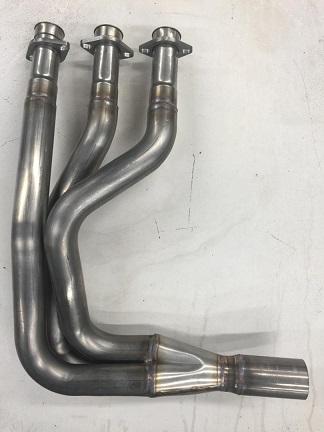
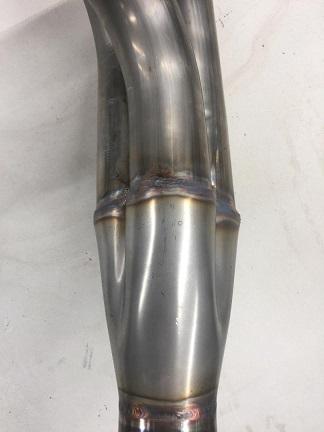
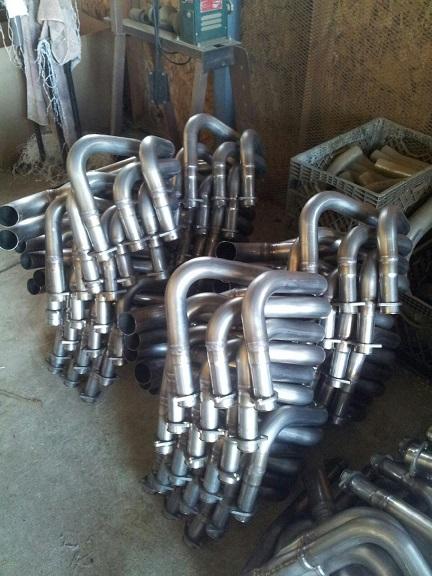
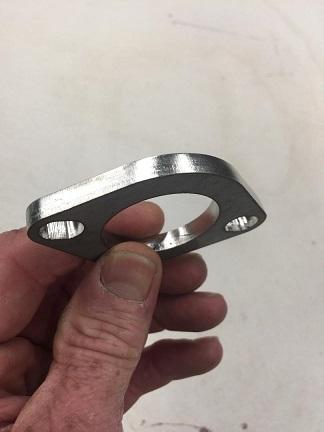
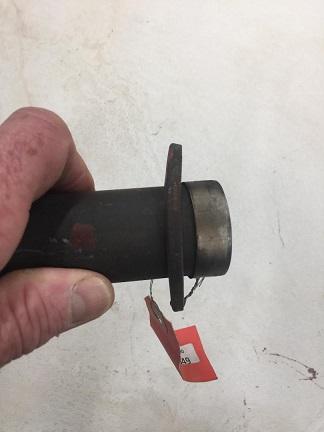
A pre-production prototype header assembly with specifications nearly identical to the Two Brothers Racing [TBR] 5th gen VFR 800 header is now being constructed in southern California. This is a new thread duplicating a post on the VFRD '5th & 6th VFR 800 Header build' thread. The objective of this new thread is to give the project described below an opportunity to stand on its own four cylinders. There is a metric ton of valuable data and opinion on the old thread, so if you're new to VFR headers and curious about the gestation of this project, don't deny yourself the pleasure of reviewing it. Here is photographic evidence of the work in progress. This photo shows the jig that has been fabricated in order to get the proper layout of the performance headers. Photos taken 12/26/2018: *Acknowledgements: From the start of this project, we knew we'd need help, and so sought assistance from some very well respected, long time VFRD members. Special thanks to VFRD member Cornercarver for the generous and trusting loan of his prized, irreplaceable [Until now!] set of original TBR headers. We also would like to thank VFRD member RVFR for his support of this effort through contributions from the 2017 gofundme header fund. Contributing members - all massively experienced and extremely helpful - include but are not limited to: Sebspeed, Cornercarver, TimmytheCop, MiniCarver, BusyLittleShop, BuzznerSuntrusts, RVFR, Mohawk, Mello Dude, CandyRedRC46, Stray, keef, voided76, and 3dcycle. Our sincere thanks to all these individuals and others for their wise counsel. Without you, we could neither be getting a prototype built, nor could we have established a path to a production version of this performance header. *General information / major bullet points: [1] The production version of the performance header assembly described here will be hand built in southern California and cost $790.00 plus shipping from the manufacturer. California residents need to add 7.75% state sales tax. [2] The header will fit 5th and 6th gen VFR800s. [8th gen owners, see Note 'a' below] [3] The header will go into production when orders for 15 units are received with a $200 deposit per unit. [4] The prototype header is scheduled to be completed by 1/11/2019. [5] A baseline dyno run of a VFR fitted with 98/99 headers and same day/same dyno full tune of the same VFR with prototype header installed is scheduled for the week of 1/14/2019. [Dyno testing methodology is detailed under 'Dyno testing procedure'] [6] The list below of deposits received will be kept updated, and we will be adding a second list of individuals interested in seeing the dyno results before placing a deposit. If you are interested, PM us and let us know the following: a] which gen VFR [5th, 6th, or 8th] you would like a header for b] which fueling management system you use or intend to use c] which slipon muffler/midpipe you have or will use d] if you intend to have your exhaust system dyno tuned e] if more than one unit, how many headers you are interested in purchasing f] if you are placing a deposit *A LIST - 5th gen/6th gen header orders with deposits received: 1-Duc2V4 5th gen Rapid Bike TBR slipon yes dyno tune 1 5/6th [maybe 2nd header for 6th gen] 2-VFR7503 6th gen PC3 has TBR and Leo Vince maybe dyno 1 5/6th 3-WackenSS 5th gen PC3 [RB in future] Leo Vince yes dyno 1 5/6th 4-jim v 6th gen PC3 [maybe RB in future] Micron yes dyno 1 5/6th [maybe full system] 5-MadScientist 5th gen PCV w autotune Micron low, MIG high autotune [maybe dyno] 1 5/6th 6-bornes 6th gen Rapid Bike SC Project CR-T yes dyno 1 5/6th 7-Airisom 5th gen PC3 or PCV Delkevic yes dyno 1 5/6th 8-CornerCarver 5th gen PC2 or better Wolf [sweet!] yes dyno 3 5/6th 9-CC 5 eng in 6 chassis PCV Staintune yes dyno 10-CC 6th gen Rapid Bike OEM 11-Sebspeed 5th gen 1 5/6th 12-Mbrane 5th gen PC [which PC TBD] miscellaneous yes dyno 2 5/6th 13-MBrane 14-interceptor69 5th PC3 Vance & Hines no dyno 1 5/6th 15-3Dcycle 6th gen 1 5/6th 16-moosemoose 5th gen RB Delkevic 1 5/6th 17-sfdownhill 5th gen PC3 Staintune yes dyno 1 5/6th 18-EX-XX 5th gen PC2 Custom midpipe/slipon yes dyno 1 5/6th 19-GreginDenver 5th gen TBD 1 5/6th 20-Funkatron 5th gen PC3 TBR maybe dyno 1 5/6th 21-Tirso 5th gen PC3/PCV w auto Staintune no dyno 1 5/6th 22-8th gen prototype LIST 8 - 8th gen headers with deposits received 1-HighSideNZ 8th gen header 6 chassis /825cc 5eng/front rad Rapid Bike Leo Vince 1 8th 2-Fz6wja 1 8th 3-samuelx PCV Yoshimura yes dyno 1 8th *B LIST - parties interested in purchasing a 5th/6th gen and/or 8th gen header who prefer to wait before placing a deposit: -Samuelx 8th gen RB or PCV current Delk, Yosh, OEM maybe dyno 1 8th -Voided76 8th gen Rapid Bike Assorted slipons 1 8th -Stray 8th gen header front rad 5th 1 8th -boOZZIE 6th gen Rapid Bike Micron yes dyno 1 5/6th -RC51Nick 6th gen Rapid Bike/autotune Staintune autotune 1 5/6th -carlgustav 6th gen Rapid Bike M4 no dyno 1 5/6th -CornerCarver 8th gen header front rad 5 eng in 6 chassis PCV Staintune yes dyno 2 8th 8th gen header front rad Torocharged 6 gen Rapid Bike Staintune looking for a dyno capable of handling it -Sebspeed 8th gen 1 8th -MooseMoose 5th gen Rapid Bike/MyBikeTunig Delkevic 1 5/6th -adkfinn 5 gen PC3 Black Widow yes dyno 1 5/6th -fly750 8th gen 1 8th -neo2122 6th gen OEM/PC3 Delkevic yes dyno 1 5/6th -wholepailofwater 5th gen OEM/TBD Staintune 1 5/6th *Background: Over the past year, VFRD member Duc2V4 and I have made an exhaustive [ouch!] search for a manufacturer/fabricator qualified and willing to produce a reasonably-priced, high quality "replica" of the Two Brothers Racing 5th gen header assembly. The TBR is the accepted standard in production VFR performance exhaust systems. After unproductive efforts with several fabricators, in August of this year we were referred to and contacted a gentleman named Wade, founder of an established southern California exhaust manufacturing firm. Wade expressed interest in taking on this project. Communications about and development of this project have continued with Wade since August and resulted in the construction of the fixture pictured above, along with a pre-production prototype header, a dyno testing schedule, and a commitment to build a production run of 15 units. *Dyno testing procedure: Testing will consist of a baseline dyno run of a 5th gen VFR with OEM 98/99 headers installed [See Note b below]. After the baseline run, the test VFR's 98/99 headers will be removed and replaced with the prototype performance header assembly. On the same day as the baseline run, a full dyno tune will be performed on the subject VFR with performance header installed. The dyno tune will be performed on the same dyno by the same dyno technician, with the same air filter, same fuel management system, and same midpipe/muffler. [Test subject VFR is described in 'Test bike'] *Some dimensions, features, and specifications of the header will be taken from the TBR. The new header will incorporate the following specifications from the original TBR header design: -header construction will be from 18 gauge 304 stainless steel tubing, [0.049"/1.24mm wall thickness] -header will have 38mm od primary tubes [1.5" od] -header will have 41.5mm od secondary tubes [1 5/8" od] -header will have 51mm od collector tubing [2" od] -header's rear primary tube junctions will be fastened by spring tension fittings -header's left front and left rear primary tubes will merge -header's right front and right rear primary tubes will merge -header will have no crossover of front or rear primary tubes -header's collector exit tube will have a 51mm od [See Note c below] -header's tubing will be mandrel bent *Some specifications will be changed from original TBR header design. To align with the VFR community's objectives and improve durability, the header will incorporate the following changes to the original TBR header design: -header's collector exit pipe will be modified to match position and angle of OEM collector exit pipe -midpipe/muffler/clamp to be supplied by customer [See Note c below] -midpipe/muffler to be fastened to header collector exit pipe by clamp [Clamp not supplied with header] -header will have two O2 sensor bosses at 2000-2009 OEM header's O2 sensor locations: one O2 sensor boss on secondary tube after left front/left rear primary merge, one O2 sensor boss on secondary tube after right front/right rear primary merge -right rear primary tube of all headers will be mandrel bent to provide 1/16" clearance from rear head cam chain tensioner when installed on 6th gen VFRs -header's stud nut tension flanges will be 1/4" thick stainless steel [See Note d below] -header's collars at head end of primary tubes will be reinforced and length adjusted for 1/4" head stud fixing flanges -header's internal flow surfaces at head end collar joints of primary tubes will be finished smooth/flush [See Note e below] *Wade's credentials: Wade designed and built exhausts for Kerker Exhaust Systems from 1980-1988. Since founding his own exhaust fabrication business in 1989, he has produced custom, prototype, and production exhaust systems and components for numerous individuals and manufacturers, including Two Brothers Racing. He builds a production aftermarket full exhaust system for a current non-Honda V4-powered motorcycle. Here are two of his current projects. Photos taken 12/27/2018 and 12/28/2018 : *Test bike: For initial testing, we will use this motorcycle [Or possibly our 6th gen - see Note b below]: 2001 California 5th gen with 60,000 miles K&N big mouth air filter [See Note f below] PC III USB, map dyno tuned in 2013 with OEM California ECU, no O2 sensors installed Dynojet O2 sensor resistor terminations installed on OEM O2 sensor leads OEM 49 state ECU now installed, PC III not retuned, no O2 sensors installed OEM 98/99 VFR headers ceramic coated with Staintune high mount slipon. Maintenance performed before dyno testing: New air filter, new Denso iridium IUH27#4 plugs, valve clearance adjustment, injectors professionally calibrated, starter valves synched, new thermostat, new silicon coolant hoses, new Engine Ice coolant, oil and filter changed w Mobil 1 0w-30 and Purolator PBL14610 filter *Notes: Note a - an 8th gen version of the performance header with 'widely spaced' front primaries is in the works for a production run to follow the initial production run of 5th/6th gen headers. Note b - If there is significantly greater interest in proving the prototype header on a 6th gen, we have a 6th gen standing by and can use it for the dyno baseline run and test/tuning instead of the 5th gen. For 6th gen test/tuning, we will use the same dyno testing procedure at the same test/tune facility as described for the initial 5th gen test/tune. The 6th gen available for testing currently has ceramic coated 98/99 headers installed with gutted OEM mufflers and a PCV. We would obtain open flowing aftermarket 6th gen slipon mufflers to optimize testing of the prototype header. Note c - Wade recommends keeping the the 51mm od collector exit pipe instead of reducing it to the OEM exit pipe's 49mm od for the following reasons: 1 - it is probable that reducing the collector diameter will have a [small] negative effect on top end performance 2 - Wade uses premanufactured tubing merges of very high quality. Reducing the collector diameter would mean that the collector merge exit diameter would be too large for the 49mm od exit pipe, and the labor required to adapt the two components would raise the cost. 3 - purchasers of a replica header who want to use aftermarket slipons can have the collector end of their slipon expanded to fit the 51mm od exit pipe by any competent exhaust/muffler shop. Two Brothers slipons and OEM mufflers will require exhaust wrap to function as a gasket in place of the OEM 'donut' gasket. 4 - the collector joint of all slipon midpipes we could think of except TBR are 2" od and slotted at the clamping end. Wade was concerned that a 2" od midpipe that has been slotted to clamp onto the OEM collector pipe is likely to tear at the base of the slots when expanded. IMPORTANT - when having a slipon's midpipe expanded to fit this performance header, make certain the muffler shop expands it gradually in two or more small steps. Wade recommends drilling a relief hole at the muffler side ends of the midpipe's slots to distribute stress and reduce the possibility of tearing. Wade tested the viability of expanded slotted 304 stainless steel 18 gauge 2" od tubing by slotting a piece of 2" tubing while I was at his facility. He then expanded the slotted end of the tube in two steps to fit over the 51mm od collector exit pipe with no tearing at the slots. Note d - Here is Wade's 1/4" thick stainless steel head stud nut tension flange: Here is the original TBR head stud nut tension flange [Note that flange is bent from tension]: Note e - Original TBR has rough, unfinished joints in the internal flow surfaces at head end collars of primary tubes Note f - See RVFR's June 8 2017 post on page 5 of vfrd thread '5th & 6th VFR 800 header build' for photos of standard vs big mouth K&N air filters. Both filters have K&N part number HA-8098 Note g - Significant improvement can be achieved over OEM gas flow through the exhaust port into the header primaries by using crush gaskets that do not intrude into the gas flow path when installed. The id of OEM VFR crush gaskets reduces to around 30.41mm when installed with header stud nuts torqued to spec. The exhaust port id is 32.45mm - that's a 2mm reduction in gas flow passage diameter. To solve this, we will be confirming Mohawk's recommendation to use GSXR750 crush gaskets between the performance header primaries and the VFR's head. Note h - Wade has expressed a modest willingness to build complete exhaust systems in high or low mount configurations for 5th gen VFRs. These full systems would have the same specs as the full systems that were the only configuration in which TBR sold the VFR headers - the TBR headers were only available with a matching midpipe and muffler/canister. Mufflers built by Wade would be available in metal or carbon fiber. We neglected to ask Wade which metals he uses for muffler/canisters or what a full system would cost, but soon will ask him to specify materials and pricing. We have not yet introduced the possibility of Wade building a 6th gen full system, but will ask him if he'd consider it.
 1 point
 -
1 point
-
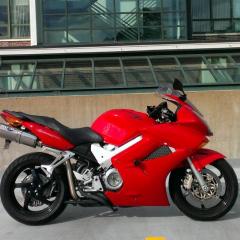
Took my first 100 mile ride today on the Honda 8thGen Interceptor after the VFRD performance upgrades. Flawless. Zero issues. Magnificent. I'm just blown away about how much better this bike is now. I would say I have a 13-15% power increase and a power curve/VTEC transition that is magical. 😉 Top end power is super impressive and much improved. It is slightly louder, but not too bad. The only modification I have left to do, and I was saving it for last, was the seat. The new custom seat will be the cherry on top 😉 This is my Dream bike. 😉 This 8G is NOT stock! Look MOM! No Utters! 😉 Thank you LANCE!!
1 point
-
Perfect, thanks interceptor69, PayPal sent. Looking for that PC3 v PC5 now........1 point
-
I'd like to purchase a map - PC3, VFRD headers, Micron cans, Pipercross air filter - who should I contact? Should I upgrade to PC5?1 point
-
I believe we hit the minimum number of deposits so Wade should be gearing things up. We'll post up as soon as we have an update.1 point
-
Yes! A fellow snap-crackle-pop enthusiast! Cool, I don't feel like such a weirdo anymore. I knew there were more of us out there. I know man, it's awesome. I mean I don't like some exhausts because the exhaust note is just too harsh, too raspy, too unrefined. There's a certain noise level that I will just draw the line and say, "Nope, that exhaust sounds like shit. Too loud and obnoxious." But that being said, I always love a lot of crackle-and-pop on decel. Just a matter of personal taste I guess. It's surprising so many other people try to completely eliminate those sounds though, isn't it??? To me that would be like being in love with aged, triple-cream brie cheese, yet they can only eat the soft middle and throw away the whole rind. The rind is awesome too. Ok so we just need to find someone out there who's devised a way to "Make Exhaust Crackle Great Again" lol and tell us how to modify the bike somehow. Maybe modifying the PAIR valve system to inject more air into the exhaust manifold? Maybe doing an ECU tune where it adds a little more fuel on decel? How about adding a manual trigger on the grip that disrupts the spark, letting unburnt fuel get into the exhaust manifold...1 point
-
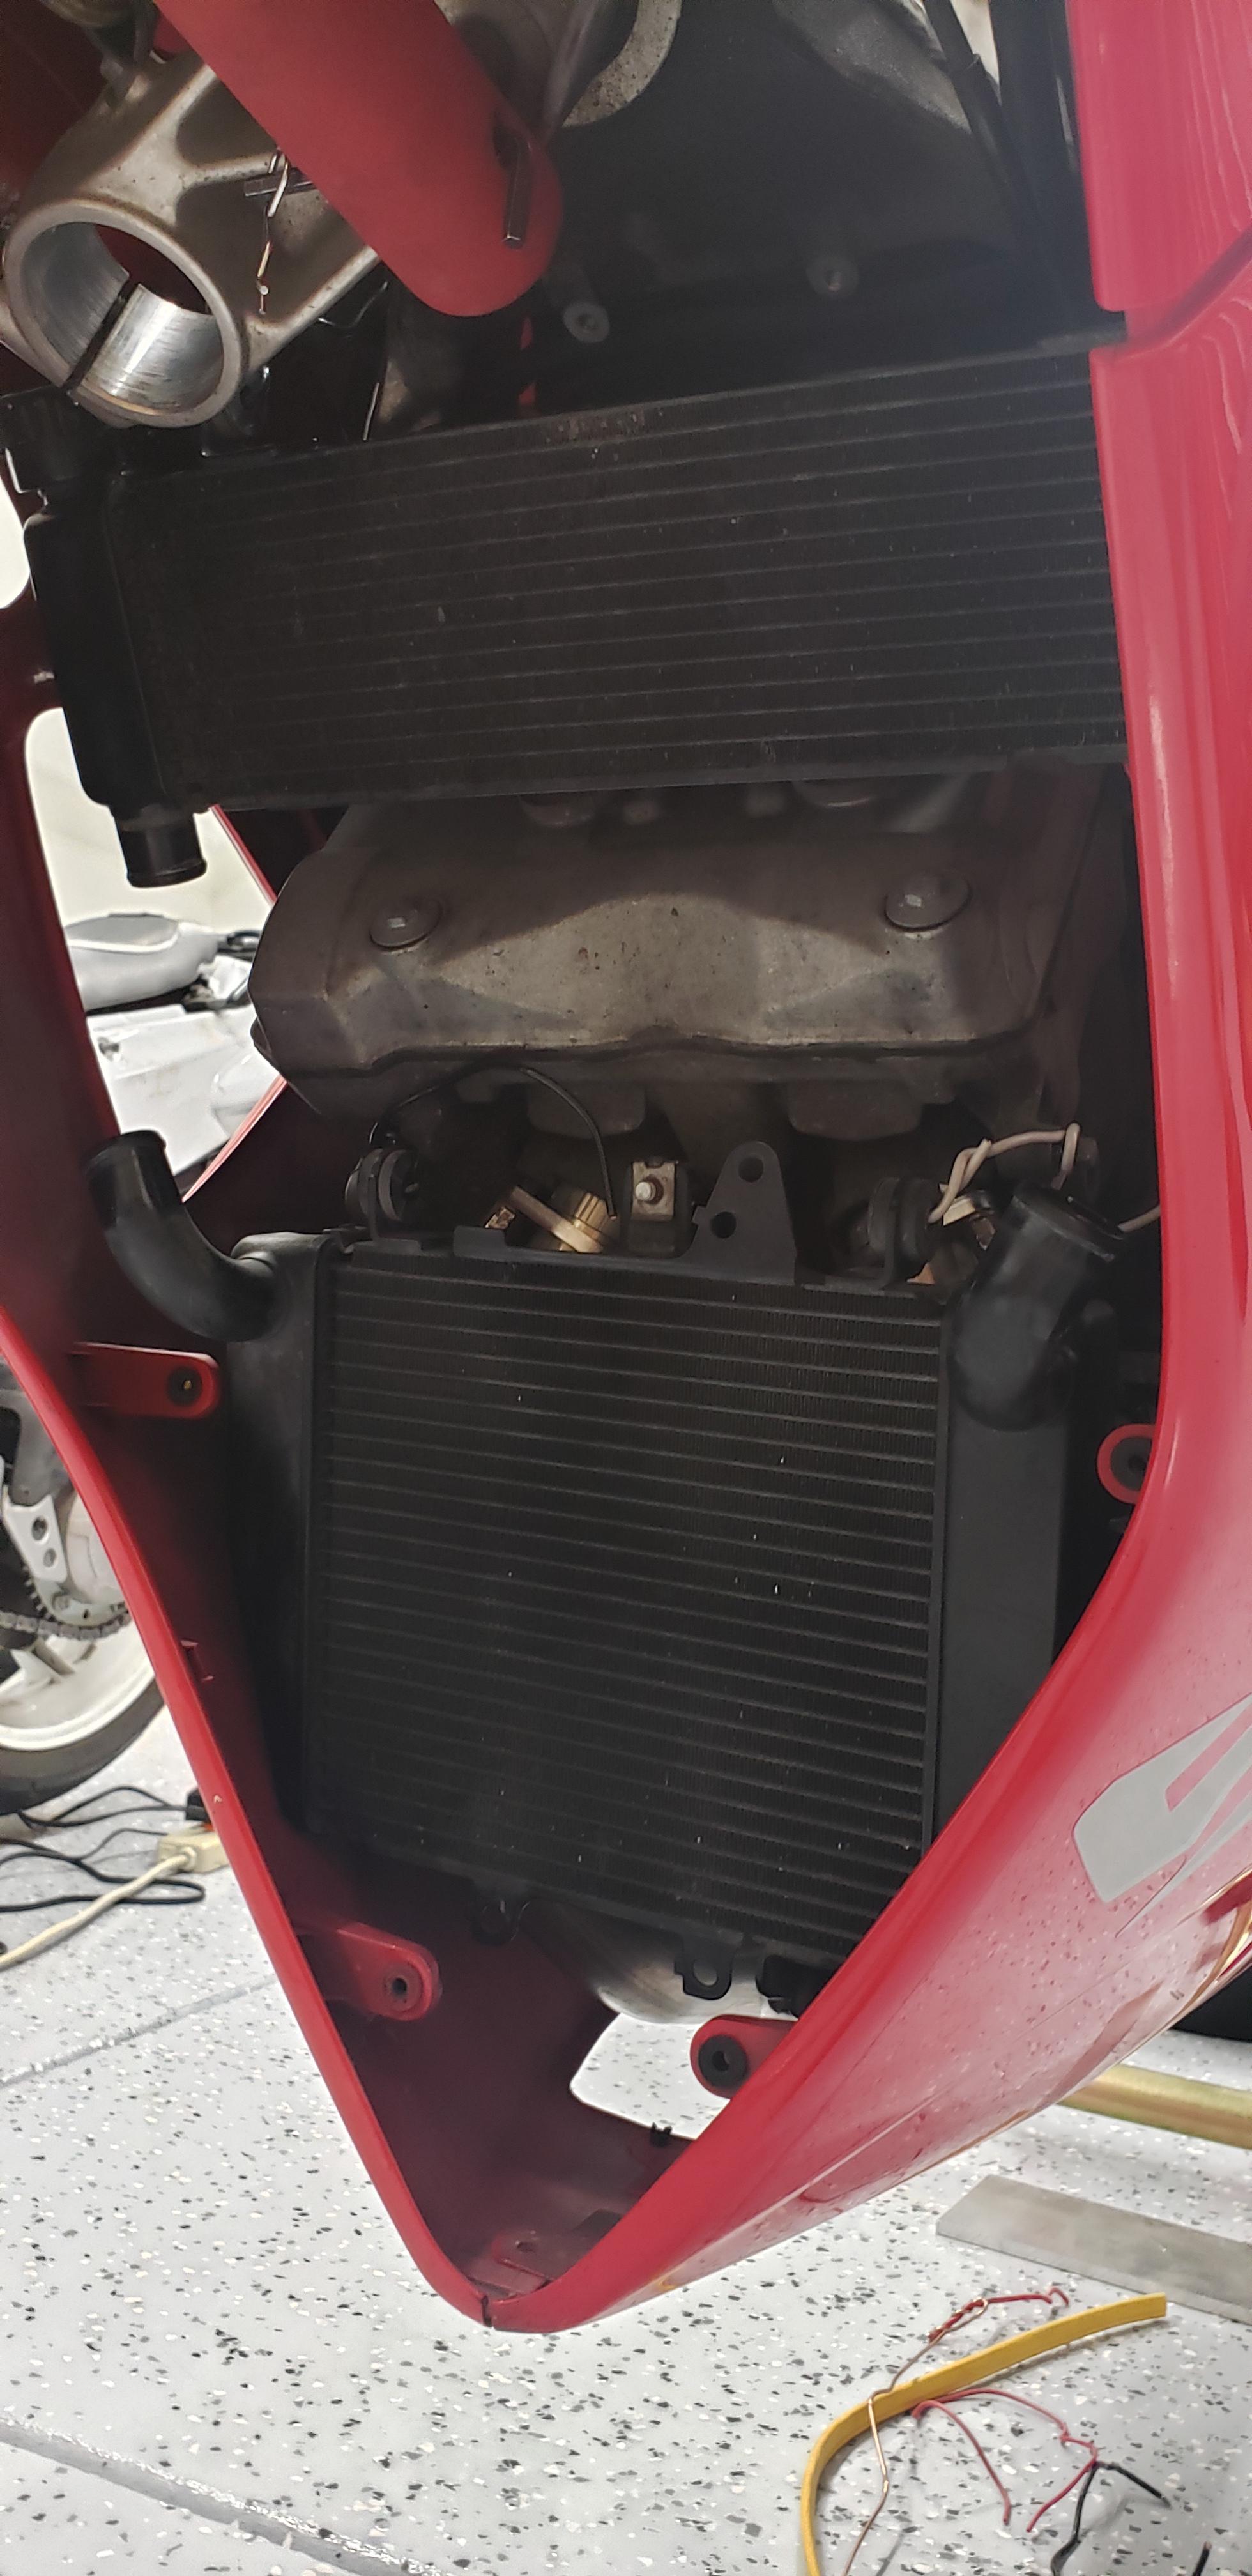
Looks like the 8th gen rads and fan will just fit with the 8g header and 5g fairings, may need to keep the 5g oil cooler though.
1 point
-
Good questions, Samuel. 1 - we have chosen not to list the fabricator’s website or exact location because, in the past, several potential manufacturers and distributors of headers have been driven away when multiple enthusiastic VFR owners - with only the best of intentions - went around the member already in contact with the supplier, directly calling and emailing the supplier into a frustrated state of disinterest. 2 - on Note a, we have discussed with Wade the differences between 5th/6th gen headers and those for 8th gen. Because the headers will be constructed on an assembly line in jigs/fixtures that facilitate a specific confguration, production runs of 15 units will happen for one configuration at a time. Part of producing the 8th gen header will probably be making the front primaries modular so that a rear primary/collector assembly can be designed to fit all three gens - 5th/6th gen or 8th gen front primaries can then be selected depending on which gen the customer has requested headers for. Getting Wade to buy in to the viability of this project was tough. The more we demonstrated a fully developed objective with no complicating variables, the more willing he became to participate. As a result, distilling the first production run to a single configuration that matched the sample TBR we had on hand was mandatory. 3 - nope, each 5th/6th gen header will be exactly the same. Detailed specs are listed in the original post.1 point
-
I found that when I brake for a tight turn at slow speed I was getting chatter in the forks, its really unnerving so I decided to tackle the steering head bearings. ?Most of the work involved is taking parts off to get to the bearings. Removing Fairings The side fairings are rather easy to take off remove all the bolts and just pop it off nice and easy, there are a couple of plastic tabs in the wheel well and 2 more bolts in the scoop, 2 on the very bottom. ?It is the front fairing that can be tricky since there are hidden fasteners under other pieces. Remove the mirrors - 5mm hex bolts Under the mirror is a screw that must be removed Remove the screws on the inner moldings Another hidden screw inside the molding The front cowl is ready to be pulled loose Now you can unplug the two lights and turn signals Remove the fender Taking off the wheel loosening the axle bolt Loosening the axle pinch bolts Removing the brake calipers this side is 12mm bolts the other is 6mm hex I lifted the bike with a jack under the pipes and pulled off the wheel, then I started to remove the hose attachments and the horn assembly. Remove the horn assembly Take off the hose attachments 4 bolts one is behind the hose so its last I loosened the four pinch bolts on the triple clamp unbolted the clipons and slid out the forks, I took a card paper and used it to mark the height of the forks in the clamps for easy reference when reassembling. ?I used a large crescent wrench on the top clamp bolt, thats a no brainier it has to come off. Here is the steering column Bend the tabs flat and tap off the top pinch bolt with a hammer and a flat screwdriver. Honda sells an expensive socket for this but I dint have the time to find it. They are not on too tight Unscrew the bottom bolt and remove the clip, then the column just falls out careful not to let it drop, remove the old bearing sets. Hammering out the bottom race The races have to be hammered out, the frame has notches for you to do this, I used a metal rod and hammer and tapped on both sides until they popped out. Looking up you can see the notches The old races came out easy The old races where visibly pitted and that was the cause of my chattering forks, too much play in the column does that. You can see where the ball bearing pitted the race I gently clamped the column and started to hammer the race off This was a bit awkward, I used a rag in the vice and hammered on each side until the race came off, it took about five minutes. ?I did not use a torch since I tend to burn myself with those. ?It just took patients and evenly hammering it so it would not twist and bind on the column. Now its off I saved the old races to use as hammers to make contact with the strong part of the new bearings to keep from damaging the tapered rollers. New dust collar and slide on the new bearing The new bearings are binded with the outer races the old ones were separate pieces. I flipped the old race over and found a pipe that was long and wide enough to make contact and hammered the new bearing in. Using the old race to hammer in the new one The inside races are tapered not concave, I have a bearing hammer to use for those. Greased up race first then gently hammered them into place. Fitted the new race on the bottom Hammered it in the rest of the way I have a bearing hammer that has interchangeable heads for different sized bearings, this one fit the top race just right. Now the top race its in, now grease the race surface good. Pack grease on the new bearings Fit the column back in from the bottom Make sure the bearings are snug Put on the top dust seal I screwed on the flange and tightened it not too tight so that it turned easy but not loose, over tight could ruin your new bearings, too loose and your in trouble. ?It should take about 7 lbs of force to move the handle bar fully assembled you should not feel it grinding thats too tight. ?Just as IntAcepter suggested I followed his procedures for the most part. Now fitting all the other parts back on, ?I find the bike sits a bit higher now cause they are taller tapered bearings, so the bikes rides a might bit higher. ?I am going to back off some preload first and see how it feels, if it feels like it used to ?I will then lower the forkes about 5mm if the thats the case.</font>1 point