
Leaderboard


Popular Content
Showing content with the highest reputation on 09/25/2019 in all areas
-
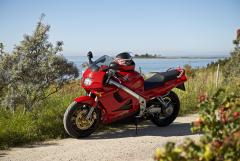
From the album: My VFR 750F T (1996)
Looking out at Isefjord with Kattegat on the horizon. The land in the backgrund is the tiny island of Alholm. A Royal Danish Navy ship is named after the island, the HDMS Alholm (A544).© Peter Baerentzen
2 points -
Well, the first 2/3 of the topic was missing due to the forum crash, so here it is again from the top, sorry we lost all the other member's comments alonng the way, you guys make a great cheering squad!!! -------------------------------------------------------------------------------------------------------------------------------------------------------------------------------------------------- Well, I FINALLY :cool: booked out to the garage and started ripping and tearing the bike down for the exhaust project. First thing on the menu of course was to remove all the tail plastic plus the stock undertray and battery box: This left me with a jumble of wires and such to deal with: Later, later. Let's start making stuff! Next thing I did was to reinstall the tailsection plastic and hang the mufflers to get an idea of how everything would sit: Triple exhaust anyone? Width is good, about the same side-to-side as the later, smaller Dia. WOLF cans: They don't stick out much more than the Micron does, I'll wait to see how they sound before I decide to shorten them (or not): Yeah, I know, they need to be shifted to the right a bit. A man can only do so much with ZipTies:1 point
-
Very nice, I'll take 2 Thank You!1 point
-
featured1 point
-
Now the plate bracket is all finished up, the Micron has been removed, and the bike is currently in the shop getting the custom Y-pipe fabricated.1 point
-
I went another few rounds with the bike today. In the end, the bike won. More about that later. First order of business was raising the front portion of the undertray to allow greater clearance for the Y-pipe going into the mufflers. I gained 3/4" of clearance Versus the previous iteration. Next, I set about fabricating supports for the taillight. I had read reports of the tailsections vibrating and cracking, so I made this contraption using the stock rubber grommets from the plastic undertray: I finalized the mounting brackets and got one can clamped in place: The problem arose when I installed the second can. The rear portion is spaced well, but the fronts are too close together. I'll have to remove them and space the leading clamps apart, possibly with some washers between the inner part of the T-bolt clamp and the drop mount. Elevation and symmetry look good, just have to get the leading edges of the cans spaced apart 1/4-3/8" or so. I also got in touch with the guy who's going to be doing the custom connector pipe for me, and I'm taking the Viffer in on the 26th. Can't wait to hear the V-4 roar from 2 mufflers at once! Or as my wife so eloquently put it: "You paid 350 bucks for new mufflers so your bike could fart out the back instead of the side?"1 point
-
Next on the list is to make a slight mod on the forward portion of the undertray for more clearance and then fab the hanger brackets for the twin cans plus a rear support bracket for the taillight housing. After that, I'll take the bike to Edmonton to have the custom up-pipe and Y pipe fitted. It'll look something similar to the WOLF plumbing except it'll be a 2" splitting into two 1.5" at the Y.1 point
-
RH side view: Various shots showing how the forward portion attaches to the battery box:1 point
-
Next, I made templates of the sidepanels to check the fit: Clamped in place in preparation for riveting: This sucker ain't goin' nowhere: View from the outside, note 3/4" Al square tubing behind the steel plate that the R/R mounts to: Template and the actual cutout: Clamped in place for riveting: It's actually starting to look like something now:1 point
-
I decided to make the undertray in two pieces, one upper and one lower. The upper one sits aft of the round crossmember and mounts atop the subframe rails like so: The notches on the sides are for the passenger seat, so the appropriate bits sit flush with the subframe rails when the seat is installed. The notches toward the bottom of the pic are for the riders seat, so the two hooks can still hook underneath the round crossmember. Here, the upper portion of the undertray has been drilled and riveted into place, fixing it to the subframe: I felt if I mounted it atop the framerails in this manner, it would leave me maximum clearance for the cans, moreso than the WOLF undertray pics I've seen to date. I plan to attach some aluminum angle to the underside of the upper part of the tray to enable me to hang the cans from with some band clamps. This is where using 1/8" Al sheet will begin to make sense as it will be a stressed member so to speak, holding the weight of the dual cans. Now to do something about the forward portion. It needs to run underneath the subframe rails to provide clearance for the rider's seat pan. The plastic seat pan dips below the upper rails and would not clear if the forward tray were mounted up top. Here is the vacancy that needs to be filled. There's an old kid's snowsuit protecting my CF hugger so it doesn't get marred while I'm messing about: This is the simple piece I wound up with, 1 bend and cut narrower at the leading edge to clear the lower subframe rails. it's clamped in place as part of the fitup and in preparation for drilling and riveting: It will be riveted to the subframe and to the remains of the stock battery box which has been trimmed and rotated forward to allow more clearance for the Y-pipe that will connect the two mufflers. I'll have to make a small vertical filler piece to close the gap and have that welded in place to join the two levels of the undertray. Don't want to invite water and road grime through that huge opening, but the Hugger and the dual cans, they should block at least some spray. I'm planning on removing the whole works this winter and having it powdercoated. For now, it'll stay as raw aluminum. B)1 point
