KOCONUT Posted October 5, 2015 Share Posted October 5, 2015 So I havent really posted on here is some time. Other bikes grabbed my attention (have a supermoto project going) so the 3rd gen took a back seat for awhile. It had all the original fairings, but someone at some point had laid the bike down on both sides, so they were rashed. Plus I wanted to change the look to RWB and didn't want to paint original factory pieces. I had ordered a new one piece rear fairing from airtech awhile ago and finally recieved it in the mail this last week. Waiting on parts for the other bike, so decided to turn my attention to the VFR. The quality of the Airtech fairing seems top level. Its fiberglass, so its light and easy to work with. It does take some prepping to get it to work, like the taillight openings are not cut out and the mounting holes must be drilled yourself. Also, the tabs on the taillight that align the rear turn signals, I found, should be removed. They just get in the way and aren't really necessary for getting the rear lights lined up. Ill post up some pics on how I got it so far. Next step is getting some new hardware to mount up the piece then getting a new lower fairing from airtech. I'll update with more pics and news about fitting these parts as I go. To be continued.... Link to comment Share on other sites More sharing options...
Member Contributer Cogswell Posted October 5, 2015 Member Contributer Share Posted October 5, 2015 It's great that there's something out there for 3rd gens besides ebay. Looking forward to seeing your progress. Link to comment Share on other sites More sharing options...
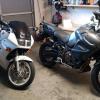
KOCONUT Posted November 9, 2015 Author Share Posted November 9, 2015 Got around to getting the lights installed into the Airtech rear fairing. I had to decide if I was going to drill into the fairings to mount the lights like the factory did or go another cleaner route. I decided to go the cleaner route, since there is no internal structure to mount the lights to. The easiest and best way I could think of was to use some industrial hook and loop tape. Pictures say a thousand words, needless to say that it works and seems to hold the lights in place as good as or better than stock, though it still needs some fine tuning with placement. The only problem I'm having so far is the clearance of the seat and the rear cowl part of the fairing. It looks like I will have to file it down some to get the seat to fit properly, right now the sides of the seat are getting bunched up with the inside edges of the fairing. More updates incoming. Link to comment Share on other sites More sharing options...
Member Contributer Cogswell Posted November 9, 2015 Member Contributer Share Posted November 9, 2015 That's really coming together! Link to comment Share on other sites More sharing options...
KOCONUT Posted November 30, 2015 Author Share Posted November 30, 2015 small update today. I have just ordered the one piece mid fairing from airtech. got 20 percent off for black friday, which pretty much just covered shipping and tax. Velcro has been holding int he rear lights very well, havent had any issues. Taken the bike on the freeway and hit plenty of speedbumps and train tracks and they have stayed put. I'm thinking of epoxy-ing the outside at a few contact areas just to give me the reassurance that they will stay in the proper position, but it's prob overkill. Anyway, hope to have the mid fairing fitted in a month or so, then swapping to a 4th gen exhaust and prob the ZX14 rear shock. Link to comment Share on other sites More sharing options...
Member Contributer MaxSwell Posted November 30, 2015 Member Contributer Share Posted November 30, 2015 That should end up being a real beauty. Good luck. Link to comment Share on other sites More sharing options...
Member Contributer Switchblade Posted December 1, 2015 Member Contributer Share Posted December 1, 2015 Starting to come together . Link to comment Share on other sites More sharing options...
Nifty7Fifty Posted December 8, 2015 Share Posted December 8, 2015 Awesome!! Nice work fitting the rear fender, looks perfect. I was looking at the airtech one-piece mid fairing too, can't wait to see how it turns out for you. Wish I saw that Black Friday deal. . . Link to comment Share on other sites More sharing options...
KOCONUT Posted December 8, 2015 Author Share Posted December 8, 2015 Awesome!! Nice work fitting the rear fender, looks perfect. I was looking at the airtech one-piece mid fairing too, can't wait to see how it turns out for you. Wish I saw that Black Friday deal. . . Yeah it was a pretty sweet deal. Soon, I'll be picking up a ZX-14 shock, thanks to your research in that thread of yours. Thanks for doing alot of the leg work in getting that functional by the way. I've upgraded the fork on my bike with heavier oil and stiffer racetech springs, but the rear end is always unsettled. I've been looking at inspiration for the new paint scheme. I've always loved the RWB anniversary edition 5th gens. I had always though it would turn out to be some sort of RWB theme, but lately I've been missing having an orange bike and think the orange fairings with black honda decals and the white wheels will really turn some heads....pic below. Anyway, havent made a decision yet. On the topic of my exhaust, I have been thinking of contacting two bros. to see if they can make me a set of the left side exit system. I live local to them, so at least shipping wont be a problem... Until next time Link to comment Share on other sites More sharing options...
atx Posted December 9, 2015 Share Posted December 9, 2015 That orange looks pretty cool, i dig it. Love me some hi viz. Make sure you plastidip some pumpkin eyes/mouth aruond halloween for the kids though :D Link to comment Share on other sites More sharing options...
Veefer800Canuck Posted December 9, 2015 Share Posted December 9, 2015 Unless you yourself are one of the Two Brothers, good luck with the exhaust. They've been contacted before and asked to make a hundred of them, and the price was astronimical, and the interest from TBR was not even lukewarm. Chilly is more like it. Link to comment Share on other sites More sharing options...
KOCONUT Posted January 18, 2016 Author Share Posted January 18, 2016 Update: Finally got my one piece lower fairing from airtech. Ordered this about a month ago, they have been busy and had to extend me by about a week. Just like the rear fairing the quality is great. There isn't really a correct way to mount it. They had explained over the phone that raising the front of the bike by the forks and sliding it up would work but I didn't have any luck with that. After much consideration, I decided I would slice it in half down the middle and fit it as two pieces. This would make it much easier to access normal maintenance items like the oil filter as well as fitting it and finessing the fiber glass. Then after some finessing Now to get the left side on. The upper fairing needs some work as well and I'll be adjusting it to fill in the gaps with the new lower. Stay tuned, more updates incoming... Sent from my XT1254 using Tapatalk Link to comment Share on other sites More sharing options...
KOCONUT Posted January 22, 2016 Author Share Posted January 22, 2016 got it all mounted up and everything put in its final resting spot. Havent seen the bike look this good in a long time. All I need now is the paint. I tied the right and left sides together with some aluminum plates that I riveted to one side and drilled holes through the other side to link the 2 pieces together. Much stronger and way simpler than the factory setup. The 5 pieces that I used to have which had brittle tabs and complicated hardware to fasten to the bike have been replaced with 2 big pieces and 3 different sized fasteners. I also lined the bottom of both pieces with some radiant heat barrier material to help protect the fiberglass. The next step will be finding a shop to paint for a reasonable price. I also may cut the top off the rear fairing to allow my wife to ride with me, but haven't decided yet. While everything is at paint, I'll be swapping the rear tire, pulling the rear shock and linkage to change to a 2nd gen shorter linkage and doing the ZX-14 shock conversion. I've also got 4th gen exhaust that I'll prob be switching to. Link to comment Share on other sites More sharing options...
Member Contributer CornerCarver Posted January 22, 2016 Member Contributer Share Posted January 22, 2016 Looks great. I have been searching for a couple pieces of white 3G NOS plastics to no avail. I may consider this after seeing how well yours has turned out. Link to comment Share on other sites More sharing options...
KOCONUT Posted March 14, 2016 Author Share Posted March 14, 2016 decals have been ordered. will be in paint soon. as a side note, anyone have had a Vmax? I'm thinking about getting one.... Link to comment Share on other sites More sharing options...
Member Contributer SamW Posted March 14, 2016 Member Contributer Share Posted March 14, 2016 Looks good! A buddy used to have one, fun bike, but my favorite magazine quote was from an early Vmax test ride, the rider said he when he rode it on the track that he saw Jesus so many times, he started using him as a brake marker... Link to comment Share on other sites More sharing options...
KOCONUT Posted June 28, 2016 Author Share Posted June 28, 2016 Update 6/28/2016 I have the front fairings complete. Now that I have the technique down for painting, I can start to blow through the rest. I thought that my novice skill level and relying on spray paint would make these fairings look crummy, but I have to say I'm really pretty happy with the result. The hardest part of this whole build by far has been the rear fairing. There is no internal structure in the airtech peices, so its up to me to find a way to make it work. I wanted access to my rear seat, so I had to get rid of the rear seat cowling since its molded into the one peice rear fairing. Doing that exposes the subframe, even with the seat on, while looking down onto the bike. Currently I have the rear fairing curing with some fiberglass right now. it will take some time and massaging but it will go together soon for the last time. My painting technique is as follows, 1. Rough up your original pieces with 300 grit to get rid of the shine. Its ok to go through the paint, as long as you remove all the clear on top of it. 2. Lay down one mist coat of primer, allow to cure for 30 min, then hit it with two more heavy coats allowing each coat to cure. Allow final coat to cure for 24 hours min. 3. use 1500 grit to wet sand and smooth out the primer until its all level and glassy smooth. Finish with 2000 grit if necessary. 4. lay down a mist coat of color and repeat the same steps with the color as the primer. 5. Wet sand the color in the same manner as the primer using 2000 grit. 6. Lay down your clear in the same way as the color/primer. If you did it right, you should only have to do minimal sanding on the clear if at all. I thought the pieces turned out great, so I decided to not sand the clear. I've never used the 2k clear coat before, but now I'm completely sold on it. If you ever need to clear a fairing, this stuff works great especially if your like me and dont have a high capacity compressor and spray gun. Link to comment Share on other sites More sharing options...
Member Contributer rhoderage Posted June 28, 2016 Member Contributer Share Posted June 28, 2016 Updated pics? Link to comment Share on other sites More sharing options...
KOCONUT Posted June 30, 2016 Author Share Posted June 30, 2016 These are just the upper fairing. Rear and side fairing is still in process. Sent from my XT1254 using Tapatalk Link to comment Share on other sites More sharing options...
KOCONUT Posted July 13, 2016 Author Share Posted July 13, 2016 Complete! I had a hiccup with a couple of the decals, but they can be replaced pretty easily. I didn't wet sand the clear, I might still get around to that. If i do I'll add more info here. All together I prob spent about 700 for the airtech pieces and the primer/paint/clearcoat. Doing the painting myself saved me another 900 which is what the local paint and body shop quoted me. Labor intensive, but very possible to do with excellent results Sent from my XT1254 using Tapatalk Link to comment Share on other sites More sharing options...
Sweeper Posted July 13, 2016 Share Posted July 13, 2016 Nice! Link to comment Share on other sites More sharing options...
Member Contributer Duc2V4 Posted July 13, 2016 Member Contributer Share Posted July 13, 2016 Came out real nice! Link to comment Share on other sites More sharing options...
Member Contributer BCmcrider Posted July 14, 2016 Member Contributer Share Posted July 14, 2016 Paint looks great. Well done. Link to comment Share on other sites More sharing options...
Member Contributer Mikey Posted July 15, 2016 Member Contributer Share Posted July 15, 2016 Very nicely done! Great looking bike. Link to comment Share on other sites More sharing options...

Recommended Posts
Archived
This topic is now archived and is closed to further replies.