Member Contributer Popular Post HighSideNZ Posted July 30, 2015 Member Contributer Popular Post Share Posted July 30, 2015 I've embarked on doing a single nut rear axle conversion to my 6th Gen/5th Gen VFR825. Mohawk did it a couple of years ago and I used his ideas but ended up with a brand new RC45 rear wheel instead of the carbon wheel like Mohawk. (Yep, I got hold of a pair of RC45 wheels that a guy has had in a cupboard unused since the mid nineties) The donor axle was a VFR400 and so is the caliper, disk, and caliper carrier. Had to get the taper spacer for the wheel and a new nut and shim, from an RC45 via Partzilla and Tyga Performance. When I started, I could not find a donor VFR400 (NC30) so I used an axle from an MC28 but found that the MC28 axle is made from lower tensile steel and it's internal profile is quite different and I felt weaker than the NC30 axle. I would advise anyone doing this mod to use the NC30 donor parts and not the MC28. The cush drive assembly is based on a Ducati quick change unit from JT and I've used a set of urethane bobbins instead of the genuine Ducati SilentBloc rubber ones. In the end this has shaved 3.0kg off the unsprung weight on the rear. The assembly drawing lists all the parts used including the part numbers and suppliers. If anyone wants to go down the same route, I've made a full set of CAD drawings and these, along with photos, are below. Disk and axle Cush Drive Assembly and Rebuilt/painted NC30 caliper Cush Drive and Axle assembled Caliper fitted All fitted up Chain guard/hugger fitted and brake hose/sensor cable bound RC45 wheel, Tyga spacer and Wheel nut Drawings Cush Drive Assembly.pdf Axle machining dwg 1.pdf Caliper Mounting Plate.pdf Cush Drive Backing Plate.pdf Cush Drive Retainer Washer.pdf Sprocket Carrier.pdf 12 Quote Link to comment Share on other sites More sharing options...
Veefer800Canuck Posted July 30, 2015 Share Posted July 30, 2015 Let me be the first to congratulate you. Nice work, as always. Are you running a 190 rear tire? Quote Link to comment Share on other sites More sharing options...
Member Contributer Switchblade Posted July 30, 2015 Member Contributer Share Posted July 30, 2015 Show bike , great job .. Quote Link to comment Share on other sites More sharing options...
Member Contributer zupatun Posted July 30, 2015 Member Contributer Share Posted July 30, 2015 wow...drool...wow... Quote Link to comment Share on other sites More sharing options...
Beck Posted July 30, 2015 Share Posted July 30, 2015 That looks fantastic! The wheel looks great but that that new cush drive assembly looks so exotic! I wish I had the skills and resources to do such mods...... It looks like a lot of work, but the product is worth it! 1 Quote Link to comment Share on other sites More sharing options...
Member Contributer YoshiHNS Posted July 30, 2015 Member Contributer Share Posted July 30, 2015 The cush drive is a sweet idea. I might have to give it a go. Quote Link to comment Share on other sites More sharing options...
Member Contributer Duc2V4 Posted July 30, 2015 Member Contributer Share Posted July 30, 2015 Wow great post and with pdf documents to boot, you have upped the ante for posting a "how-to" thread. Nice Job! Quote Link to comment Share on other sites More sharing options...
Member Contributer wagzhp Posted July 30, 2015 Member Contributer Share Posted July 30, 2015 That oozes awesomeness! Quote Link to comment Share on other sites More sharing options...
Member Contributer HighSideNZ Posted July 30, 2015 Author Member Contributer Share Posted July 30, 2015 Thanks for all the comments. Yes the wheel 6.00x17 so I'm now running a 190/50x17 tyre. If the weather is good over the weekend I'll get it out for a test and take some full bike shots. 1 Quote Link to comment Share on other sites More sharing options...
The Phantom Posted July 31, 2015 Share Posted July 31, 2015 Lovely work. Quote Link to comment Share on other sites More sharing options...
Member Contributer HighSideNZ Posted July 31, 2015 Author Member Contributer Share Posted July 31, 2015 Here is the link to Mohawks thread on the VFR400 rear axle and the cush drive. Sorry, I should have included this in the original post. http://www.vfrdiscussion.com/forum/index.php/topic/72914-custom-cush-drive-for-vfr800-vfr400-axle/ Cheers Phil Quote Link to comment Share on other sites More sharing options...
Member Contributer CornerCarver Posted July 31, 2015 Member Contributer Share Posted July 31, 2015 Holy Crap Phil! I love that cush drive solution. I have been trying to find a simple single-nut solution that does not add weight (like the Triumph is reported to) for my VFR. Great post and once again your attention to detail is in documenting this upgrade is as good as your problem solving and engineering work on the upgrade. Quote Link to comment Share on other sites More sharing options...
Member Contributer vfrcapn Posted July 31, 2015 Member Contributer Share Posted July 31, 2015 Very beautiful work. Honda, HighSide has the ultimate VFR mold. How about you get to work cranking some replicas out!?! 1 Quote Link to comment Share on other sites More sharing options...
keef Posted July 31, 2015 Share Posted July 31, 2015 Thanks for all the comments. Yes the wheel 6.00x17 so I'm now running a 190/50x17 tyre. If the weather is good over the weekend I'll get it out for a test and take some full bike shots. when i put the 1098 6 inch wheel on, i ran a 190/55, but it felt heavy. I changed it to a 190/55 and handling felt sharp again. And Brilliant job, by the way, absolutely awesome. Holy Crap Phil! I love that cush drive solution. I have been trying to find a simple single-nut solution that does not add weight (like the Triumph is reported to) for my VFR. Great post and once again your attention to detail is in documenting this upgrade is as good as your problem solving and engineering work on the upgrade. 1098S rear wheel is forged al, and weighs nothing. But you have to change the front as well otherwise your wheels won't match. 5 gen arm, ducati hub, ducati wheel, a spacer and a shim. Is the 5th arm very different to the 6th arm? Quote Link to comment Share on other sites More sharing options...
Member Contributer Cogswell Posted July 31, 2015 Member Contributer Share Posted July 31, 2015 This bike should be in the Barber Motorsports Museum. It's mechanical art - just beautiful. Quote Link to comment Share on other sites More sharing options...
Member Contributer Mohawk Posted July 31, 2015 Member Contributer Share Posted July 31, 2015 Way to go Phil, looks great. Mine feels much softer on the chain with those new urethane bobbins than it did with the old Ducati ones. Still not convinced on the colour of them though, but if you have a red bike then it fits, totally at odds with my Blue one though. Hmm, must paint my rear caliper to match the front ones in a nice gold ;). Another little winter job on the list. Quote Link to comment Share on other sites More sharing options...
Member Contributer HighSideNZ Posted July 31, 2015 Author Member Contributer Share Posted July 31, 2015 Hey thanks again guys. All the qudos for the initial ideas has to go to Mohawk though. Seems that red is the only colour you can get urethane. Even back in the '80s buying urethane bar stock, it was always red. Yep, agree, red and blue not the best combination. I've been toying with the idea of painting my front calipers gold as well since I did the new rear one. Gold, red and black really do go together well. Keef I take it you meant 190/50 is what you ended up with. 190/55 would be too high in the profile I thought. The 190/50 is about the same rolling radius as the original 180/55 that I was running. Quote Link to comment Share on other sites More sharing options...
Member Contributer gig Posted July 31, 2015 Member Contributer Share Posted July 31, 2015 Holy Crap Phil! I love that cush drive solution. Great post and once again your attention to detail in documenting this upgrade is as good as your problem solving and engineering work on the upgrade. What he said!! Quote Link to comment Share on other sites More sharing options...
Member Contributer Kel Posted July 31, 2015 Member Contributer Share Posted July 31, 2015 Welcome to the single nut club, looks like it's about to add more members. 1 Quote Link to comment Share on other sites More sharing options...
V4 Rosso Posted July 31, 2015 Share Posted July 31, 2015 Very nice, looking forward to seeing some shots of the whole bike. The cush drive assembly is based on a Ducati quick change unit from JT and I've used a set of urethane bobbins instead of the genuine Ducati SilentBloc rubber ones. In the end this has shaved 3.0kg off the unsprung weight on the rear. vfroem, are you still here? Quote Link to comment Share on other sites More sharing options...
Member Contributer digitallyhip Posted July 31, 2015 Member Contributer Share Posted July 31, 2015 Welcome to the single nut club, looks like it's about to add more members. This is absolutely the BEST way to join The Single Nut Club. 2 Quote Link to comment Share on other sites More sharing options...
Member Contributer Cogswell Posted August 1, 2015 Member Contributer Share Posted August 1, 2015 Welcome to the single nut club, looks like it's about to add more members. If you're in the single nut club, you can still have kids . . . so plan accordingly. 1 Quote Link to comment Share on other sites More sharing options...
Member Contributer HighSideNZ Posted August 1, 2015 Author Member Contributer Share Posted August 1, 2015 Well went for the first ride today, just to make sure everything held together. No problems at all, it all stayed tight and functioned as expected. Just need to bed the rear brake in and we should be all go. The whole driveline feels more taught with no play in anything as the urethane bobbins are a press fit into the sprocket carrier. Seems to be smooth down to about 3k rpm, then you need to drop a gear to pull away cleanly. I'll post a couple of full bike photos a bit later. Quote Link to comment Share on other sites More sharing options...
Member Contributer Mohawk Posted August 1, 2015 Member Contributer Share Posted August 1, 2015 That's something I forgot to mention as well, the bike used to need a gear change around 2750rpm, will now work fine at 2250-2500 :) Quote Link to comment Share on other sites More sharing options...
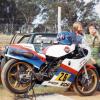
Member Contributer HighSideNZ Posted August 1, 2015 Author Member Contributer Share Posted August 1, 2015 Here are a couple of shots of the complete bike. Left and right. 6 Quote Link to comment Share on other sites More sharing options...

Recommended Posts
Join the conversation
You can post now and register later. If you have an account, sign in now to post with your account.