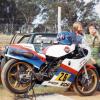
Member Contributer HighSideNZ Posted May 23, 2015 Member Contributer Share Posted May 23, 2015 Anyone that has been following the post about over boring a Gen 5 over at http://www.vfrdiscussion.com/forum/index.php/topic/75067-anyone-ever-reboredoverbored-a-56th-gen/ will know that my current project has been to build a new 4 into 2 into 1 exhaust for the 825 motor. I took a semi easy way out to attain this by buying a set of pipes from an RC45 and modifying them to suit the Gen 5 engine in the Gen 6 frame. I was going to TIG the pipes up but my TIG skills after 30 years are nowhere near good enough these days and my hands are not a steady as they used to be so MIG is the direction I ended up going with. Not as neat but most effective. The original pipes were left exit with a twin CF muffler setup and I needed to convert this to right exit and also to maintain my centre stand. Added to this I wanted to split the mapping in my RapidBike Racing across 2 maps, one for the front and one for the rear cylinders, each with a wideband O2 sensor. This gave me the option to use unequal length pipes to fatten up the mid-range a little and to allow me to keep the centre stand. This means that the rear pipes have to sweep forward and around the front of the stand pivot. So what I've done is balanced the primary and secondary total lengths by having shorter primaries and a longer secondary on the rear compared to the front. Here are some photos of progress so far. The pipes are complete and ready to be cleaned up and bead blasted. The original RC45 pipes Lefthand side with front O2 sensor Rear exit for mid pipe Centre stand buffer bracket Righthand side with rear O2 sensor Tri-Clamp joint between front and rear pipes Right view with centre stand down I'm going to electro-clean them up with phosphoric acid and then get them bead blasted. Once that is done, It will be time to fit to the hike and work out what I need to do with the bottom radiator hose as it cannot run behind these pipes. I'll keep everyone posted. Cheers Phil Link to comment Share on other sites More sharing options...
Member Contributer YoshiHNS Posted May 23, 2015 Member Contributer Share Posted May 23, 2015 Link to comment Share on other sites More sharing options...
Member Contributer jim v Posted May 23, 2015 Member Contributer Share Posted May 23, 2015 Strong work, I haven't checked the other thread in a while but this is good reminder You realize that making semi-custom headers for 5th/6th gens could be a nice little business :) Link to comment Share on other sites More sharing options...
Member Contributer Rush2112 Posted May 23, 2015 Member Contributer Share Posted May 23, 2015 You Sir, are an inspiration! Nice work!! Link to comment Share on other sites More sharing options...
Member Contributer HighSideNZ Posted May 24, 2015 Author Member Contributer Share Posted May 24, 2015 Jim V Sorry but making custom pipes is not a goer! No one could afford the cost of single one off's I've spent a lot of hours doing what I outline above and if I was to cost it out I'd say it would be like 4K. There is over $500 USD worth of mandel bends and other bits in there as well. Time on my own projects doesn't count, but if you are doing it for others it does. Hence why we need a company the does this for a living, and has the equipment, to come to the party. Cheers Phil Link to comment Share on other sites More sharing options...
Member Contributer HighSideNZ Posted May 31, 2015 Author Member Contributer Share Posted May 31, 2015 Well I've been fitting the modified RC45 exhaust to the bike today and have discovered that there is a slight difference in the exhaust port layout between Gen6 and Gen5 heads, at least wit the rear head. This has meant cutting and redoing the rear pipes and it has moved the rear collector back making my mid pipe not fit. Probably got something to do with the 16mm height difference between the 2 model heads. With normal headers you probably don't see that much of a problem, but with the stub system that I'm using, everything has to line up exactly. Last job to do is make a new final bend from the last collector to the mid pipe and remake the centre stand stop bracket etc. Kind of a bit of a bummer after all the work I did on the spare motor and jigging it all up. But nearly there. Once the final bend is complete, I then need to work out the bottom radiator hose routing in front of the headers instead of behind. Made a nice little heat shield for the rear master cylinder out of carbon fibre sheet as the original was not going to go anywhere near fitting. Turned out great and will do the job protecting the MC and lines. I'll take some shots tomorrow with everything buttoned up and post. Link to comment Share on other sites More sharing options...
Member Contributer rangemaster Posted June 1, 2015 Member Contributer Share Posted June 1, 2015 You Sir, are an inspiration. Link to comment Share on other sites More sharing options...
Member Contributer HighSideNZ Posted June 1, 2015 Author Member Contributer Share Posted June 1, 2015 Got everything finished and the radiator hose sorted. Fired it up and I have a small leak in one of the rear headers so still a bit of work to be done. Lucky the weather forecast is crap for the rest of the week. Just need to get a leave pass from the wife! Here are some shots of the completed job. Link to comment Share on other sites More sharing options...
Member Contributer Mohawk Posted June 1, 2015 Member Contributer Share Posted June 1, 2015 Sweet Phil, nice job. I see the rad hoses missed the pipes on the other side, so no real drama. I will be really interested to see how this performs, with the big bores greater compression & shorter primaries, combined with the 6th gen injectors it should really rev & make good power. The big bore should alleviate the issues with the 45's pipes on standard engines. Get the fueling sorted & let us hear it. very impressive work. I'd bend that center stand stop up a bit or trim the rubber buffer. other than that looks great. Keep up the good work. Link to comment Share on other sites More sharing options...
Member Contributer zupatun Posted June 1, 2015 Member Contributer Share Posted June 1, 2015 just wow... Link to comment Share on other sites More sharing options...
Member Contributer HighSideNZ Posted June 2, 2015 Author Member Contributer Share Posted June 2, 2015 Hi Mohawk Thanks for the feed back. Yes I'm hoping on the bore and porting doing the trick with the primary sizes as well. By all my calculations I feel it will work well. May push the peak up a little more than I want. Time will tell. As far as the centre stand tang goes. I think it is pretty much where it needs to be as there is minimal clearance on the bottom chain run. It is a bit deceiving with the bike on the 2 stands as the front is high. The radiator hose still concerns me a bit so I'm going to wrap it in Ti header wrap just to protect it a little more. I'm also going to wrap the bend in the rear headers to protect the master cylinder hose as outlined below. The reservoir hose is arrowed. Link to comment Share on other sites More sharing options...
Member Contributer Rush2112 Posted June 2, 2015 Member Contributer Share Posted June 2, 2015 Nice progress! Do you think the short rear primaries with the longer front primaries will smooth & spread out the torque curve? Did you put in O2 bungs for the front and rear banks separately to be able to adjust fueling accordingly? Link to comment Share on other sites More sharing options...
Member Contributer HighSideNZ Posted June 2, 2015 Author Member Contributer Share Posted June 2, 2015 Hi Rush Yes that is what I'm hoping, that the different length primaries will spread the curve. May not give the maximum HP, but it is a road bike all the same. Yep, I have O2 bungs in both the front and rear collectors and my second My Tuning Bike module has just hit the couriers for delivery. I'm going to run 2 separate maps, one for front and the other for rear, and set the AFR separately between the banks. That's the theory anyway. Practice will tell I expect. I've also got a bung in the final collector so as I can put my data logger in as well and see what the final effect is and analyse the logged data. Hopefully the weather is good enough to get a few miles under the belt this weekend. Link to comment Share on other sites More sharing options...
Member Contributer HighSideNZ Posted June 4, 2015 Author Member Contributer Share Posted June 4, 2015 Well got it all sealed up and the radiator hose wrapped. Didn't worry about wrapping the rear pipes like I was going to, just remade the carbon heat shield and put an angled extension on the top of it to cover the master cylinder hose. Then sprayed the inside of the shield with high temp ceramic aluminium paint to reflect the radiated heat. With the headers showing 140 deg C on my IR thermometer, the outside face of the heat shield was showing 40 deg C. A good outcome, especially when it was static with no air movement. The Ti header wrap looks like it is working well as it is just warm to the touch, so the hose should be well protected. Installed the 2 My Tuning Bike devices and wideband O2 sensors as well. Just need to configure the RB Racing unit tomorrow night and see what happens from there. I'll post some photos of it all finished tomorrow night, all going well. Link to comment Share on other sites More sharing options...
Member Contributer HighSideNZ Posted June 6, 2015 Author Member Contributer Share Posted June 6, 2015 Well went for the first ride today with the new pipes. What a massive improvement over the Delkevic headers I've been running. Wrapped the bottom radiator hose in Titanium header wrap and the hose has not got hot at all. Working really well. The bike is really easy to ride on the throttle and both mid-range and top end have improved out of site. By my butt-dyno I'd have to say I heading towards 130HP and the overall torque is so much stronger. One thing that thru me a little was chasing a miss from about 5k up to 6.5k. Not a bad miss but it was still there. Then I had a thought, the traction control on the YouTune device. Dropped it 2 points and the miss was gone! Another pointer to better mid-range torque. I'm running 2 wideband O2's and 2 separate maps for the front and rear pipes. The maps are coming along quite well, and as I expected, there is a reasonable difference front to rear. Here are some shots of the final setup. Sorry about the dirt! Here are a couple of screenshots of the maps I've built so far. Cyl 1 and 3 Cyl 2 and 4 Cheers Phil Link to comment Share on other sites More sharing options...
keef Posted June 6, 2015 Share Posted June 6, 2015 Although it has far too much body work for me, I love this bike. When are the lightweight wheels coming? Link to comment Share on other sites More sharing options...
WackenSS Posted June 6, 2015 Share Posted June 6, 2015 Creeping towards 130 butt-hp makes me wish you plan a Dyno run, any plans? Link to comment Share on other sites More sharing options...
Member Contributer HighSideNZ Posted June 6, 2015 Author Member Contributer Share Posted June 6, 2015 I'd need to convert the back end to single nut to make it worthwhile. On out shite roads over here in NZ, I'd always be concerned with them breaking. Yep, once I get the mapping done, it's off to the dyno Link to comment Share on other sites More sharing options...
Member Contributer HighSideNZ Posted June 6, 2015 Author Member Contributer Share Posted June 6, 2015 Hey, forgot to mention that of course with the cylinder matching different to the standard pipes, the overall sound is different. It sounds more like an RC30 at the rear than a VFR. I like that! More flat in the sound. Link to comment Share on other sites More sharing options...
Member Contributer Mohawk Posted June 6, 2015 Member Contributer Share Posted June 6, 2015 Looking good. That kind of output more than makes up for the extra weight of the 6th gen. Working on the principal that you have have basically replicated my mods & incresed the cc, then a simple calc based on my current output says you should be good for 127+ hp without taking the extra compression effect into account. I'd expect to see 130-140hp on a dynojet 250 dyno with that setup. Regarding a single nut rear end, I recently found a great engineering place near me, proper work shop, as in the classic man in a shed business. They have designed & built their own single nut axle for a sidecar. So I'll be going to chat with them about this for mine this winter. They have CNC so once sorted should be repeatable ! I have BST carbon wheels on mine, front is 4 years old, rear 3, been on quite a few crap roads over 6K miles on them & a few tyre changes, no problem. As an FYI, when they submitted the wheels for German TUV approval, the toughest tests in Europe, they used ONE wheel for all tests, all metal wheel manufacturers submit one new wheel PER test ! Each wheel has a standard load capacity of 400Kg, so wheeling the bike 2 up would only reach that weight. That is not a test weight, just the standard allowance, test weights are typically +50% so circa 600Kg. I used to make carbon prepreg, it's tough stuff when cured. Once upon a time they made conrods from it, but they were just to expensive, then Ti became more common & the market shifted ! Maps are looking good, it's obviously consuming much more air looking at the plus figures in the mid range. I might have to build my 916cc version :) estimate hp @ 145hp ! Link to comment Share on other sites More sharing options...
Member Contributer HighSideNZ Posted June 6, 2015 Author Member Contributer Share Posted June 6, 2015 Hi Mohawk What you estimate is what I was thinking. The major difference, apart from the motor mods, is the crap pipes I had on before. Honestly, it is chalk and cheese. As soon as I got it out the front gate I could feel the extra torque. It is that marked. I have a nice quite straight road that I use for top end tests and rolling on to it in second and going full throttle up thru the box, I hit 210k in the shortest distance yet. I need to get it on a dyno just to know, but it is soooo strong. Yep, a 916 would be a killer! The cost of the BST wheels is a real stopper for me. Even just a front to suit the R1 would cost me about $2500 NZD landed so at present spending close to 6K on wheels really does not fit the budget. Link to comment Share on other sites More sharing options...
Veefer800Canuck Posted June 6, 2015 Share Posted June 6, 2015 Let's hear that beast roar please! Link to comment Share on other sites More sharing options...
Member Contributer rhoderage Posted June 6, 2015 Member Contributer Share Posted June 6, 2015 Agree, sound clip of it running and revving please Link to comment Share on other sites More sharing options...
Member Contributer HighSideNZ Posted June 6, 2015 Author Member Contributer Share Posted June 6, 2015 I'll see what I can do tomorrow Link to comment Share on other sites More sharing options...
Member Contributer KevCarver Posted June 6, 2015 Member Contributer Share Posted June 6, 2015 Regarding a single nut rear end, I recently found a great engineering place near me, proper work shop, as in the classic man in a shed business. They have designed & built their own single nut axle for a sidecar. So I'll be going to chat with them about this for mine this winter. They have CNC so once sorted should be repeatable ! We're going to need to see some cost estimates and shipping to the States! Link to comment Share on other sites More sharing options...

Recommended Posts
Archived
This topic is now archived and is closed to further replies.