Member Contributer apexandy Posted May 1, 2014 Author Member Contributer Share Posted May 1, 2014 I'm not at home to check but I know fuel gauge should be on 100 ohm. Tach... Hmmm. What are the options again? It think it might be 4 cyl 2 pulse high-act. And I set the scale for 15,000rpm. If you aren't getting any reading on both I would think it's very possible something is wired incorrectly. Also, I did the resistor and diode mods to my tach this winter and it's working perfectly now. Quote Link to comment Share on other sites More sharing options...
Member Contributer apexandy Posted May 2, 2014 Author Member Contributer Share Posted May 2, 2014 I also figured out how to get the low fuel light to work with the Koso LED indicator panel. Here is a little diagram I made if any one is interested: For those who are curious about this stuff… The stock gauge uses a 7w Bulb which has the correct "power requirement" to work with the low fuel "thermistor" in the tank (when the fuel drops below the level of the thermistor it heats up and lowers the resistance of the circuit). With the Koso LED indicator panel the low fuel light will always be lit as the LED requires such little power to activate. I tried different resistors but there was alway a tiny bit of power getting through and that was enough to light the LED constantly. The relay allows the LED to be on a separate on/off circuit from the thermistor. I tested it on the last tank and it worked, time will tell if it continues to function properly. So now I have a fuel gauge and a low fuel light, just like stock :) Going without the low fuel light on the Koso gauge isn't really a problem as the fuel level is consistent (thought not necessarily accurate to percentages of the actual tank level) and the Koso gauge has a user adjustable low fuel warning. However it takes over one of the gauge readouts (for example, if you wanted to have the gauge on engine temperature) and starts flashing when you hit the specified percentage of remaining fuel. A little annoying… now I can postpone the fuel level warning until 10% and rely on the low fuel light. -End of long winded and probably unnecessary explanation. 1 Quote Link to comment Share on other sites More sharing options...
Member Contributer apexandy Posted June 4, 2014 Author Member Contributer Share Posted June 4, 2014 I plan to build on a VFR 750 after being inspired by your bike, and was wondering how much work it was to get the new fork to fit? Thanks! Ronny Sweden Not sure how I missed this… Sorry man, and thanks to Zefarton for answering If you run the complete front end (forks, triples, brakes, wheels, discs, axle, spacers…) it is pretty much a direct swap. I drilled and tapped the stock steering stops and installed small allen bolts to limit the forks from hitting the frame. I used an RC51 upper triple clamp so I could drill and mount handlebar risers. Because it isn't a gullwing design my front end is actually a little lower than Zefarton's. With the radiator tucked up close to the frame with custom brackets I have just enough room to keep the wheel from hitting the rad. Good luck! Quote Link to comment Share on other sites More sharing options...
rallen0223 Posted December 1, 2014 Share Posted December 1, 2014 What headlight did you end up using because that front is terrific Quote Link to comment Share on other sites More sharing options...
Member Contributer apexandy Posted December 1, 2014 Author Member Contributer Share Posted December 1, 2014 Headlight is originally a Yamaha MT-03 item. You can find them on ebay for much less than ordering from yamaha but still made by the same supplier. It's a good quality light, but mounts usually need to be fabricated. Quote Link to comment Share on other sites More sharing options...
Scottay951 Posted December 23, 2014 Share Posted December 23, 2014 This thread used to be 20 or so pages long, did someone clean it out? Quote Link to comment Share on other sites More sharing options...
Veefer800Canuck Posted December 23, 2014 Share Posted December 23, 2014 As per ApexAndy's request, yes. 1 Quote Link to comment Share on other sites More sharing options...
SoCal97VFR Posted February 18, 2015 Share Posted February 18, 2015 What an extraordinary clean build. Nice work! I'm really loving the sound of the 2bro's slipon too! My left side exit exhaust makes finding an exhaust that wont be 100% custom a bit difficult. 1 Quote Link to comment Share on other sites More sharing options...
Scottay951 Posted February 19, 2015 Share Posted February 19, 2015 My left side exit exhaust makes finding an exhaust that wont be 100% custom a bit difficult. I mean, if you're not happy with your left exit headers I'd be overjoyed to take them off your hands 1 Quote Link to comment Share on other sites More sharing options...
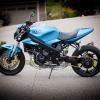
Member Contributer apexandy Posted February 26, 2015 Author Member Contributer Share Posted February 26, 2015 So this update has been a long time coming! After moving last summer my wife and I decided to build a house this winter… so that has been keeping me extremely busy lately. But today I am home sick and finally have some time to post up some pics of last years mods: Since I mostly ride solo I decided to remove the passenger pegs and make a new exhaust hanger. I made an MDF mockup and a friend of mine machined it for me Decided to send my forks and shock off to Jaimie Daugherty Motorsports to be resprung and revalved The wiring harness always bugged me, nothing was where it needed to be on the bike, so I decided to start from scratch. This is the stock harness without tape Needed to make better mounting points for the various components And then began the long tedious journey of building my own harness Decided to crimp all connections and seal with heat shrink Concentric twisting of the layers leaves the harness much more flexible. I eventually wrapped the whole harness in motorsport spec flexible heat shrink and used high quality weather sealed connectors almost everywhere. Finally made a mount for my hugger fender. Used my own carpenter techniques this time Upgraded the switchgear and throttle. Used a CBR throttle housing and an R6 throttle tube for a quick turn modification. I would highly recommend this change on the VFR. Since I use the Koso gauge speed sensor I made a block off plate for the stock sensor location A few pics from the summer. Met my dad for a few day ride My riding buddies Had a fun night at the local 1/8 mile dragstrip. Even took home a trophy (okay… only a turbo 900cc snowmobile and myself in the bike class that night. But hey, a victory is a victory) That's my buddies mustang… and no, it's not stock. 800+ hp on drag slicks. We actually ran very close times that night. He runs low 10's in the quarter. It is so strange having a car match your speed under full throttle! And that's all the pics I have for now. The only other mod I didn't have a close up of was the addition of a dedicated LED brake light on the license plate. I didn't feel comfortable the run/brake LED had enough of a difference between the two to be really noticeable. I rode another 5000km this season and enjoyed every km of it. The bike is working like a dream. It honestly feels like a brand new machine every time I hop on and ride. 2 Quote Link to comment Share on other sites More sharing options...
Sweeper Posted February 26, 2015 Share Posted February 26, 2015 And it still could pass for a brand new bike. If only Honda would build something like it. Well done Andy, you have excellent taste! Quote Link to comment Share on other sites More sharing options...
Member Contributer paladinreed Posted February 26, 2015 Member Contributer Share Posted February 26, 2015 Truly amazing how factory it looks next to the other factory fighters. I mean that as a comlliment. Also, as an aside I love the hugger, amazing how much more room between tire and swingarm there is on the 4th gen than on the 5th. That hugger would really pop in body color. Anyhow, so good man. Quote Link to comment Share on other sites More sharing options...
Member Contributer CasualSwede Posted February 27, 2015 Member Contributer Share Posted February 27, 2015 Just when we all thought the best looking custom VFR couldn't be topped... Wow! 1 Quote Link to comment Share on other sites More sharing options...
Member Contributer zoomzoom Posted February 27, 2015 Member Contributer Share Posted February 27, 2015 Somehow the wife's 4th gen looks just soooooo plain by comparison. Another, and still excellent work Andy. Look forward to perhaps meeting up for a ride this summer. With any luck, maybe even the wife can join in the fun. She starts her motorcycle safety course the end of April, and she is looking forward to getting in a little seat time. Quote Link to comment Share on other sites More sharing options...
Beck Posted February 27, 2015 Share Posted February 27, 2015 Nice muffled support you made there! I wish I had the talent an tools to do the same. My solution on my bike is to just "shave" a right passenger peg bracket I bought off eBay: It was the quick, more affordable approach for me and I guess it worked out OK so far.... Quote Link to comment Share on other sites More sharing options...
Member Contributer apexandy Posted February 27, 2015 Author Member Contributer Share Posted February 27, 2015 I like the tank grip Beck Truly amazing how factory it looks next to the other factory fighters. I mean that as a comlliment. Thanks man! That was the goal of the build, OEM+ Cool to see you plugging away on your bike again! I can't wait to move into my 2 car garage to have some room for bike work again. That hugger would really pop in body color. I've thought about doing the hugger in body color…but I was thinking it might look a little "90's". It does need a new finish of some sort. I just wrapped it in 3M carbon fibre vinyl for now. Look forward to perhaps meeting up for a ride this summer. With any luck, maybe even the wife can join in the fun. I was thinking of maybe organizing a bit of a VFR ride in the okanagan area. A nice sunday ride to the motorcycle museum outside Salmon Arm would be sweet :) 1 Quote Link to comment Share on other sites More sharing options...
Member Contributer paladinreed Posted March 5, 2015 Member Contributer Share Posted March 5, 2015 Hey man, what are you using to cut your alu? It seems like you're getting really nice cuts and I always have such a hard time working with it. Quote Link to comment Share on other sites More sharing options...
Member Contributer apexandy Posted March 5, 2015 Author Member Contributer Share Posted March 5, 2015 A variety of woodworking tools… As I'm a cabinet maker that is what I have access too, I'm sure there are better tools for the job. For sheet stock I sometimes use the table saw with an old carbide blade to cut it close to size and then usually a good jigsaw with a high quality fine tooth wood blade. It helps to clamp the aluminum to a sacrificial sheet of plywood or mdf and cut through both. For bar stock pieces I get creative with the table saw and mitre saw… can get sketchy at times though. Then files and sanding for the rest. Also, I find using a high quality sealer or wax on the parts keeps them corrosion free and easy to clean all season. Quote Link to comment Share on other sites More sharing options...
The Phantom Posted March 5, 2015 Share Posted March 5, 2015 So you built a house... does it happen to look anything like the house John Britten built? Loved that last update with the drag strip photos. Not only built, but used Quote Link to comment Share on other sites More sharing options...
Member Contributer apexandy Posted March 5, 2015 Author Member Contributer Share Posted March 5, 2015 John Britten was from another planet! I couldn't last a week working at the pace he managed for years. I modified a motorcycle with a few hand made parts… he build an entire racing motorcycle and took on the world. My house has some hand built cabinets and custom touches… he made everything in his home, including his own sink fixtures! Incredible! The VFR launches so well at the strip! My best time was a 7.6 in the 1/8 mile. With the track being at 4100 feet it equates to about a 7.2 at sea level I think. Which translates to low 11's I believe in the full 1/4 using online conversions. However I'm not sure how well my bike would do in the 1/4 without a fairing. 1/8 mile suits it well. My clutch was already a little suspect before the drag races, and I have a sneaking suspicion 2nd gear wheelies are a little hard on it, so I have a new one to install before riding season. I'm going to put in oem discs, but purchased stiffer springs based on positive reviews from others on here. I'm excited to see how it rides with the fresh clutch How's your bike coming along? I thought I read in one of your posts you have been working on it lately? Quote Link to comment Share on other sites More sharing options...
Member Contributer paladinreed Posted March 5, 2015 Member Contributer Share Posted March 5, 2015 … can get sketchy at times though. haha if its not sketchy its probably not very creative. I just felt like your aluminum results are always so nice and I have a hard time working with aluminum stock I wanted some insights. I might play around and get a little sketchy myself. Good tip on the sealer. Quote Link to comment Share on other sites More sharing options...
Member Contributer apexandy Posted March 5, 2015 Author Member Contributer Share Posted March 5, 2015 A belt sander clamped to the work bench is very handy as well Quote Link to comment Share on other sites More sharing options...
SEBSPEED Posted March 5, 2015 Share Posted March 5, 2015 Use an old candle or WD40 to lube your cutting tools. Quote Link to comment Share on other sites More sharing options...
750 Posted March 14, 2015 Share Posted March 14, 2015 Are you gonna bother with a belly pan? I think it'd finish it off just right. Quote Link to comment Share on other sites More sharing options...
Member Contributer apexandy Posted March 14, 2015 Author Member Contributer Share Posted March 14, 2015 I've definitely thought about it. I have a desire to change the headers at some point, and potentially enclose an oil cooler in a belly pan, so I don't want to spend too much time on a belly pan that might not fit future plans. I used to spend a lot of time on the custom fighters forum and I always appreciated the members who "completed" a build and then continued to modify and refine the package as time went on. The itch to do new builds will always be there however… 1 Quote Link to comment Share on other sites More sharing options...

Recommended Posts
Join the conversation
You can post now and register later. If you have an account, sign in now to post with your account.