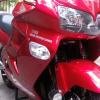
Member Contributer AnikMankar Posted April 13, 2009 Member Contributer Share Posted April 13, 2009 (edited) hi Guys Finally got the HID fitted on the bike. It took me about 3 to 4 hours to get it all fitter (finding the correct place, wiring routing, to see if it really works) but eventually got it going. I used a Philips car H4 bulb HID kit. It will come with 2 Ballast,2 Bulbs, 1 Relay wiring harness, Wire tags etc. 1) Remove the UPPER and LOWER COWL along with the meter panel 2) Disconnect the HEADLIGHTS, SIGNAL LIGHTS etc. 3) I fitter the BALLAST under the upper first with double side tape as its easy to take out incase the placement is wrong. Lucky i did that as i had stuck it too close to the SIDE COWL. (if i had screwed them in ...that would have been quite a mess) Front view Lower view Side view 4) Repeat the same on the Right side Side view 5) Now fit the bulbs, I first tried fitting the bulbs first and then to the HEADLIGHT UNIT. Trust me thats very tough as its very difficult to put the lamp locks afterwards So i took the bulb out of the HID socket and fitted the holder first. Lock the holder using the RETAINER. Now fit the DUST COVER and then insert the bulb(s), this was much easier. 6) Mount the wiring harness Since its all plastic i fitted the the relay and the wiring harness on the inside of the INNER PANEL. use the wire tags to hold all this together. 7) Connect the Wires (no images) - Connect the Positive wire (red) to the battery - Connect the Negative / ground (Black) to the chassis) - i used the horn bracket. - Connect the wiring harness to the BALLAST. - Connect the Bulbs to the BALLAST along with the Hi/lo socket. - The harness also comes with a bulb SOCKET (female type) which is connect to the existing /origninal bulb SOCKET. This triggers the power, high and low 8) BALLAST location finalize - once the location of the BALLAST has been finalized, drill holes on the UPPER COWL. Bolt the BALLASTS into place. I used match bolts like the one on the upper cowl. 8) Switch on to see if all is ok. (ususally is ) Lights getting warmed up 9) Fit all the cowls (had a tough time getting the UPPER and SIDE COWL, the rubber screws kept falling inside. (but finally eventually got there) 10) Adjust the beams Lights fully warmed up Front profile Also changed the Parking lights to LED 11) Total Cost : $180 You are done. Edited April 14, 2009 by AnikMankar Quote Link to comment Share on other sites More sharing options...
Tightwad Posted December 31, 2010 Share Posted December 31, 2010 I wanted to give this topic a bump since it took me a bit of searching to find it. Good writeup on the install...question for Anik however...did you have to trim the tabs on the bulb for it to fit? Quote Link to comment Share on other sites More sharing options...
Member Contributer KevCarver Posted December 31, 2010 Member Contributer Share Posted December 31, 2010 Oh, so that's what that Euro parking light thing is... :fing02: We ain't got no stinking parking light! :pissed: Quote Link to comment Share on other sites More sharing options...
Member Contributer MuddDawg Posted January 1, 2011 Member Contributer Share Posted January 1, 2011 Oh, so that's what that Euro parking light thing is... :fing02: We ain't got no stinking parking light! :pissed: Yea what he said.. Then again.. I can't shut my headlights off. But it still would be cool. Quote Link to comment Share on other sites More sharing options...
Member Contributer AnikMankar Posted January 1, 2011 Author Member Contributer Share Posted January 1, 2011 I wanted to give this topic a bump since it took me a bit of searching to find it. Good writeup on the install...question for Anik however...did you have to trim the tabs on the bulb for it to fit? My orignial head light assembly fit well - the tabs aligned as the bike is EU model. I had ordered a new head light assembly from the US - where the tabs didnt align. I did it the hard way...used a dermel to shave of a little of the housing so the tabs could align, eventually i got tired and just bent the tabs ...so one side i have the housing altered and the other side the the holder tab is bent. Have not noticed any difference in the way the beam focuses. Quote Link to comment Share on other sites More sharing options...
Guest DarkKnight Posted January 1, 2011 Share Posted January 1, 2011 What I did differently was instead of using screws to mount the ballasts I just used the stronger two sided tape and mounted the ballasts to the inner upper fairing. That is a clean write up with great pics! Quote Link to comment Share on other sites More sharing options...
Member Contributer AnikMankar Posted January 3, 2011 Author Member Contributer Share Posted January 3, 2011 What I did differently was instead of using screws to mount the ballasts I just used the stronger two sided tape and mounted the ballasts to the inner upper fairing. That is a clean write up with great pics! thanks... I have used double sided tape also but it gets hot here plus the engine heat makes the glue soft. these pictures are old. I have replaced the X head screws with allen type (used on the fairing )so now it looks like part of the bike :) I have seen smaller ballasts so if these go bad i would go for them untill then i am enjoying what i have. Quote Link to comment Share on other sites More sharing options...
FrankoQ Posted August 6, 2011 Share Posted August 6, 2011 Very nice. what is the color temperature on those bulbs? 5000K, 6000k, or what? Quote Link to comment Share on other sites More sharing options...
Veefer800Canuck Posted August 6, 2011 Share Posted August 6, 2011 thanks... I have used double sided tape also but it gets hot here plus the engine heat makes the glue soft. Hot? In India? Say it isn't so!!!! LOL "it is hot here, like a cow on fire!" -foamy the squirrel tech support I'll mail you some snow in a box next time we get some, that'll cool you down! :-) Quote Link to comment Share on other sites More sharing options...
Member Contributer Ranger77 Posted August 6, 2011 Member Contributer Share Posted August 6, 2011 Very nice. what is the color temperature on those bulbs? 5000K, 6000k, or what? Dang. You've posted in almost every light thread. If you want white stay with 4k-5k. Any higher and blue will start to show. Quote Link to comment Share on other sites More sharing options...
Beck Posted August 6, 2011 Share Posted August 6, 2011 Do I understand correctly that as the HIds are not "dual filament" bulbs. I assume you just have high beams? Beck 95 VFR Quote Link to comment Share on other sites More sharing options...
FrankoQ Posted August 6, 2011 Share Posted August 6, 2011 Very nice. what is the color temperature on those bulbs? 5000K, 6000k, or what? Dang. You've posted in almost every light thread. If you want white stay with 4k-5k. Any higher and blue will start to show. desperately looking for an answer. I ordered the 6k for a little bit of blue. Quote Link to comment Share on other sites More sharing options...
Member Contributer Ranger77 Posted August 7, 2011 Member Contributer Share Posted August 7, 2011 Do I understand correctly that as the HIds are not "dual filament" bulbs. I assume you just have high beams? Beck 95 VFR You can get single and dual beam HID bulbs. Some are only single because the auto/bike uses multiple bulbs like the H7 bulb. They only come in one filament that's why bikes have two sets. 5th gens use H4 bulbs that are dual filaments. Quote Link to comment Share on other sites More sharing options...
Beck Posted August 7, 2011 Share Posted August 7, 2011 (edited) Do I understand correctly that as the HIds are not "dual filament" bulbs. I assume you just have high beams? Beck 95 VFR You can get single and dual beam HID bulbs. Some are only single because the auto/bike uses multiple bulbs like the H7 bulb. They only come in one filament that's why bikes have two sets. 5th gens use H4 bulbs that are dual filaments. Thank you for clarifying, I didn't know they made a dual beam type HID system. Knowing this might make me consider putting one on my bike one day as a winter mod. Beck 95 VFR Edited August 7, 2011 by Beck Quote Link to comment Share on other sites More sharing options...

Recommended Posts
Join the conversation
You can post now and register later. If you have an account, sign in now to post with your account.