SoCal97VFR Posted February 18, 2015 Share Posted February 18, 2015 This post will outline my 97 VFR to CBR 929RR suspension, electronics and CBR 600RR Bodywork. Like many people I've been waiting for the return of the RVF, a big 1000cc V4 in a sportbike package leaving the touring aspect behind. I got tired of waiting so I did the next best thing. I bought my 97 VFR in 2007 for $500 from a guy who bought it simply to swap the good fairing to his bike meaning I got some damaged ones. The bike didn't run when I picked it up but about 30 minutes after getting it home and cleaning the carbs, we were trading off taking test rides on it. Bone stock, the suspension geometry and exhaust note made it fun to ride although a little flat on power and the front brakes were less than desirable. The tail fairings had substantial damage and we all know how hard it is to come by plastics for these so I fab'd up a fiberglass alternative for the short term to make it street legal. I scavenged an aftermarket performance exhaust with a left side exit from my 1990 VFR basket case and that began the road to more power/performance including Jet kit, airbox mod, sprocket changes, fork and brake rebuilds, raise the back, etc. At one point I had some popping out of gear so I dropped the engine, split the case, and rebuilt the transmission.The VFR was about as good as it was going to get in its current package and this was fine. It ran the mountain well just like any of my other sport bikes. It's dated design would occasionally get me into trouble when chasing down more modern bikes. The front suspension would flex under all that weight quite a bit on hard braking corner entry and of course release and change geometry mid corner if coming in too hot, typical standard fork issues. The brakes were also less than adequate under hard use managing all that weight. Being aware of these issues, I just didn't push the bike too hard and never really realized the true potential except for brief moments. Since the VFR neck and CBR necks were identical for over a decade, I felt that a suspension upgrade down this path would be the easiest to direct bolt on. And while I'm at it, updating the bodywork would come easy as mounting points on Honda's are all relatively similar. I chose to go with a complete 02 CBR 929RR front end for the Inverted forks, light wheel, and huge 330mm brakes. For bodywork, I wanted a clean adaption of guage cluster (retaining fuel level gauge) and fairings so I chose the 06 CBR 600RR body with electronics. This is the initial result: NOTE: The wiring is relatively straight forward, but you will need a 900rr temp sender to normalize correct temps to the gauge(notice the 255F pictured when cold) and you will need a SpeedoHealer V4 to correct speed differences, everything else works perfectly. I left the coil packs in place but cut the long protruding fairing mounts off the coil pack mounts. I clocked the coil pack mounts so that the radiator moves back just a little to provide clearance for the inverted forks at full turn. NOTE: turning radius is limited a little but only noticeable in a parking lot or when backing the bike into the garage at full clock. The lower mount tab was oval'd out a little to pull the bottom of the radiator in as well. I cut the hoses on my oil cooler and shortened them to mount directly under my radiator flush. The fairings then used the factory bolt hole location on the VFR to finish bolting up. The upper covers of the fairings needed to be clearanced for the coil packs, the side covers needed to be clearanced fro the radiator hoses. Thats all. I used a factory 06 CBR 600RR fairing stay, cut the tab off the end, cross drilled the remainder, and mounted it directly to the stock VFR fairing stay frame tab using 2 aluminum plates and 4 bolts. I have a 12 ton press so I sandwiched the aluminum plates between some steel ones to give them the bends but thats not required to make this work. NOTE: I sold my stock fairings and front forks/wheel to fund this whole project and pocketed extra cash. The handling is substantially improved, braking is much better although using the stock master will require the usage of adjustable levers as the throw to engage is longer. The geometry is much tighter with a slightly shorter fork and loss of offset in the triples so the wheelbase is also shorter. All of this adds up to a more modern stance, ride, turn in, and better cornering. I still have more work to do on the fairings, including finishing the belly pan and possibly incorporating the rear fairings/subframe. I also am currently working on the CBR 929RR rear shock swap as the final compliment to making this system fully adjustable. Things to Note: 929 forks are shorter, period. Use fork cap extenders to gain length and clearance at full compression and or a custom upper clamp that can accommodate mounting them down lower. Both of these approaches are semi costly. Shorter forks also means less ground clearance, less rake, less trail, and less wheelbase. Understand these effects on handling and decide if this meets your riding style. 929 triple clamps have less offset. Understand this affect on handling. This brings the larger diameter forks closer to the headstock and thus closer to the frame which is why the forks hit the radiator/frame with less turning radius. 929 forks have progressive rate springs so typical sag settings do not apply, if you are going to be pushing the bike hard then I recommend replacing these with linear rate springs setup for your weight. RaceTech has them for $99 US. You will need a special tool and some basic knowledge of forks to change them yourself. As eluded to, while the front brake master can be made to work initially, it is not an optimal long term solution, a modern Radial Master is recommended. More to come later: Link to comment Share on other sites More sharing options...
Member Contributer Switchblade Posted February 18, 2015 Member Contributer Share Posted February 18, 2015 Awesome job. Link to comment Share on other sites More sharing options...
MVinOZ Posted February 18, 2015 Share Posted February 18, 2015 Yep, great work. Link to comment Share on other sites More sharing options...
Member Contributer vfrcapn Posted February 19, 2015 Member Contributer Share Posted February 19, 2015 Yes, very nice job. Link to comment Share on other sites More sharing options...
SoCal97VFR Posted February 19, 2015 Author Share Posted February 19, 2015 I got to run the setup a bit harder today and everything is checking out good. I'll be finishing up the belly pan next and call it good. Link to comment Share on other sites More sharing options...
slovcan Posted February 19, 2015 Share Posted February 19, 2015 Really nice work and especially nice to share your info with us. I had no idea it would be so easy to do. The thing that really surprised me was the simplicity of swapping over the gauges. Some lot of us went through save/replace/update the gauges on our V65 Sabres. I know you can't really compare a mid '90's VFR with a mid '80's Sabre, but still interesting. The Sabre was the first Honda that really went down the electronic road with gauges and doo-dads. Thanks, Glenn Link to comment Share on other sites More sharing options...
SoCal97VFR Posted February 19, 2015 Author Share Posted February 19, 2015 Honda is really good about keeping the wire colors and functionality the same spanning some 30 years now. I'm about to do a digital gauge swap on an 88 Honda Hawk, same thing, looks straight forward! Link to comment Share on other sites More sharing options...
750 Posted February 19, 2015 Share Posted February 19, 2015 Ignore my PM request, I somehow didn't see this thread. Awesome, awesome info! About time someone explained it in a bit more detail. Link to comment Share on other sites More sharing options...
SoCal97VFR Posted February 21, 2015 Author Share Posted February 21, 2015 It seems a lot of people want more info on the 929 Fork swap and the resulting clearances. While the clearance lock to lock is reduced over stock, this is quite manageable. The shorter forks and loss of offset in the clamps however can pose a safety issue if you do not take the time to understand and account for the loss of available travel. Shown below are pics of my zip tie and measurement of the 5" of available travel. My zip tie showed I was not using the last 1 3/8" of travel even after purposefully mousetrapping a small wheelie. My fender showed no signs of contact but that doesn't mean it wasn't happening. It's important to note that i weigh 200lbs with full gear on these tests so your mileage may vary. Removing the forks caps and compressing the front end shows exactly where the front fend first makes contact with the radiator, and the measurement shows this happens at 1 3/8" from full compressing, right where my zip tie was. Removing the fender and repeating the above test shows you can reduce the "unusable" (used loosely here) travel down to 3/8". This alone highlights the need for fork extenders so that the forks can compress fully before making contact with the radiator. The front fender that came with my 929 front end had damage in the rear so I decided it was worth it to cut the back off, shown here. I have lowered my forks to 3mm below the top of the fork cap to gain just a bit more clearance. I reset my ziptie to the fork seal. A subsequent ride and purposeful mousetrap of a small wheelie pushed the ziptie down to the max travel I am using which again was 1 3/8" from the bottom. So it seems I didn't need to trim my fender after all but its also good to leave a buffer so its worth doing it. Off to carve the mountain tomorrow and spend some time on the compression/rebound settings. More to come. Link to comment Share on other sites More sharing options...
Member Contributer Switchblade Posted February 21, 2015 Member Contributer Share Posted February 21, 2015 Any shims under the rear shock ? Link to comment Share on other sites More sharing options...
SoCal97VFR Posted February 21, 2015 Author Share Posted February 21, 2015 The bike currently has the stock VFR rear shock installed with a set of raised triangle linkage plates (easy to make). This setup actually works pretty well other than the lack of any fine tuning. After tomorrows big round of testing on the front end, I will reinstall the CBR 929 rear shock and start testing that. Link to comment Share on other sites More sharing options...
SoCal97VFR Posted February 22, 2015 Author Share Posted February 22, 2015 What an absolute blast this was yesterday. I spent a 4hr session in the hairpins, dialing in the compression/rebound and by the last hour the bike was performing better than it ever has. The forks never used the last 1 1/4" of travel leaving a good margin of remaining clearance as is. As a budget build goes, you CAN do this on the cheap with a little attention to detail. Pics of the session to come hopefully later tonight or tomorrow with before/after shots in the same corner. Link to comment Share on other sites More sharing options...
Beck Posted February 22, 2015 Share Posted February 22, 2015 My experience with fiddling around with front fork travel limits is, if the travel is there, especially on the street where road conditions can never be predictable on every ride, eventually your bike will find that bump or pot hole that will use it all up, even if you crank in all the preload you can, the front forks will eventually get bottomed out, somewhere, some time on the street. So it is still best if you can find a final, permanent clearance solution to the radiator/fender/tire encroachment issue. Link to comment Share on other sites More sharing options...
SoCal97VFR Posted February 22, 2015 Author Share Posted February 22, 2015 You are somewhat correct in relation to stock forks, however, sometimes the preload is enough to accomplish coil bind before bottoming out. If you read up in the previous posts, I recommend using fork extenders and correct springs as a proper means to solve the clearance problem entirely before bottoming out. I do not currently have mine installed but wanted to give an update none the less for those considering the 929 swap. This kind of information allows planning and staging to making it all come together slowly rather an all at once. Another low tech solution is to promote coil bind as a sort of bump stop before full compression, by cutting the spring down. While this is more often done on standard forks, it also works with inverted forks where the springs are too soft and ample range of motion remains. Cutting a coil spring down and increasing the spacer length will effectively increase the spring rate (even more on progressive springs like the stock 929 if you cut the softer side off). Clearly you do not just arbitrarily cut of a random length, there is some math and measuring involved to get this just right. I only bring these up as short term solutions to doing it right, for those limited on means. Link to comment Share on other sites More sharing options...
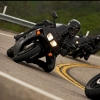
SoCal97VFR Posted February 23, 2015 Author Share Posted February 23, 2015 Well that's a pleasant surprise, my bike made the VFRD feature picture. Link to comment Share on other sites More sharing options...
Veefer800Canuck Posted February 23, 2015 Share Posted February 23, 2015 Possible to move the radiator up or back slightly? Link to comment Share on other sites More sharing options...
SoCal97VFR Posted February 23, 2015 Author Share Posted February 23, 2015 Unfortunately the radiator is as far up and back as possible. Only solution is longer forks and/or larger triple clamp offset. Link to comment Share on other sites More sharing options...
SEBSPEED Posted February 23, 2015 Share Posted February 23, 2015 Have you tried making new mounts? Link to comment Share on other sites More sharing options...
SoCal97VFR Posted February 23, 2015 Author Share Posted February 23, 2015 For the radiator? Yes, I modified the stock mounts which allowed me to clock the radiator back farther but it is hitting the neck and front head. The solution I plan to use to solve my remaining clearsnce is to use fork extenders. This provides just enough length at $200. Link to comment Share on other sites More sharing options...
SEBSPEED Posted February 23, 2015 Share Posted February 23, 2015 You can cut your top-out springs in half too, and add the length to the preload spacer. Link to comment Share on other sites More sharing options...
SoCal97VFR Posted February 23, 2015 Author Share Posted February 23, 2015 The 929 inverted forks do not have a top-out spring, that's typically found in standard telescoping forks. However, you could similarly cut the softer side of the progressive main spring down a bit and add a spacer so as to promote coil bind as a way to limiting travel. A side affect of this would also increases spring rate which in the case of the 929 springs would be a step in the right direction. Good low budget hacks for sure. As I'm not fond of the progressive springs to begin with I think I would opt for replacements like the racetech ones and use the fork cap extenders to retain full travel and no contact. Link to comment Share on other sites More sharing options...
SEBSPEED Posted February 24, 2015 Share Posted February 24, 2015 Cutting the top out springs doesn't limit the fork travel, it increases it. Link to comment Share on other sites More sharing options...
SoCal97VFR Posted February 24, 2015 Author Share Posted February 24, 2015 I was drawing similarities between spring cut methods since the 929 inverted forks in my build do not have top-out springs, hence your method doesn't apply in this circumstance. On factory telescoping standard VFR forks, yes, you can gain distance from the radiator using your method. However, if you were using standard VFR forks you wouldn't have a radiator clearance issue to begin with ;) Link to comment Share on other sites More sharing options...
750 Posted February 24, 2015 Share Posted February 24, 2015 sooooooooooooooo...can I bolt on CBR forks and not worry about dying? Link to comment Share on other sites More sharing options...
SoCal97VFR Posted February 24, 2015 Author Share Posted February 24, 2015 I can't speak for you, your mileage may vary, but just doing the simple things I have outlined brought the bike to a respectable session on the mountain shown in the pics below. In your specific case, I would imagine the only thing you will run into as a problem will be moving the radiator back a little and clip-on clearance as your stock bodywork will complicate these two parts. Aftermarket clipons will likely solve one, and a little bending at the coil for the body mounts could remedy clocking the radiator back as well. I had a hard time recognizing the VFR in the pictures as it looks so different with the CBR fairings. By the 4th hour of testing I finally had the compression/rebound where I like it, the bike was entering the corners with confidence, holding a line and exiting where I wanted it. A few odd corners on the hill require getting on/off the brakes on corner entry due to bumps in the road or lane position due to oil,dirt, etc. Braking stayed consistent all day. Where I notice the biggest difference is in transitioning from one direction to the other in the chicane. The bike flicks over easier and has lost its little bobble when setting it down on the other side. Link to comment Share on other sites More sharing options...

Recommended Posts
Archived
This topic is now archived and is closed to further replies.